- Getting Started: Building and Running Clang
- Release Clang Versions
- Building Clang and Working with the Code
- On Unix-like Systems
- Using Visual Studio
- Using Ninja alongside Visual Studio
- Clang Compiler Driver (Drop-in Substitute for GCC)
- Examples of using Clang
- Preprocessing:
- Type checking:
- GCC options:
- Pretty printing from the AST:
- Solarian Programmer
- My programming ramblings
- Linux and WSL — Install Clang 9 with libc++ and compile C++17 and C++20 programs
- Posted on December 13, 2017 by Paul
- Installing clang on linux
- clangd
- teach your editor C++
- Getting started
- Installing clangd
- Installing with a package manager
- Standalone .zip releases
- Compiling from sources
- Editor plugins
- Under the hood
- company-mode
- Under the hood
- Under the hood
- Under the hood
- Project setup
- compile_commands.json
- compile_flags.txt
Getting Started: Building and Running Clang
This page gives you the shortest path to checking out Clang and demos a few options. This should get you up and running with the minimum of muss and fuss. If you like what you see, please consider getting involved with the Clang community. If you run into problems, please file bugs in LLVM Bugzilla.
Release Clang Versions
Clang is released as part of regular LLVM releases. You can download the release versions from https://llvm.org/releases/.
Clang is also provided in all major BSD or GNU/Linux distributions as part of their respective packaging systems. From Xcode 4.2, Clang is the default compiler for Mac OS X.
Building Clang and Working with the Code
On Unix-like Systems
If you would like to check out and build Clang, the current procedure is as follows:
- Get the required tools.
- See Getting Started with the LLVM System — Requirements.
- Note also that Python is needed for running the test suite. Get it at: https://www.python.org/downloads/
- Standard build process uses CMake. Get it at: https://cmake.org/download/
- Check out the LLVM project:
- Change directory to where you want the llvm directory placed.
- git clone https://github.com/llvm/llvm-project.git
- The above command is very slow. It can be made faster by creating a shallow clone. Shallow clone saves storage and speeds up the checkout time. This is done by using the command:
- git clone --depth=1 https://github.com/llvm/llvm-project.git (using this only the latest version of llvm can be built)
- For normal users looking to just compile, this command works fine. But if someone later becomes a contributor, since they can’t push code from a shallow clone, it needs to be converted into a full clone:
- cd llvm-project
- git fetch --unshallow
- Build LLVM and Clang:
- cd llvm-project
- mkdir build (in-tree build is not supported)
- cd build
- cmake -DLLVM_ENABLE_PROJECTS=clang -G "Unix Makefiles" ../llvm
- make
- This builds both LLVM and Clang for debug mode.
- Note: For subsequent Clang development, you can just run make clang.
- CMake allows you to generate project files for several IDEs: Xcode, Eclipse CDT4, CodeBlocks, Qt-Creator (use the CodeBlocks generator), KDevelop3. For more details see Building LLVM with CMake page.
- If you intend to use Clang’s C++ support, you may need to tell it how to find your C++ standard library headers. In general, Clang will detect the best version of libstdc++ headers available and use them — it will look both for system installations of libstdc++ as well as installations adjacent to Clang itself. If your configuration fits neither of these scenarios, you can use the -DGCC_INSTALL_PREFIX cmake option to tell Clang where the gcc containing the desired libstdc++ is installed.
- Try it out (assuming you add llvm/build/bin to your path):
- clang --help
- clang file.c -fsyntax-only (check for correctness)
- clang file.c -S -emit-llvm -o - (print out unoptimized llvm code)
- clang file.c -S -emit-llvm -o - -O3
- clang file.c -S -O3 -o - (output native machine code)
- Run the testsuite:
- make check-clang
Using Visual Studio
The following details setting up for and building Clang on Windows using Visual Studio:
- Get the required tools:
- Git. Source code control program. Get it from: https://git-scm.com/download
- CMake. This is used for generating Visual Studio solution and project files. Get it from: https://cmake.org/download/
- Visual Studio 2017 or later
- Python. It is used to run the clang test suite. Get it from: https://www.python.org/download/
- GnuWin32 tools The Clang and LLVM test suite use various GNU core utilities, such as grep, sed, and find. The gnuwin32 packages are the oldest and most well-tested way to get these tools. However, the MSys utilities provided by git for Windows have been known to work. Cygwin has worked in the past, but is not well tested. If you don’t already have the core utilies from some other source, get gnuwin32 from http://getgnuwin32.sourceforge.net/.
- Check out LLVM and Clang:
- git clone https://github.com/llvm/llvm-project.git
Note: Some Clang tests are sensitive to the line endings. Ensure that checking out the files does not convert LF line endings to CR+LF. If you’re using git on Windows, make sure your core.autocrlf setting is false.
- cd llvm-project
- mkdir build (for building without polluting the source dir)
- cd build
- If you are using Visual Studio 2017: cmake -DLLVM_ENABLE_PROJECTS=clang -G "Visual Studio 15 2017" -A x64 -Thost=x64 ..\llvm
-Thost=x64 is required, since the 32-bit linker will run out of memory. - To generate x86 binaries instead of x64, pass -A Win32.
- See the LLVM CMake guide for more information on other configuration options for CMake.
- The above, if successful, will have created an LLVM.sln file in the build directory.
- Open LLVM.sln in Visual Studio.
- Build the «clang» project for just the compiler driver and front end, or the «ALL_BUILD» project to build everything, including tools.
Using Ninja alongside Visual Studio
We recommend that developers who want the fastest incremental builds use the Ninja build system. You can use the generated Visual Studio project files to edit Clang source code and generate a second build directory next to it for running the tests with these steps:
- Check out clang and LLVM as described above
- Open a developer command prompt with the appropriate environment.
- If you open the start menu and search for «Command Prompt», you should see shortcuts created by Visual Studio to do this. To use native x64 tools, choose the one titled «x64 Native Tools Command Prompt for VS 2017».
- Alternatively, launch a regular cmd prompt and run the appropriate vcvarsall.bat incantation. To get the 2017 x64 tools, this would be:
"C:\Program Files (x86)\Microsoft Visual Studio\2017\Community\VC\Auxiliary\Build\vcvarsall.bat" x64
- mkdir build_ninja (or build, or use your own organization)
- cd build_ninja
- set CC=cl (necessary to force CMake to choose MSVC over mingw GCC if you have it installed)
- set CXX=cl
- cmake -GNinja ..\llvm
- ninja clang This will build just clang.
- ninja check-clang This will run the clang tests.
Clang Compiler Driver (Drop-in Substitute for GCC)
The clang tool is the compiler driver and front-end, which is designed to be a drop-in replacement for the gcc command. Here are some examples of how to use the high-level driver:
The ‘clang’ driver is designed to work as closely to GCC as possible to maximize portability. The only major difference between the two is that Clang defaults to gnu99 mode while GCC defaults to gnu89 mode. If you see weird link-time errors relating to inline functions, try passing -std=gnu89 to clang.
Examples of using Clang
Preprocessing:
Type checking:
GCC options:
Pretty printing from the AST:
Note, the -cc1 argument indicates the compiler front-end, and not the driver, should be run. The compiler front-end has several additional Clang specific features which are not exposed through the GCC compatible driver interface.
Источник
Solarian Programmer
My programming ramblings
Linux and WSL — Install Clang 9 with libc++ and compile C++17 and C++20 programs
Posted on December 13, 2017 by Paul
Updated 23 September 2019
In this article, I will show you how to install Clang with libc++ on Ubuntu Linux and Windows System for Linux. Same procedure should work on other Debian based Linux distributions. Latest version of Clang supports the C++17 standard and has experimental support for C++20.
If you want to compile Clang from sources check my previous post.
Alternatively, if you are using Docker, you can install Clang 9 in a Docker container.
Open a Terminal (on Windows 10, you can open a Command Prompt or a PowerShell window and write bash to start WSL) and make sure your system is updated:
Next, we need to install a few prerequisites for running Clang:
Download and extract latest binary of Clang, which is 9.0.0 at the time of this writing:
Next, you will need to add Clang to your system PATH:
Let’s try to compile and run a C++17 code that uses an if block with init-statement (the example is a bit silly, but it will show you how to compile C++17 programs):
Save the above code in a file named if_test.cpp and compile it with:
This is what I see on my machine:
Next, let’s try to compile a program that uses the C++17 Filesystem:
Save the above file as test_fs.cpp and compile it with:
This is what I see on my machine if I run the above code (you should see a list of files that are present in the folder where you have the executable):
Finally, let’s test if we can use C++17 std::optional:
This is what I see if I build and run the above code:
Clang 9 has experimental support for the new C++20 standard, at this time you’ll need to use std=c++2a in order to enforce the C++20 standard. Here is an example of using the new C++20 std::span:
This is what I see if I build and run the above code:
If you are interested to learn more about modern C++ I would recommend reading A tour of C++ by Bjarne Stroustrup.
Источник
Installing clang on linux
This script installs self-contained standalone 9.0 versions of clang, LLVM, libc++, compiler-rt, libc++abi, lldb, and lld, on macOS and Linux, including linking clang and LLVM against libc++ themselves as well. The script keeps all of the installation within a given target prefix (e.g., /opt/clang ), and hence separate from any already installed compilers, libraries, and include files. In particular, you can later uninstall everything easily by just deleting, e.g., /opt/clang . Furthermore, as long as the prefix path is writable, the installation doesn’t need root privileges.
If you have used older version of this script before, see News below for changes.
To see the available options, use -h :
For example, to build Clang on a machine with multiple cores and install it in /opt/clang , you can use:
Once finished, just prefix your PATH with
By default, install-clang currently installs the 9.0 release branch of https://github.com/llvm (the «mono repository»). Adding -m on the command line instructs the script to use the current git master version instead. The script downloads the source code from GitHub and compiles the pieces as needed. Other OSs than macOS and Linux are not currently supported.
The script also has an update option -u that allows for catching up with upstream repository changes without doing the complete compile/install-from-scratch cycle again. Note, however, that unless coupled with -m , this flag has no immediate effect since the git versions to use are hardcoded to the Clang/LLVM release version.
Doing a self-contained Clang installation is a bit more messy than one would hope because the projects make assumptions about specific system-wide installation paths to use. The install-clang script captures some trial-and-error I (and others) went through to get an independent setup working. It compiles Clang up to three times, bootstrapping things with the system compiler as it goes. It also patches some of the Clang/LLVM projects to incorporate the installation prefix into configuration and search paths, and also fixes/tweaks a few other things as well.
install-clang comes with a Dockerfile to build a Docker image, based on Ubuntu, with Clang then in /opt/clang:
Источник
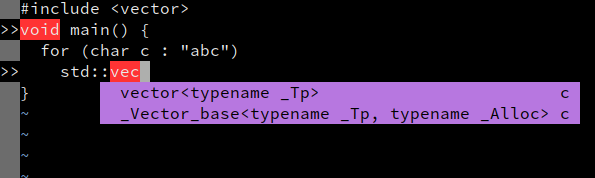
clangd
teach your editor C++
Getting started
To use clangd, you need:
- clangd installed
- a plugin for your editor
- to tell clangd how your project is built
Installing clangd
You’ll want a recent version of clangd. The current release is 12.0.
After installing, clangd —version should print clangd version 12.0.1 or later.
(Version numbers are based on LLVM. clangd 7 was the first usable release).
Installing with a package manager
Clangd can be installed (along with LLVM) via Homebrew:
Download the LLVM installer from releases.llvm.org
Installing the clangd package will usually give you a slightly older version.
Try to install the latest packaged release (12.0):
If that’s not found, at least clangd-9 or clangd-8 should be available. Versions before 8 were part of the clang-tools package.
This will install clangd as /usr/bin/clangd-12 . Make it the default clangd :
Most distributions include clangd in a clangd package, in a clang-tools package, or in the full llvm distribution.
For some platforms, binaries are also available at releases.llvm.org.
Standalone .zip releases
You can also download binaries directly for macOS, windows, and Linux (x86-64): latest stable release.
If you live on the bleeding edge, snapshot pre-releases are built weekly and available on the github releases page.
Compiling from sources
You can find instructions in llvm-project.
Editor plugins
Language Server plugins are available for many editors. In principle clangd should work with any of them, though feature set and interface may vary.
Here are some plugins we know work well with clangd:
YouCompleteMe can be installed with clangd support. This is not on by default, you must install it with install.py —clangd-completer .
We recommend changing a couple of YCM’s default settings. In .vimrc add:
You should see errors highlighted and completions as you type.
YouCompleteMe supports many of clangd’s features:
- code completion
- diagnostics and fixes ( :YcmCompleter FixIt )
- find declarations, references, and definitions ( :YcmCompleter GoTo etc)
- rename symbol ( :YcmCompleter RefactorRename )
Under the hood
- Debug logs: run :YcmDebugInfo to see clangd status, and :YcmToggleLogs to view clangd’s debug logs.
Command-line flags: Set g:ycm_clangd_args in .vimrc , e.g.:
LanguageClient-neovim also has instructions for using clangd, and may be easier to install.
eglot can be configured to work with clangd.
Install eglot with M-x package-install RET eglot RET .
Add the following to
/.emacs to enable clangd:
After restarting you should see diagnostics for errors in your code, and M-x completion-at-point should work.
eglot supports many of clangd’s features, with caveats:
- code completion, enhanced by company-mode , see below
- diagnostics and fixes
- find definitions and references ( M-x xref-find-definitions etc)
- hover and highlights
- code actions ( M-x eglot-code-actions )
company-mode
eglot does have basic integration with company-mode, which provides a more fluent completion UI.
You can install it with M-x package-install RET company RET , and enable it with M-x company-mode .

Under the hood
- Debug logs: available in the EGLOT events buffer.
- Command-line flags and alternate binary: instead of adding «clangd» to eglot-server-programs , add («/path/to/clangd» «-log=verbose») etc.
Visual Studio Code
The official extension is vscode-clangd and can be installed from within VSCode.
Choose View –> Extensions, then search for “clangd”. (Make sure the Microsoft C/C++ extension is not installed).
After restarting, you should see red underlines underneath errors, and you should get rich code completions including e.g. function parameters.
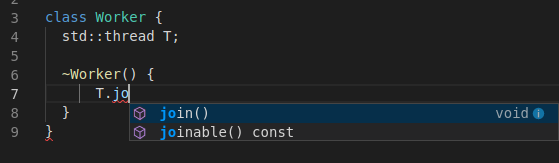
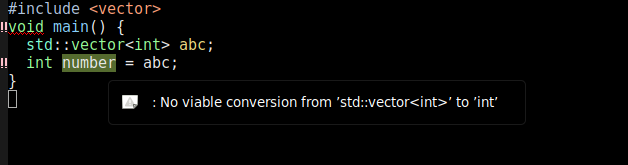
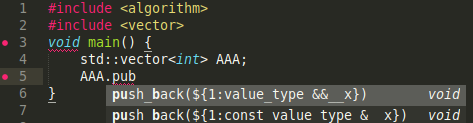
vscode-clangd has excellent support for all clangd features, including:
- code completion
- diagnostics and fixes
- find declarations, references, and definitions
- find symbol in file ( Ctrl-P @foo ) or workspace ( Ctrl-P #foo )
- hover and highlights
- code actions
Under the hood
- Debug logs: when clangd is running, you should see “Clang Language Server” in the dropdown of the Output panel (View ->Output).
- Command-line flags: these can be passed in the clangd.arguments array in your settings.json . (File ->Preferences ->Settings).
- Alternate clangd binary: set the clangd.path string in settings.json .
Sublime Text
tomv564/LSP works with clangd out of the box.
Select Tools–>Install Package Control (if you haven’t installed it yet).
Press Ctrl-Shift-P and select Package Control: Install Package. Select LSP.
Press Ctrl-Shift-P and select LSP: Enable Language Server Globally. Select clangd.
Open a C++ file, and you should see diagnostics and completion:
The LSP package has excellent support for all most clangd features, including:
- code completion (a bit noisy due to how snippets are presented)
- diagnostics and fixes
- find definition and references
- hover and highlights
- code actions
Under the hood
Settings can be tweaked under Preferences–>Package Settings–>LSP.
- Debug logs: add «log_stderr»: true
- Command-line flags and alternate clangd binary: inside the «clients»: <"clangd": < . >> section, add «command»: [«/path/to/clangd», «-log=verbose»] etc.
Other editors
There is a directory of LSP clients at langserver.org.
A generic client should be configured to run the command clangd , and communicate via the language server protocol on standard input/output.
If you don’t have strong feelings about an editor, we suggest you try out VSCode, it has excellent language server support and most faithfully demonstrates what clangd can do.
Project setup
To understand your source code, clangd needs to know your build flags. (This is just a fact of life in C++, source files are not self-contained).
By default, clangd will assume your code is built as clang some_file.cc , and you’ll probably get spurious errors about missing #include d files, etc. There are a couple of ways to fix this.
compile_commands.json
This file provides compile commands for every source file in a project. It is usually generated by tools. Clangd will look in the parent directories of the files you edit looking for it.
If your project builds with CMake, it can generate this file. You should enable it with:
compile_commands.json will be written to your build directory. You should symlink it (or simply copy it) to the root of your source tree, if they are different.
Bear is a tool to generate a compile_commands.json file by recording a complete build.
For a make -based build, you can run make clean; bear — make to generate the file (and run a clean build!).
Other tools can also generate this file. See the compile_commands.json specification.
compile_flags.txt
If all files in a project use the same build flags, you can put those flags one-per-line in compile_flags.txt in your source root.
Clangd will assume the compile command is clang $FLAGS some_file.cc .
Creating this file by hand is a reasonable place to start if your project is quite simple.
Источник


