- Installation
- Python Version Supported
- Using PyPI
- Using Conda
- Manually Downloading
- Installing from Source
- Install Spark on Ubuntu (PySpark)
- Common issues: Unable to load native-hadoop library for your platform… using builtin-java classes where applicable
- Concluding Remarks
- Установка PySpark с JAVA 8 на Ubuntu 18.04
- Базовая установка для распределенного машинного обучения
- Вывод
- контакт
- Install PySpark on Ubuntu
- Install PySpark on Ubuntu — Learn to download, install and use PySpark on Ubuntu Operating System
- 1. Download and Install JDK 8 or above
- 2. Download and install Anaconda for python
- 3. Download and install Apache Spark
- 4. Configure Apache Spark
- 1. Download and Install JDK 8 or above
- 2. Download and install Anaconda for python
- 3. Download and install Apache Spark
- After extracting the file go to bin directory of spark and run ./pyspark
- 4. Configure Apache Spark
- Install pyspark on linux
Installation
PySpark is included in the official releases of Spark available in the Apache Spark website. For Python users, PySpark also provides pip installation from PyPI. This is usually for local usage or as a client to connect to a cluster instead of setting up a cluster itself.
This page includes instructions for installing PySpark by using pip, Conda, downloading manually, and building from the source.
Python Version Supported
Python 3.6 and above.
Using PyPI
PySpark installation using PyPI is as follows:
If you want to install extra dependencies for a specific component, you can install it as below:
For PySpark with/without a specific Hadoop version, you can install it by using PYSPARK_HADOOP_VERSION environment variables as below:
The default distribution uses Hadoop 3.2 and Hive 2.3. If users specify different versions of Hadoop, the pip installation automatically downloads a different version and use it in PySpark. Downloading it can take a while depending on the network and the mirror chosen. PYSPARK_RELEASE_MIRROR can be set to manually choose the mirror for faster downloading.
It is recommended to use -v option in pip to track the installation and download status.
Supported values in PYSPARK_HADOOP_VERSION are:
without : Spark pre-built with user-provided Apache Hadoop
2.7 : Spark pre-built for Apache Hadoop 2.7
3.2 : Spark pre-built for Apache Hadoop 3.2 and later (default)
Note that this installation way of PySpark with/without a specific Hadoop version is experimental. It can change or be removed between minor releases.
Using Conda
Conda is an open-source package management and environment management system which is a part of the Anaconda distribution. It is both cross-platform and language agnostic. In practice, Conda can replace both pip and virtualenv.
Create new virtual environment from your terminal as shown below:
After the virtual environment is created, it should be visible under the list of Conda environments which can be seen using the following command:
Now activate the newly created environment with the following command:
You can install pyspark by Using PyPI to install PySpark in the newly created environment, for example as below. It will install PySpark under the new virtual environment pyspark_env created above.
Alternatively, you can install PySpark from Conda itself as below:
However, note that PySpark at Conda is not necessarily synced with PySpark release cycle because it is maintained by the community separately.
Manually Downloading
PySpark is included in the distributions available at the Apache Spark website. You can download a distribution you want from the site. After that, uncompress the tar file into the directory where you want to install Spark, for example, as below:
Ensure the SPARK_HOME environment variable points to the directory where the tar file has been extracted. Update PYTHONPATH environment variable such that it can find the PySpark and Py4J under SPARK_HOME/python/lib . One example of doing this is shown below:
Installing from Source
To install PySpark from source, refer to Building Spark.
Источник
Install Spark on Ubuntu (PySpark)

Jan 3, 2017 · 2 min read
The video above demonstrates one way to install Spark (PySpark) on Ubuntu. The following instructions guide you through the installation process. Please subscribe on youtube if you can.
Prerequisites: Anaconda. If you already have anaconda installed, skip to step 2.
- Download and install Anaconda. If you need help, please see this tutorial.
- Go to the Apache Spark website (link)

2. Make sure you have java installed on your machine. If you don’t, I found the link below useful.
3. Go to your home directory (command is in bold)
4. Unzip the folder in your home directory using the following command.
tar -zxvf spark-2.0.0-bin-hadoop2.7.tgz
5. Use the fo l lowing command to see that you have a .bashrc file
6. Next, we will edit our .bashrc so we can open a spark notebook in any directory
7. Don’t remove anything in your .bashrc file. Add the following to the bottom of your .bashrc file
8. Save and exit out of your .bashrc file. Either close the terminal and open a new one or in your terminal type:
Notes: The PYSPARK_DRIVER_PYTHON parameter and the PYSPARK_DRIVER_PYTHON_OPTS parameter are used to launch the PySpark shell in Jupyter Notebook. The master parameter is used for setting the master node address. Here we launch Spark locally on 2 cores for local testing.
Please let me know if you have any questions. You can also test your PySpark installation here!
Common issues: Unable to load native-hadoop library for your platform… using builtin-java classes where applicable
If you get this type of error message, the next couple of steps can help.
- Download hadoop binary (link, basically another file) and put it in your home directory
(you can choose a different hadoop version if you like and change the next steps accordingly)
2. Unzip the folder in your home directory using the following command.
tar -zxvf hadoop-2.8.0.tar.gz
3. Now add export HADOOP_HOME=
/hadoop-2.8.0 to your .bashrc file. Open a new terminal and try again.
Concluding Remarks
Please let me know if you have any questions! I am happy to answer questions in the comments section below or on the youtube video page, or through Twitter.
Источник
Установка PySpark с JAVA 8 на Ubuntu 18.04
Дата публикации Jul 30, 2019

Базовая установка для распределенного машинного обучения
После нескольких часов борьбы я наконец установил java 8, спарк и настроил все переменные окружения. Я просмотрел много средних статей и ответов StackOverflow, но ни один конкретный ответ или сообщение не решили мои проблемы. Так что это всего лишь мое небольшое усилие собрать все вместе.
На моей машине установлена Ubuntu 18.04, и я использую Java 8 вместе с Anaconda3. Если вы будете следовать инструкциям, вы сможете установить PySpark без проблем.
- Убедитесь, что у вас установлена Java.
Если вы этого не сделаете, выполните в терминале следующую команду:
После установки, если вы введетеJava-версияв терминале вы получите:
Запомните каталог, куда вы скачали. Я получил его в моей папке загрузок по умолчанию, где я буду устанавливать спарк.
3. Установите переменную среды $ JAVA_HOME.
Для этого запустите в терминале следующее:
Это откроет файл в vim. Затем в новой строке после переменной PATH добавьте
Наберите wq! и выход. Это сохранит изменения в файле. Позже в терминале бегут
Не забудьте запустить последнюю строку в терминале, так как это создаст переменную среды и загрузит ее в текущую запущенную оболочку. Теперь, если вы бежите
Выход должен быть:
Так же, как это было добавлено. Теперь некоторые версии Ubuntu не работают /etc/environment файл каждый раз, когда мы открываем терминал, поэтому лучше добавить его в файл .bashrc, так как файл .bashrc загружается в терминал каждый раз, когда он открывается. Запустите следующую команду в терминале:
Файл открывается. Добавьте в конце
Мы добавим искровые переменные ниже. Закройте сейчас и снова загрузите файл .bashrc в терминал, выполнив следующую команду.
Или вы можете выйти из этого терминала и создать другой. Теперь, если вы запустите echo $ JAVA_HOME, вы должны получить ожидаемый результат.
4. Установка свечей.
Перейдите в каталог, в который был загружен искровой zip-файл, и введите команду для его установки:
Примечание. Если ваш искровой файл имеет другую версию, исправьте имя соответствующим образом.
5. Настройте переменные среды для искры.
Добавьте следующее в конце,
Сохраните файл и выйдите. Наконец, снова загрузите файл .bashrc в терминал
Это должно открыть блокнот Jupyter для вас. Я удалил и снова запустил команды, чтобы установить spark и java. Наконец, если вы делаете:
Вы увидите изображение, как.

Вывод
Надеюсь статья поможет вам в установке спарк. Сегодня Spark стал очень важным инструментом для распределенного машинного обучения, и его обязательно нужно иметь в резюме для любого специалиста по данным или машинного обучения. Первым делом можно настроить спарк, а затем изучить фреймы искровых данных и затем использовать их в любом проекте.
контакт
Если вы любите науку о данных, давайте подключимсяLinkedInили следуй за мной здесь. Если вам понравилась история, пожалуйста, оцените ее, хлопая в ладоши. Благодарность 🙂
Источник
Install PySpark on Ubuntu
In this tutorial we are going to install PySpark on Ubunut and use for Spark Programming.
In this tutorial we are going to install PySpark on Ubunut and use for Spark Programming.
Install PySpark on Ubuntu — Learn to download, install and use PySpark on Ubuntu Operating System
In this tutorial we are going to install PySpark on the Ubuntu Operating system. Steps given here is applicable to all the versions of Ubunut including desktop and server operating systems. Installing PySpark is the first step in learning Spark Programming with Python programming language. Python is one of most popular object oriented, scripting, interpreted programming language these days used for writing many types of applications.
Apache Spark distribution comes with the API and interface to use the Spark features from Python programming language. Spark distribution comes with the pyspark shell which is used by developers to test their Spark program developed in Python programming (PySpark) language. Programmers can use PySpark to develop various machine learning and data processing applications which can be deployed on the distributed Spark cluster.
In this section we are going to download and installing following components to make things work:
1. Download and Install JDK 8 or above
2. Download and install Anaconda for python
3. Download and install Apache Spark
4. Configure Apache Spark
Let’s go ahead with the installation process.
1. Download and Install JDK 8 or above
First of all we have to download and install JDK 8 or above on Ubuntu operating system. If JDK 8 is not installed you should follow our tutorial How to Install Oracle Java JDK 8 in Ubuntu 16.04?
You should check java by running following command:
After the installation of JDK you can proceed with the installation of Anaconda on Ubuntu operating system.
2. Download and install Anaconda for python
Python 3.6 or above is required to run PySpark program and for this we should install Anaconda on Ubuntu operating System. Anaconda python comes with more than 1000 machine learning packages, so its very important distribution of Python for machine learning developers.
If Anaconda Python is not installed on your system check tutorials How to install Anaconda in Ubuntu?.
You should verify installation with typing following command on Linux terminal:
After installation of Python we can proceed with the installation of Spark.
3. Download and install Apache Spark
Now the next step is to download latest distribution of Spark. Visit the website https://spark.apache.org/downloads.html and there you will find the latest distribution of Spark framework. At the time of writing of this tutorial Spark framework was spark-2.3.0-bin-hadoop2.7.tgz.

Click on the spark-2.3.0-bin-hadoop2.7.tgz link to download spark.

You will get url to download, click on the full link as shown in above url. Now save the save the file on your computer as shown below:

create a directory spark with following command in your home.
Move spark-2.3.0-bin-hadoop2.7.tgz in the spark directory:
After extracting the file go to bin directory of spark and run ./pyspark
It will open following pyspark shell:
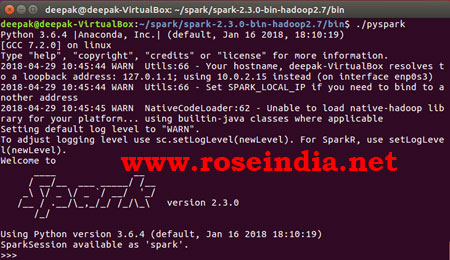
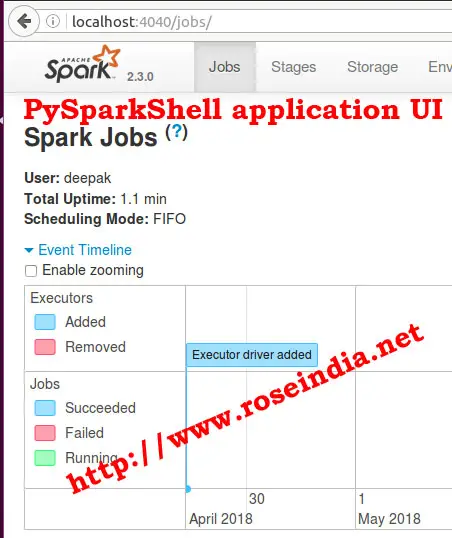
You can check the web UI in browser at localhost:4040
4. Configure Apache Spark
Now you should configure it in path so that it can be executed from anywhere. Open bash_profile file:
Add following entry:
Run the following command to update PATH variable in the current session:
After next login you should be able to find pyspark command in path and it can be accessed from any directory.
Источник
Install pyspark on linux
Spark + pyspark setup guide
This is guide for installing and configuring an instance of Apache Spark and its python API pyspark on a single machine running ubuntu 15.04.
— Kristian Holsheimer, July 2015
Table of Contents
In order to run Spark, we need Scala, which in turn requires Java. So, let’s install these requirements first
1 | Install Requirements
1.1 | Install Java
Check if installation was successful by running:
The output should be something like:
1.2 | Install Scala
Download and install deb package from scala-lang.org:
Note: You may want to check if there’s a more recent version. At the time of this writing, 2.11.7 was the most recent stable release. Visit the Scala download page to check for updates.
Again, let’s check whether the installation was successful by running:
which should return something like:
1.3 | Install git
We shall install Apache Spark by building it from source. This procedure depends implicitly on git, thus be sure install git if you haven’t already:
1.4 | Install py4j
PySpark requires the py4j python package. If you’re running a virtual environment, run:
2 | Install Apache Spark
2.1 | Download and extract source tarball
Note: Also here, you may want to check if there’s a more recent version: visit the Spark download page.
2.2 | Compile source
This will take a while. (approximately 20
After the dust settles, you can check whether Spark installed correctly by running the following example that should return the number π ≈ 3.14159.
This should return the line:
Note: You want to lower the verbosity level of the log4j logger. You can do so by running editing your the log4j properties file (assuming we’re still inside the
and replace the line:
2.3 | Install files
Add this to your path by editing your bashrc file:
Add the following lines at the bottom of this file:
Restart bash to make use of these changes by running:
If your ipython instance somehow doesn’t find these environment variables for whatever reason, you could also make sure they are set when ipython spins up. Let’s add this to our ipython settings by creating a new python script named load_spark_environment_variables.py in the default profile startup folder:
and paste the following lines in this file:
Now we’re finally ready to start running our first PySpark application. Load the spark context by opening up a python interpreter (or ipython / ipython notebook) and running:
The spark context variable sc is your gateway towards everything sparkly.
Источник


