- Set up an environment for KMM development
- Kotlin/Native as an Apple framework – tutorial
- Create a Kotlin library
- Generated framework headers
- Kotlin/Native runtime declarations
- Kotlin numbers and NSNumber
- Classes and objects from Kotlin
- Global declarations from Kotlin
- Garbage collection and reference counting
- Use the code from Objective-C
- Use the code from Swift
- Xcode and framework dependencies
- Xcode for macOS target
- Xcode for iOS targets
- Next steps
- Using Kotlin from CLI on Mac
- Java SE Development Kit
- Kotlin Compiler
- Hello, World!
- See you!
Set up an environment for KMM development
Before you begin creating your first application to work on both iOS and Android, start by setting up an environment for Kotlin Multiplatform Mobile (KMM) development:
If you are going to work with shared code or Android-specific code, you can work on any computer with an operating system supported by Android Studio.
If you also want to write iOS-specific code and run an iOS application on a simulated or real device, use a Mac with a macOS. These steps cannot be performed on other operating systems, such as Microsoft Windows. This is due to an Apple requirement.
Install Android Studio – version 4.2 or higher.
You will use Android Studio for creating your multiplatform applications and running them on simulated or hardware devices.
If you need to write iOS-specific code and run an iOS application, install Xcode – version 11.3 or higher.
Most of the time, Xcode will work in the background. You will use it to add Swift or Objective-C code to your iOS application.
Make sure that you have a compatible Kotlin plugin installed.
In Android Studio, select Tools | Kotlin | Configure Kotlin Plugin Updates and check the current Kotlin plugin version. If needed, update to the latest version in the Stable update channel.
Install the Kotlin Multiplatform Mobile plugin.
In Android Studio, select Preferences | Plugins, search for the plugin Kotlin Multiplatform Mobile in Marketplace and install it.

Install the JDK if you haven’t already done so.
To check if it’s installed, run the command java -version in the Terminal.
Источник
Kotlin/Native as an Apple framework – tutorial
Kotlin/Native provides bi-directional interoperability with Objective-C/Swift. Objective-C frameworks and libraries can be used in Kotlin code. Kotlin modules can be used in Swift/Objective-C code too. Besides that, Kotlin/Native has C Interop. There is also the Kotlin/Native as a Dynamic Library tutorial for more information.
In this tutorial, you will see how to use Kotlin/Native code from Objective-C and Swift applications on macOS and iOS.
In this tutorial you’ll:
create a Kotlin Library and compile it to a framework
examine the generated Objective-C and Swift API code
use the framework from Objective-C and Swift
Configure Xcode to use the framework for macOS and iOS
Create a Kotlin library
The Kotlin/Native compiler can produce a framework for macOS and iOS out of the Kotlin code. The created framework contains all declarations and binaries needed to use it with Objective-C and Swift. The best way to understand the techniques is to try it for ourselves. Let’s create a tiny Kotlin library first and use it from an Objective-C program.
Create the hello.kt file with the library contents:
While it is possible to use the command line, either directly or by combining it with a script file (such as .sh or .bat file), this approach doesn’t scale well for big projects that have hundreds of files and libraries. It is therefore better to use the Kotlin/Native compiler with a build system, as it helps to download and cache the Kotlin/Native compiler binaries and libraries with transitive dependencies and run the compiler and tests. Kotlin/Native can use the Gradle build system through the kotlin-multiplatform plugin.
We covered the basics of setting up an IDE compatible project with Gradle in the A Basic Kotlin/Native Application tutorial. Please check it out if you are looking for detailed first steps and instructions on how to start a new Kotlin/Native project and open it in IntelliJ IDEA. In this tutorial, we’ll look at the advanced C interop related usages of Kotlin/Native and multiplatform builds with Gradle.
First, create a project folder. All the paths in this tutorial will be relative to this folder. Sometimes the missing directories will have to be created before any new files can be added.
Use the following build.gradle(.kts) Gradle build file:
Move the sources file into the src/nativeMain/kotlin folder under the project. That is the default path, where sources are located, when the kotlin-multiplatform plugin is used. Use the following block to configure the project to generate a dynamic or shared library:
Along with macOS X64 , Kotlin/Native supports macos arm64 and iOS arm32 , arm64 and X64 targets. You may replace the macosX64 with respective functions as shown in the table:
| Target platform/device | Gradle function |
|---|---|
| macOS x86_64 | macosX64() |
| macOS ARM 64 | macosArm64() |
| iOS ARM 32 | iosArm32() |
| iOS ARM 64 | iosArm64() |
| iOS Simulator (x86_64) | iosX64() |
Run the linkNative Gradle task to build the library in the IDE or by calling the following console command:
Depending on the variant, the build generates the framework into the build/bin/native/debugFramework and build/bin/native/releaseFramework folders. Let’s see what is inside.
Generated framework headers
Each of the created frameworks contains the header file in /Headers/Demo.h . The headers do not depend on the target platform (at least with Kotlin/Native v.0.9.2). It contains the definitions for our Kotlin code and a few Kotlin-wide declarations.
The way Kotlin/Native exports symbols is subject to change without notice.
Kotlin/Native runtime declarations
Take a look at Kotlin runtime declarations:
Kotlin classes have a KotlinBase base class in Objective-C, the class extends the NSObject class there. There are also have wrappers for collections and exceptions. Most of the collection types are mapped to similar collection types from the other side:
| Kotlin | Swift | Objective-C |
|---|---|---|
| List | Array | NSArray |
| MutableList | NSMutableArray | NSMutableArray |
| Set | Set | NSSet |
| Map | Dictionary | NSDictionary |
| MutableMap | NSMutableDictionary | NSMutableDictionary |
Kotlin numbers and NSNumber
The next part of the /Headers/Demo.h contains number type mappings between Kotlin/Native and NSNumber . There is the base class called DemoNumber in Objective-C and KotlinNumber in Swift. It extends NSNumber . There are also child classes per Kotlin number type:
| Kotlin | Swift | Objective-C | Simple type |
|---|---|---|---|
| — | KotlinNumber | — | |
| Byte | KotlinByte | char | |
| UByte | KotlinUByte | unsigned char | |
| Short | KotlinShort | short | |
| UShort | KotlinUShort | unsigned short | |
| Int | KotlinInt | int | |
| UInt | KotlinUInt | unsigned int | |
| Long | KotlinLong | long long | |
| ULong | KotlinULong | unsigned long long | |
| Float | KotlinFloat | float | |
| Double | KotlinDouble | double | |
| Boolean | KotlinBoolean | BOOL/Bool |
Every number type has a class method to create a new instance from the related simple type. Also, there is an instance method to extract a simple value back. Schematically, declarations look like that:
Where __TYPE__ is one of the simple type names and __CTYPE__ is the related Objective-C type, for example, initWithChar(char) .
These types are used to map boxed Kotlin number types into Objective-C and Swift. In Swift, you may simply call the constructor to create an instance, for example, KotlinLong(value: 42) .
Classes and objects from Kotlin
Let’s see how class and object are mapped to Objective-C and Swift. The generated /Headers/Demo.h file contains the exact definitions for Class , Interface , and Object :
The code is full of Objective-C attributes, which are intended to help the use of the framework from both Objective-C and Swift languages. DemoClazz , DemoInterface , and DemoObject are created for Clazz , Interface , and Object respectively. The Interface is turned into @protocol , both a class and an object are represented as @interface . The Demo prefix comes from the -output parameter of the kotlinc-native compiler and the framework name. You can see here that the nullable return type ULong? is turned into DemoLong* in Objective-C.
Global declarations from Kotlin
All global functions from Kotlin are turned into DemoLibKt in Objective-C and into LibKt in Swift, where Demo is the framework name and set by the -output parameter of kotlinc-native .
You see that Kotlin String and Objective-C NSString* are mapped transparently. Similarly, Unit type from Kotlin is mapped to void . We see primitive types are mapped directly. Non-nullable primitive types are mapped transparently. Nullable primitive types are mapped into Kotlin * types, as shown in the table above. Both higher order functions acceptFunF and supplyFun are included, and accept Objective-C blocks.
More information about all other types mapping details can be found in the Objective-C Interop documentation article
Garbage collection and reference counting
Objective-C and Swift use reference counting. Kotlin/Native has its own garbage collection too. Kotlin/Native garbage collection is integrated with Objective-C/Swift reference counting. You do not need to use anything special to control the lifetime of Kotlin/Native instances from Swift or Objective-C.
Use the code from Objective-C
Let’s call the framework from Objective-C. For that, create the main.m file with the following content:
Here you call Kotlin classes directly from Objective-C code. A Kotlin object has the class method function object , which allows us to get the only instance of the object and to call Object methods on it. The widespread pattern is used to create an instance of the Clazz class. You call the [[ DemoClazz alloc] init] on Objective-C. You may also use [DemoClazz new] for constructors without parameters. Global declarations from the Kotlin sources are scoped under the DemoLibKt class in Objective-C. All methods are turned into class methods of that class. The strings function is turned into DemoLibKt.stringsStr function in Objective-C, you can pass NSString directly to it. The return is visible as NSString too.
Use the code from Swift
The framework that you compiled with Kotlin/Native has helper attributes to make it easier to use with Swift. Convert the previous Objective-C example into Swift. As a result, you’ll have the following code in main.swift :
The Kotlin code is turned into very similar looking code in Swift. There are some small differences, though. In Kotlin any object has only one instance. Kotlin object Object now has a constructor in Swift, and we use the Object() syntax to access the only instance of it. The instance is always the same in Swift, so that Object() === Object() is true. Methods and property names are translated as-is. Kotlin String is turned into Swift String too. Swift hides NSNumber* boxing from us too. We can pass a Swift closure to Kotlin and call a Kotlin lambda function from Swift too.
More documentation on the types mapping can be found in the Objective-C Interop article.
Xcode and framework dependencies
You need to configure an Xcode project to use our framework. The configuration depends on the target platform.
Xcode for macOS target
First, in the General tab of the target configuration, under the Linked Frameworks and Libraries section, you need to include our framework. This will make Xcode look at our framework and resolve imports both from Objective-C and Swift.
The second step is to configure the framework search path of the produced binary. It is also known as rpath or run-time search path. The binary uses the path to look for the required frameworks. We do not recommend installing additional frameworks to the OS if it is not needed. You should understand the layout of your future application, for example, you may have the Frameworks folder under the application bundle with all the frameworks you use. The @rpath parameter can be configured in Xcode. You need to open the project configuration and find the Runpath Search Paths section. Here you specify the relative path to the compiled framework.
Xcode for iOS targets
First, you need to include the compiled framework in the Xcode project. To do this, add the framework to the Frameworks, Libraries, and Embedded Content section of the General tab of the target configuration page.
The second step is to then include the framework path into the Framework Search Paths section of the Build Settings tab of the target configuration page. It is possible to use the $(PROJECT_DIR) macro to simplify the setup.
The iOS simulator requires a framework compiled for the ios_x64 target, the iOS_sim folder in our case.
This Stackoverflow thread contains a few more recommendations. Also, the CocoaPods package manager may be helpful to automate the process too.
Next steps
Kotlin/Native has bidirectional interop with Objective-C and Swift languages. Kotlin objects integrate with Objective-C/Swift reference counting. Unused Kotlin objects are automatically removed. The Objective-C Interop article contains more information on the interop implementation details. Of course, it is possible to import an existing framework and use it from Kotlin. Kotlin/Native comes with a good set of pre-imported system frameworks.
Kotlin/Native supports C interop too. Check out the Kotlin/Native as a Dynamic Library tutorial for that.
Источник
Using Kotlin from CLI on Mac

Davi Diório Mendes
Apr 3, 2019 · 4 min read
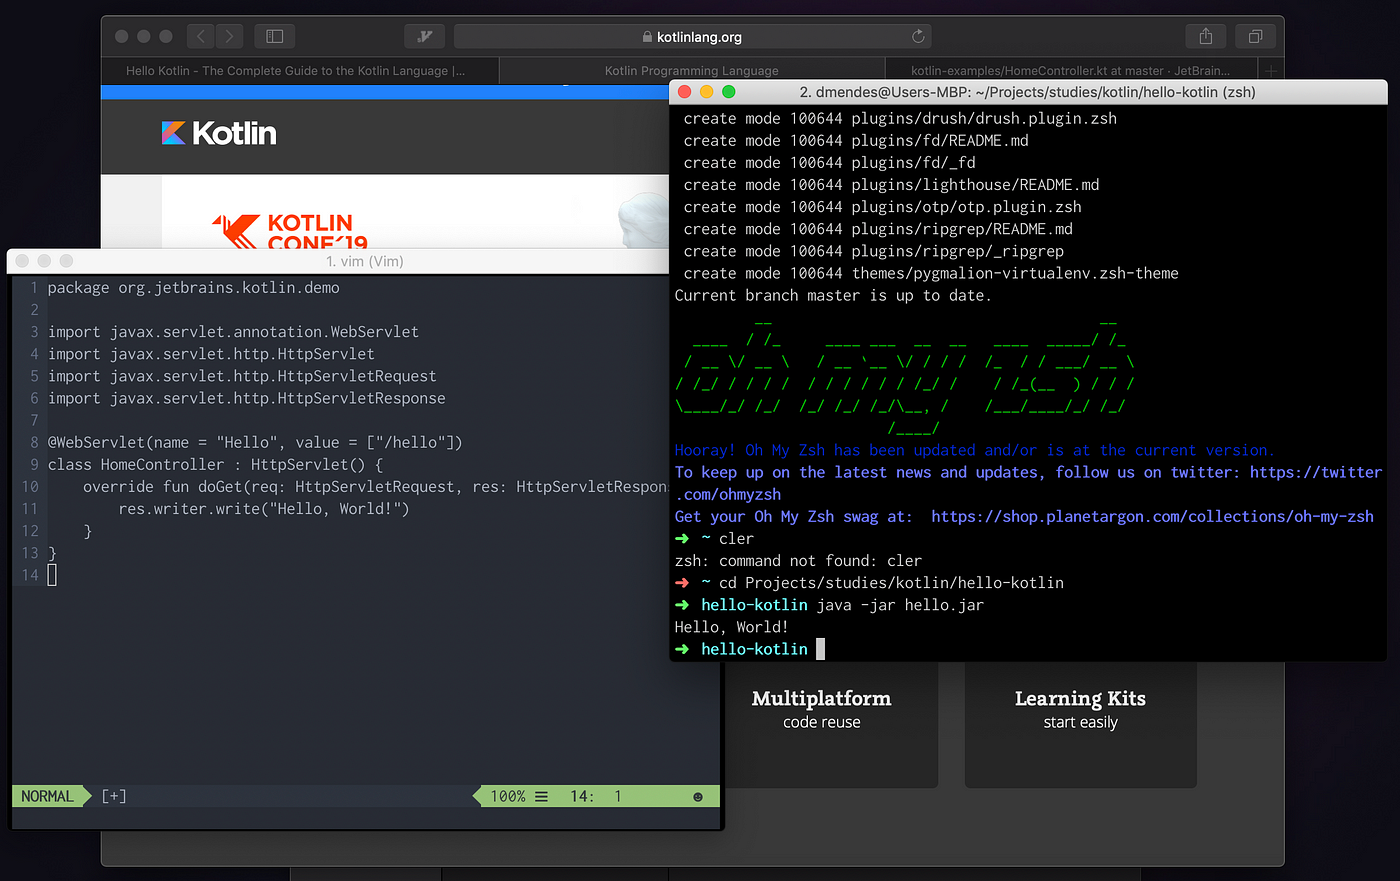
Hello everyone! I don’t know about you guys, but I really love working on terminal. One of these days I have started studying Kotlin and I soon noticed that you should install IntelliJ and blah blah blah. I have anything against IntelliJ. Really love it actually. But I like the fun in doing things by hand too.
Were I working on a real Kotlin product or a more complex project I would use the IntelliJ for sure. It would break a leg for me. But for simple studies and the fun, I got curious whether I could edit it on vim and compile/execute by hand on terminal.
Yes! Yes, we can! And it’s not hard at all! Here comes a tutorial for you that like the fun of coding & running on terminal. Tested on Mac. If you use Linux/Windows I’ll let some reference on the end and you can dig a bit on yourself.
Java SE Development Kit
If you still don’t have the jdk installed on your system install it from the source you like. I installed the official from oracle website: Java SE Downloads
Just run the installer, it is pretty simple. After it is done you can check on your terminal with $ java -version .

If you want more details about Java installation you can check on oracle website: How do I install Java for my Mac?
Kotlin Compiler
Installing Java is just a pre-requisite for the core of this story: the Kotlin Compiler. Now that we have jdk installed we can attack the main course.
The Kotlin Official documentation has an entire tutorial on how to install its compiler in several ways for several operational systems. For mac you can go with brew:
Just let it be brew and test the installation by checking kotlin version.

Congrats! Now we can compile and run our kotlin studies directly on terminal!
And now, finally, the great, the fabulous, the magnificent. The…
Hello, World!
The “ Hello, World!” is usually a very simple program that just prints the text “ Hello, World!”. With it we can know the very basic steps to compile any program. Now we will create our Kotlin “Hello, World!” to test the kotlin compiler we just installed.
Below we have the code. Write it with your favorite text editor, save to your favorite folder and let’s put our compiler to rock.
I particularly used macvim with the VimBox setup. But this is a subject for another story.
We will compile our kotlin code to a jar file and run it with the JVM. If you want to check more options and usages of the compiler you can refer to official documentation but I will leave the basics here.
Open your terminal and change to that favorite directory where you saved our hello.kt . Now run these commands:
Now we have a jar file with our code plus the kotlin runtime. If you omit the -include-runtime flag you must have the kotlin runtime in your path or you can use the jar as a lib in your project.
You can also just drop a $ kotlinc and start a Kotlin REPL session.
See you!
I hope you liked this post. If you have any doubt or trouble on this tutorial, please let me know! Any ideas for what you want to see from terminal, please let me know as well! Thank you for your time and have fun with my sources.
Источник


