- How to install IBM Installation Manager 1.8 on Linux
- Download IBM IM 1.8
- Install IBM IM 1.8
- Verify IBM IM 1.8 Installation
- How to Download and Install WebSphere 9 ND in Linux?
- Download & Install IBM IM 1.8.5
- Installing IBM WAS 9
- Installing Installation Manager on AIX or Linux
- Before you begin
- About this task
- Procedure
- What to do next
- Install WAS 8 using IBM Installation Manager
- Downloading IBM Installation Manager
- Installing WAS using IBM Installation Manager
- Verifying the installed binaries
How to install IBM Installation Manager 1.8 on Linux
![]()
Geekflare is supported by our audience. We may earn affiliate commissions from buying links on this site.
IBM Installation Manager (IBM IM) is required to install IBM WAS 8.x ND.
In this article, I have listed the steps to install IBM IM 1.8 on Linux OS. There are three parts overall – Download, Install & Verify.
Download IBM IM 1.8
- Click on below link to download the IBM IM

Once downloaded, you should have agent.installer.linux.gtk.x86_64_1.8.2000.20150303_1526.zip
Install IBM IM 1.8
- Go to folder where you have downloaded the package
- unzip the downloaded zip file using unzip command
- Execute install command
- Click on next on the following screen

- Accept the license agreement and click Next

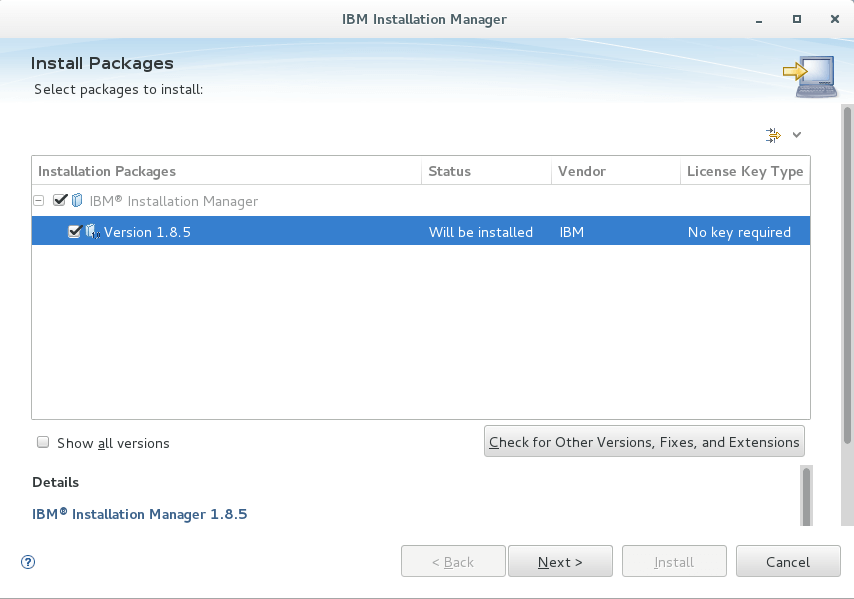
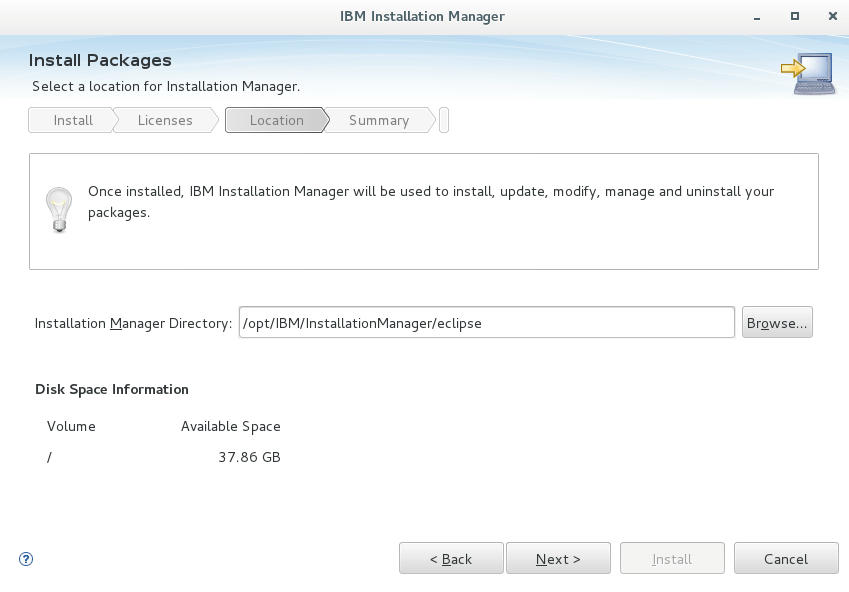
- By default, it will install under /opt/IBM however if you wish you can change the installation path by clicking on Browse

- Click on Install on review summary window

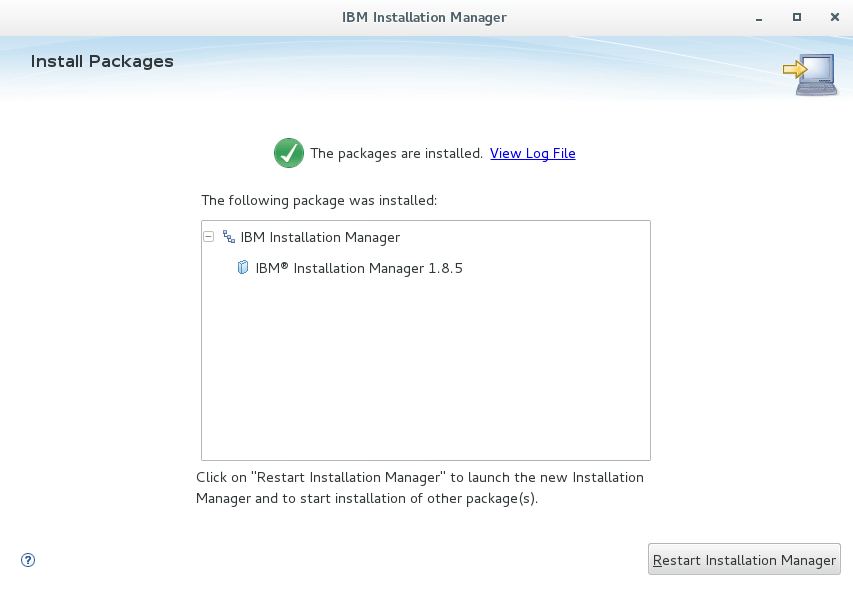
It will take few minutes and at the end you will have installation confirmation window as below
Verify IBM IM 1.8 Installation
Click on Restart Installation Manager and you will have IBM Installation Manager 1.8 opened.

That’s all for today. Hope it helps you in installing IBM IM 1.8 on Linux.
Источник
How to Download and Install WebSphere 9 ND in Linux?
![]()
Geekflare is supported by our audience. We may earn affiliate commissions from buying links on this site.
Procedure to download & install IBM WAS 9 Network Deployment in Linux environments
IBM released WebSphere Application Server (WAS) 9 initially on their cloud – Bluemix. And now it’s available for you to download and install it.
I hope installation procedure will remain similar to the previous version but let’s see how it goes. If you are new to WebSphere then don’t forget to a chekout little introduction about it.
In this article, I’ll explain step-by-step from where to download WAS 9 and install it using IBM Installation Manager.
Download & Install IBM IM 1.8.5
IBM IM 1.8.5 or later is required to install WebSphere 9 so let’s get it installed.
- Download IM 1.8.5 from the following location

I am not sure if it will work but you may try this direct link to download as well.
It’s around 164 MB for Linux 64bit so based on your internet speed it may take few minutes.
- Once downloaded, you should have the following.
- Let’s extract by unzip command
- After extract, you should see the following
It’s time to install IBM IM 1.8.5 now by executing an install file.
- it will prompt an installation wizard, click Next
- Accept the license and click Next
- By default, it will install on /opt/IBM however, if you wish to change then you may do on next screen
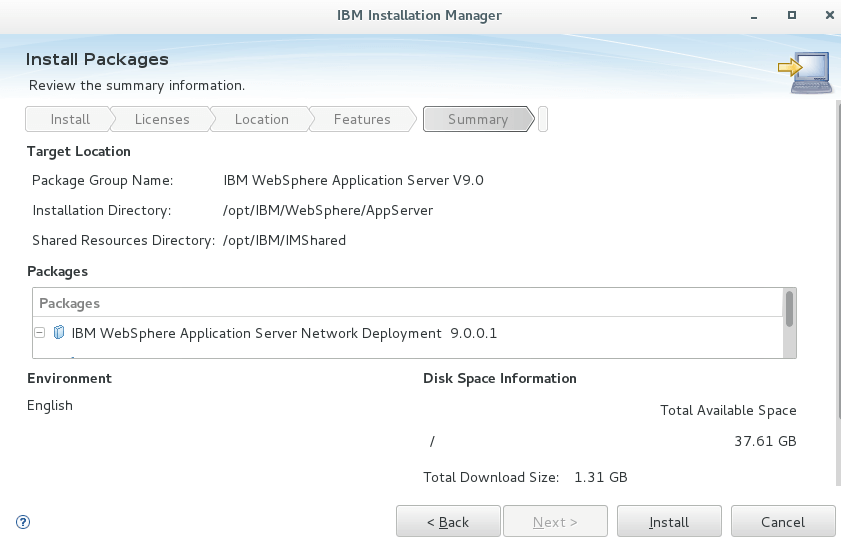
- Review the summary information and click Install
- It will take few seconds and give you the confirmation on successfully installed
Nice, first pre-requisite is done.
Installing IBM WAS 9
We will install WebSphere using IBM IM through an online repository. If not already, open IBM IM
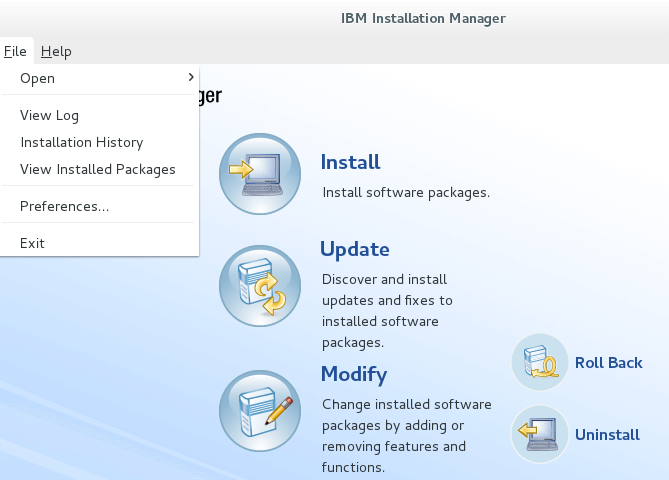
- Go to File >> Preferences
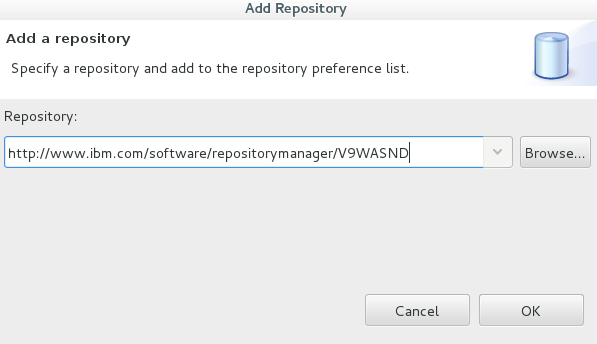
- Click “Add Repository”, it will open a prompt where you can enter the repository path and click Ok
- Accept the license and click Next
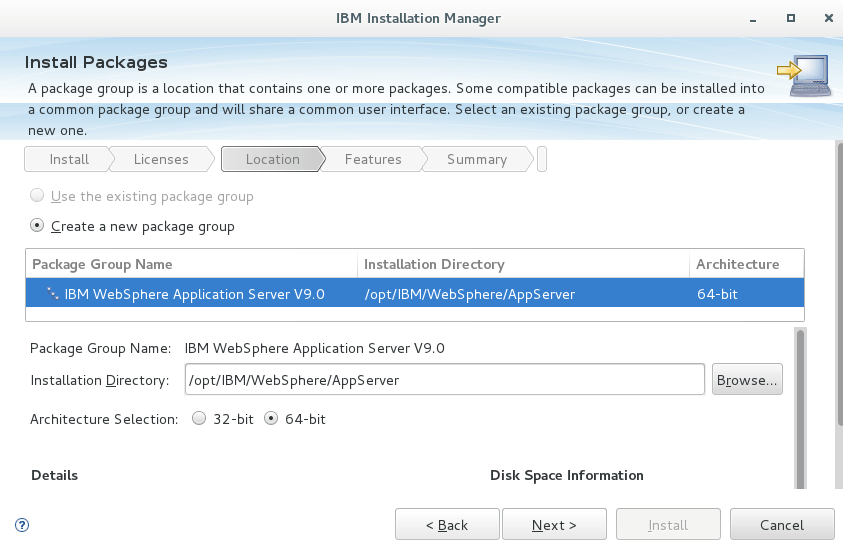
- By default, shared resources will be installed on /opt/IBM/IMShared and if you need, you can change on next screen

- Select the additional language if needed and click Next
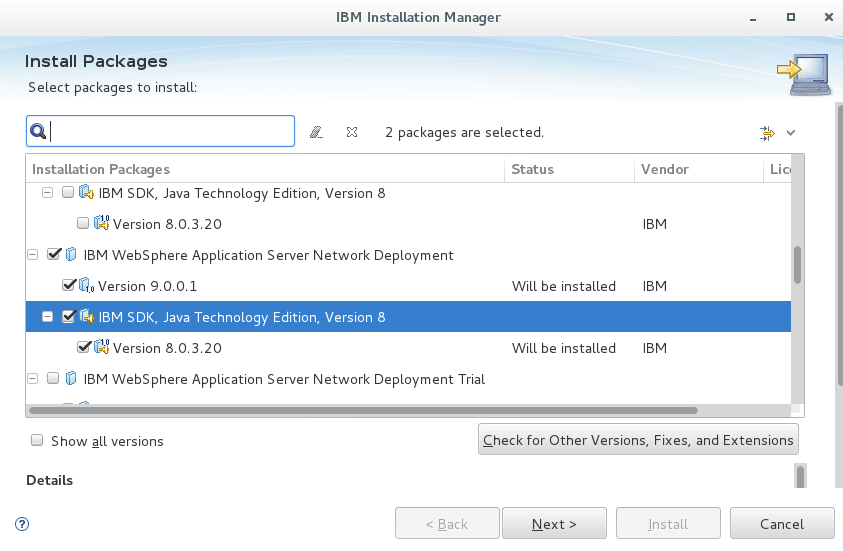
- Review the installation summary and click “Install”
- It will take few minutes to install and once done, you will get the confirmation screen.
Well done, you’ve successfully installed WAS 9 ND. Stay tuned for next post on profile creation
Источник
Installing Installation Manager on AIX or Linux
Install IBMВ® Installation Manager on AIXВ® or Linuxв„ў so that you can use it to install other IBM products.
Before you begin
For Linux RHEL only, if you have not done so already, disable SELinux on any RedHat operating system:
- Log in as root on the Linux RedHat server.
- Open the /etc/selinux/config file for editing.
- Locate the SELINUX setting. Change its value to either disable or permissive.
- Save and close the file.
- Restart the Linux server.
On all other operating systems, use the steps in the following procedure.
About this task
You must download and install Installation Manager itself before attempting to install another product with it.
Procedure
- Log in as root on the Linux RedHat server.
- Find the software packages you need to download.
The repository defaults to the current directory (where you extracted Installation Manager), so you do not need to change it.
For refresh 1 for Installation Manager 1.8.4, search for the following refresh pack: 1.8.4.1-IBMIM-Multiplatform-Update-20160217_1716
What to do next
Back up the Installation Manager agent data in case you need to run the install again later to restore a server. For more information, see Backing up and restoring Installation Managerin the Installation Manager product documentation.
Источник
Install WAS 8 using IBM Installation Manager
by Ramakanta · Published February 5, 2012 · Updated November 28, 2014

Here in this article we willВ Install WAS 8 using the IBM installation manager tool, please follow below steps by step process to complete the same.
Downloading IBM Installation Manager
At the time of writing, the latest version of IIM (version 1.4.4) can be downloaded from IBM at the following location:
online documentation located at the followingВ URL:
Installing IIM
You should have downloaded one of the following files:
IBM Installation Manager 1.4.4
IBM Installation Manager 1.4.4
1. For Linux:
— Copy the downloaded agent.installer.linux.gtk.x86_1.4.4000.20110525_1254.zip file to a suitable location on your Linux server and unzip it. Take note of this location for future reference.
— Decompress the ZIP file.
— Ensure you have an X Window System (X11 for short) session running.
— Run the installer using the following command: ./install
— Copy the downloaded agent.installer.win32.win32.x86_1.4.4000.20110525_1254.zip file to a suitable location on your Windows server. Take note of this location for future reference.
— Decompress the ZIP file.
— Run the installer using the following command: install.exe
Once the installer is loaded, follow the steps mentioned next:
1. The IIM installer will begin an installation wizard. The following screen is presented detailing the version of IIM that is going to be installed. You are also given an option to Check for other Versions, Fixes, and Extensions. If you choose this option, IIM will contact the IBM online repositories and scan for IIM updates. Click Next to continue:

2. Read the license agreement, and then select the I accept the terms in the license agreement radio option, and click Next.
3. In the following screen you will be given an option to change the location where the IBM Installation Manager will be installed. Either accept the default location or alter it as per your requirement. We will refer to this path as . Click Next to continue:

4. Review the installation summary information that is presented and click Install to perform the installation.
5. Once the IIM installation has completed, click the Restart Installation Manager button to restart IIM.
Installing WAS using IBM Installation Manager
1. If IIM is not already running, launch IIM. You can use the following commands to launch IIM:
°° For Linux:
/IBMIM
°° For Windows:
\IBMIM.exe
2. Once IIM is loaded, you will be presented with the workbench screen:

3. Before we can install WAS, we need to set the repository location preferences.This will inform IIM where the WAS repository components are located. Using the File menu, select the Preferences option.
In the Preferences page, you can select the location of your WAS binary repositories. If you have a Passport Advantage account, you can set the appropriate authentication settings for downloading the commercial versions of IBM products and install from a local repository.
4. To add a repository location, click the Add Repository button located at the top right-hand corner of the preferences screen.
5. In the Add a repository pop-up dialog, type the following URL in the Repository field:
6. Click OK to add the URL to the Repositories list. You will be prompted by IIM to supply your IBM username and password (IBM ID). If you do not have an IBM ID, click the IBM ID and FAQ link to register. Once you have entered your IBM ID username and password, click OK. A new entry will appear in the Repositories list:

7. Click OK again to close and return to the main workbench screen.
8. From the main workbench screen, locate and click the Install button.
9. IIM will check online for the availability of the latest downloads and fix packs for the trial. Once the process has been completed, a list of installation packages will be presented.
10. Ensure that all the installation packages are selected. Click the Check for other Versions, Fixes and Extensions button and IIM will re-verify the available downloads online. Once the verification is complete, click Next.
11. In the following screen you will be presented with details of the actual WAS binaries and latest fixes that need to be downloaded from the online IBM repository. Click Next to continue.
12. You will now be presented with another license screen, this time for WAS. Read the license agreement, then select the I accept the terms in the license agreement radio option, and click Next.
13. On the next screen, you will be asked to fill out a questionnaire detailing your reason for evaluating WAS. Answer the questions as required and click Next to continue.
14. The next screen defines where the IIM will create the WAS-shared resources folder. This folder contains the files that make up what is known as the installation repository. Accept the default location suggested by the IIM installer, or enter a different one. In the following example, we have used the default provided location /opt/IBM/IMShared. We will refer to the location as . Click Next to move on to the next screen where you will be asked to supply the location to install the WAS binaries:

15. You will now be given an opportunity to decide where you want to install this instance of WAS. Once again, you can decide on a file path that is convenient to your needs. It may be useful to shorten the folder names, which will make it easier for administration later when we need to navigate through the WAS filesystems. For our purposes, we are going to accept the default location in the installation directory field as shown in the following screenshot. Take note of this path. Throughout the book it will be referred to as the path:

16. On the next page, select your preferred language, and click Next again, to move onto the features screen.
17. Within the features screen, you will have the option to install the sample applications provided by IBM for testing JEE concepts and features of WAS. This is an optional choice. You may wish to install the samples for later exploration. There are two other options, which we will leave checked:
• EJBDeploy tool for pre-EJB 3.0 modules:
Provided for backwards compatibility for generating EJB 2.0 deployment code.
• Standalone clients and resource adapters:
Provides a set of clients for a variety of technologies, such as JAX-WS, JAX-RPC, JAX-RS, XML, EJB, JPA, JMS, and others.
18. Consult with your application development team to understand whether you need to incorporate these two options, or not.
— Installing the sample applications will add extra logging information to your installation and clutter the admin console, so it is recommended not to install these applications until you need them. They can be installed using IIM at a later date.
19. Also within the features screen, IIM will have already detected your Operating System (OS) architecture and pre-selected either the 32-bit or 64- bit IBM Software Development Kit option. Ensure this is correct for your OS. Click Next to continue.
20. Click Next to proceed to the final summary screen and review the options you have chosen in the previous steps.
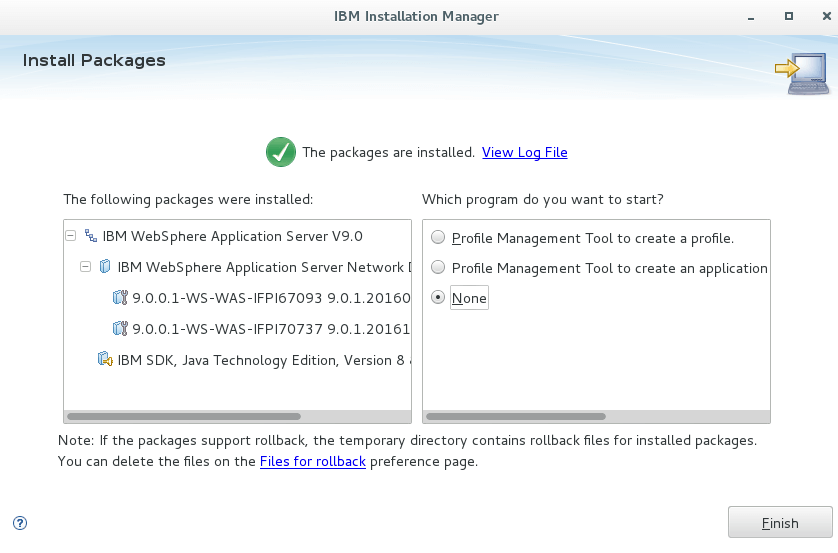
21. Click the Install button to begin the actual WAS installation. Once the installation is complete, you will be given an option to run the Profile Management Tool (PMT) to create a WAS profile. At this stage, we do not want to launch the PMT tool.
22. Select the option labeled None and exit the IBM Installation Manager.
Verifying the installed binaries
All we have installed at this point is the base binaries into the location we specified. By looking at the files installed by the installer, you will see what makes up the base binaries. You will also notice that the folder permissions are rwxr-xr-x (755), which is a result of the 022 umask that we set before we ran the installation wizard.
We will now do a quick check to see if the base binaries have installed correctly by running the WAS command script versionInfo.sh (which is found in the /bin folder). We can generate a report that will identify the state of the installation.
Run the following command:
1. For Linux:
/bin/versionInfo.sh
2. For Windows:
\bin\versionInfo.bat
The result of running the previous command will be a report similar to the following screenshot:

In case of any В©Copyright or missing credits issue please check CopyRights page for faster resolutions.
Источник


