- How to run jupiter notebook on windows
- Getting started with JupyterLab
- Install with conda
- Install with pip
- Run JupyterLab
- Getting started with the classic Jupyter Notebook
- conda
- Getting started with Voilà
- Installation
- conda
- Как настроить Jupyter Notebook для Python 3
- Требования
- Шаг 1. Установка Jupyter Notebook
- Шаг 2 (необязательный). Запуск Jupiter Notebook на сервере
- SSH-туннелирование с помощью Mac или Linux
- SSH-туннелирование с помощью Windows и Putty
- Шаг 3. Запуск Jupyter Notebook локально
- Шаг 4. Использование Jupyter Notebook
- Вывод
- Running the Notebook
- Basic Steps
- Starting the Notebook Server
- Introducing the Notebook Server’s Command Line Options
- How do I open a specific Notebook?В
- How do I start the Notebook using a custom IP or port?В
- How do I start the Notebook server without opening a browser?В
- How do I get help about Notebook server options?В
- 3. Running the Jupyter Notebook
- 3.1. Launching Jupyter Notebook App
- 3.1.1. Change Jupyter Notebook startup folder (Windows)
- 3.1.2. Change Jupyter Notebook startup folder (Mac OS)
- 3.2. Shut down the Jupyter Notebook App
- 3.3. Close a notebook: kernel shut down
- 3.4. Executing a notebook
How to run jupiter notebook on windows
Get up and running with the JupyterLab or the classic Jupyter Notebook on your computer within minutes!
Getting started with JupyterLab
The installation guide contains more detailed instructions
Install with conda
If you use conda , you can install it with:
Install with pip
If you use pip , you can install it with:
If installing using pip install —user , you must add the user-level bin directory to your PATH environment variable in order to launch jupyter lab . If you are using a Unix derivative (FreeBSD, GNU / Linux, OS X), you can achieve this by using export PATH=»$HOME/.local/bin:$PATH» command.
Run JupyterLab
Once installed, launch JupyterLab with:
Getting started with the classic Jupyter Notebook
conda
We recommend installing the classic Jupyter Notebook using the conda package manager. Either the miniconda or the miniforge conda distributions include a minimal conda installation.
Then you can install the notebook with:
If you use pip , you can install it with:
Congratulations, you have installed Jupyter Notebook! To run the notebook, run the following command at the Terminal (Mac/Linux) or Command Prompt (Windows):
Getting started with Voilà
Installation
Voilà can be installed using conda or pip . For more detailed instructions, consult the installation guide.
conda
If you use conda , you can install it with:
If you use pip , you can install it with:
Copyright © 2021 Project Jupyter – Last updated Fri, Apr 02, 2021
Как настроить Jupyter Notebook для Python 3

Jupyter Notebook — это командная оболочка для интерактивных вычислений. Этот инструмент может использоваться не только с Python, но и другими языками программирования: Julia, R, Haskell и Ruby. Он часто используется для работы с данными, статистическим моделированием и машинным обучением.
В статье мы рассмотрим, как настроить Jupyter Notebook для локального запуска или запуска на сервере под управлением Ubuntu 16.04. Этот инструмент поможет создавать файлы (notebooks), которые содержат не только компьютерный код, но и другие элементы (заметки, уравнения, диаграммы, ссылки и т.д.), которыми можно потом поделиться с заказчиками или друзьями.
После прочтения этой статьи вы будете знать, как запускать код Python 3 при помощи Jupyter Notebook локально или на удалённом сервере.
Требования
Нам понадобится среда программирования для Python 3, установленная либо на локальной машине, либо на сервере Ubuntu 16.04.
Шаг 1. Установка Jupyter Notebook
Jupyter Notebook можно установить при помощи пакетного менеджера pip .
В статье будет использоваться виртуальное окружение с именем my_env . Для установки пакета для работы с виртуальным окружением введите следующую команду в терминале:
Теперь мы готовы создать виртуальное окружение. Выбираем каталог, в который все будет установлено, или создаем новый каталог с mkdir :
Как только вы переместитесь в нужную вам директорию, введите следующую команду в терминал:
По сути, pyvenv создает новый каталог, содержащий несколько элементов, которые мы можем просмотреть с помощью команды ls :
Для активации виртуального окружения вам осталось ввести последнюю команду:
Затем нужно убедиться, что pip был обновлен до последней версии:
Теперь можно установить Jupyter Notebook следующей командой:
После этой строчки кода Jupyter Notebook будет установлен в активное виртуальное окружение.
19–21 апреля, Онлайн, Беcплатно
Следующий шаг предназначен для тех, кто хочет подключиться к веб-интерфейсу, используя SSH-туннелирование.
Шаг 2 (необязательный). Запуск Jupiter Notebook на сервере
Для тех, кто установил Jupyter Notebook на удаленный сервер, нужно подключаться к веб-интерфейсу через SSH-туннель. Приложение использует порт 8888 (или же 8889 ), а SSH-туннель поможет обезопасить соединение с сервером.
SSH-туннелирование с помощью Mac или Linux
Для тех, кто работает с macOS или Linux, нужно выполнить следующую команду в окне терминала:
Команда ssh создаст SSH-подключение, а флаг –L перенаправит порт локального или клиентского хоста на хост и порт уделенного сервера. То есть все, что работает на порте 8888 с серверной стороны, будет работать на порте 8888 вашей локальной машины.
При необходимости можно изменить порт 8888 на один из ваших вариантов, чтобы избежать использования порта, который уже используется другим процессом:
- server_username — имя пользователя на сервере (например, sammy );
- your_server_ip — это IP-адрес сервера.
Например, для имени пользователя sammy и адреса сервера 203.0.113.0 команда будет следующей:
Если после запуска команды ssh -L не появляется ошибка, можно переходить в среду программирования и запустить Jupyter Notebook:
После этого, вы получите результат содержащий URL-адрес. Введите его в окне браузера и перейдите к веб-интерфейсу Jupyter Notebook ( http://localhost:8888 ).
SSH-туннелирование с помощью Windows и Putty
Пользователи Windows могут создать туннель SSH, используя программу Putty.
Сначала нужно ввести URL-адрес сервера или IP-адрес имени хоста, как показано ниже на скриншоте:
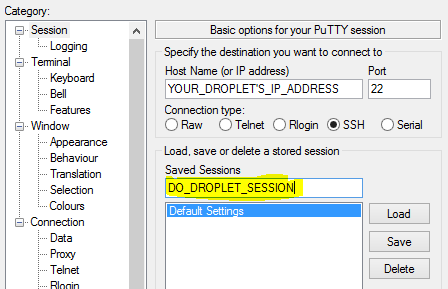
Далее нажимаем SSH внизу левой панели, для раскрытия полного меню и нажимаем на слово Tunnels (туннели). Вводим номер локального порта, который будет использоваться для доступа к Jupyter на локальном компьютере. Выбираем порт 8000 или выше, чтобы избежать совпадения портов, используемых другими службами, и указываем назначение как localhost: 8888 , где: 8888 — это номер порта, через который работает Jupyter Notebook.
Теперь нажмите кнопку Add (добавить), и порты должны появиться в списке Forwarded ports (Переадресованные порты):

И после этого переходим по адресу http://localhost:8000 (или любым другим портом, который вы выбрали) в веб-браузере, чтобы подключиться к Jupyter Notebook, работающему на сервере.
Шаг 3. Запуск Jupyter Notebook локально
После окончания установки Jupyter Notebook можно запустить при помощи следующей команды в терминале:
В терминале выведутся логи Jupyter Notebook. При запуске инструмент использует определенный порт. Обычно это 8888 . Для проверки порта, с которым работает Jupyter Notebook, используйте команду, при помощи которой запускался Jupyter Notebook:
Если вы используете Jupyter Notebook на локальном компьютере, а не на сервере, то при открытии веб-приложения Jupyter Notebook должен открыться ваш браузер по умолчанию. Если этого не произошло, можно открыть браузер вручную и перейти к http://localhost: 8888 для подключения.
Если нужно остановить процессы Jupyter Notebook, то нажмите CTRL + C , а потом Y при появлении запроса на закрытие и ENTER для подтверждения.
Вы получите следующий результат:
Jupyter Notebook остановлен.
Шаг 4. Использование Jupyter Notebook
Пришло время начать использование Jupyter Notebook.
Теперь можно подключиться к нему с помощью веб-браузера. Jupyter Notebook — очень мощный инструмент и имеет множество функций. В этом разделе описываются некоторые основные функции, позволяющие начать работу с ним. Jupyter Notebook покажет все файлы и папки в каталоге, из которого он запущен, поэтому, когда начинается работа над проектом, обязательно нужно запускать его из каталога проекта.
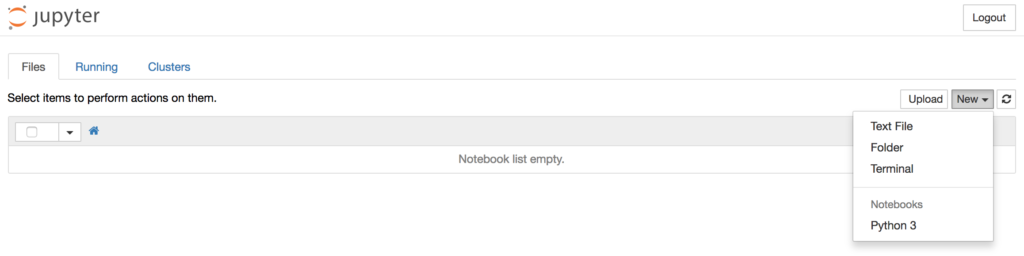
Чтобы создать документ выбираем New → Python 3 в верхнем выпадающем меню:
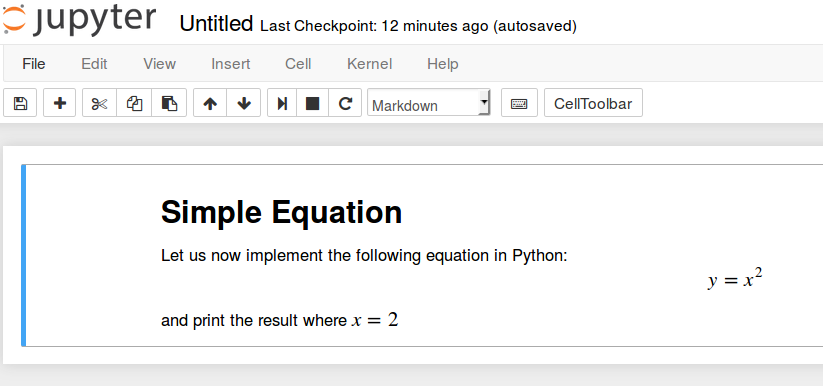
После открытия документа можно запускать код Python в ячейке или использовать язык разметки Markdown. Чтобы изменить первую ячейку для работы с Markdown, нужно нажать в верхней панели навигации Cell → Cell Type → Markdown. Теперь можно создавать заметки с использованием Markdown и даже включать уравнения, написанные в LaTeX, помещая их между символами $$ . Например, попробуем ввести следующую команду в ячейку после включения Markdown:
Чтобы переформатировать Markdown в форматированный текст, нажимаем CTRL + ENTER и получаем следующие результаты:
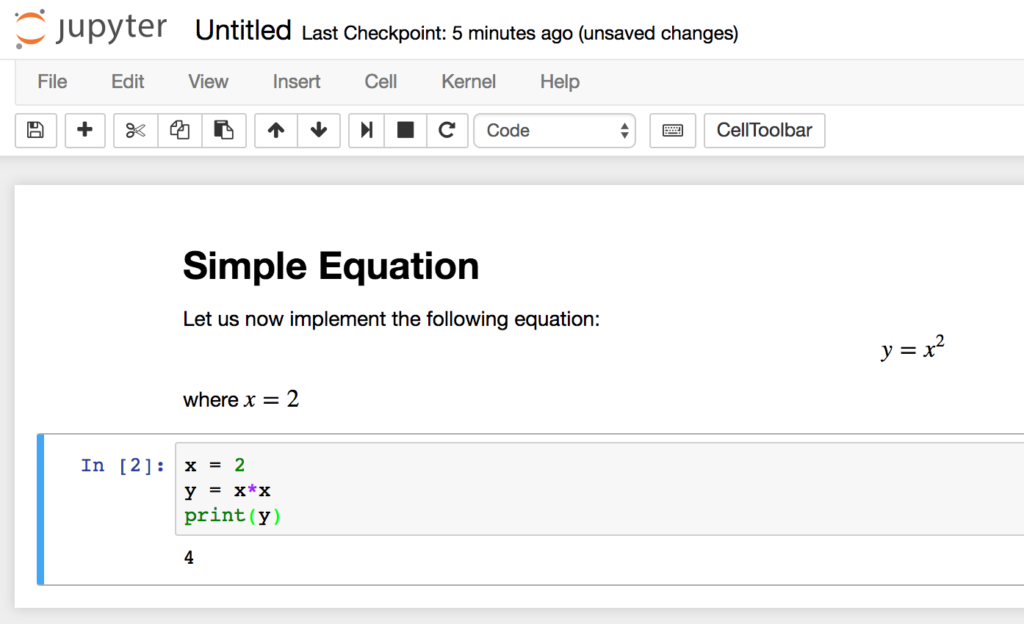
Также можно использовать ячейки Markdown для написания кода. Для теста напишем небольшое уравнение и выведем результат. Нажимаем на верхнюю ячейку, нажимаем ALT+ENTER для создания ячейки под ней и вводим следующий код в новую ячейку:
Чтобы запустить код, нажимаем CTRL + ENTER и получаем следующие результаты:
Теперь у вас есть возможность импортировать модули и использовать Jupyter Notebook так же, как и в любой другой среде разработки Python!
Вывод
Поздравляем! Теперь вы можете написать воспроизводимый код Python и заметки в Markdown с помощью Jupyter Notebook. Для получения справки по использованию Jupyter Notebook нажмите Help → User Interface Tour в главном меню навигации.
Running the Notebook
Basic Steps
Start the notebook server from the command line :
You should see the notebook open in your browser.
Starting the Notebook Server
After you have installed the Jupyter Notebook on your computer, you are ready to run the notebook server. You can start the notebook server from the command line (using Terminal on Mac/Linux, Command Prompt on Windows) by running:
This will print some information about the notebook server in your terminal, including the URL of the web application (by default, http://localhost:8888 ):
It will then open your default web browser to this URL.
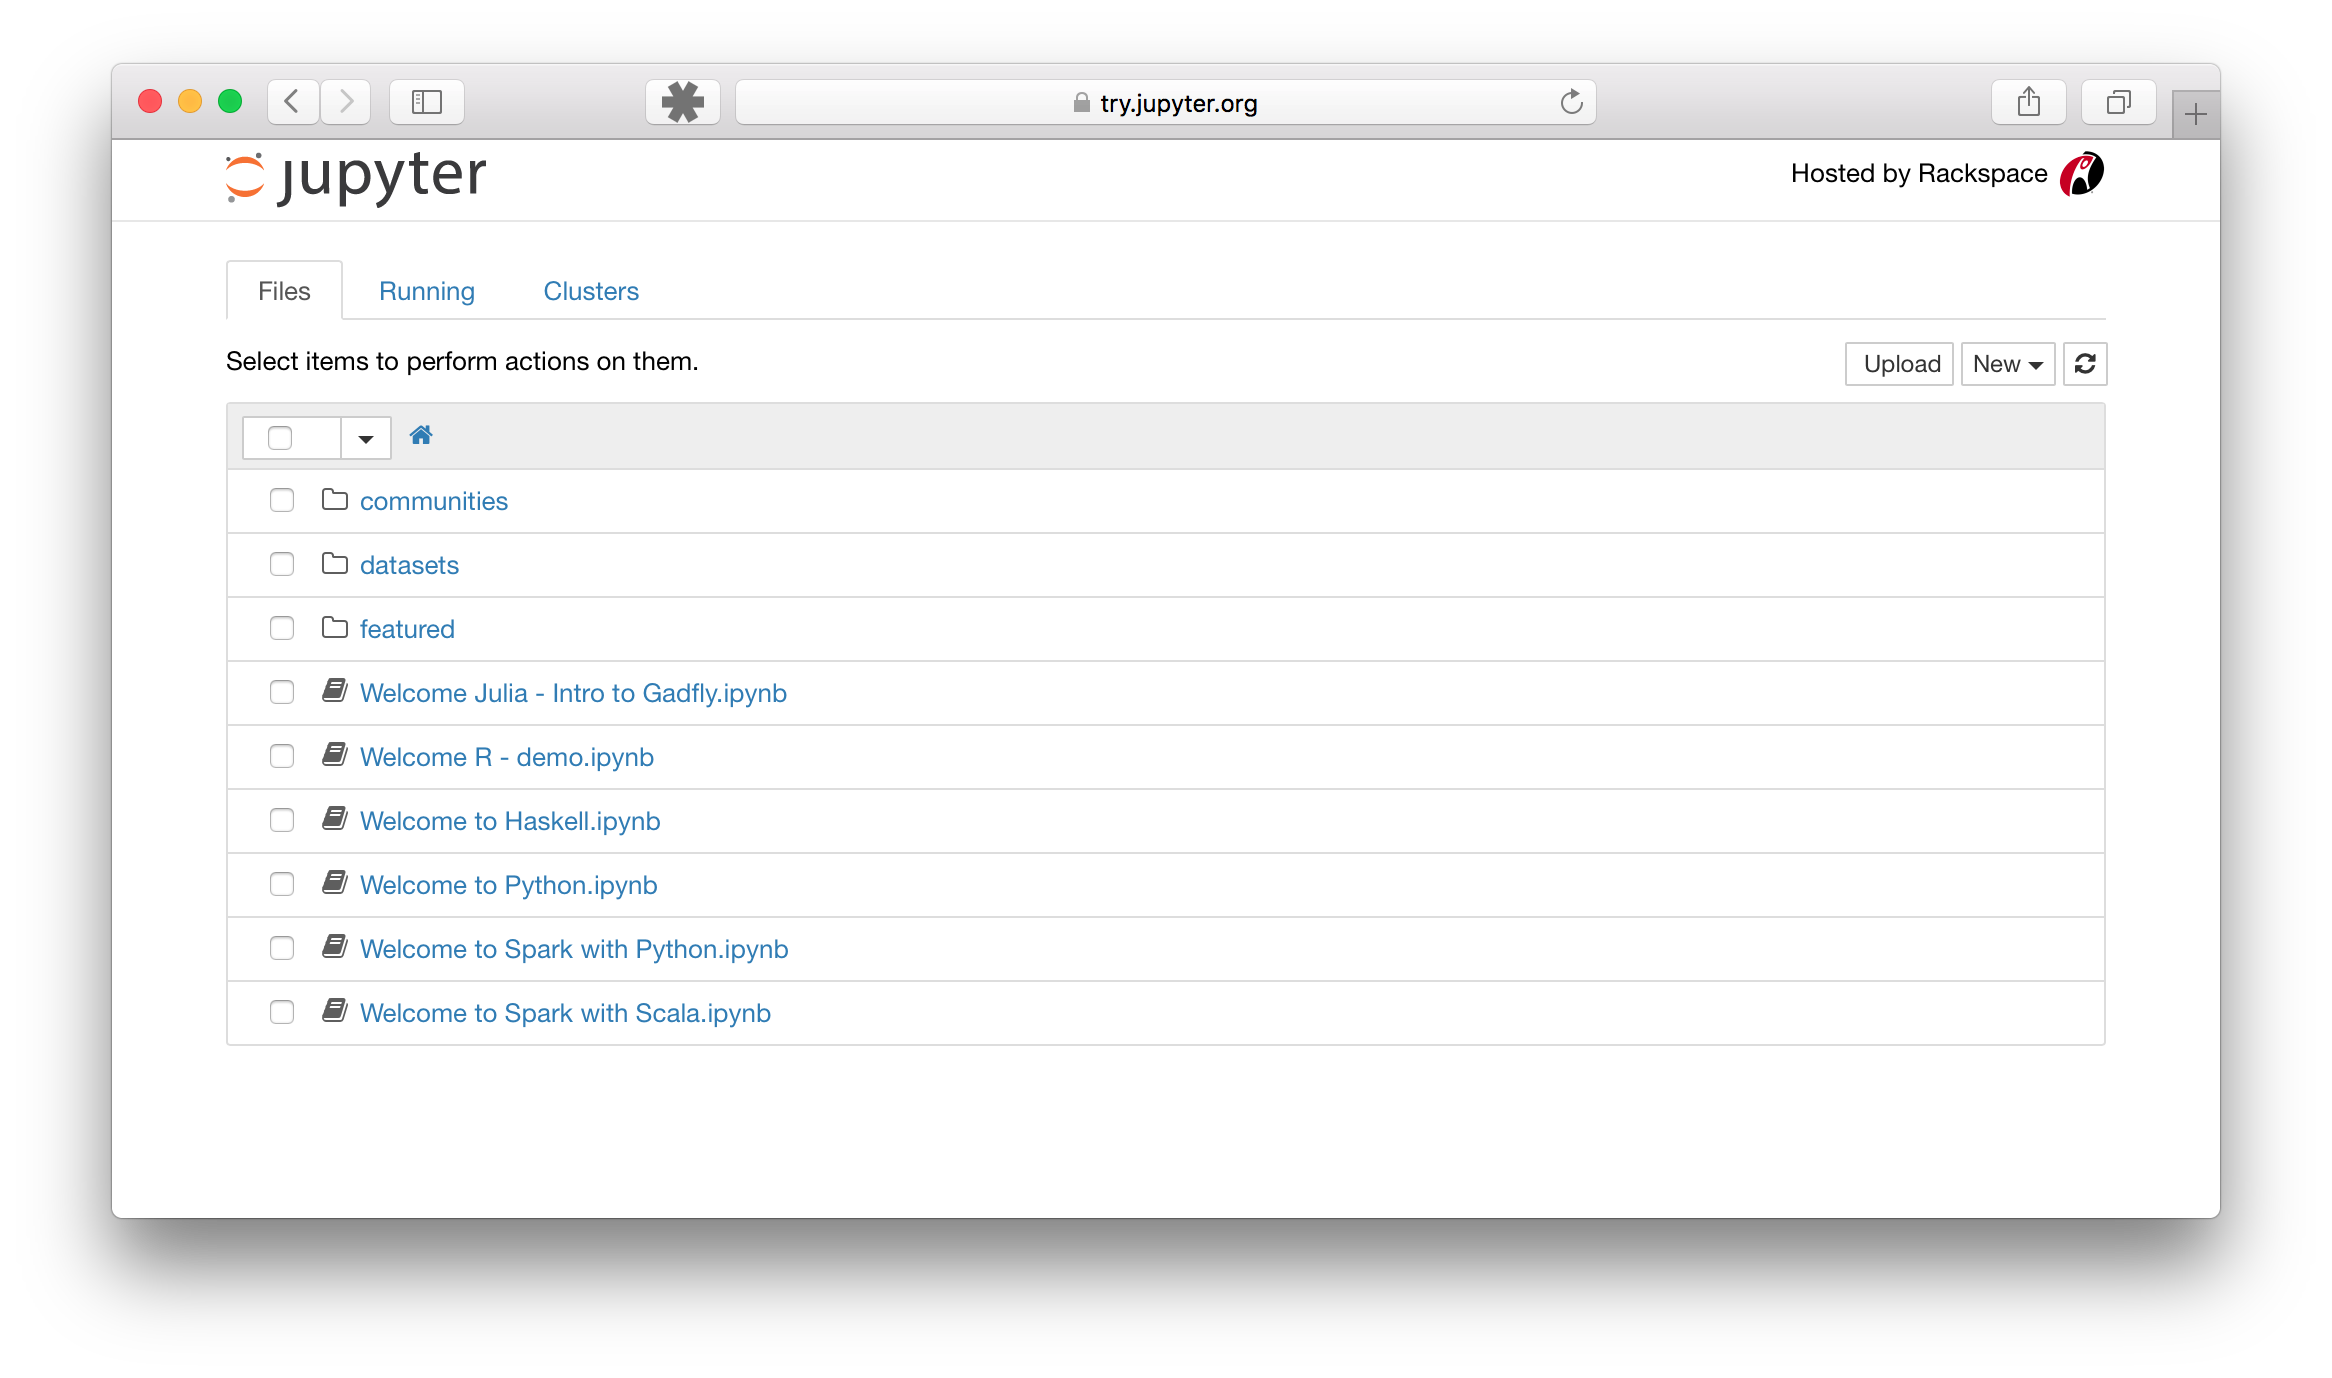
When the notebook opens in your browser, you will see the Notebook Dashboard , which will show a list of the notebooks, files, and subdirectories in the directory where the notebook server was started. Most of the time, you will wish to start a notebook server in the highest level directory containing notebooks. Often this will be your home directory.
Notebook Dashboard
Introducing the Notebook Server’s Command Line Options
How do I open a specific Notebook?В
The following code should open the given notebook in the currently running notebook server, starting one if necessary.
How do I start the Notebook using a custom IP or port?В
By default, the notebook server starts on port 8888. If port 8888 is unavailable or in use, the notebook server searches the next available port. You may also specify a port manually. In this example, we set the server’s port to 9999:
How do I start the Notebook server without opening a browser?В
Start notebook server without opening a web browser:
How do I get help about Notebook server options?В
The notebook server provides help messages for other command line arguments using the —help flag:
Detailed information about command line arguments, configuration, and usage.
3. Running the Jupyter Notebook
3.1. Launching Jupyter Notebook App
The Jupyter Notebook App can be launched by clicking on the Jupyter Notebook icon installed by Anaconda in the start menu (Windows) or by typing in a terminal (cmd on Windows):
This will launch a new browser window (or a new tab) showing the Notebook Dashboard , a sort of control panel that allows (among other things) to select which notebook to open.
When started, the Jupyter Notebook App can access only files within its start-up folder (including any sub-folder). No configuration is necessary if you place your notebooks in your home folder or subfolders. Otherwise, you need to choose a Jupyter Notebook App start-up folder which will contain all the notebooks.
See below for platform-specific instructions on how to start Jupyter Notebook App in a specific folder.
3.1.1. Change Jupyter Notebook startup folder (Windows)
- Copy the Jupyter Notebook launcher from the menu to the desktop.
- Right click on the new launcher and change the Target field , change %USERPROFILE% to the full path of the folder which will contain all the notebooks.
- Double-click on the Jupyter Notebook desktop launcher (icon shows [IPy]) to start the Jupyter Notebook App . The notebook interface will appear in a new browser window or tab. A secondary terminal window (used only for error logging and for shut down) will be also opened.
3.1.2. Change Jupyter Notebook startup folder (Mac OS)
- Click on spotlight, type terminal to open a terminal window.
- Enter the startup folder by typing cd /some_folder_name .
- Type jupyter notebook to launch the Jupyter Notebook App The notebook interface will appear in a new browser window or tab.
3.2. Shut down the Jupyter Notebook App
Closing the browser (or the tab) will not close the Jupyter Notebook App . To completely shut it down you need to close the associated terminal.
In more detail, the Jupyter Notebook App is a server that appears in your browser at a default address (http://localhost:8888). Closing the browser will not shut down the server. You can reopen the previous address and the Jupyter Notebook App will be redisplayed.
You can run many copies of the Jupyter Notebook App and they will show up at a similar address (only the number after “:”, which is the port, will increment for each new copy). Since with a single Jupyter Notebook App you can already open many notebooks, we do not recommend running multiple copies of Jupyter Notebook App .
3.3. Close a notebook: kernel shut down
When a notebook is opened, its “computational engine” (called the kernel ) is automatically started. Closing the notebook browser tab, will not shut down the kernel , instead the kernel will keep running until is explicitly shut down.
To shut down a kernel, go to the associated notebook and click on menu File -> Close and Halt. Alternatively, the Notebook Dashboard has a tab named Running that shows all the running notebooks (i.e. kernels) and allows shutting them down (by clicking on a Shutdown button).
3.4. Executing a notebook
Download the notebook you want to execute and put it in your notebook folder (or a sub-folder of it).
Then follow these steps:
- Launch the Jupyter Notebook App (see previous section ).
- In the Notebook Dashboard navigate to find the notebook: clicking on its name will open it in a new browser tab.
- Click on the menu Help -> User Interface Tour for an overview of the Jupyter Notebook App user interface.
- You can run the notebook document step-by-step (one cell a time) by pressing shift + enter.
- You can run the whole notebook in a single step by clicking on the menu Cell -> Run All.
- To restart the kernel (i.e. the computational engine), click on the menu Kernel -> Restart. This can be useful to start over a computation from scratch (e.g. variables are deleted, open files are closed, etc…).
More information on editing a notebook:
Save notebooks: modifications to the notebooks are automatically saved every few minutes. To avoid modifying the original notebook, make a copy of the notebook document (menu File -> Make a copy …) and save the modifications on the copy.
Pay attention to not open the same notebook document on many tabs: edits on different tabs can overwrite each other! To be safe, make sure you open each notebook document in only one tab. If you accidentally open a notebook twice in two different tabs, just close one of the tabs.
More info on the Jupyter Notebook App environment see References .


