- Install PyCharm
- System requirements
- Install using the Toolbox App
- Install the Toolbox App
- Install the Toolbox App
- Install the Toolbox App
- Standalone installation
- Install using tar archives
- Install using snap packages
- Silent installation on Windows
- Silent configuration file
- Установка PyCharm в Ubuntu
- Особенности PyCharm
- Установка PyCharm Ubuntu
- 1. Пакетный менеджер snap
- 2. Центр приложений
- 3. Официальный сайт
- Первый запуск PyCharm
- Удаление PyCharm
- Выводы
- How to Install Python IDE PyCharm in Ubuntu and Other Linux Distributions
- Method 1: Install PyCharm in Ubuntu and other Linux using Snap [Easy]
- Method 2: Install PyCharm in Linux using official Linux installer from JetBrains [Intermediate level]
Install PyCharm
PyCharm is a cross-platform IDE that provides consistent experience on the Windows, macOS, and Linux operating systems.
PyCharm is available in three editions: Professional , Community , and Edu . The Community and Edu editions are open-source projects and they are free, but they have fewer features. PyCharm Edu provides courses and helps you learn programming with Python. The Professional edition is commercial, and provides an outstanding set of tools and features. For details, see the editions comparison matrix.
System requirements
| Requirement | Minimum | Recommended |
|---|---|---|
| RAM | 4 GB of free RAM | 8 GB of total system RAM |
| CPU | Any modern CPU | Multi-core CPU. PyCharm supports multithreading for different operations and processes making it faster the more CPU cores it can use. |
| Disk space | 2.5 GB and another 1 GB for caches | SSD drive with at least 5 GB of free space |
| Monitor resolution | 1024×768 | 1920×1080 |
| Operating system | Latest 64-bit version of Windows, macOS, or Linux (for example, Debian, Ubuntu, or RHEL) |
You do not need to install Java to run PyCharm because JetBrains Runtime is bundled with the IDE (based on JRE 11).
Python 2: version 2.7
Python 3: from the version 3.6 up to the version 3.10
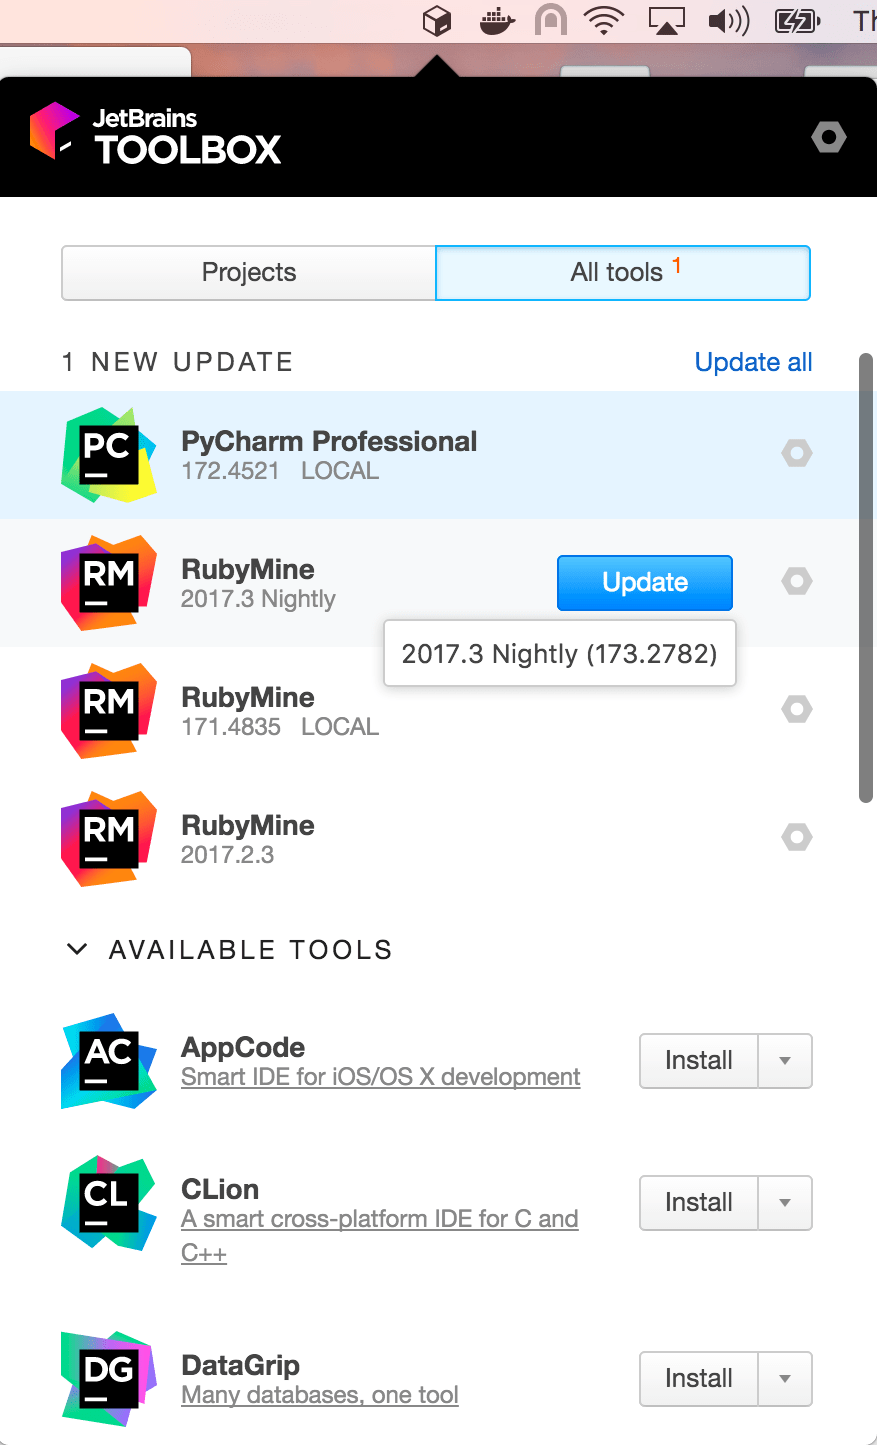
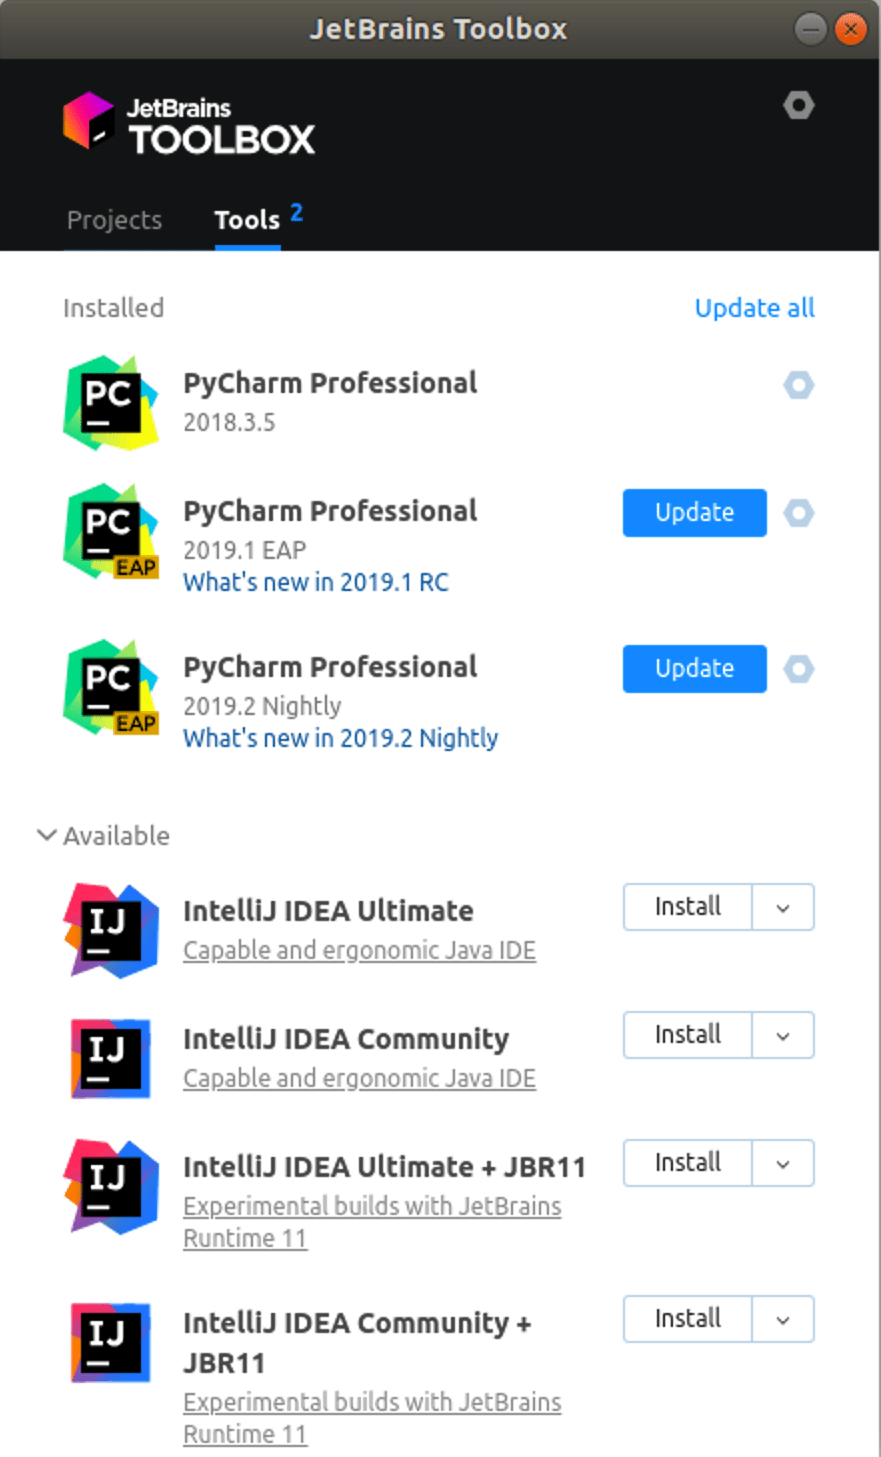
Install using the Toolbox App
The JetBrains Toolbox App is the recommended tool to install JetBrains products. Use it to install and manage different products or several versions of the same product, including Early Access Program (EAP) and Nightly releases, update and roll back when necessary, and easily remove any tool. The Toolbox App maintains a list of all your projects to quickly open any project in the right IDE and version.
Install the Toolbox App
Download the installer .exe from the Toolbox App web page.
Run the installer and follow the wizard steps.
After you run the Toolbox App, click its icon in the notification area and select which product and version you want to install.

Log in to your JetBrains Account from the Toolbox App and it will automatically activate the available licenses for any IDE that you install.
Install the Toolbox App
Download the disk image .dmg from the Toolbox App web page.
There are separate disk images for Intel and Apple Silicon processors.
Mount the image and drag the JetBrains Toolbox app to the Applications folder.
After you run the Toolbox App, click its icon in the main menu and select which product and version you want to install.
Log in to your JetBrains Account from the Toolbox App and it will automatically activate the available licenses for any IDE that you install.
Install the Toolbox App
Download the tarball .tar.gz from the Toolbox App web page.
Extract the tarball to a directory that supports file execution.
For example, if the downloaded version is 1.17.7391, you can extract it to the recommended /opt directory using the following command:
Execute the jetbrains-toolbox binary from the extracted directory to run the Toolbox App and select which product and version you want to install. After you run the Toolbox App for the first time, it will automatically add the Toolbox App icon to the main menu.
Log in to your JetBrains Account from the Toolbox App and it will automatically activate the available licenses for any IDE that you install.
You can use this shell script that automatically downloads the tarball with the latest version of the Toolbox App, extracts it to the recommended /opt directory, and creates a symbolic link in the /usr/local/bin directory.
Standalone installation
Install PyCharm manually to manage the location of every instance and all the configuration files. For example, if you have a policy that requires specific install locations.
To verify the integrity of the installer, use the SHA checksum linked from the Download page.
Run the installer and follow the wizard steps.
Mind the following options in the installation wizard
64-bit launcher : Adds a launching icon to the Desktop.
Open Folder as Project : Adds an option to the folder context menu that will allow opening the selected directory as a PyCharm project.
.py : Establishes an association with Python files to open them in PyCharm.
Add launchers dir to the PATH : Allows running this PyCharm instance from the Console without specifying the path to it.
To run PyCharm, find it in the Windows Start menu or use the desktop shortcut. You can also run the launcher batch script or executable in the installation directory under bin .
There are separate disk images for Intel and Apple Silicon processors.
To verify the integrity of the downloaded disk image, use the SHA checksum linked from the Download page.
Mount the image and drag the PyCharm app to the Applications folder.
Run the PyCharm app from the Applications directory, Launchpad, or Spotlight.
Install using tar archives
Unpack the pycharm-*.tar.gz file to a different folder, if your current Download folder doesn’t support file execution:
The recommended installation location according to the filesystem hierarchy standard (FHS) is /opt . To install PyCharm into this directory, enter the following command:
To verify integrity of the downloaded archive, use the SHA checksum linked from the Download page.
Switch to the bin subdirectory:
Run pycharm.sh from the bin subdirectory.
Install using snap packages
For Ubuntu 16.04 and later, you can use snap packages to install PyCharm.
PyCharm is distributed via two channels:
The stable channel includes only stable versions. To install the latest stable release of PyCharm, run the following command:
The —classic option is required because the PyCharm snap requires full access to the system, like a traditionally packaged application.
The edge channel includes EAP builds. To install the latest EAP build of PyCharm, run the following command:
Run pycharm-professional , pycharm-community , or pycharm-educational in the Terminal.
To create a desktop entry, do one of the following:
On the Welcome screen, click Configure | Create Desktop Entry
From the main menu, click Tools | Create Desktop Entry
When you run PyCharm for the first time, some steps are required to complete the installation, customize your instance, and start working with the IDE.
For information about the location of the default IDE directories with user-specific files, see Directories used by the IDE.
Silent installation on Windows
Silent installation is performed without any user interface. It can be used by network administrators to install PyCharm on a number of machines and avoid interrupting other users.
To perform silent install, run the installer with the following switches:
/S : Enable silent install
/CONFIG : Specify the path to the silent configuration file
/D : Specify the path to the installation directory
This parameter must be the last in the command line and it should not contain any quotes even if the path contains blank spaces.
To check for issues during the installation process, add the /LOG switch with the log file path and name between the /S and /D parameters. The installer will generate the specified log file. For example:
Silent configuration file
The silent configuration file defines the options for installing PyCharm. With the default options, silent installation is performed only for the current user: mode=user . If you want to install PyCharm for all users, change the value of the installation mode option to mode=admin and run the installer as an administrator.
The default silent configuration file is unique for each JetBrains product. You can modify it to enable or disable various installation options as necessary.
It is possible to perform silent installation without the configuration file. In this case, omit the /CONFIG switch and run the installer as an administrator. Without the silent configuration file, the installer will ignore all additional options: it will not create desktop shortcuts, add associations, or update the PATH variable. However, it will still create a shortcut in the Start menu under JetBrains .
Источник
Установка PyCharm в Ubuntu
PyCharm — это одна из лучших сред разработки для написания программ на языке Python. Программа распространяется как в профессиональной версии, которая стоит денег, так и в версии для сообщества. Профессиональная версия имеет больше возможностей, в этой статье будет рассмотрена установка PyCharm в Ubuntu, как профессиональной, так и бесплатной версии.
Все рассмотрено очень подробно, поэтому проблем с установкой возникнуть не должно. Но сначала давайте рассмотрим отличительные особенности этой IDE.
Особенности PyCharm
Среда разработки программного обеспечения на языке Python имеет такие особенности:
- Подсветка синтаксиса;
- Автоотступы и форматирование кода;
- Автозавершение кода;
- Подсветка блочных и строковых комментариев;
- Выделение ошибок в реальном времени;
- Сворачивание фрагментов кода;
- Легкая навигация по коду и поиск;
- Анализ кода;
- Настраиваемые вставки кода;
- Рефракторинг Python;
- Документация.
Отличия между профессиональной платной версией и бесплатной вы можете посмотреть на официальной странице.
Установка PyCharm Ubuntu
1. Пакетный менеджер snap
С современных версиях Ubuntu, в том числе в Ubuntu 20.04 можно установить PyCharm с помощью пакетного менеджера snap. Для установки профессиональной версии выполните:
sudo snap install pycharm-professional —classic
А для установки редакции community:
sudo snap install pycharm-community —classic
Есть ещё версия для образовательных учреждений, для её установки выполните:
sudo snap install pycharm-educational —classic

После завершения установки программа будет доступна в главном меню.
2. Центр приложений
Вы можете установить Pycharm с помощью центра приложений, для этого простой найдите программу в поиске:

Затем нажмите кнопку Установить:

3. Официальный сайт
На официальном сайте программы доступны архивы с исполняемыми файлами программы для Community и Professional версии, скачайте нужный вам вариант:

Затем распакуйте полученный архив:
Затем запустить программу можно из подкаталога pycharm-community-2020.2.1/bin:
Для удобства вы можете создать ярлык для этой команды.
Первый запуск PyCharm
При первом запуске программа попросит принять лицензионное соглашение:

Выберите надо ли передавать данные об использовании программы разработчикам:

Затем выберите тему оформления:

После этого программа предложит вам создать новый проект и вы сможете пользоваться PyCharm:

Удаление PyCharm
Чтобы удалить PyCharm, установленный с помощью пакетного менеджера snap используйте такую команду:
sudo snap remove pycharm-community
Для удаления профессиональной редакции выполните:
sudo snap remove pycharm-professional
Для удаления версии, установленной из официального сайта достаточно удалить папку, в которую вы её распаковали.
Выводы
Это все, что вам нужно знать про то как выполняется установка PyCharm Ubuntu 20.04. Если у вас остались вопросы, спрашивайте в комментариях!
Источник
How to Install Python IDE PyCharm in Ubuntu and Other Linux Distributions
Last updated October 29, 2020 By Abhishek Prakash 64 Comments
A quick tutorial to show you how to install PyCharm in Ubuntu and other Linux Distributions.
PyCharm is an IDE for Python development and has been considered as one of the best Python IDE by the experts.
The IDE comes in professional and community edition. The community edition is free of cost, but professional edition has more features.
The full list of features can be found here. You can read this comparison between professional and community edition to decide which version is suitable for you.

The installation steps are pretty much the same for all PyCharm editions.
Let’s have a look at the features of PyCharm IDE:
- Syntax highlighting
- Auto-Indentation and code formatting
- Code completion
- Line and block commenting
- On-the-fly error highlighting
- Code snippets
- Code folding
- Easy code navigation and search
- Code analysis
- Configurable language injections
- Python refactoring
- Documentation
Method 1: Install PyCharm in Ubuntu and other Linux using Snap [Easy]
Good news is that PyCharm is available in the Ubuntu Software Center as a Snap package. Which means that you can search for it in the software center and install it from there.
If you are using some other Linux distribution, enable snap support first and then use the snap command to install the PyCharm Community Edition:
To remove PyCharm, you may use this command:
Note: Students with an academic email can request access to PyCharm Professional Edition for free! This also applies to developers working on Open Source projects which are non-commercial. More information on other initiatives for free access and discounts can be found here.
Method 2: Install PyCharm in Linux using official Linux installer from JetBrains [Intermediate level]
If you do not like Snap packages, there are other ways to install PyCharm. PyCharm provides an installer for Linux and I am going to show you how to use it.
Go to PyCharms Download page and download the tar.gz files for either of the Professional or Community version. I am using Community version in the tutorial.

Follow these commands one by one but do keep in mind that you may have to replace “pycharm-community-2020.1.1.tar.gz” and “pycharm-community-2020.1.1” with the file and folder name of your download.
Go to Downloads where you have downloaded the PyCharm:
Now extract the tar gz file using the tar command in this way:
Now enter the extracted PyCharm folder:
Go to its bin folder:
You’ll find a shell script here. Make sure that you have execute permission:
Now run this shell script:

PyCharm starts running now. In the first run, it will ask you to accept privacy policy:

Then JetBrains will ask whether you would like to send data about features, plugins, and other data. If you wish to send the data, you can hit the “Send Anonymous Statistics” button, or you can click on the “Don’t Send” button.

Now, PyCharm will ask you to set up the IDE. So simply start by choosing the UI theme, creating a launcher script, and adding plugins.

Once the installation is completed, you will get to see a screen like the one below:

It will be a good idea to create desktop entry so that you can search for PyCharm in the system menu and start it from there.
Now click on the Configure option and click on “Create Desktop Entry”.

On the next screen, you will be asked if you wish to create the entry for all users or not. Set the settings according to your preference and click on the OK button.

Now, you’ll be able to search for PyCharm like any other Linux application.

Enjoy PyCharm in Linux.
Ubuntu provide a wonderful command line tool, umake for developers. umake lets you easily install a number of development tools in Ubuntu such as Android Studio, Visual Studio Code, Ubuntu SDK, Eclipse, Arudino Software Distribution etc. PyCharm is also one of the development tools included in the umake.
To install PyCharm using umake, you need to have umake first. Normally, it should already be installed in your system, get the latest stable version of umake:
Once you have umake, use the command below to install PyCharm Community Edition in Ubuntu:
To install PyCharm Professional Edition (you need license for this), you can use the command below:
To remove PyCharm installed via umake, use the command below:
We’ll be using an unofficial PPA to easily install PyCharm in Ubuntu. I am using Ubuntu 15.04 but this PPA is also available for Ubuntu 14.04. You can use the same method to install PyCharm in Linux Mint 17, elementary OS Freya and other Ubuntu based Linux distributions. PyCharm uses Java so make sure to install Java in Ubuntu beforehand.
Open a terminal and use the following commands:
To install the community edition of PyCharm, use the command below. It will download data of around 120 MB.
To install the professional edition of PyCharm, use the command below. It will download data of around 160 MB.
Once installed, go to Unity Dash and search for PyCharm and you should be able to see it running. This is what it looked like on my Ubuntu 15.04:

That’s all you need to do. I hope this tutorial helped you to install PyCharm in Ubuntu and other Linux distributions. Any questions or suggestions are always welcomed.
Like what you read? Please share it with others.
Источник


