- How to make Windows 10 look like Mac [SUPER EASY]
- How to make your PC look like a mac?
- Download a Mac SkinPack
- Download the Mac OS Transformation Pack
- MAC-related features on Windows
- How to make Windows 10 look like Mac
- Make Windows 10 look like Mac
- 1] Lightshot
- 2] Seer: Quick Look Tool
- 3] Quick Time Screen Recording
- 4] Universal Search using Cortana (WIN Q) or use WOX
- 5] WinLaunch
- 7 ways to make your PC look like a Mac
- Make Windows 10 Look Like macOS Big Sur
- How to Make Ubuntu Look Like macOS in 5 Easy Steps
- How to give your Ubuntu Linux a macOS makeover
- Prerequisites: GNOME Tweaks and GNOME Extensions
- Step 1: Install a macOS inspired GTK theme
- Step 2: Install macOS like icons
- Step 3: Add macOS like dock
- Step 4: Use macOS wallpaper
- Step 5: Change system fonts
- Bonus Tip: Spotlight like app launcher (if you want to go the extra mile)
How to make Windows 10 look like Mac [SUPER EASY]


If you like the Mac interface or if you used it before but you would like to also stay with your Windows 10 operating system, you now have the possibility to make your Windows 10 look like Mac with the help of a few apps.
In this manner, you’ll make your PC look like a Mac with just a couple of clicks and a Mac theme for Windows 10.
The desktop will look exactly like a Mac but your operating system will still function under Windows 10. Also, you can have access to all the Windows 10 features as you did before.
With no changes in the functionality department, you’ll just make Windows feel like Mac.
Making your Windows desktop look like Mac OS can be done very easily and in just a couple of minutes of your time.
You will only have to carefully follow the tutorial posted below and you will be ready to use your new apple theme for Windows 10.
How to make your PC look like a mac?
Download a Mac SkinPack
- You can download a Mac theme for Windows 10 by following the link below:
- Download Mac theme for Windows 10
Note 1: Before you download your Mac theme for Windows, check if you are downloading the pack for Windows 10. Be sure to look for a pack that is compatible with your Windows 10 system and also one that is either for a 32-bit system or a 64-bit system.
Note 2: Another thing you need to keep in mind is the System Restore feature. It would be highly recommended to create a system restore point before you download the skin packs just in case something goes wrong during the installation or if you cannot uninstall them.
- Download Mac theme for Windows 10
- To create a system restore on Windows 10, press and hold the “Windows” button and the “X” button and left click from that menu on “System”.
- On the left side-panel, in the “Find a setting” search box, type “restore” and click on Create a restore point.
- Now you should have a window with “System properties” in front of you. Left click on the “Create” button you are presented there and give a name to the restore session that you will create.
- Proceed with the system restore.
- You can go ahead with the installation of the Windows 10 Mac OS skin.
Note: During the installation, you will be asked what features you want to have from the mac interface. You can choose the features as you see fit. - After the skin pack finishes the installation you will have to restart your Windows 10 PC.
Note: If you have any issues after the restart of the Windows 10 PC, you can do a “Safe mode” boot and disable any of the features that are causing the issues.
Download the Mac OS Transformation Pack
You can also download and install the Mac OS transformation pack. With the help of this tool, you can make Windows feel like Mac.
The pack includes a great number of changes, but it’s easy to install and use. It brings Mac themes, wallpapers, as well as new OS X features to your Windows computer.
MAC-related features on Windows
There are other interesting MAC-related things that you can do on a Windows PC. We will show you the most popular and used MAC features on Windows PC’s. Here they are:
Now that you have your Windows 10 Mac OS skin up and running on your PC, you can start testing it and see if it fits your needs.
Don’t hesitate to write us below if you are unable to install the Mac theme for Windows on your PC, and we’ll be sure to help you succeed.
How to make Windows 10 look like Mac
The macOS offers some inbuilt features that make the OS popular. The OS has been designed to make sure the creators get the maximum benefit and get their job done rather quickly. I used to admire the app launcher, but now I am ok with the taskbar and start menu combination. If you are looking for a way to get some Mac features on Windows 10 and make Windows 10 look like macOS, then you are in the right place.
Make Windows 10 look like Mac
While Windows 10 has evolved a lot, but there are features I would love to have on Windows. In this post, I have shared a few tools which bring in those functionalities to Windows 10. These will make Windows 10 look like Mac.
1] Lightshot
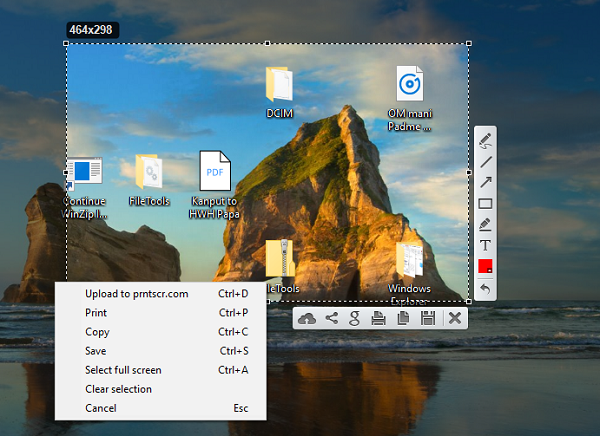
macOS has an inbuilt screen recorder and screenshot feature. It’s extensive and makes macOS a very user-friendly for creators. While Windows 10 has Snip and also a lot of third party tools for taking a screenshot, Lightshot wins by a great margin. Once you install it, use print screen to trigger it.
Then just like on macOS, Command-Shift-4, it reveals the selector. You can then select an area. It will instantly offer editing tools, annotate, highlight, option to share, save or print the screenshot.
2] Seer: Quick Look Tool
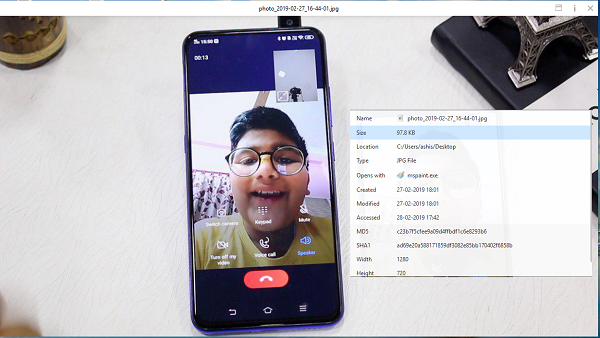
On macOS, when you select a file and hit the spacebar, it shows a preview of the file including the content. You don’t need to double click to open or right click to view properties. The best part is you can also customize Seer. To further customize, you can open settings and configure:
- Keyboard shortcuts
- Install Plugins to enhance its functionality like rename, ExifTool, and so on
- Font support
- Change Language
Apart from this software, you can also try the QuickLook app from Microsoft Store. It offers the following actions:
- Spacebar: Preview/Close Preview
- Esc: Close Preview
- Enter: Run & Close Preview
- Ctrl+Mouse Wheel: Zoom Images/Documents
- Mouse Wheel: Adjust Volume
Using these you can zoom into documents, switch between files by hitting the arrow key, and also choose which program to use to open different file types.
3] Quick Time Screen Recording
You can use the Xbox App to record a small video quickly. Also called as GAME DVR, it can record almost anything on Windows though it is primarily for recording Xbox Game clips. But since most of the third-party software is paid, this comes in handy to record without installing anything.
4] Universal Search using Cortana (WIN Q) or use WOX
macOS universal search tool is one of the best-inbuilt features. All you need to do is hit the spacebar, and it reveals a search box. You can use it to find almost anything. Windows offers a similar experience with Cortana search. All you need to do is invoke it by with Win + Q keyboard shortcut and start searching.
One small drawback of this is that it also displays search results from Bing. There is an equally good alternative–Wox. Once installed you can configure it to launch when you hit the space bar. It will pop up a search box where you can type to find what you want to see on Windows.
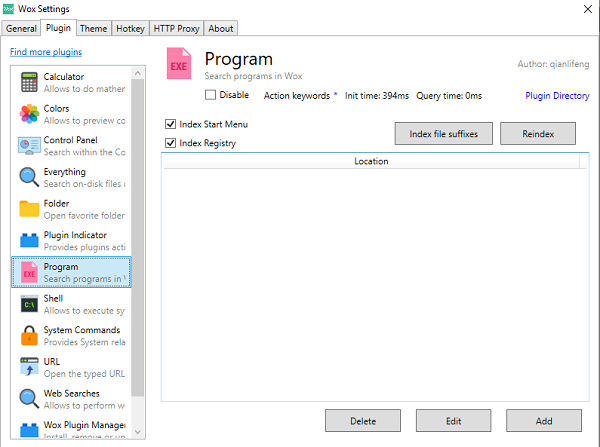
The best part of Wox is that its open source supports plugins, you can customize hotkeys, disable it on full screen, execute command line tools, search within the Control Panel, and it replaces your run prompt.
5] WinLaunch
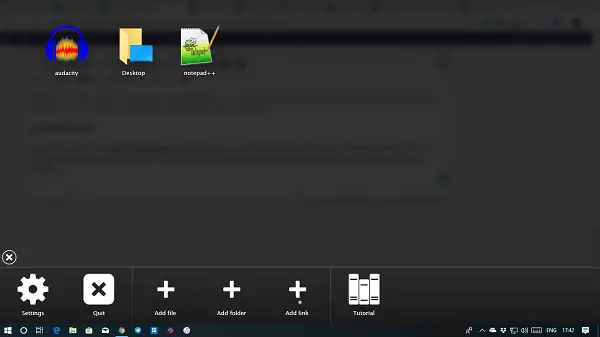
If you want to have macOS like launcher on Windows 10, you need to try WinLaunch. You can add programs, files, URLs to it. To launch all you need to do is hit SHIFT + TAB, and it will reveal the blurred background with the list of apps you added to the launcher.
As you can see here, we aren’t trying to convert your Windows completely into Mac. Instead, we are trying to bring only some useful features.
7 ways to make your PC look like a Mac
By Adam Oxford 11 November 2008
Fed up with Windows monotony? Add a little Apple magic!
Fed up with the dull appearance of your PC? Prefer the aesthetics on the Apple side of life? One of the more interesting new features of Windows 7 will be the increased number of options you’ll have to tweak the appearance of the desktop. Clearly the growing number of restrictions each generation of the OS has foisted onto users in the name of branding hasn’t worn well with Joe the Plumber, and Microsoft is freeing us up to set up our work areas the way we want them again.
Why wait for Windows 7 though? There are loads of ways you can fiddle with Vista’s interface and cheer up the depressing and omnipresent black bars. To show you some of the options out there here are seven tricks for dealing with that most common of Windows’ viruses: Mac-envy.
1. Move your taskbar to the top of your screen
Simple, but an easy one to miss. A Mac is like looking in the mirror. If you have a tall monitor, working with the taskbar at the top of the screen makes life a little easier on the eyes, but it’s mostly down to preference.
2. Install a dock
The OSX dock is a simple way to launch regularly used programs. There are two well known versions of it for Vista, StarDock’s ObjectDock or RocketDock. Of the two, we prefer RocketDock’s look and feel, and the fact that there’s no charge for extra applets.
3. Get Expose
Adding in background apps to Windows isn’t always a good idea – they can seriously slow down your PC. If you want a better window browser than Vista’s Win+Tab feature, try the Expose-like Switcher 2.0.0 app from insentient.net.
4. Throw in Widgets
It’s easy to forget that you can actually detach Sidebar gadgets in Vista and position them wherever you want, then just use Win+D to show and hide them. Alternatively, you could install Yahoo! Widgets for a more colourful, Apple Dashboard-like experience.
5. Completely reskin Windows
Heavy duty editing of the Windows look is going to require a third party app like StarDock’s WindowBlinds – but it will cost you. Alternatively, there’s the complete OSX clone FlyAKite, which you can try in your browser at the link. Be warned, though, installing it will change important Windows files and there’s no bug fixing development on the way.
6. Get some Spaces
Multiple work areas are nothing new, but Apple likes to point out their existence in Leopard. Give yourself some extra room for Windows with DeskSpace.
7. That’s the look
You can customise Vista without installing extra software, but it usually involves a lot of tweaking. Why not visit MyVistaThemes and try out a new look? The inevitable MacOS one is available, while there’s also a tutorial to help install it here.
Make Windows 10 Look Like macOS Big Sur
Apple has recently released the new version of their flagship operating system macOS. The new version of macOS is being called Big Sur. If you are not an Apple user and are using a Windows PC, then you can also get some fun by making your Windows 10 PC look like macOS Big Sur.
If you want to make your Windows 10 PC look like the latest version of Apple macOS Big Sur then you can follow these steps:
- Download and install RocketDock from https://punklabs.com/.
- Download macOS Big Sur pack for RocketDock from https://www.deviantart.com/maiguris/art/macOS-BigSur-For-RocketDock-847338077.
- From the downloaded ZIP file, extract all the folders beginning with Big Sur into C:\Program Files (x86)\RocketDock\Skins. Similarly, extract the icons folder from the ZIP to any folder on your hard drive.

- Right-click on RocketDock and choose Dock Settings. In the settings, select Style section and then choose any of the Big Sur themes – Big Sur Light, Big Sur Night, Big Sur RoundedNight, Big Sur RoundedLight.
- Right-click on RocketDock, choose Icon settings, click on the + icon and add the icon folder from step 3. Select the newly added folder and click OK.
- Right-click on Windows Taskbar and select Taskbar settings. Select the option, Automatically hide the taskbar in desktop mode. This will hide the taskbar on your Windows desktop.
- In the RocketDock settings, select Position section and choose Bottom as screen position.
- Download Windows 10 themes from https://www.deviantart.com/niivu/art/Big-Sur-Windows-10-Suite-849525656. Extract the contents of Themes folder from the ZIP into C:\Windows\Resources\Themes.
- Download UltraUxThemePatcher from https://mhoefs.eu/software_uxtheme.php. Use this to patch your theme files in Windows 10.
- Restart your Windows PC and choose macOS Big Sur themes by right-clicking on Windows desktop and choosing Personalization.


This is it, now you have macOS Big Sur theme installed on your Windows 10 PC complete with a dock. Now your Windows PC must be looking like macOS Big Sur. For extra effect, you can even change the wallpaper to macOS wallpapers which are available all over the internet.
How to Make Ubuntu Look Like macOS in 5 Easy Steps
Last updated October 1, 2020 By Community 52 Comments
Customization is one of the main reasons why I use Linux. There is no end to the kind of customization you can do to your desktop Linux. You can change icons, themes, change fonts, change terminals, add screenlets, indicator applets, extensions and what not.
We have covered numerous desktop customization tips and tricks on It’s FOSS. In this one, I’ll show you how to make Ubuntu look like macOS.
Many people use macOS because of its simplistic and elegant look. You may disagree with it but it remains a popular opinion. Even there are Linux distributions that have macOS like look and feel.
One of the readers requested us to show how to make Ubuntu look like macOS and hence we’ve created this tutorial. In fact, this is a good example to show the customization capability of desktop Linux.
No, you don’t have to install a new distribution just for customizing the looks. You can do some tweaking on your own and give your system mac-like looks.
How to give your Ubuntu Linux a macOS makeover
Although this article suggests it’s for Ubuntu, you can follow it for other distributions with GNOME desktop with little or no changes. Please make sure to check your desktop environment.
To be honest, even if you are using some other desktop environment, you can still take some hints about what changes to do. But you have to make sure to follow the steps using your DE’s tools.
Prerequisites: GNOME Tweaks and GNOME Extensions
Please make sure to install GNOME Tweaks tool. You’ll need it for changing the themes and icons.
You’ll also need to enable GNOME Extensions for changing GNOME Shell and adding planks.
After you enable GNOME Extension, you need to install “user themes” extension from Gnome extensions or just go to this link and click on the switch to turn it on.
I also expect you to have some knowledge about installing themes in Ubuntu. I’ll briefly touch on this subject, though.
Let’s see the steps one by one.
Step 1: Install a macOS inspired GTK theme
Since the focus is on making GNOME look like macOS, you should choose a macOS like theme. There are plenty of themes which are macOS like.
Download a theme of your choice
You can go to Gnome-look site, and look for themes for GTK3. Don’t worry if you see “Pling” written on the Gnome-look website, they both are from same providers.
You can choose any theme you want. Here are some macOS themes I think you should take a look at:
I shall be using “McMojave” in this article. You can choose any theme you want. You will find dropdown download button on the right side of website, click on it.
Here you may find various “.tar.xz” files. These different files contain same theme with small differences. Like in “McMojave” we have variations like dark and light theme. You can try them all, or just pick anyone you like from the carousel given in middle.
Set downloaded theme
Extract the downloaded theme and copy this extracted theme folder to .local/share/themes folder.
Open GNOME Tweak tool and change the Application and Shell theme. As soon as you change the themes, you can see those three yellow, green and red buttons, and that Apple logo on upper left corner. You can also notice come changes on panel items.
 McMojave GTK and Shell theme
Step 2: Install macOS like icons
The next step in this macOS makeover is to use macOS like icons.
Download icon set
Here are some icon sets I suggest that you can download from Gnome-look website:
I shall be using “McMojave-circle” in this article, feel free to use any icons you like.
Just like the theme, you can download it from “download” dropdown button from right side. Here you may also find various different versions of same icons.
 Mcmojave Circle
Set icon
Now set the downloaded icon. For that extarct the download folder and copy it to .icons folder in your home directory. See this article on installing icon themes in Ubuntu.
This is what this icon looks like:
McMojave Circle Icons Look
Step 3: Add macOS like dock
Without macOS like dock, your Ubuntu will not look like macOS. There are various docks available for Linux. I like Dash to Dock and I am going to use it here.
Dash to Dock is a GNOME extension. By now you are familar with GNOME Extensions. Just go to this link and click on toggle button to install it. Your native dock will be automatically replaced with dash-to-dock.
You can change settings by right clicking on “show applications” button (rightmost menu button), and selecting “Dash to dock settings”.
Step 4: Use macOS wallpaper
Most of the complicated stuff are done. Now it’s time to set macOS wallpaper. You can download macOS default wallpapers from the link below:
Change the desktop background
I shall be using “Mojave Day” wallpaper. Right click on the downloaded image and select ‘Set As Wallpaper’ option to change the wallpaper.
After setting this wallpaper, this is how my system looks like:

Change the lock screen Wallpaper
The lock screen background option is removed from the settings of Ubuntu 20.04. Now it uses blurred desktop wallpaper as the background of lock screen.
To set a custom lock screen wallpaper, you can use “Lock screen background” extension.
Open “Lock screen background” extension setting, and set lock screen wallpaper.
This is how the lockscreen looks now. If you are wondering, here’s how to take screenshot of lockscreen in Ubuntu.
 Lock Screen
  Login Screen
Step 5: Change system fonts
For several years, the primary system font in macOS is ‘San Francisco’. But this San Francisco font is not public domain but proprietary like so many other things in the Apple ecosystem. For this reason, you cannot use this font.
What you can do is to use an open source font that looks similar to the San Francisco fonts. I recommend using Roboto font by Google or Source Sans Pro by Adobe.
Installing fonts is straightforward in Ubuntu. Download the zip files of the fonts and just double-click on the ttf files in the extracted folder. It will give you the option to install the fonts one by one.
If you want to save time and install all the fonts at once, extract all fonts in it to the “.fonts” directory in your home folder (
Once you have installed the fonts, you can change the system wide font using GNOME Tweaks tool.
Bonus Tip: Spotlight like app launcher (if you want to go the extra mile)
If you are a fan of macOS Spotlight launcher, you may have something similar on Linux also. My favorite package for getting this kind of launcher is “Albert“.
After installing; open “Albert” and set hotkey (key combination you want for opening launcher) and you are good to go. I think in macOS, the Command+Space is to launch Spotlight. You may set Super+Space keyboard shortcut in Ubuntu.
You will get many themes in built, in picture below I’ve used “Spotlight dark”.
Albert won’t be able to launch apps directly, you have to give it permissions for where it can look for search results.
After setting up, this is how it looks:
This is how my Ubuntu 20.04 looks like after making all the customizations. Does it look like macOS? You be the judge.
 macOS Theme
So, this is how you can make your GNOME desktop look like macOS. As I said in the beginning, this is a good example of Linux desktop’s customization capability.
If you have any new ideas or have any queries; the comment section is all yours.
Written by Sumeet with additional inputs from Abhishek Prakash.
Like what you read? Please share it with others.


