- Splunk – Установка агентов для сбора логов Windows и Linux
- Настройка базовой инфраструктуры
- WINDOWS
- LINUX
- Заключение
- Install a Splunk forwarder on Linux
- Install a *nix universal forwarder
- Considerations for installing the universal forwarder
- Default installation location
- Installation of the universal forwarder as a non-root user
- Installation with tar files
- Do not install the universal forwarder over an existing installation of Splunk Enterprise
- Install the universal forwarder on Linux
- Install from a tar file
- Install from a RedHat Package Manager (RPM) package
- Install from a Debian package management (DEB) file
- Install the universal forwarder on Solaris
- Install from a tar file
- Install the universal forwarder on Mac OS X
- Install the universal forwarder from the Finder
- Install from a tar file
- Install the universal forwarder on FreeBSD
- Prerequisites
- Basic FreeBSD installation
- Requirements after installing the forwarder on FreeBSD
- Install the universal forwarder on AIX
- Enable automatic starting of the universal forwarder at boot time
- After you install: Start and configure the universal forwarder
Splunk – Установка агентов для сбора логов Windows и Linux
Нам часто задают вопросы о том, как загрузить различные данные в Splunk. Одними из самых распространенных источников, представляющих интерес, оказались логи Windows и Linux, которые позволяют отслеживать неполадки операционных систем и управлять ими. Загружая данные в Splunk, Вы можете анализировать работу всех систем в одном месте, даже когда у Вас десятки или сотни различных источников.

В данной статье мы пошагово объясним Вам, как загрузить данные из Windows и Linux в Splunk, для последующей обработки и анализа.
Настройка базовой инфраструктуры
Для того, чтобы начать собирать данные нам необходимы следующие элементы системы:
- Splunk – Indexer
- Windows сервер
- Linux сервер
Для того, чтобы загружать логи в Splunk, необходимо сначала предварительно настроить индексер, для этого потребуется:
В первую очередь, вам понадобится Splunk на машине, которая является нашим индексером. Если у вас нет установленного Splunk, то прочитать подробнее, как и на какие системы можно поставить его вы можете прочитать тут.
После установки необходимо настроить индексер на прием данных:
Settings -Forwarding and Receiving, затем в разделе Receive data добавить новую конфигурацию: Configure receiving.
Это приложение необходимо для того, упростить управление источниками данных, когда этих источников много или доступ к ним для внесения изменений затруднителен. Также приложение позволит вам не совершать потенциально ошибочные изменения конфигурации на многих хостах, ограничивая изменением только на одном месте.
Создаем приложение: Apps — Manage Apps — Add New
После создания приложения, необходимо сформировать конфигурационный файл оutputs.conf (Подробнее об том файле Вы можете прочитать на официальном сайте Splunk)
В текстовом редакторе введите следующий текст, заменив indexer_hostname_or_ip_address именем хоста или IP-адресом индексера и получающим портом, установленным на предыдущем шаге:
Сохраните как outputs.conf и добавьте в папку \etc\apps\sendtoindexer\local (Папку local необходимо создать).
На этом этапе мы заканчиваем предварительную настройки индексера и переходим к установке агентов на машины Windows и Linux.
WINDOWS
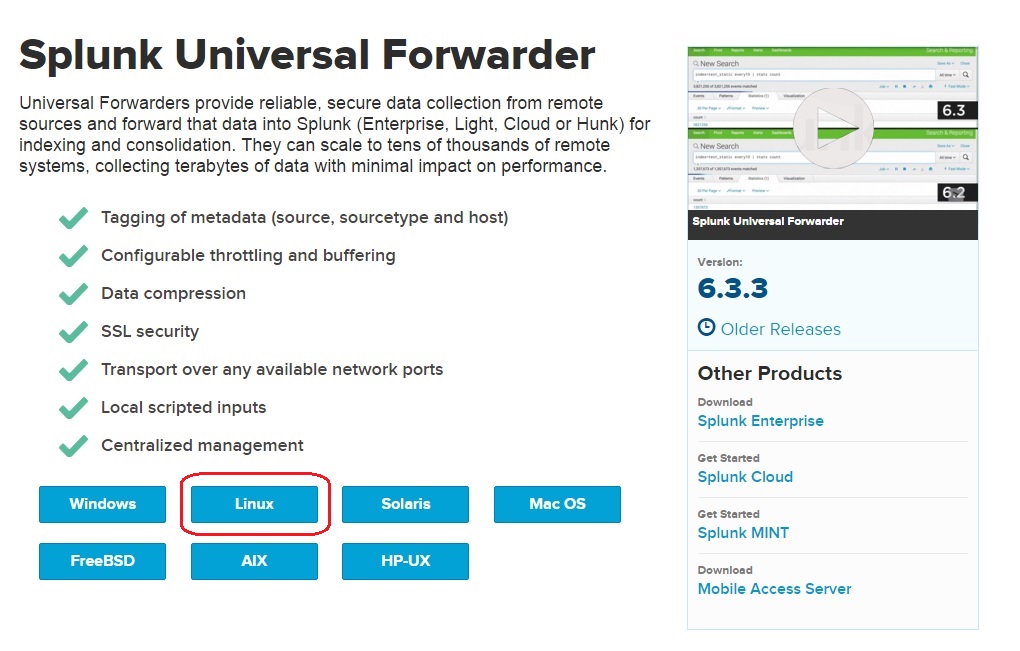
Универсальным инструментом для загрузки логов является специальный агент – Splunk Universal Forwarder. Universal Forwarder представляет собой версию Splunk Enterprise с существенно ограниченным функционалом, единственной задачей которого является сбор данных с хоста и отправка их.
Скачать его можно по этой ссылке.
На картинке выше видно, что Universal Forwarder можно установить как на Windows, так и на Linux, Solaris и другие операционные системы.
1. Устанавливаем Universal Forwarder
В качестве Deployment Server указываем IP-адрес или название Splunk индексера, где мы создали приложение «Send to indexer». Порт по умолчанию: 8089. Раздел Receiving Indexer оставим пустым, так как эти функции выполнит «Send to indexer».
2. Следующий шагом нам необходимо вернуться к Splunk и определить класс сервера для приложения «Send to indexer».
Класс сервера что-то похожее на правило, в котором мы указываем какие приложения мы будем распределять между какими целевыми машинами-клиентами. Критериями для формирования разных классов сервера могут стать тип машины, ОС, географическая область или тип приложения, причем классы могут пересекаться между собой. (Более подробно можно прочитать на официальном сайте)
Settings — Forwarder Management — edit action — add new classes.
3. После сохранения вам будет предложено добавить приложения, которые мы будем рассылать и целевые системы, так называемые клиенты, которым мы будем их рассылать.
Добавляем «Send to indexer» в раздел приложений.
4. Затем добавляем клиента. Клиентом будет наша машина с Windows, на которую мы установили Universal Forwarder. Если Universal Forwarder был установлен правильно, то машина должна появиться в списке клиентов, подключенных к Deployment Server. Заносим ее в Include (whitelist).
5. Проверить правильно ли все работает можно, посмотрев на содержимое индекса _internal. После добавления «Send to indexer» в класс сервера Universal Forwarder начинает отправлять свои внутренние логи туда. Также в этом индексе далее мы можем следить за тем, правильно ли работают наши агенты.
6. Далее скачиваем специальный Add-on с сайта SplunkBase, который позволяет собирать данные о работе Windows.
7. Устанавливаем приложение на Splunk-Indexer ( Apps — Manage Apps — Install app from file)
По умолчанию оно устанавливается в каталог . \Splunk\etc\apps\Splunk_TA_windows, но нам необходимо скопировать его в папку deployment-apps, чтобы это приложение было доступно для deployment server, чтобы потом мы могли отправить его на другие машины также, как и «Send to indexer». (Важно: в папке apps оно также должно остаться, чтобы на индексере сформировались нужные нам индексы для данных).
8. Затем необходимо сделать преднастройку приложения.
Переходим в каталог . \Splunk\etc\deployment-apps\Splunk_TA_windows
Создаем в нем под-каталог «local» (Важно: Вносить изменения в конфигурационные файлы необходимо всегда в каталоге local).
Скопируем файл inputs.conf из ...\Splunk\etc\deployment-apps\Splunk_TA_windows\default\inputs.conf в каталог local.
Включим индексацию требуемых данных. Для этого в файле inputs.conf из каталога local через текстовый редактор делаем некоторые изменения. Заменим значения disabled=1 на disabled=0 в необходимых блоках файла. Давайте добавим логи системы по Application, Security, System.
9. Далее, на Splunk-indexer, добавляем к приложению созданный ранее сервер-класс. (Settings — Forwarder Management — Apps — Splunk_TA_Windows – «+» — Windows Forwarder)
10. Перезагрузим deployment server, это можно сделать через командную строку из каталога … /splunk/bin:
Проверям, загружаются ли данные. (Settings – Indexes ) Они должны попадать в индекс wineventlog. Как видно на нашем рисунке последние данные, которые были загружены на данный момент имеют временную метку 3 минуты назад.
LINUX
Одним из инструментов, позволяющих повысить уровень безопасности в Linux, является подсистема аудита auditd. C её помощью можно получить подробную информацию обо всех системных событиях. Именно данные, генерируемые этой системой мы будем индексировать в Splunk.
(Код будет представлен для Linux CentOS)
1. Проверим, если ли на машине предустановленная система аудита, если нет установим ее.
Добавим новое правило, которое мы будем отслеживать.
Проверить его наличие можно с помощью функции.
Логи, генерируемые auditd попадают в файл:
2. Далее, установим Universal Forwarder. Найти дистрибутив можно по ссылке.
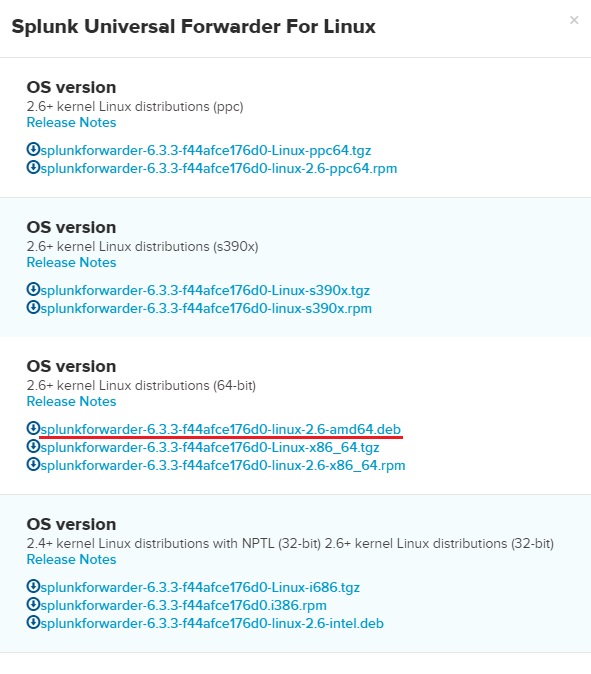
Следует скачать файл формата .rpm, после скачивания которого появится возможность получить wget ссылку.
3. Далее на создадим нового пользователя, который будет отвечать за работу со splunk.
4. Дадим разрешения пользовалелю, которого мы только что создали и запустим UniversalForwarder от его имени.
5. Проведем настройку форвардера и укажем Deployment Server, также как в части с Windows, это IP-адрес или имя Splunk-indexer/
6. Можно проверить, работает ли форвардер, следующим образом:
7. Далее переходим в Splunk-indexer и устанавливаем на него специальный Add-on, позволяющий передавать логи с Linux. Скачать дистрибутив можно по ссылке.
8. После установки, находим папку с приложением по следующему адресу ../splunk/etc/apps/Splunk_TA_nix. Копируем папку Splunk_TA_nix из apps в deployment-apps. Чтобы это приложение появилось как доступное для deployment server.
В каталоге …/ deployment-apps/Splunk_TA_nix создаем папку local и копируем в нее файл input.conf из папки ../Splunk_TA_nix/default.
В файл …/ deployment-apps/Splunk_TA_nix/ local/ input.conf через текстовый редактор вносим изменения, которые покажут данные из каких папок мы хотим собирать. В нашем случае это /var/log/audit.
В input.conf есть раздел [monitor:///var/log], в котором необходимо изменить disabled=1 на disabled=0 (Важно: убедитесь, что необходимая папка есть в whitelist, если ее нет, но нужно ее добавить)
9. Далее проверим, увидел ли Deployment server нового клиента, нашу машину Linux. (Settings — Forwarder Management – Clients).
Если ее нет, то необходимо проверить название (Host name) машины, если он совпадает с названием машины индексера, то необходимо его изменить, иначе возникает ошибка.
10. Затем создаем новый сервер класс, относящийся к Linux.
Settings — Forwarder Management – Server Classes — New Server Class
11. Добавляем в этот класс приложения «Send to indexer» и «Splunk_TA_nix», а в качестве клиента добавляет машину Linux.
Обратите внимание, что файлы не будут загружаться, если у Universal Forwarder (у юзера, под которым мы используем Universal Forwarder) нет доступа к папкам, которые необходимо мониторить. Так что необходимо учесть этот момент и разрешить доступ.
12. В конце необходимо перезагрузить deployment server, это можно сделать через командную строку из каталога … /splunk/bin :
После проведения выше описанных операций, Вы получите логи Linux, которые будут загружены в индекс OS.
Заключение
Таким образом, мы показали вам, как загрузить ваши логи из Windows и Linux в Splunk для дальнейшего анализа и обработки. Надеемся, что эта информация будет полезна для Вас.
Мы рады ответить на все ваши вопросы и комментарии по данной теме. Также, если вас интересует что-то конкретно в этой области, или в области анализа машинных данных в целом — мы готовы доработать существующие решения для вас, под вашу конкретную задачу. Для этого можете написать об этом в комментариях или просто отправить нам запрос через форму на нашем сайте.
Источник
Install a Splunk forwarder on Linux
You can install a Splunk forwarder on your Linux using using three methods:
- using a Splunk forwarder .tar file.
- using a Splunk forwarder .deb file.
- using a Splunk forwarder .rpm file
In this section we will show you how to install a Splunk forwarder on Ubuntu, a Debian-based Linux distrubution. First, we need to download the right software. Go to https://www.splunk.com/en_us/download/universal-forwarder.html and click the Linux button:
Choose the software version for your system. We will download the 64-bit .deb version:
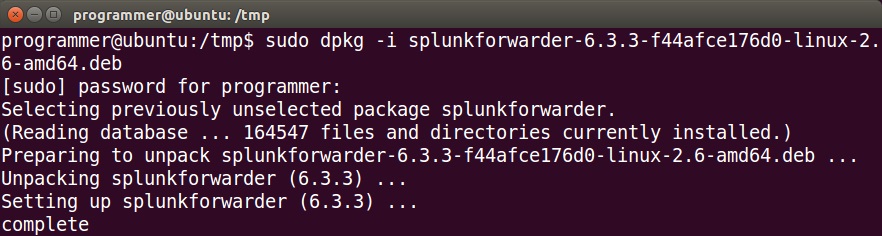
Open the shell and browse to the packet location. Note that .deb version can only be installed in the default location (/opt/splunk). To start the installation, run the sudo dpkg -i splunk_package_name.deb command:
To start a Splunk universal forwarder, browse to the /bin directory in the /opt/splunkforwarder/ directory and run the sudo ./splunk start command:

The first time you start Splunk after a new installation, you will need to accept the license agreement. Press y to accept the license and start the forwarder. You can run the sudo ./splunk status command to verify that the forwarder is indeed running:
Источник
Install a *nix universal forwarder
This topic describes how to install the universal forwarder software on a *nix host, such as Linux, Solaris, or Mac OS X. It assumes that you plan to install directly onto the host, rather than use a deployment tool. This type of deployment best suits these needs:
- Small deployments.
- Proof-of-concept test deployments.
- System image or virtual machine for eventual cloning.
The universal forwarder installation packages are available for download from splunk.com.
On *nix operating systems, the installation comes as a tar file or an installation package (.rpm, .deb, .pkg, etc.) Choose the package type that suits your needs and you are comfortable with.
In general, a tar file contains only the files needed to install and run the universal forwarder and can be installed wherever you have permissions. Installation packages contain logic that checks for software dependencies and install in a predetermined place, depending on your operating system.
To install the universal forwarder on a *nix host, follow the directions later in this topic for your specific OS.
Considerations for installing the universal forwarder
When you perform an installation of the universal forwarder, note the following caveats:
Default installation location
The universal forwarder installs by default in the /opt/splunkforwarder directory. The default installation directory for Splunk Enterprise is /opt/splunk .
Installation of the universal forwarder as a non-root user
The instructions for installing a universal forwarder for a non-root user are the same as installation of Splunk Enterprise as a non-root user. The only difference will be the default destination folder. See Run Splunk Enterprise as a different or non-root user in the Installation Manual.
Installation with tar files
When you install the universal forwarder using a tar file:
- Some non-GNU versions of tar might not have the -C argument available. In this case, to install in a specific directory, either cd to the directory where you want to install the forwarder or place the tar file in that directory before you run the tar command.
- The universal forwarder does not create the splunk user on the machine. If you want the forwarder to run as a specific user, you must create the user manually before you install.
- Confirm that the disk partition has enough space to hold the uncompressed volume of the data you plan to index.
Do not install the universal forwarder over an existing installation of Splunk Enterprise
Do not install the universal forwarder over an existing installation of full Splunk Enterprise. This is particularly vital if you plan to migrate from a light forwarder as described in «Migrate a nix light forwarder».
Install the universal forwarder on Linux
The universal forwarder is available for Linux as a tar file, an RPM package, and a DEB package.
Install from a tar file
Use the tar command to install the forwarder.
- To install the forwarder into the folder /opt/splunkforwarder , run:
- To install the forwarder into the current working directory under the splunkforwarder folder, run:
For post-installation configuration and credential creation, see After you install: Start and configure the universal forwarder.
Install from a RedHat Package Manager (RPM) package
Use the rpm command to install the forwarder.
- To install the forwarder RPM package into the default directory /opt/splunkforwarder :
For post-installation configuration and credential creation, see After you install: Start and configure the universal forwarder.
Install from a Debian package management (DEB) file
Use the dpkg command to install the forwarder DEB package.
- To install the forwarder DEB package in the default directory /opt/splunkforwarder :
The DEB package only supports installation into: /opt/splunkforwarder
For post-installation configuration and credential creation, see After you install: Start and configure the universal forwarder.
Install the universal forwarder on Solaris
The universal forwarder is available for Solaris as a tar file or a PKG file.
If you plan to install a universal forwarder on a Sun SPARC system that runs Solaris, confirm that you have patch level SUNW_1.22.7 or later of the C library ( libc.so.1 ). If you do not, the universal forwarder cannot run because it needs this version of the library.
Install from a tar file
Use the tar command to install the forwarder.
- To install into the folder /opt/splunkforwarder :
- Uncompress the tar file.
- Extract the tar file.
- To install into the current working directory under the splunkforwarder folder:
- Uncompress the tar file.
- Extract the tar file.
For post-installation configuration and credential creation, see After you install: Start and configure the universal forwarder.
Install the universal forwarder on Mac OS X
The universal forwarder is available for Mac OS X as a tar file or a DMG package.
Install the universal forwarder from the Finder
- Navigate to the folder or directory where the installer is located.
- Double-click the DMG file.
A Finder window that contains the splunkforwarder.pkg opens. - Double-click the Install Splunk Universal Forwarder icon to start the installer.
- The Introduction panel lists version and copyright information. Click Continue.
- The License panel lists shows the software license agreement. Click Continue.
- You will be asked to agree to the terms of the software license agreement. Click Agree.
- In the Installation Type panel, click Install. This installs the universal forwarder in the default directory /Applications/SplunkForwarder .
- You are prompted to type the password that you use to login to your computer.
- When the installation finishes, a popup informs you that an initialization must be performed. Click OK.
- A terminal window appears and you are prompted to specify a userid and password to use with the universal forwarder.
The password must be at least 8 characters in length. The cursor will not advance as you type.
Make note of the userid and password. You will use these credentials to authenticate when using CLI commands on the forwarder.
The installer places a shortcut on the Desktop so that you can start or stop the universal forwarder from your Desktop any time.
Install from a tar file
Use the tar command to install the forwarder.
- To install the forwarder into the folder /Applications/splunkforwarder , run:
- To install the forwarder into the current working directory under the splunkforwarder folder, run:
For post-installation configuration and credential creation, see After you install: Start and configure the universal forwarder.
Install the universal forwarder on FreeBSD
The universal forwarder is available for FreeBSD as a .txz file package.
Prerequisites
FreeBSD best practices maintain a small root filesystem. Verify that the root filesystem has sufficient free space for the universal forwarder installation.
The package installs the forwarder in the default directory, /opt/splunkforwarder . If /opt does not exist, you might receive an error message.
Basic FreeBSD installation
- Download the FreeBSD package file from splunk.com (login required.)
- Install the universal forwarder on FreeBSD using the pkg command:
- Start the universal forwarder service and create a local user and password. For post-installation configuration and credential creation, see After you install: Start and configure the universal forwarder.
Requirements after installing the forwarder on FreeBSD
These instructions ensure that the forwarder functions properly on FreeBSD. If your host has less than 2 GB of memory, reduce the kern.maxdsiz and kern.dfldsiz values accordingly.
- Add the following to /boot/loader.conf
- Add the following to /etc/sysctl.conf :
- Restart the FreeBSD host for the changes to effect.
Install the universal forwarder on AIX
The universal forwarder is available for AIX as a tar file. The default installation directory is /opt/splunkforwarder .
Do not use the AIX version of tar to unarchive the file. Use the GNU version instead. This version comes with the AIX Toolbox for Linux Applications package that comes with a base AIX installation. If your AIX does not come with this package installed, you can download it from IBM. See IBM AIX Toolbox download information.
- Confirm that the user that the universal forwarder runs as has permission to read the /dev/random and /dev/urandom devices.
- Expand the tar file into an appropriate directory:
Enable automatic starting of the universal forwarder at boot time
The AIX version of the universal forwarder does not register itself to auto-start on reboot. You can register it by running the following command from the $SPLUNK_HOME/bin directory at a prompt:
This command invokes the following system commands to register the forwarder in the System Resource Controller (SRC):
mkssys -G splunk -s splunkd -p
-u -a _internal_exec_splunkd -S -n 2 -f 9
When you enable automatic boot start, the SRC handles the run state of the forwarder. This means that you must use a different command to start and stop the forwarder manually:
- /usr/bin/startsrc -s splunkd to start the forwarder.
- /usr/bin/stopsrc -s splunkd to stop the forwarder.
If you attempt to start and stop the forwarder using the ./splunk [start|stop] method from the $SPLUNK_HOME directory, the SRC catches the attempt and the forwarder displays the following message:
To prevent this message from occurring and restore the ability to start and stop the forwarder from the $SPLUNK_HOME directory, disable boot start:
- For more information on the mkssys command line arguments, see Mkssys command on the IBM pSeries and AIX Information Center website.
- For more information on the SRC, see System resource controller on the IBM Knowledge Center website.
After you install: Start and configure the universal forwarder
After you complete the installation of the universal forwarder, you must configure it before it can do anything.
You can configure the forwarder from the command line or by using configuration files. If you want to configure from the command line, the forwarder must be running.
- Start the universal forwarder, accept the license agreement, and provide credentials. See Start the universal forwarder.
- Configure the universal forwarder, either from the command line or with a configuration file. See Configure the universal forwarder or Configure forwarding with outputs.conf.
- Restart the forwarder service to enable the configuration changes you made.
This documentation applies to the following versions of Splunk ® Universal Forwarder: 8.2.0, 8.2.1, 8.2.2
Источник


