- How To Install And Run Android Studio On Linux
- 1. Install Android Studio On Linux Steps.
- 2. Start Android Studio On Linux.
- 3. Specify Android SDK And JDK Path In Android Studio.
- 4. Add Android SDK Command Tool In System PATH.
- Easily Install Android Studio in Ubuntu And Linux Mint
- Install Android Studio in Ubuntu and other distributions using Snap
- Alternative Method 1: Install Android Studio using umake in Ubuntu
- Alternative Method 2: Install Android Studio in Ubuntu and Linux Mint via unofficial PPA
- Uninstall Android Studio:
- Как установить Android Studio на Linux
- Установка Android Studio на Linux mint и другие производные
- С официального сайта
- Из PPA
- Установка Android Studio в Ubuntu
- С официального сайта
- Из PPA
- Через Umake
- Install Android Studio
- Windows
- Linux
- Required libraries for 64-bit machines
- Chrome OS
How To Install And Run Android Studio On Linux
This article will tell you how to install and run the android studio on Linux. It is not similar to Windows and macOS. If you are a beginner to the android studio, this is very helpful to you.
1. Install Android Studio On Linux Steps.
- Download related android studio version from android studio official website. It is just a zip file.
- Unzip the download zip file to a local directory for example /home/zhaosong/WorkSpace/Tool/android-studio-ide-181.5056338-linux.
- Please note there is also another subfolder named android-studio in the above folder. Now the android studio has been installed successfully.
2. Start Android Studio On Linux.
Start android studio on Linux is also not similar to Windows or macOS, you should run the start script in the terminal to start it.
- Open a terminal and go to the android studio unzipped folder.
- CD into the bin folder in the android-studio folder.
- Execute $ ./studio.sh command in the terminal, then you can see the android studio startup as normal. Maybe there will have some error messages are printed in the terminal but it does not matter.
3. Specify Android SDK And JDK Path In Android Studio.
When the android studio is started, click File —> New —> New Project to create a new android project. If you want to change the default Android SDK and JDK to other folders, you can follow the below steps.
- Click File —> Other Settings —> Default Project Structure… menu item in the android studio top menu bar.
- Then you can change the android studio project SDK and JDK folder in the popup dialog window SDK Location & JDK location section. If you are a beginner, you do not need to change them at all.
4. Add Android SDK Command Tool In System PATH.
Generally, you will use android studio to run the android SDK command tool, but sometimes you may need to invoke those android SDK commands in the terminal, so please follow the below steps to add android SDK command execute path in Linux PATH system environment variable value then you can invoke them in the command line.
Источник
Easily Install Android Studio in Ubuntu And Linux Mint
Last updated November 10, 2019 By Abhishek Prakash 56 Comments
Android Studio, Google’s own IDE for Android development, is a nice alternative to Eclipse with ADT plugin. Android Studio can be installed from its source code but in this quick post, we shall see how to install Android Studio in Ubuntu 18.04, 16.04 and corresponding Linux Mint variants.
Before you proceed to install Android Studio, make sure that you have Java installed in Ubuntu.

Install Android Studio in Ubuntu and other distributions using Snap
Ever since Ubuntu started focusing on Snap packages, more software have started providing easy to install Snap packages. Android Studio is one of them. Ubuntu users can simply find the Android Studio application in the Software Center and install it from there.
If you see an error while installing Android Studio from Software Center, you can use the Snap commands to install Android studio.
Alternative Method 1: Install Android Studio using umake in Ubuntu
You can also easily install Android Studio using Ubuntu Developer Tools Center, now known as Ubuntu Make. Ubuntu Make provides a command line tool to install various development tools, IDE etc. Ubuntu Make is available in Ubuntu repository.
To install Ubuntu Make, use the commands below in a terminal:
Once you have installed Ubuntu Make, use the command below to install Android Studio in Ubuntu:
It will give you a couple of options in the course of the installation. I presume that you can handle it. If you decide to uninstall Android Studio, you can use the same umake tool in the following manner:
Alternative Method 2: Install Android Studio in Ubuntu and Linux Mint via unofficial PPA
Thanks to Paolo Ratolo, we have a PPA which can be used to easily install Android Studio in Ubuntu 16.04, 14.04, Linux Mint and other Ubuntu based distributions. Just note that it will download around 650 MB of data. So mind your internet connection as well as data charges (if any).
Open a terminal and use the following commands:
Was it not easy? While installing a program from source code is fun in a way, it is always nice to have such PPAs. Once we have seen how to install Android Studio, lets see how to uninstall it.
Uninstall Android Studio:
If you don’t have already, install PPA Purge:
Now use the PPA Purge to purge the installed PPA:
That’s it. I hope this quick helps you to install Android Studio in Ubuntu and Linux Mint. Before you run Android Studio, make sure to install Java in Ubuntu first. In similar posts, I advise you to read how to install and configure Ubuntu SDK and how to easily install Microsoft Visual Studio in Ubuntu.
Any questions or suggestions are always welcomed. Ciao 🙂
Like what you read? Please share it with others.
Источник
Как установить Android Studio на Linux
Узнайте о том, что такое Android Studio (Linux), и как погрузиться в мир мобильного девелопмента. Пошаговая инструкция по установке популярной среды разработки на персональный компьютер под управлением Linux.
Android Studio — это IDE или интегрированная среда разработки, реализуемая в рамках проекта компании Google. Сборник инструментов и плагинов распространяется бесплатно и дает возможность желающим попробовать себя в роли разработчика мобильных приложений.
Интегрированная среда разработки приложений на Android доступна для всех операционных систем. Но часто молодых разработчиков интересует установка Android Studio на Linux.
Нет ничего сложного в том, чтобы начать пользоваться популярнейшей средой для мобильного девелопмента в ОС Linux. Используйте один из способов из пошаговой инструкции — установите IDE: с официального сайта, из PPA или с помощью утилиты umake.

Установка Android Studio на Linux mint и другие производные
С официального сайта
Установка Android Studio на Linux mint потребует для начала загрузки на компьютер инструментарий Java. Для скачивания Oracle Java 8, наберите команду «sudo apt install oracle-java8-installer».
Введя в консоли «sudo apt-get install libc6:i386 libncurses5:i386 libstdc++6:i386 lib32z1 libbz2-1.0:i386» вы получите дополнительные библиотеки, требуемые для установки среды.
По аналогии с вариантом загрузки IDE на Ubuntu произведите установку Android Studio Linux клиент с официального сайта и запустите из директории загрузки.
Если установочный пакет сохранился в папке Downloads, его потребуется перенести командой «sudo mv
/downloads/android-studio/usr/local/» в директорию usr/local/ соответственно.
Затем запустите установку, набрав:
./studio.sh Дальше обращаться к консоли не потребуется. Как и в случае работы с Ubuntu, установка будет происходить в окне.

Из PPA
Для установки из PPA интегрированной среды разработки на «Линукс минт», потребуется использовать уже знакомый репозиторий:
sudo add-apt-repository ppa:paolorotolo/android-studio.
Начните установку программы с ввода в терминал команды:
sudo apt update
sudo apt-get install android-studio
Готово. Запускается IDE так же, как и на Ubuntu.

Установка Android Studio в Ubuntu
С официального сайта
Android Studio в Ubuntu установка производится в несколько шагов. До начала работы IDE, первым шагом установите виртуальную машину Java. Подходящей версией будет Java 8 Oracle. Для загрузки инструментария на компьютер введите команду ниже.
sudo apt-get install oracle-java8-installer
Далее с сайта разработчика вам потребуется скачать установочный файл Android Studio для Linux с дальнейшей распаковкой его в директорию с помощью команды:
sudo unzip android-studio-ide-141.2178183-linux.zip -d /opt
А запустить программу из папки вы сможете строкой — /opt/android-studio/bin/studio.sh
Дальнейшее управление процессом не потребует использования терминала и будет происходить в окне приложения. На выбор будет предоставлен вариант ручной или автоматической установки, показан список компонентов программы. По окончании продолжительной загрузки, нажмите кнопку «Finish».

Из PPA
Если с официального сайта установить среду разработки мобильных приложений не удалось или потребовалась старая версия программы, можно взять Андроид Студио из PPA.
Для начала добавьте директорию, вписав строчку:
sudo add-apt-repository ppa:paolorotolo/android-studio
Затем наберите в консоли «sudo apt-get install android-studio», чтобы установить программу. По окончании установки запустите инструментарий разработки, набрав Dash: studio.
Или напрямую из папки /opt, введя в консоли: /opt/android-studio/bin/studio.sh.

Через Umake
Сократить продолжительность установки Android Studio на компьютер поможет Ubuntu make. Эта утилита распространяется бесплатно и создана специально для того, чтобы облегчить разработчику процесс установки ряда программ.
Более того, пользователям системы Ubuntu версии 15.04 и выше Umake доступна с самого начала. Из официального репозитория установить ее можно командой «sudo apt install ubuntu-make».

Владельцам операционной системы ранних версий (14.10 и ниже) потребуется установка из PPA, набрав в консоли:
sudo add-apt-repository ppa:ubuntu-desktop/ubuntu-make
sudo apt-get update
sudo apt-get install ubuntu-make.
Далее установите мобильную среду через строчку в терминале:
umake android -accept-license
или umake android.После установки ярлык будет создан автоматически.
В каждом из перечисленных случае вам потребуется заблаговременно установить виртуальную машину Java и использовать терминал для написания команд. В остальном установка Андроид Студио от способа к способу имеет минимальные различия.
Источник
Install Android Studio
Setting up Android Studio takes just a few clicks.
Windows
To install Android Studio on Windows, proceed as follows:
- If you downloaded an .exe file (recommended), double-click to launch it.
If you downloaded a .zip file, unpack the ZIP, copy the android-studio folder into your Program Files folder, and then open the android-studio > bin folder and launch studio64.exe (for 64-bit machines) or studio.exe (for 32-bit machines).
That’s it. The following video shows each step of the setup procedure when using the recommended .exe download.
As new tools and other APIs become available, Android Studio tells you with a pop-up, or you can check for updates by clicking Help > Check for Update.
To install Android Studio on your Mac, proceed as follows:
- Launch the Android Studio DMG file.
- Drag and drop Android Studio into the Applications folder, then launch Android Studio.
- Select whether you want to import previous Android Studio settings, then click OK.
- The Android Studio Setup Wizard guides you through the rest of the setup, which includes downloading Android SDK components that are required for development.
That’s it. The following video shows each step of the recommended setup procedure.
As new tools and other APIs become available, Android Studio tells you with a pop-up, or you can check for updates by clicking Android Studio > Check for Updates.
Note: If you use Android Studio on macOS Mojave or later, you might see a prompt to allow the IDE to access your calendar, contacts, or photos. This prompt is caused by new privacy protection mechanisms for applications that access files under the home directory. So, if your project includes files and libraries in your home directory, and you see this prompt, you can select Don’t Allow.
Linux
To install Android Studio on Linux, proceed as follows:
- Unpack the .zip file you downloaded to an appropriate location for your applications, such as within /usr/local/ for your user profile, or /opt/ for shared users.
If you’re using a 64-bit version of Linux, make sure you first install the required libraries for 64-bit machines.
Tip: To make Android Studio available in your list of applications, select Tools > Create Desktop Entry from the Android Studio menu bar.
Required libraries for 64-bit machines
If you are running a 64-bit version of Ubuntu, you need to install some 32-bit libraries with the following command:
If you are running 64-bit Fedora, the command is:
That’s it. The following video shows each step of the recommended setup procedure.
As new tools and other APIs become available, Android Studio tells you with a pop-up, or you can check for updates by clicking Help > Check for Update.
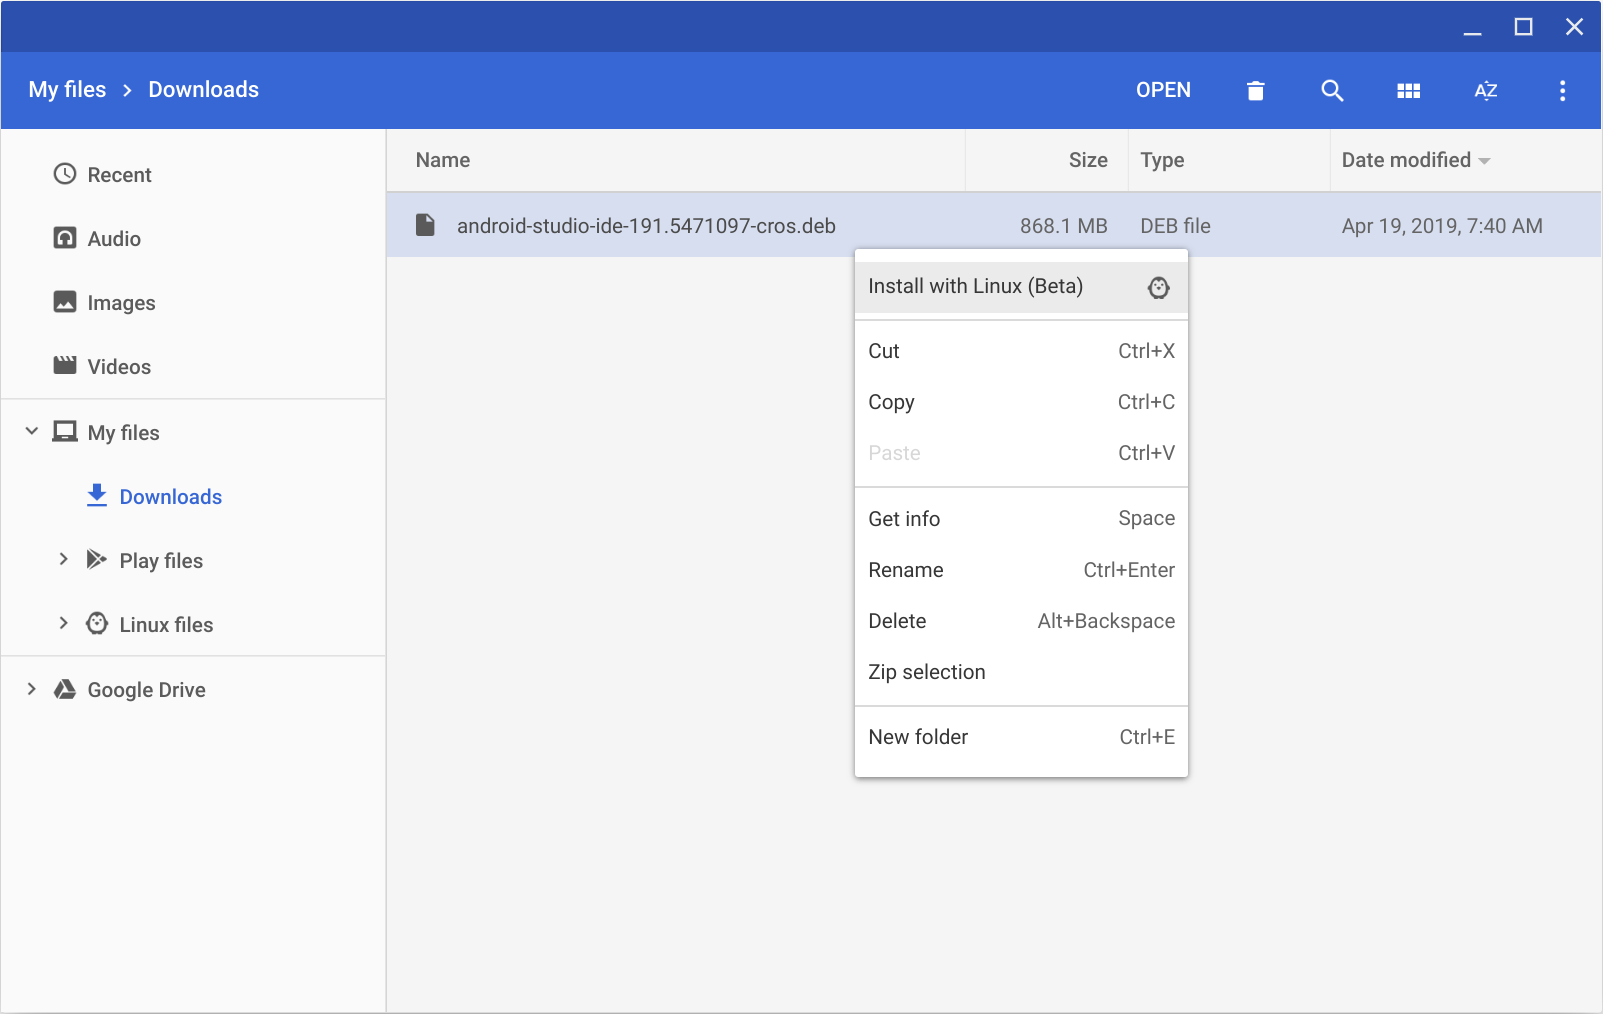
Chrome OS
Follow these steps to install Android Studio on Chrome OS:
- If you haven’t already done so, install Linux for Chrome OS.
- Open the Files app and locate the DEB package you downloaded in the Downloads folder under My files.
Right-click the DEB package and select Install with Linux (Beta).
- If you have installed Android Studio before, select whether you want to import previous Android Studio settings, then click OK.
The Android Studio Setup Wizard guides you through the rest of the setup, which includes downloading Android SDK components that are required for development.
After installation is complete, launch Android Studio either from the Launcher, or from the Chrome OS Linux terminal by running studio.sh in the default installation directory:
That’s it. As new tools and other APIs become available, Android Studio tells you with a pop-up, or you can check for updates by clicking Help > Check for Update.
Content and code samples on this page are subject to the licenses described in the Content License. Java is a registered trademark of Oracle and/or its affiliates.
Источник


