- 4 Ways To Find Out Windows 10 Wi-Fi Password
- #1. Use Windows settings to view WiFi password
- #2. View WiFi password directly from the control panel
- #3. Use a Power Shell command
- #4. Use a third-party WiFi password viewer
- Bonus methods 😎
- From Router web-interface
- At the back of the router device
- Reset the router
- Ending words
- How to Get WiFi Password from Computer
- Steps — How to Get WiFi Password from Computer
- Find the WiFi Password in Windows 10 Using CMD
- WLAN Profile
- Using CMD to Find the WiFi Password
- MAC Addresses
- Changing Your MAC Address
4 Ways To Find Out Windows 10 Wi-Fi Password
![]()
It’s not uncommon to forget your WiFi password as you only need to enter it once on your PC, and it will automatically connect to it when the network is near.
I personally use strong passwords (and you should too) for my WiFi and often forget them, but thankfully, Windows 10 makes it easy to view network password when needed.
If you don’t remember your WiFi password and need to give it to someone or use it on a different device, there are multiple ways to view it right inside your Windows computer.
Today, I am going to show your different ways to view the WiFi password. Each method is useful depending on your preference and how much access you have to the PC settings if you are not the administrator.
If you need help to generate a complex password then check out the password generator.
#1. Use Windows settings to view WiFi password
As I am the administrator of my PC and don’t have any restrictions, this is my go-to method for finding the WiFi password.
From the Start menu, click on Settings and then click on Network & Internet.

In the Status section, scroll down and click on Network and Sharing Center.

Now click on your WiFi name in the View your active networks section.

When the WiFi Status window opens, click on Wireless Properties here.

Afterward, move to the Security tab and check the checkbox next to Show characters to view your WiFi password.

#2. View WiFi password directly from the control panel
Although the above method works fine, what if you cannot access Windows 10 settings at all?
Or maybe you prefer a faster method and don’t mind remembering a small command. Well, you can directly access your WiFi network settings using the Run command. As long as you can access your network settings, this method should work for you.
Open the Run dialog by pressing Windows+R keys and type ncpa.cpl in the text field and then click on OK.

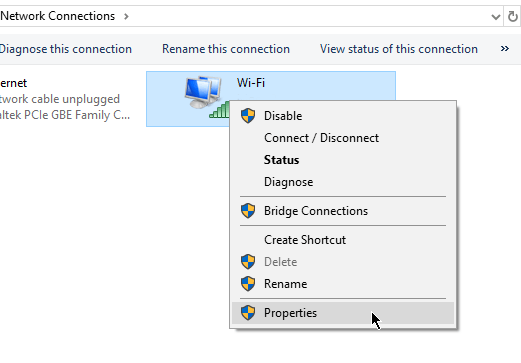
This command will directly open your network connection in the control panel—Right-click on your WiFi network here and select Status from the context menu.

Click on Wireless Properties in the WiFi Status window.
Now click on the Security tab and then click on Show characters to reveal your WiFi password.
#3. Use a Power Shell command
Coming to a more advanced method – in the Power Shell, you can use a Network Shell (Netsh) command to view a bunch of details about your network, including its password.
Furthermore, you can also use this method to view the passwords of all the networks your PC has connected to previously. For example, if you want to know your office network password while you are home, you can do so using this method without needing to connect to the office network. However, this will not work if you have used the Forget option to forget a network’s details.
First, you need to know the name (SSID) of the WiFi network to use the netsh command. This isn’t an issue if you are already connected to the network as you can see the name, but it will be a problem if you need to see a previously connected network’s password. Thankfully, you can use a Power Shell command to see the list of all the networks you have connected to before.
Note: You can use these same commands in Command Prompt, too, if you cannot access Power Shell for some reason.
Right-click on the Start menu and select Power Shell from the list.

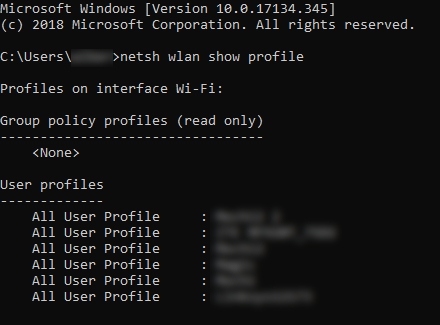
Here enter this command netsh wlan show profiles and press the Enter key. You will see all the saved networks name under the User profiles section.

Just copy the name of the network(s) from here so you could easily use it in the next command.
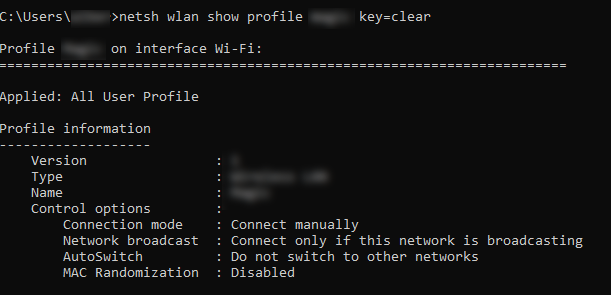
To know the password of any one of the saved networks, use the below-mentioned command and replace the wifiname part with the actual name of the network.
netsh wlan show profile «name=wifiname» key=clear
For example, in my case, the command will be netsh wlan show profile «name=SSID hidden» key=clear .

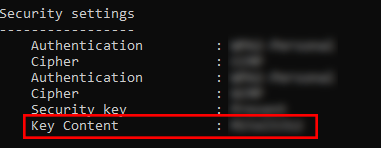
Once you press the Enter key, you will see loads of information about this network. Here in the Security settings section, the password will be written next to Key content.

#4. Use a third-party WiFi password viewer
You can also use a third-party app to help you view all your saved networks and their passwords in one place. If you frequently need to view your WiFi password, then using a third-party is useful as it makes it a single-click process view all the data. Additionally, you may like to use third-party software if you need to perform more advanced tasks like importing WiFi passwords from another PC/Windows or exporting them.
If you are up for it, I’ll recommend you give WirelessKeyView from NirSoft a try. Although there are many apps for this purpose, I like WirelessKeyView for its simple interface and is completely free.
The software comes as a .zip file, so you’ll have to extract it first. Once you launch the program, it will automatically search and list all the saved WiFi networks with their password listed under the Key (Ascii) section. You can also double-click on a network to view all its details.

If you don’t like WirelessKeyView for some reason, you can also use WiFi Password Revealer. It’s an installable program that shows all the saved network passwords and lets you quickly copy them in bulk.
Bonus methods 😎
The above methods should work fine for finding the WiFi password inside Windows 10. However, there are some other methods as well.
From Router web-interface
You can access the web-interface of your router to access its settings. There is usually an option to both change the password and view it. There are no universal instructions I can provide you to help with this as routers have different addresses to access the web-interface and the interface itself is different depending on router manufacturer.
However, to give you an idea, you need to use your router’s IP address to access the web-interface. Inside, you need to look for a wireless setting or WiFi setting option. There should be an option to reveal the password in it.
At the back of the router device
If you didn’t change the default WiFi password, then most probably, the default password is written behind or under the router. Just pick it up and search for a password on it; usually, it’s an 8-digit password.
Reset the router
You can also reset your router, which will reset all your settings along with the WiFi password. You can then use the default password to connect to the network. There should be a reset button on the router to press and hold for 5-10 seconds to reset the router. It’s inside a hole on most routers, so you’ll have to use a paper pin or something similar to press and hold it.
Ending words
I am sure for most users; the first two methods will be more than enough to view the WiFi password. Although if you are a system administrator and need to handle multiple computers and connections, I’ll recommend using a third-party WiFi password viewer.
Next, find out how to optimize Windows power options.
How to Get WiFi Password from Computer


Steps — How to Get WiFi Password from Computer
Did you encounter the scene that you are using a laptop connected with Internet via Wi-Fi, you also want to make your smartphone connect with Internet but you don’t know the password? Actually, when the computer is connected with Wi-Fi, it will save the password of the Wi-Fi automatically. All you need to do is to find the password in the computer and remember them. This can be done in a few seconds without any other tools and complex operations. Here are the steps which will show you how to get Wi-Fi password from computer. The example shown below is based on Windows 8, but the situation in windows 7 is almost the same.
Steps — How to Get WiFi Password from Computer
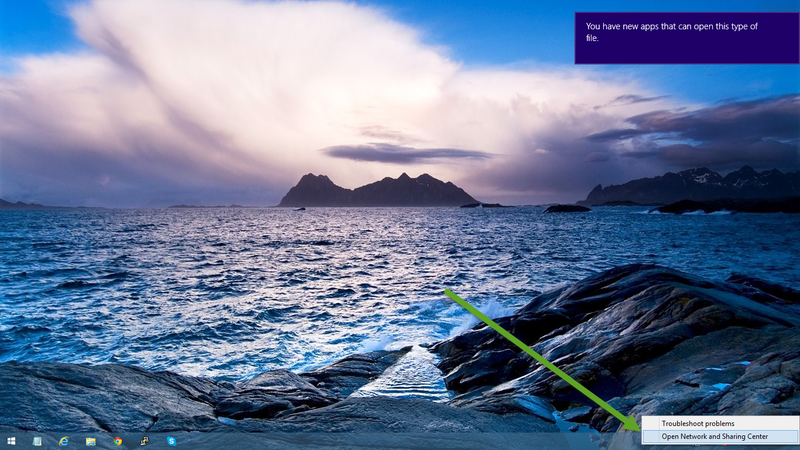
First, you should go to the Desktop to begin the operation. Find the icon «signal symbol like the one in smartphones» at the bottom right corner and right click on the icon. Then a menu will be shown. Click on the option «Open Network and Sharing Center» to continue.
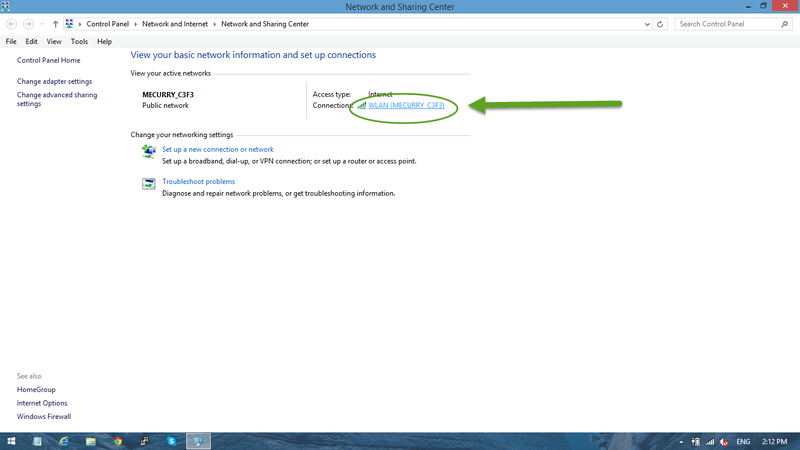
The window of Network and Sharing Center will be opened. You’ll see your current connected network. Click on the blue underlined text «WLAN» or «WiFi» to continue.
The window of your connection status will be opened. Find the button «Wireless Properties» and click on it.
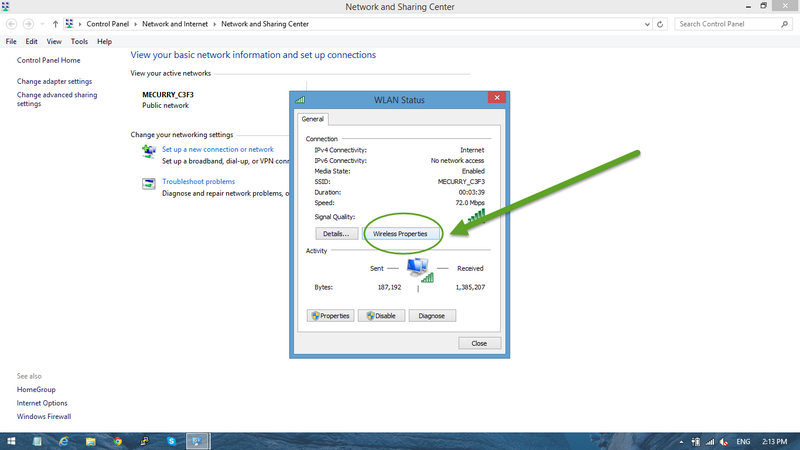
Switch the tab to «Security» and tick off the checkbox before «Show characters», then you’ll see the password is shown. You can write down the password to record it. Click on the button «OK» and close the «Network and Sharing Center» to end the operation.
Find the WiFi Password in Windows 10 Using CMD
Get a list of every computer on the network’s passwords
Did you forget one of your WiFi passwords? Do you need access to it right away?
Using the command prompt (CMD), you can see a list of every wireless network your computer has ever connected to and their passwords.
This article details how you can find out the WiFi password or change WiFi settings using CMD.

We also created a short YouTube video that goes over some of the information below in case you don’t feel like reading a bunch of text. Be sure to check it out and subscribe to our sister-site Online Tech Tips YouTube channel!
WLAN Profile
There comes a time when users like yourself forget your own WiFi password. This happens more commonly than you think. With WiFi routers running nonstop and WiFi connections establishing themselves automatically, there’s very little reason why you’d recall a complicated WiFi password.
Some users wind up using secure passwords consisting of random characters which are very easy to forget. Others just keep using the random one given to them by their ISP.
Either way, there’s no need to panic yet. WLAN profiles are created whenever users enter WiFi credentials and establish a new connection. The profile of that WiFi includes essential information like the network name, settings, and password.
We’re going to tap into these network profiles through the command prompt. This method will work regardless if you’re currently connected to the WiFi network you’re trying to gain access to or not. However, your computer had to have connected to that WiFi network at some previous point at least once.
Using CMD to Find the WiFi Password
Here’s how to find the WiFi password using the command prompt:
Open the command prompt by opening Run (Windows + R) and typing CMD. Hit Enter.
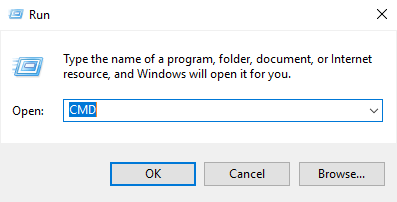
Note: Alternatively, you can use Search and type CMD. Right-click on Command Prompt and select Run As Administrator.
Type the following command line and hit Enter:
You will see a list of WLAN profiles stored on the PC. Take note of the network name you’d like to explore.
Type the following command and replace “WIFI” with the network name.
Completing these steps successfully will bring up the WLAN profile of the network you want to connect to. Scroll down and you’ll find the password under the Key Content field.
MAC Addresses
Every device that connects to a WiFi network has an identifying number commonly referred to as a MAC address. And while some network technologies are dependent on MAC to function, some use them to track people or restrict access.
This is a bigger issue for mobile users. For example, some use specialized equipment to log a phone’s MAC address as their victims jump from one network to another. This means your steps can be traced to see just where you’ve been.
This breach of privacy can be prevented by changing your MAC address.
Changing Your MAC Address
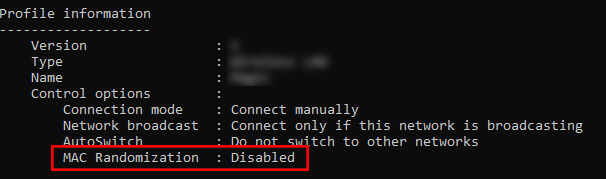
Take a closer look at your WLAN profile. If MAC randomization is turned, chances are your MAC address is vulnerable to tracking. Consider changing your MAC address as an added measure for protecting your privacy.
Here’s how you change your MAC address on Windows:
Go to Control Panel > Network and Sharing Center > Change Adapter Settings.
Right-click on the network you’d like to configure and select Properties. A new window will pop up.
On the new window, click Configure.

Go to Advanced tab. In the Property field, select Network Address or Locally Administered Address.
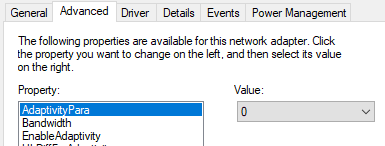
Note: If you can’t find the Network Address option, there are third-party programs you can use to replace the MAC address.
In the Value field, type in a new MAC address. Click OK once you’re finished to exit. Enjoy!
Christopher Jan Benitez is a freelance writer for hire who provides actionable and useful web content to small businesses and startups. In his spare time, he religiously watches professional wrestling and finds solace in listening to ’80s speed metal. Read Christopher’s Full Bio


