- How to Configure Wireless on Any Linux Desktop
- Assumptions
- Wifi Radar
- Command Line
- Simplify the Process
- Final thoughts
- How to Enable Wifi on Ubuntu
- How Do I Enable Wireless on Linux Using nmtui?
- Launch nmtui
- Enable Wireless Network
- How Do I Enable Wi-fi in the Terminal on Linux?
- Step 1: How to Find the Name of the Wireless Interface and Network
- Step 2: How to Connect to Wifi Network Using WPA_Supplicant
- How to Stop the Network Manager
- How to Connect to Hidden Wireless Network
- Step 3: How to Auto-Connect at Boot-Time
- Why Is Linux Server Not Connecting to Wifi?
- Step 1: Install Wireless Drivers From Ubuntu ISO
- Step 2: How to Check if Wireless Device Is Detected
- Step 3: How to Install Missing Driver Module Using Ubuntu
- Step 4: Automatically Loading Module at Boot-Time
- Resolve the DNS Issue
- Conclusion
How to Configure Wireless on Any Linux Desktop
If you are a mobile Linux user one of the first things you need to do is to connect that mobile device to a wireless access point. By default, the standard Wi-Fi tools for the Linux desktops are straight-forward and reliable. That of course presumes you are using the standard desktops (GNOME or KDE). But what happens when you opt for a different desktop such as E17 or Fluxbox? Or what if the “default” standards aren’t flexible enough or feature-rich enough for your needs. In those instances you need to take a look at a different toolset for connecting you to a wireless access point.
What are your options? You could go for a GUI or command the command line. I would like to offer options for both GUI and command line with the help of Wifi Radar and ifconfig .
Assumptions
I will assume that you do have wireless hardware that does work in Linux. If you have found yourself with a wireless card that does not seem to work you might consider installing the latest Ubuntu and enabling the proprietary driver for your device. Most often this will have your wireless working much quicker than trying to go the ndiswrapper route.
I will also assume you have both SSID and the authentication key for your wireless connection, otherwise you probably wouldn’t be attempting to make this connection in the first place, right?
Wifi Radar
For many, Wifi Radar is a Python/PyGTK2 application that offers quite a bit more features and flexibility than the average tool (it will even speak the status of your connection – when connecting or disconnecting – so you know, without looking, if you are connected.) Wifi Radar is easy to install as well as use.
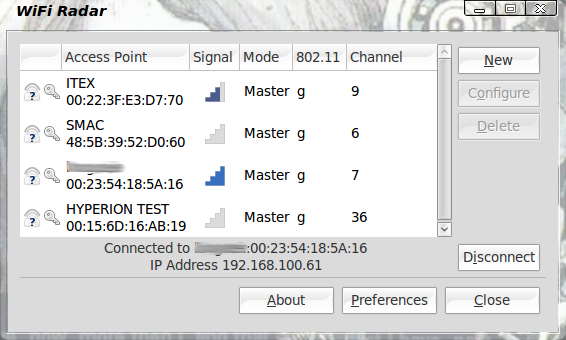 Since Wifi Radar is found in most all default distribution repositories, the installation is as simple as installing any Linux application. Just open up your Add/Remove Software tool and install. Once Wifi Radar is installed you can find it in Applications > Internet. When you start up Wifi Radar it will auto scan for any wireless networks and will display the available access points for you (see Figure 1). To connect to a network just select the network and click Connect and you will be prompted for a password (if the access point is set up to require one).
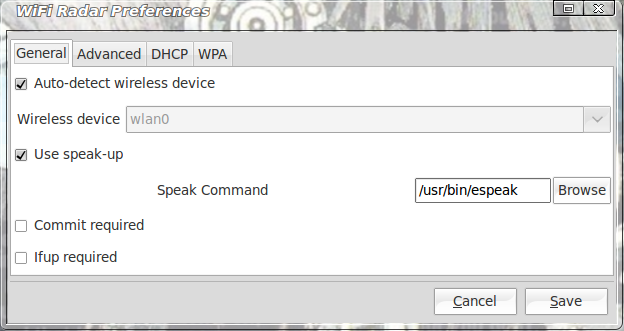 You can also dig deep within the preferences of WiFi Radar. If you do this, do it with caution. Much of the configurations are commands that are set up to work with the wireless networking system and many of these commands are fairly complex. What options you can safely tinker with are in the General tab. In this tab (see Figure 2) you can set Wifi Radar to auto-detect your wireless device (which is not set by default) and you can also set the Speak option. By default the Speak option uses the say command which is buggy at best. Instead, reconfigure this to use the espeak command. Once you do this the Speak option will work.
You will notice that WiFi Radar does not have a system tray icon. Don’t worry – when you close the application you will not be disconnected from your network.
Now let’s take a look at setting up a wireless connection from the command line.
Command Line
Believe it or not, this isn’t as challenging as it might seem. I will demonstrate how this is done on a Ubuntu machine. For other distributions you might have to alter the location of scripts or the name.
What you will need, in order to be able to establish this connection, are the following:
- ifconfig: Enable your wireless device.
- iwlist: List the available wireless access points.
- iwconfig: Configure your wireless connection.
- dhclient: Get your IP Address via dhcp.
- wpa_supplicant: For use with WPA authentication.
Make sure you have all of the above tools on your computer before you continue. To test for this tools you can, from within your terminal window, issue the commands:
- which ifconfig
- which iwlist
- which iwconfig
- which dhclient
- which wpa_supplicant
You should see the path where each tool is installed. If you receive an error that a command is not installed you will need to install it. This should not be the case, since these are standard tools that are required for wireless networking.
Let’s take a look at how this is done when you are connecting to a non-WPA authentication-based wireless network.
Now that you have confirmed they are installed start off with the command:
ifconfig wlan0 up
Where wlan0 is the name of your wireless device (this is most often the default). The above command will bring your wireless device up so it is ready to use. The next phase is to scan for any wireless access points with the command:
iwlist wlan0 scan
From the output of the scan you should see a line (or lines) like:
Where NETWORK_NAME is the name of an available wireless network.
Now that you have your network name (and you know it’s available) you can connect to that network with the command:
iwconfig wlan0 essid NETWORK_NAME key WIRELESS_KEY
Where NETWORK_NAME is the name of the network you want to connect to and WIRELESS_KEY is the security key for that network. NOTE: The iwconfig command defaults to HEX values for wireless keys. If you need to use ascii you have to prepend the “s” prefix to your key like so:
iwconfig wlan0 essid NETWORK_NAME key s:WIRELESS_KEY
With your connection made, you now have to get an IP address for your machine using the dhclient command like:
Simplify the Process
Naturally you do not want to have to issue all of those command in order to bring up a wireless network. You can make this a lot easier by creating a script to handle the task. A possible script might look like this:
#! /bin/bash
ifconfig wlan0
iwconfig wlan0 essid NETWORK_NAME key WIRELESS_KEY
dhclient wlan0
Where NETWORK_NAME and WIRELESS_KEY are unique to the network you are connecting to. Save that file with the name wireless_up and give it executable permissions with the command chmod u+x wireless_up and you are ready to use that file to bring up your wireless. You can even move that file to /usr/local/bin so the command is global. All you would have to do to bring up your wireless connection is issue the command wireless_up and you’re ready to go.
WPA
For WPA-based networks you will need to take a different approach. Do the following:
1. Issue the command wpa_passphrase SSID PASSWORD (Where SSID is your network ID and PASSWORD is your wireless password). This will generate a psk string that you will use in the configuration file.
2. Edit the /etc/wpa_supplicant.conf file to reflect:
Where SSID is the actual ID of your wireless network and PSK is the string generated by the wpa_passphrase command.
3. Run the wpa_supplicant daemon with the command:
wpa_supplicant -B -i INTERFACE -DWext -c /etc/wpa_supplicant.conf
Where INTERFACE is the name of your wireless interface.
4. Now make sure you are associated with your network with the command iwconfig INTERFACE (Where INTERFACE is the name of your wireless interface).
5. Get an IP address with the command: dhclient INTERFACE (Where INTERFACE is the name of your wireless interface).
You should now be on the wireless network.
You can automate this by creating an entry in /etc/network/interfaces like this:
iface INTERFACE inet dhcp
  pre-up wpa_supplicant -Bw -Dwext -i INTERFACE -c /etc/wpa_supplicant.conf
  post-down killall -q wpa_supplicant
Where INTERFACE is the name of your wireless interface.¬â€
Final thoughts
There are plenty of ways to connect to a wireless network in Linux. So long as your hardware is working, you shouldn’t have a problem finding a tool that will help you get connected. Whether it’s a GUI or command line, Linux has you covered on the wireless front.
Источник
How to Enable Wifi on Ubuntu

Are you a developer or a website tester who uses Ubuntu to code and troubleshoot? If yes, we have got great news for you regarding Wifi connectivity on Linux.
As we all know, Ubuntu is a Linux-based system, liked by developers all around the world. But, in addition to developers, many users prefer Ubuntu because it’s open-source, user-friendly, and customizable.
Read along to learn how to access the Wifi connection on Linux systems and servers.
Table of Contents
How Do I Enable Wireless on Linux Using nmtui?
Network Manager Text User Interface nmtui is essentially a command-line terminal that you use in a Linux system for network configuration. You can invoke the graphical text interface to enable Wi-fi on Ubuntu in a more convenient way.
Launch nmtui
First, you must execute the command $ nmtui in the terminal to launch the graphical interface. Here, you’ll see three options out of which you can select “Activate a connection” and click OK.
Enable Wireless Network
The system will scan the available wireless networks and present the list on the screen. From here, you can select your home wi-fi network and press enter. Next, similar to Windows, you must enter the password in the pop-up dialogue window and select OK to confirm.
After the successful wireless connection, you can go back and select “quit” to close the nmtui interface. You can also test the Internet connectivity by executing the ping command to the Google DNS:
How Do I Enable Wi-fi in the Terminal on Linux?
The good news is you can use the command terminal on the Ubuntu 20.04 desktop and server to connect to Wifi network, courtesy of the wpa_supplicant.
The advanced Wifi networks are protected with WPA-PSK or WPA-Personal, a pre-shared key instead of WPA-Enterprise.
A supplicant is essentially a client software that you can install on your computer or laptop. Next, you need to authenticate the supplicant to connect to the wireless network. Finally, you can implement a WPA supplicant component using the wpa_supplicant.
Step 1: How to Find the Name of the Wireless Interface and Network
Open the command terminal in Ubuntu 20.04 and run the following command to know the name of the Wifi interface:
You should know that “wlan0” is the most common name used for the wireless network interface on most Linux systems without Systemd.
However, Ubuntu uses Systemd; that’s why you’ll see the name of your wireless network interface as “wlp4s0.”
Another piece of information that you’ll see in the terminal is the access point. Again, if the Wi-fi isn’t enabled on the Linux system, there won’t be any access point associated with the wireless interface.
However, if you can’t see your wireless interface, you can use the following command:
- sudo ifconfig wlp4s0 up
Next, your computer needs to scan all the networks in the vicinity to search for your home wireless network. Then, all you need to do is to replace “wlp4s0” with the name of your wireless interface, which you found out using the above command.
The next step is to use the following command to learn the network name identifier ESSID:
- sudo iwlist wlp4s0 scan | grep ESSID
Step 2: How to Connect to Wifi Network Using WPA_Supplicant
Once you know the name of the wireless interface and network, you can install wpa_supplicant on Ubuntu 20.04 using below command line:
- sudo apt install wpasupplicant
Next, you should create a configuration file with the name wpa_supplicant.conf with the help of the wpa_passphrase utility.
You must be wondering about the purpose of creating the file. Essentially, the wpa_supplicant-conf is the configuration file that includes all the wireless networks you want the computer to access.
You can run the below command on the terminal to create the configuration file:
- wpa_passphrase your-ESSID your-wifi-passphrase | sudo tee /etc/wpa_supplicant.conf
Note: You must write the name of your network ESSID and passphrase in the above command.
The main purpose of the above command is to write the output in the /etc/wpa_supplicant.conf file. In the next step, you must run this command to connect the wireless card and Wifi access point:
- sudo wpa_supplicant -c /etc/wpa_supplicant.conf -i wlp4s0
The output indicates whether the Internet connection has been successfully established or not.
How to Stop the Network Manager
If the wifi connection is successful, you should execute the command to stop the Network Manager. The Network Manager can create a wifi connection problem in the Ubuntu desktop edition if you are using wpa_supplicant. That’s why it’s essential to halt Network Manager.
- sudo systemctl stop NetworkManager
You can permanently disable Network manager from auto-starting at boot time using below command line:
- sudo systemctl disable NetworkManager-wait-online NetworkManager-dispatcher NetworkManager
Once the Internet connection is successfully established, you can execute “iwconfig” to see the associated access point to your network interfaces.
Usually, the wpa_supplicant runs in the foreground. However, you can use the CTRL+C to stop the process and run it in the background. All you need to do is to add the -B flag in the command line:
- sudo wpa_supplicant -B -c /etc/wpa_supplicant.conf -i wlp4s0
At this point, your Ubuntu 20.04 desktop is authenticated and connected to your home Wi-fi network. However, you still don’t have a private IP address. You can obtain an IP address from the DHCP server by executing this command in the terminal:
Moreover, you can also check your IP address by writing the below command in the terminal:
How to Connect to Hidden Wireless Network
What if your wireless modem doesn’t broadcast ESSID: Don’t worry; all you need to do is add the “scan_ssid=1” in the /etc/wpa_supplicant.conf file.
Step 3: How to Auto-Connect at Boot-Time
If you want to connect to the Wifi network at the boot time automatically, you must edit the wpa_supplicant.service file. Before editing the file, you can copy it from the directory /lib/systemd/system/ to /etc/systemd/system.
This way, the new version of wpa_supplicant doesn’t override your modifications.
- sudo cp /lib/systemd/system/wpa_supplicant.service /etc/systemd/system/wpa_supplicant.service
You can use Nano, a command-line text editor to modify the file content:
- sudo nano /etc/systemd/system/wpa_supplicant.service
In the file, you need to search for this line:
- ExecStart=/sbin/wpa_supplicant -u -s- -0 /run/wpa_supplicant
You must add the network interfaces name in this command:
- ExecStart=/sbin/wpa_supplicant -u -s -0 /etc/wpa_supplicant-conf -i wlp4s0
Another important thing to consider here is to restart wpa_supplicant in case of detection of a failure. To address this issue, add this line right under the ExecStart command:
Moreover, you should command the below line using the # in the beginning:
In the end, save and close this file. Moreover, if you use the Nano text editor to modify the file, press Ctrl+0 and Enter to confirm the changes and Ctrl+X to complete the file.
You can reload systemd using this command:
- sudo systemctl daemon-reload
Next, you should enable wpa_supplicant services to start at every boot time automatically:
- sudo systemctl enable wpa_supplicant.service
Why Is Linux Server Not Connecting to Wifi?
If you cannot connect to Wifi network, it may be because of a hardware or software issue. But, first, it’s better to rule out the hardware issues with the drivers because the diagnosis is straightforward.
First, execute the following command:
Your local host is essentially the address to verify the circuitry for the NIC. If you are unable to ping, it means the problem is with your Wi-fi driver. However, if the ping comes back, most likely, the problem is with the software.
Step 1: Install Wireless Drivers From Ubuntu ISO
To address the software problem, you can use the Ubuntu ISO file to reinstall the Wi-fi drivers. First, you can place the Ubuntu ISO in the home directory and execute the below command to mount Ubuntu ISO to the virtual drive:
- sudo mkdir /media/cdrom
- sudo mount -o loop ubuntu-*.iso /media/cdrom
You should navigate to “Software & Updates,” check the CDRom and enter the password upon request from the dashboard.
Lastly, tap on the “Additional Drivers” tab to choose the “Wireless Network Adapter” option and select “Apply Changes.”
Step 2: How to Check if Wireless Device Is Detected
If Ubuntu 20.04 is unable to detect the wireless device, you can open the command terminal and execute the command:
On the other hand, you must write this command if you use a USB dongle or an internal wireless card:
If the output contains the “Network Controller” or “Ethernet Cable Controller,” Linux can detect the wireless device.
In addition to that, you can also use the following commands to see the wireless device:
If the output contains the network description, Ubuntu can’t recognize the wireless device. If not, you need to install the missing driver module.
Step 3: How to Install Missing Driver Module Using Ubuntu
First, you must execute the command to see the list of used modules:
If you want to activate a particular module, you should execute the command using the name of the chipset as a module name:
- sudo modprobe modulename
Next, you can execute the “lsmod” command to see if the module is installed correctly or not.
Step 4: Automatically Loading Module at Boot-Time
In case the module doesn’t load at the boot, you must load it permanently using the command:
You can open the Nano text editor using the above command. Then, all you need to do is write the module’s name at the end of the file and save it. Moreover, you must reboot the system to see if the wireless card can detect the wifi networks.
Resolve the DNS Issue
Although it’s a rare issue, it’s better to check if you face connectivity issues on a Linux server. First, execute this command to see the Lan address of the router:
- nmcli device show wlan1 | grep IP4.DNS
You can change the wlan1 in the above command to the wireless network name you use. Next, execute the below command to see the destination:
Now, you have all the information; it’s time to ping the router’s LAN address and Google’s DNS servers:
After diagnosing the DNS issue, you can modify the router DNS to either Open DNS or Google server. You can also contact the router manufacturer to check the DNS issue further.
Conclusion
The primary purpose of the above article is to discuss both the graphical and text user interface methods to enable Wifi on your Linux system or server.
Furthermore, you can also use the troubleshooting methods if Ubuntu can’t connect to the wireless network.
Источник


