- How to Change User Folder Name in Windows 10 – 2 Ways [MiniTool News]
- Summary :
- How to Change User Folder Name in Windows 10 – 2 Ways
- Way 1. Use the Top-right Search Bar in File Explorer
- Way 2. Change User Folder Name in Windows 10 with Registry Editor
- Bottom Line
- ABOUT THE AUTHOR
- How to change User Folder Name in Windows 10 Home
- Replies (2)
- How to Rename User and User Folder in Windows 7, 8, 8.1 or 10 OS.
- How to Rename User and User Profile Folder in Windows 10/8/7 *
How to Change User Folder Name in Windows 10 – 2 Ways [MiniTool News]
By Alisa | Follow | Last Updated October 10, 2020
Summary :

If you want to change user folder name in Windows 10 but find that there is no Rename option when you right-click the user folder in C drive, this post provides 2 ways to let you rename user folder in Windows 10. FYI, MiniTool software provides some useful software to help you better manage your Windows computer incl. data recovery software, disk partition manager, etc.
To change user folder name in Windows 10, the common practice we may think of is to go to C drive and open the Users folder in Windows 10, then right-click the target user folder and click Rename to give it a new name.
However, you may find that there is no Rename option after you right-click the user folder. Then how to change user folder name in Windows 10? This tutorial provides 2 ways to help you with Windows 10 change user folder name task.
How to Change User Folder Name in Windows 10 – 2 Ways
Way 1. Use the Top-right Search Bar in File Explorer
It’s tricky that you will find the Rename option to rename the user folder in Windows 10 if you follow the operation below.
- You can go to C drive (the OS drive) -> Users folder.
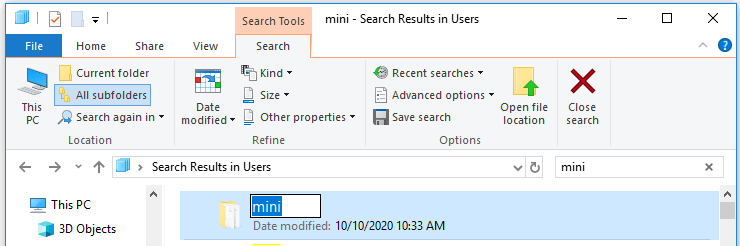
- Then click the search box at the upper-right in File Explorer, and search the user folder name you want to change.
- In the search result list, find the user folder and right-click it and you will see the Rename option. Click Rename to change the name for the user folder in Windows 10.
If you are wondering how to change c/users/username in Windows 10, you may try this way.
But some people find that this only changes the user folder name, but not the user account name. If you search a file in the user folder, you will find that the user folder name in the directory is still the old one. To really change user account name in Windows 10 and rename the user folder, you can try Way 2.
Attention: Changing user folder name or editing the Registry is risky and may cause data loss. Do at your own risk. You can make a backup of your Windows OS and important data with free backup tool like MiniTool ShadowMaker. You can also create a system restore point to easily restore Windows 10 OS if something bad happens.
Way 2. Change User Folder Name in Windows 10 with Registry Editor
This way is a little bit complicated, but you can try if you really want to rename a Windows 10 user folder.
Step 1. Create a new local user account.
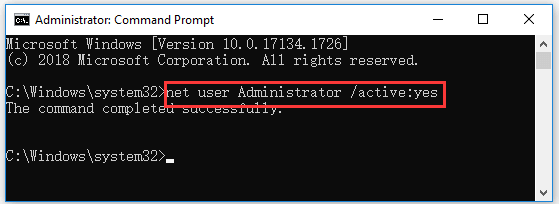
You can press Windows + R, type cmd, and press Ctrl + Shift + Enter to open elevated Command Prompt in Windows 10.
Type net user Administrator /active:yes command, and press Enter to execute the command to create a new Administrator account.
Step 2. Log in the Administrator account.
Next you can click Start -> User -> Sign out to sign out the current user account. Then select the Administrator account that you created to log in.

Step 3. Rename the user folder in OS drive.
Then you can open C drive on your computer and open Users folder. Right-click the target user folder and rename it.
Step 4. Change c/users/username in Registry Editor.
Now you can press Windows + R, type regedit, and press Enter to open Registry Editor in Windows 10.
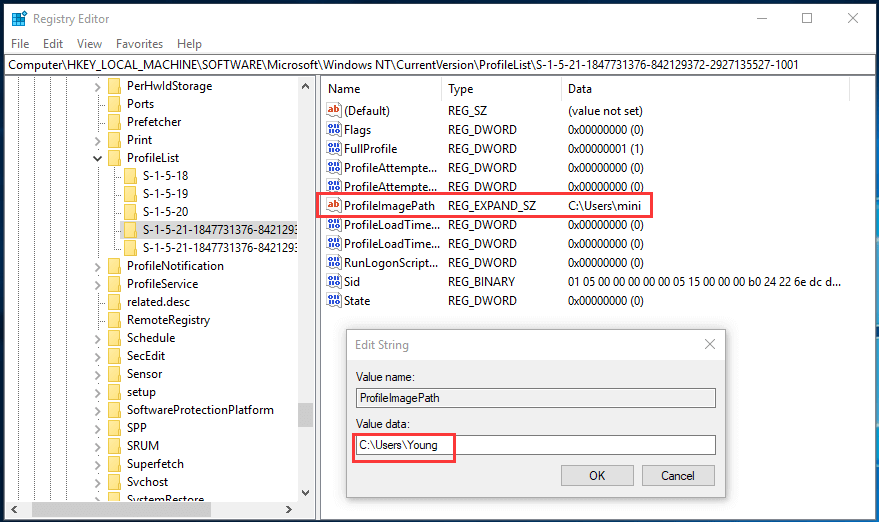
In Registry Editor window, you can expand the folder in the left panel as the following path: HKEY_LOCAL_MACHINE\SOFTWARE\Microsoft\Windows NT\CurrentVersion\ProfileList\ \.
If you find several User SIDs and don’t know which one to change, you can click each User SID and check its values in the right window to find the right one with the target user folder name you want to change.
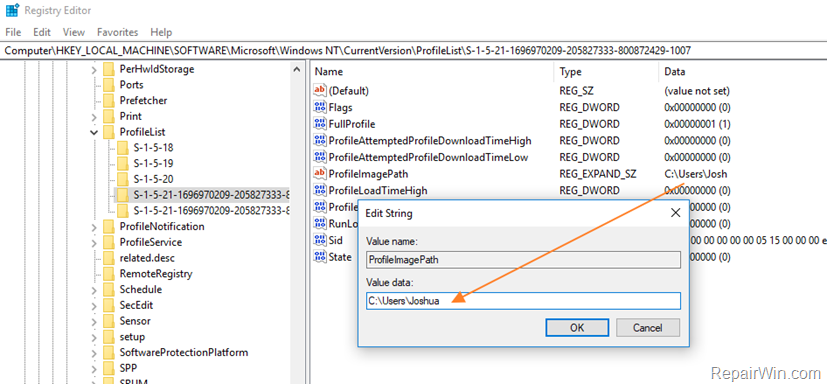
Click the User SID and double-click ProfileImagePath key in the right window. Then you can input the new user folder name at the end of the directory under Value data. Click OK to save the changes. Restart your computer to make the changes take effect.
Attention: Before you edit the registry, it’s highly advised you back up Windows 10 Registry first in case something goes wrong. Check: How to backup and restore Registry.
Step 5. Change user profile folder name in User Accounts window.
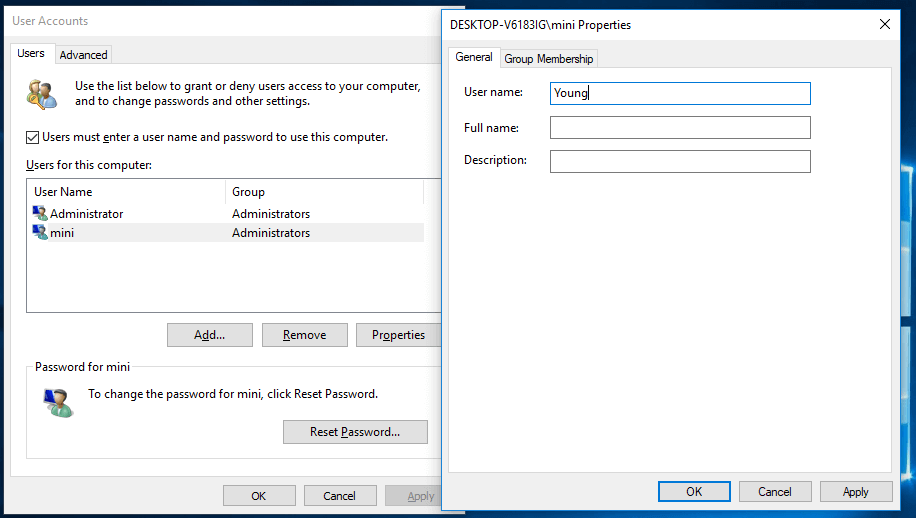
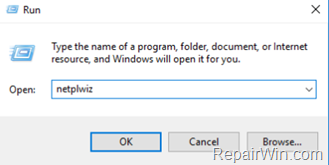
Next you press Windows + R, type netplwiz in Run dialog, and press Enter to open User Accounts window.
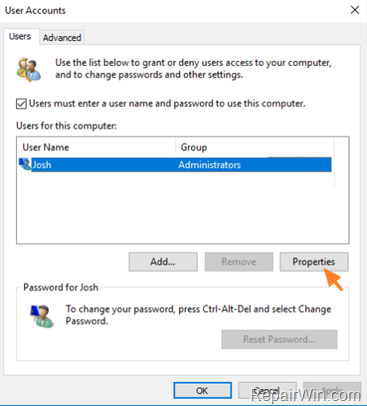
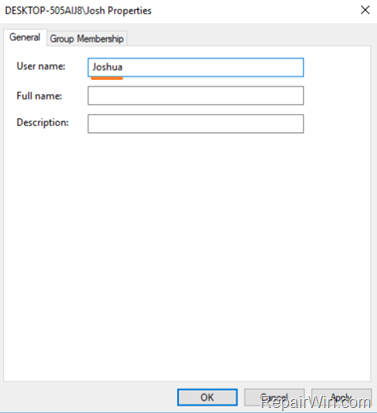
Select the target user account, and click Properties to open its properties window. Change your user name. You can copy the new user name in File Explorer and paste it into the box to avoid wrong input. Click Apply and click OK to save the setting.
Step 6. Sign in with the new user account.
Then you can click Start -> User -> Sign out to sign out Administrator account. Then select the user account with the new name to sign in.
Step 7. Delete the Administrator account.
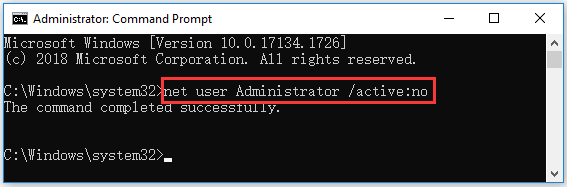
At last, you can press Windows + R, type cmd, and press Ctrl + Shift + Enter to run Command Prompt as administrator again. Type the command net user Administrator /active:no in Command Prompt, and press Enter to delete the Administrator account you created in Step 1.
Bottom Line
Please be noted that we do not advise you to change user folder name in Windows 10 or edit the registry. If you really want, Way 1 lets you change the c/users/username folder name in Windows 10 but not change the user account name. If you want to change both, you may try Way 2, but be careful, do not mess up, or you may be unable to log into your account and cause computer malfunction.
ABOUT THE AUTHOR

Position: Columnist
Alisa is a professional English editor with 4-year experience. She loves writing and focuses on sharing detailed solutions and thoughts for computer problems, data recovery & backup, digital gadgets, tech news, etc. Through her articles, users can always easily get related problems solved and find what they want. In spare time, she likes basketball, badminton, tennis, cycling, running, and singing. She is very funny and energetic in life, and always brings friends lots of laughs.
How to change User Folder Name in Windows 10 Home
We are giving a laptop computer to my sister and just upgraded to Windows 10 Home for her.
I was able to change the Computer Name, but I now need to know how to change the User Folder Name.
Also. do I need to change the name for the Upgrade to Windows 10 to my sisters name also. It currently lists my name.
Can you please tell me how to do these name changes so «things» don’t get messed up.
Thanks for your help.
Replies (2)
Hi Joanne,
I am Sumit, an Independent Advisor and a 2-Year Windows Insider MVP here to help.
The best approach to this to create a new user account and delete the older one after signing into new.
Make sure to grant admin priviliges to the new account.
There is a way to change the name of user profile folder but it isn’t a great method, in my opinion because of risks involved.
Disclaimer:
There are links to non-Microsoft websites which would provide accurate and safe information. Watch out for ads on the websites which are frequently classified as a PUP (Potentially Unwanted Products). There is no need to buy paid products to fix your computers as they do more harm than good sometimes.
Sumit
Available 6 PM — 8 AM PST
It is always good to include your PC Specs, make and model in the question
Never Call the Phone numbers received in Emails from the Microsoft Community
1 person found this reply helpful
Was this reply helpful?
Sorry this didn’t help.
Great! Thanks for your feedback.
How satisfied are you with this reply?
Thanks for your feedback, it helps us improve the site.
How to Rename User and User Folder in Windows 7, 8, 8.1 or 10 OS.
If you ‘re using a Windows 10/8 or 7 personal computer (not part of a Domain) and you want to rename the user account name and the related User Profile folder name then this tutorial may be useful for you. As you may know when you change the username of a user in Windows, the related user folder remain unchanged and you must perform some additional steps to accomplish this. In this tutorial you ‘ll learn how to rename a user in Windows and how to rename the user folder in order to match the name of the user.
How to Rename User and User Profile Folder in Windows 10/8/7 *
* Important: To apply the steps below you must sign into Windows, by using an account with Administrative privileges.
Assumption: Let’s suppose that the current username and the related profile folder is named «Josh» and you want to change the account name and the profile folder name to «Joshua».
Step 1. Rename the User from User Account Properties.
To change the username of a local account in Windows:
1. Press simultaneously the Windows  + R keys to open the run command box.
2. Type netplwiz & Press Enter.
3. Highlight the user that you want to rename and select Properties.
4. Then change the current User name (e.g. «Josh) with the new one (e.g «Joshua»)
5. When done click Apply and OK twice to close all open windows.
Step 2. Change the User Profile Folder Path in Registry.
1. Open Registry Editor: To do that:
-
- Press simultaneously the Windows
 + R keys to open the run command box.
 - Type regedit & Press Enter.
- Press simultaneously the Windows

2. Navigate to the following key at the left pane:
3. Click at any “S-1-5-21-xxx…” registry key, until you find which one contains the path for your profile folder at the «ProfileImagePath» REG_DWORD value.
* e.g. If your Username is “Josh” then see which S-1-5-21-xxx…” registry key, contains the “C:\Users\Josh” value at ProfileImagePath.
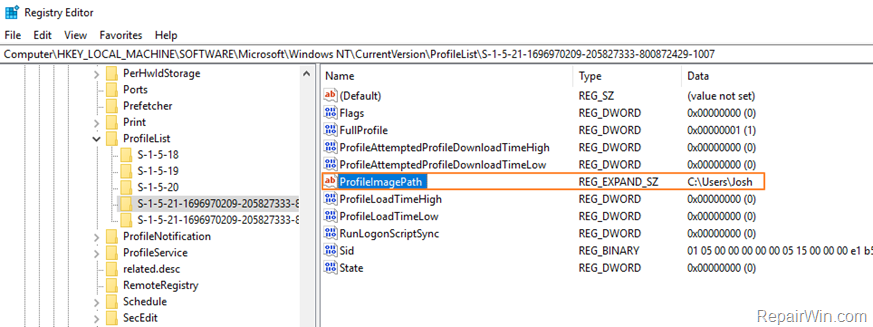
4. When you find that key, double click at ProfileImagePath and rename the current path (profile folder name) to the new one. *
* e.g. At this example we proceed to change the «C:\Users\Josh» folder name, with the new folder name «C:\Users\Joshua».
5. When done, click OK.
6. Close Registry Editor and Restart your computer.
Step 3. Rename the User Profile Folder.
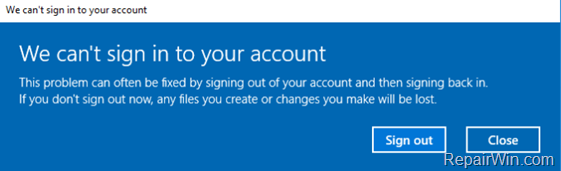
1. After restart you ‘ll be sign to a temporary profile (empty profile) with the message «We can’t sign in to your account». (Click Close at this message and continue below).
2. Open Windows Explorer and explore the contents of the «C:\Users» folder.
3. Right click on the user profile folder (e.g. «Josh» in this example) and choose Rename.
4. Type the new name for the profile folder (e.g. «Joshua» in this example) and press Enter.
5. Click Continue when asked to provide administrator permission to rename the folder. *
* Note: If you receive an «Access denied» error, when you try to rename the user folder, then try to rename the folder in Safe Mode or try the following:
1. Open Command Prompt as Administrator.
2. Type the following command and press enter: net user administrator /active:yes
3. Restart the computer and login as Administrator
4. Rename the user profile folder.
5. Restart again and login to the (renamed) user.
6. If everything is OK, then disable the administrator account by typing this command (in Command Prompt Admin): net user administrator /active:no

6. Restart your computer to login to your profile with all files and settings untouched!
Step 4. FIX Invalid Registry References.
The next step, is to fix in the Registry, the references to the old profile folder. To do that:
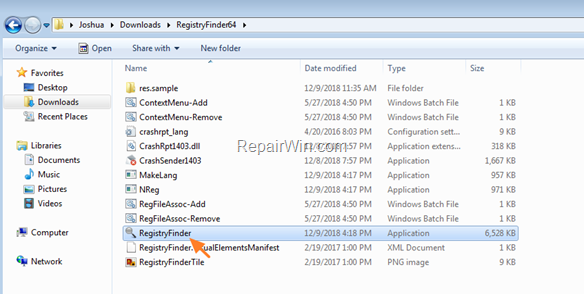
1. Download the Registry Finder utility in an archive format, according your Windows version (32 or 64Bit) and extract the download file (RegistryFinder.zip).
2. From the extracted folder, double click to run the RegistryFinder application.
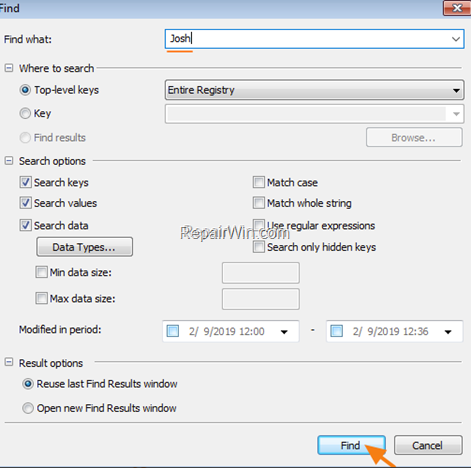
3. In Registry Finder, click the Edit menu and choose Find.
4. Type the old folder name (e.g. Josh») and click Find.
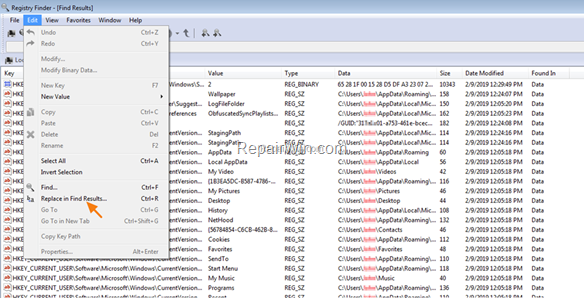
5. When the search is completed, click Edit and choose Replace in Find Results.
6. At ‘Find what’ field type the old name (e.g. Josh») and in the ‘Replace with’ field type the new name (e.g. Joshua). When done, click Replace.
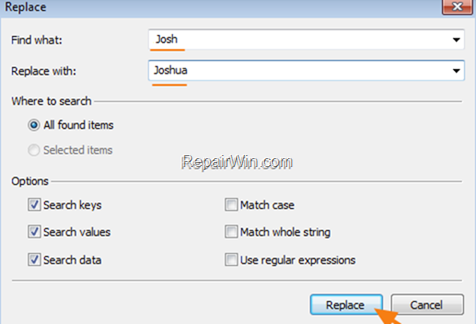
7. When the operation is completed, you should receive an error message that says «error encountered». Just ignore the error message and click No to close the window.

8. Close the Registry Finder and restart your PC.
Step 5. Rebuild the Search Index.
The final step is to rebuild the search index. To do that:
1. Navigate to Windows Control Panel and open Indexing Options.*
* If you don’t see the Indexing Options, set the View (View by) to Small icons.
2. At Indexing Options click Advanced.
3. At Troubleshooting section, click the Rebuild button.
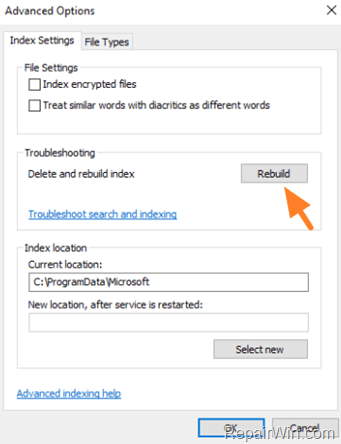
4. Press OK to rebuild the Index.
5. Wait until the index rebuilding is completed and then restart your computer again.
That’s all folks! Did it work for you?
Please leave a comment in the comment section below or even better: like and share this blog post in the social networks to help spread the word about this problem.


