- Change from Windows 10 Single Language to Multiple Languages?
- Replies (2)
- How to Change Windows 10 Display Language Without Reinstalling the Operating System?
- Introduction
- How to change the default display language in Windows 10?
- Disable language synchronization
- The steps to take if you want to change the display language
- Changing region settings
- Conclusion
- How to Change Windows 10 System Display Language?
- Add or Install A Language in Windows 10
- Change Windows 10 System Display Language
- Add languages to Windows images
- Get language resources: Language Pack ISO and Feature on Demand ISO
- Considerations
- Add language packs, LIPs, and Features on Demand
- Mount an image (install.wim) that you plan to deploy using Windows PE or Windows Setup
- Check to see if the image includes FODs with language resources in satellite packages
- Build a custom FOD and language pack repository
- Add language packs, LIPs (LXPs), and language features
- Add languages to the recovery environment (Windows RE)
- Capture the changes
- Next steps
Change from Windows 10 Single Language to Multiple Languages?
Replies (2)
Sumit
Volunteer Moderator- Microsoft Community
Mark the reply as helpful or answered to help others if your query is resolved
6 people found this reply helpful
Was this reply helpful?
Sorry this didn’t help.
Great! Thanks for your feedback.
How satisfied are you with this reply?
Thanks for your feedback, it helps us improve the site.
How satisfied are you with this reply?
Thanks for your feedback.
You would first have to upgrade to Pro in order to do that:
Open Start > Settings > Update & security > Activation
Click the link ‘Go to the store to upgrade or enter a product key’
Click the $99 button to make your purchase (the price might vary by region or depending on the edition you are upgrading from or upgrading to).
Follow the on screen instructions to make your purchase.
Within 5 to 10 minutes, your system will be upgraded to Windows 10 Pro, your personal files, apps and settings preserved.
You won’t get a product key, you get a digital license, which is attached to your Microsoft Account used to make the purchase.
9 people found this reply helpful
Was this reply helpful?
Sorry this didn’t help.
Great! Thanks for your feedback.
How satisfied are you with this reply?
Thanks for your feedback, it helps us improve the site.
How to Change Windows 10 Display Language Without Reinstalling the Operating System?
Read this article to find out how to change the language of Windows 10 interface without having to reinstall it, what system languages can be installed and what settings should be modified for that purpose.
Introduction
In Windows 10, people usually choose the preferred language for the entire operating system when they install it. However, if the language settings were wrong, or people have to use computing devices with certain language preferences, there are some settings to be modified in order to bring them in line with your personal likings.
So if you ever need to change language preferences in Windows 10, this can be done in a quick and easy way with the help of the Settings app and without having to reinstall the operating system.
In today’s article, we will show you how to change the default display language into any other, including doing it for new and existing user accounts.
How to change the default display language in Windows 10?
If you have to move to a different region or you need to use a display language different from the default choice, or the initial language settings for the computing device have been wrong, there is absolutely no point in reinstalling Windows 10. All you need is to modify a couple of system settings to enjoy the experience of using your operating system in the right language.
Disable language synchronization
If you are using a Microsoft account, the language settings will apply to all devices linked to such account. If you plan to change regional and language settings for one computer only, you need to disable synchronization of such settings before you proceed.
This is how you disable language sync in Windows 10.
Open the main system application, Settings. You can do it in any way you prefer. For example, click on the Start button in the lower left corner of your desktop, on the Taskbar, and open the main Windows menu. Use the scroll bar or the mouse wheel to search the list of all programs and applications installed on this computer and find the line Settings, or click on the Settings button in the left side of the user menu, and the application will open.

In the main Settings window, scroll down if necessary and choose the tab Accounts.

In the left panel, go to Sync your settings.
In the right panel, find the section Individual sync settings and the line Language preferences, then set the slider to the Off position (disabled).

When these steps are taken, you can start changing language settings for the copy of Windows 10 installed on this computer, without worrying that this can affect similar settings in other linked devices.
The steps to take if you want to change the display language
To change the display language of your Windows 10, you should close all running applications and do what is described below.
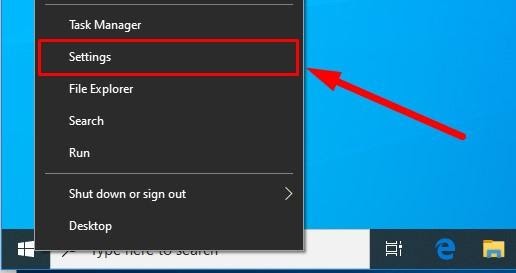
Use any method you prefer to open the Settings application. For example, right-click on the Start button that you can find on the Taskbar, in the left lower corner of the desktop, or press the key sequence Windows + X instead to open the context menu, and select the line Settings. The application will start immediately.
Use the scroll bar or the mouse wheel to navigate the Settings window, and find the tab Time and language.

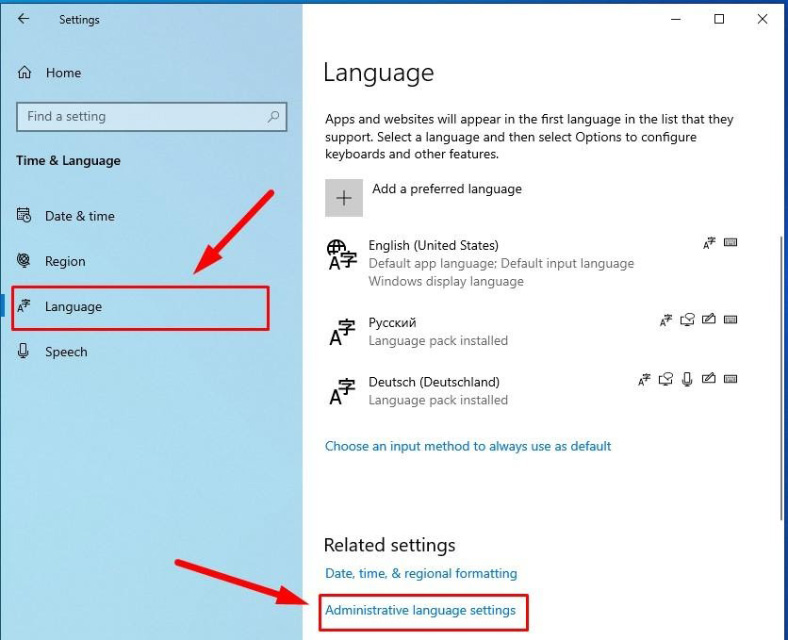
In the left panel, go to Language.
Now look to the right and find the section Preferred languages, where you can prioritize language settings, and click on the button Add a preferred language, with a + (plus) symbol on it.

In the new window Choose a language to install use the scroll bar or the mouse wheel to find the language you need, or start typing its name in the search field above.
Choose the language pack you are planning to use in Windows 10 from the list.

When the language is chosen, hit Next.
In the next page Install language features check the box for Install language pack to confirm your choice (the box with the tick will become blue, i.e. active).

Click Install below.
Changes will take effect after the language package is installed, which usually takes several minutes only. In some cases, restarting your Windows 10 may be required, and then the corresponding language settings will apply to all system elements. The changes will affect the sign-in screen, the Settings app, Windows Explorer, desktop, all applications, preferred browsers and websites you visit. From now on, they will use the new language by default. Besides, Windows 10 may suggest reviewing your current privacy settings.
Changing region settings
If you change the display language for Windows 10 because you move to a different region, then regional settings should be modified too.
Changing them in Windows 10 is easy enough: just follow the steps below.
Open the main system application, Settings, using any way you prefer. For example, press the keyboard shortcut Windows + I to access the app directly.
In the main window of the Settings app, find and select the tab Time and language.
In the left panel, select Region.
In the right panel, find the section Region and use the nested menu Country or region to specify your new location if it differs from the current settings.
In the section Regional format use another nested menu to select proper formats to display date and time in Windows, if these differ for your time and region.

Now look at the left panel and jump to the tab Language again.
Use the scroll bar or the mouse wheel to find the section Related settings and click on the link Administrative language settings.
In the new pop-up Region window, jump to the tab Administrative and in the section Welcome screen and new user accounts hit the button Copy settings.

The new window will show you corresponding screen and account settings. In the section Copy your current settings to check the boxes for each option: Welcome screen and system accounts and New user accounts.

Click ОК one more time, and then restart the computer.
After all these steps, your computer will display proper regional settings specified according to your physical location.
Most of the time, people don’t change or install additional languages regularly for their personal needs. This opportunity to change language packs quickly is more often required in small or large companies that need to deal with customers having various language preferences.
Besides, this option would be useful for people who have to move to a different region and would like their regional settings to comply. Another scenario is buying a computer from another country when the required configuration is not available locally.
Also, you should remember that modifying language settings may disable some functions like Cortana because this service is not supported in certain regions.
Conclusion
Preferred display language is one of the easily customizable things in the operating system. If you ever need to change the language settings, use one of the methods described here to replace the language pack currently used by Windows 10 without having to reinstall it.
See the full article with all additional video tutorials. If you still have any questions, please ask in a comments. Also visit our Youtube channel, there are over 400 video tutorials.
How to Change Windows 10 System Display Language?
In this article, I am going to show you how to change windows 10 system display language. Before this, you may be added a language on windows 10, and it may be a language for the keyboard. But have you ever change the windows 10 system display language or change Windows 10 system language? If no then you’re in the right place because I am going to show here, all the steps that you need to add a language to your windows 10 PC in order to change windows 10 system display language.
Windows 10 supports changing the system default language, So you don’t need to worry about the computer default language when you buy it. In cause if you are using Windows 10, so you can change the language anytime that you prefer. This is a useful environment that multiple users on a single computer, those users can prefer their own preferred language. You can download and install additional languages for Windows 10 to view menus, dialog boxes, and other user interface items in your preferred language. So before to change Windows 10 system display language, you need to add or install a language in Windows 10 first.
Add or Install A Language in Windows 10
Step #1. Go to Settings and click on Time & Language.
Settings – Time & Language
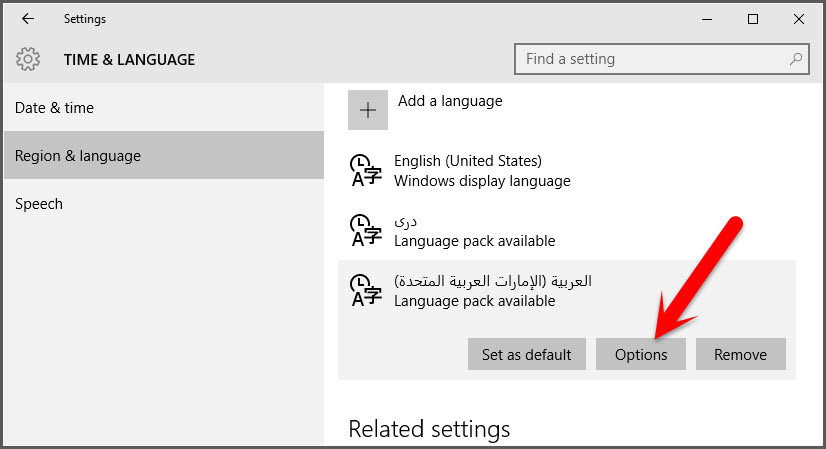
Step #2. Select Region & language from the left pane, and click Add a language.
Step #3. Now from here choose a language that you want to be added or installed on Windows 10, to change windows 10 display language.
Choose a Language
Step #4. After you have selected your preferred language then again get back to Time & Language screen, choose the language that you added or installed on your windows 10 then in order to download the pack for display click on Options.
Step #5. Now click on Download Button to download the language pack.
Download Language Pack
Step #6. Wait for the pack to be downloaded.
Wait to Download
Step #7. When the language pack downloaded completely then Restart your PC to complete the installation. Then finally the language that you preferred to add will install completely on your Window PC.
Reboot Your Windows PC
Change Windows 10 System Display Language
Now use the steps above to Download and Install a language pack on your Windows 10 PC. Now you now how to add and install a language in Wind0ws 10. Follow the step above to change the display system display language.
Step #1. Go to Settings and click on Time & Language.
Settings – Time & Language
Step #2. Select Region & language from the left pane, and click on the language that you add or installed in your Windows PC and finally click on Set as default to change it and will effect after a Restart or your next Sign in.
Set As Default Language
This was all about, how to change windows 10 system display language. If you faced any problem tell us below by comment, feel free to tell us. we’re waiting for your suggestion.
Add languages to Windows images
To add a language to your personal PC, go to Settings > Time & Language > Language, and choose a language to install. Learn more.
You can add languages and regional support to Windows 10 (except for Windows 10 Home Single Language and Windows 10 Home Country Specific editions), and Windows Server.
Windows installations start with at least one language pack and its language components. You can add:
- Language packs: Localization packages for Windows, delivered as a .cab file, for example, Microsoft-Windows-Client-Language-Pack_x64_es-es.cab. Includes UI elements like text for dialog boxes, menu items, and help files.
- Language Interface Packs (LIPs): Partially-localized language pack. Requires a base language pack. In Windows 10, version 1809, LIPs are delivered as Local Experience Packs (LXPs) .appx files, for example, LanguageExperiencePack.am-et.neutral.appx. For previous versions of Windows 10, LIPs are delivered as .cab files, for example, C:\Languages\es-ES\lp.cab.
- Language features: Language features include language basics (like spell checking), fonts, optical character recognition, handwriting, text-to-speech, and speech recognition. You can save disk space by choosing not to include some language components in your image. While this reduction in image size can be helpful when creating images for devices with limited storage, it does lead to an incomplete language experience. Delivered as .cab files, for example, Microsoft-Windows-LanguageFeatures-Basic-fr-fr-Package.cab.
- Recovery languages: UI text for the Windows Recovery Environment (WinRE). Delivered as .cab files. Example: lp.cab, WinPE-Rejuv_fr-fr.cab, and more.
Get language resources: Language Pack ISO and Feature on Demand ISO
OEMs and System Builders with Microsoft Software License Terms can download the Language Pack ISO and Feature on Demand ISO from the Microsoft OEM site or the Device Partner Center.
- For Windows 10, version 1809, LIP .appx files and their associated license files are in the LocalExperiencePack folder on the Language Pack ISO.
- For previous versions of Windows, Language Interface Packs are available as a separate download.
- WinRE language packs are distributed on the Language Pack ISO. Don’t use the WinPE language packs that ship with the ADK.
IT Professionals can download language packs from the Microsoft Next Generation Volume Licensing Site.
After Windows is installed, users can download and install more languages by selecting Settings > Time & language > Language > Add a language.
- Language components must match the version of Windows. For example, you can’t add a WindowsВ 10, version 1809 language pack to Windows 10, version 1803.
- Windows Server: Full language packs are not interchangeable with Windows 10.
Considerations
Install languages, then updates and apps. If you’re adding languages to an image that already contains apps or updates (for example, servicing stack updates (SSU) or cumulative updates (CU), reinstall the apps and updates.
After you install a language pack, you have to reinstall the latest cumulative update (LCU). If you do not reinstall the LCU, you may encounter errors. If the LCU is already installed, Windows Update does not offer it again. You have to manually install the LCU.
Care is required when installing languages to an image that includes FODs with satellite packages. When FODs have satellite packages, the localized text for the feature may be carried in a satellite package rather than the language pack or primary FOD package. Specific steps must be followed when adding languages to an image that includes these FODs.
- Starting with Windows 10, version 2004, the default Windows 10 image includes several FODs with language resources in satellite packages. Before adding languages, you must first build a custom FOD and language repository to ensure that the appropriate satellite packages are pulled in when the language is added.
- For versions of Windows 10 earlier than 2004, this is typically only a concern when you have added a FOD with satellite packages. A best practice here is to add languages first, then FODs.
Size and performance
- You can install multiple languages and components onto the same Windows image. Having too many affects disk space, and can affect performance, especially while updating and servicing Windows.
- LXP-backed language packs are smaller than their Lp.cab-backed counterparts.
- When creating Windows images, you can remove English language components when deploying to non-English regions to save space. You’ll need to uninstall them in the reverse order from how you add them.
- After the Out-Of-Box-Experience (OOBE) is complete, the default language cannot be removed. The default UI language is selected either during the Out-Of-Box-Experience (OOBE), or can be preselected in the image using DISM or an unattended answer file.
- Some time after OOBE, any pre-installed languages that haven’t been used are removed automatically. The language-pack removal task does not remove LIPs.
Cross-language upgrades are not supported. This means that during upgrades or migrations, if you upgrade or migrate an operating system that has multiple language packs installed, you can upgrade or migrate to the system default UI language only. For example, if English is the default language, you can upgrade or migrate only to English.
Add language packs, LIPs, and Features on Demand
We’ll check to see if the image includes FODs with language resources in satellite packages, build a custom and local FOD repository, add languages, and verify all language resources were pulled in for each FOD. Then we’ll add a LIP language and the language Feature on Demand packages.
To save space, you can remove English language components when deploying to non-English regions by uninstalling the language components in the reverse order from how you add them.
Mount an image (install.wim) that you plan to deploy using Windows PE or Windows Setup
Mount the Windows image:
Check to see if the image includes FODs with language resources in satellite packages
First, check to see if the image includes FODs with language resources in satellite packages:
Look for Feature on Demand packages, other than the Language Features, that include a language code in their name. For example, MSPaint:
The two packages here with the en-us language code embedded in the name are satellite packages with language specific resources. If any such package is present in your image, you must build a custom FOD and language pack repository to add languages from. This custom repository needs to include all FODs with satellite packages in your image and all language packs you wish to add. This enables DISM to automatically pull in the right FOD satellite packages when a language is added.
Build a custom FOD and language pack repository
If your image contains FODs with language resources in satellite packages you must build a custom FOD and language pack repository before adding language packs to ensure the language resources for each FOD are pulled in. If you fail to do this correctly, these features will not be localized. Starting with Windows 10, version 2004, this includes features such as Notepad, WordPad, MsPaint, and PowerShell ISE included in the image by default. If your image doesn’t include any FODs with language resources in satellite packages you can skip this section and add the FODs and language packs directly from the respective ISOs.
The following methods are recommended for building a custom FOD and language pack repository:
- If the size of the repository is not a concern, simply copy the contents of the FOD ISO and all language packs into the same directory.
- For a minimally sized repository, use the /export-source switch with DISM to export just the FODs included in your image that have satellite packages and any other FODs you’d like to add. Copy all language packs of interest into the same directory.
In the following example, we’ll build a minimally sized FOD and language pack repository. First, mount the Language Pack ISO and the Features on Demand ISO with File Explorer. This will assign them drive letters.
Next, export all FODs included in your image that have satellite packages, from the FOD ISO. If you know which languages you intend to add, you can include the associated language features too:
Where D:\ is the mount location for the Feature on Demand ISO
Next, copy the language packs of interest into the local repository. In this example, all language packs are copied.
Where E:\ is the mount location for the Language Pack ISO
Add language packs, LIPs (LXPs), and language features
Pre-install languages by adding the language packs and their corresponding Feature on Demand packages, including the base languages if you’re adding a LIP language.
Add a language pack:
Add the language pack(s) of interest. Note how the language pack is sourced from the custom repository:
Check to see that both the language pack(s) and FOD satellite packages containing language resources were added:
You should see something like this in the output:
In addition to the fr-fr language pack now appearing in the image, note how the MSPaint Feature on Demand has satellite packages containing both the en-us and fr-fr language codes present. Make sure this is the case for every FOD with language specific satellite packages, for each language you added.
Satellite FOD packages cannot be added manually, you must allow DISM to automatically pull them in.
If satellite FOD packages are not correctly included during image customization, they won’t be automatically pulled in immediately after the image boots.
Add LIP languages. In this example, we add Luxembourgish, which requires the fr-FR base language:
For Windows 10, version 1809 and later, LIP languages are delivered as LXPs:
Where E:\ is the Language Pack ISO
Verify that it’s in the image:
For earlier versions of Windows 10, LIP languages are delivered as .cab files:
Add language and region Features on Demand to support your language packs and LIPs. We recommend including the Basic, Fonts, OCR, Text-to-speech, and Speech recognition FODs if they’re available for the languages you’re pre-installing. Additionally, include the handwriting language component FOD if you’re shipping a device with a pen.
Not all LIP languages have all language components. Luxembourgish (lb-LU), for example, only has basic and handwriting FODs. You can learn which FODs are available for languages in the LP to FOD mapping spreadsheet
Example: adding Basic, OCR, Text-to-Speech, and Speech Recognition to fr-fr:
Example: adding Basic and Handwriting to lb-LU:
Verify that these packages are in the image:
Remove languages, LIPs, LXPs, and Features on Demand.
You cannot remove a language pack from an offline Windows image if there are pending online actions. The Windows image should be a recently installed and captured image. This will guarantee that the Windows image does not have any pending online actions that require a reboot.
Get a list of packages and features installed in your image:
Remove languages, .cab-based LIPs, and Features On Demand:
Remove LIPs added through LXPs:
Verify that they’re no longer in your image:
Change your default language, locale, and other international settings:
As of Windows 10, version 2004, if a .appx-based Language Experience Pack (LXP) backed language is passed as an argument then the language will be set as the System Preferred UI language and its parent language will be set as the Default System UI language. In prior versions only .cab based language packs were supported.
See which language settings are available:
For online images, use Control Panel, or the International Settings PowerShell cmdlets: Get-WinSystemLocale and Set-WinSystemLocale . This works with languages delivered as LXPs.
For more options, see
Add languages to the recovery environment (Windows RE)
For any language you add to Windows, add the language to the Windows Recovery Environment (WinRE), whenever possible.
Not all languages or LIPs have localized recovery images.
Use languages from the Language Pack ISO, not from the Windows 10 ADK, to localize WinRE.
Known issue: Windows RE included with Windows 10 October 2018 Update Thai language image (en-US base language + th-th language pack) shipped with an issue in which an end user will only see UI components (or English) without Thai language text in the Windows Recovery Environment, the text displayed during recovery (Push-button reset), and/or certain screens during the reboot process of feature updates. To fix this issue pre-install the 2018.11D Quality Update.
Mount the recovery image.
Offline: the recovery image is inside the Windows image:
Online:
Note, Windows RE is inside the Windows image until the Out of Box Experience, after which it is moved to a separate recovery partition.
Where D:\ is the Language Pack ISO.
Verify that they’re in the image:
Example output from /Get-Packages:
Commit changes to the recovery image:
For online images, also remove the mount folder:
Capture the changes
Offline: For Windows images (install.wim)
Commit changes to the Windows image:
Online: Modify a running Windows installation
Generalize and capture the image:
To learn more, see generalize.
Next steps
Localize more of Windows:
- Out of Box Experience (OOBE): Create localized end user license agreements (EULA), registration pages, and instructions for pairing keyboards and mice.
- Retail demo experience: Showcase your new devices on the retail sales floor with localized content.
Localize the installation process:
Add languages to Windows Setup: Now that you’ve added languages to your Windows image, make sure they appear in Windows Setup. You can also create Windows installation media that works in the user’s preferred language.
Add languages to WinPE to help your technicians install Windows in their preferred language.
Add languages to a Windows distribution share to help users on a corporate network select Windows in their preferred language


