- Install Windows from a USB Flash Drive
- What you need
- Step 1 — Format the drive and set the primary partition as active
- Step 2 — Copy Windows Setup to the USB flash drive
- Step 3 — Install Windows to the new PC
- If your Windows image is larger than 4GB
- How to boot your Windows 10 computer from a USB drive
- Check out the products mentioned in this article:
- HP ENVY x360 2-in-1 (From $779.99 at Best Buy)
- Windows 10 (For $139.99 at Best Buy)
- How to boot from USB using Windows 10
- How to boot from USB using your Windows computer’s startup system
- Related coverage from How To Do Everything: Tech:
- ‘How much is Windows 10?’: A cost breakdown of all three versions of Windows 10
- How to take a screenshot on any Windows 10 computer in several different ways
- How to boot your Windows 10 computer into ‘Safe Mode,’ to diagnose and troubleshoot problems
- How to properly uninstall programs on Windows 10, to protect your computer and free up space
- How to Set Computer Boot from USB Drive
- Method 1: Set computer Boot from USB device by Boot Menu
- Examples:
- Method 2: Set USB drive as first Boot device Priority in BIOS/UEFI
- For new computers pre-installed with Windows 8/10:
- For older computers with traditional BIOS:
- How to Boot From a USB Device
- Make your PC boot from a USB flash drive or external hard drive
- How to Boot From a USB Device
- What to Do When the USB Device Won’t Boot
Install Windows from a USB Flash Drive
Here’s how to create a bootable Windows installation USB drive starting with a Windows .iso file or a Windows Setup DVD.
If you’re looking for an easy way to create a bootable USB Windows installation drive, use the media creation tool.
What you need
- Windows 10 install .iso or DVD
- USB flash drive with at least 5GB free space. This drive will be formatted, so make sure it doesn’t have any important files on it.
- Technician PC — Windows PC that you’ll use to format the USB flash drive
- Destination PC — A PC that you’ll install Windows on
Step 1 — Format the drive and set the primary partition as active
Connect the USB flash drive to your technician PC.
Open Disk Management: Right-click on Start and choose Disk Management.
Format the partition: Right-click the USB drive partition and choose Format. Select the FAT32 file system to be able to boot either BIOS-based or UEFI-based PCs.
Set the partition as active: Right-click the USB drive partition and click Mark Partition as Active.
If Mark Partition as Active isn’t available, you can instead use diskpart to select the partition and mark it active.
Step 2 — Copy Windows Setup to the USB flash drive
Use File Explorer to copy and paste the entire contents of the Windows product DVD or ISO to the USB flash drive.
Optional: add an unattend file to automate the installation process. For more information, see Automate Windows Setup.
Step 3 — Install Windows to the new PC
Connect the USB flash drive to a new PC.
Turn on the PC and press the key that opens the boot-device selection menu for the computer, such as the Esc/F10/F12 keys. Select the option that boots the PC from the USB flash drive.
Windows Setup starts. Follow the instructions to install Windows.
Remove the USB flash drive.
If your Windows image is larger than 4GB
Windows USB install drives are formatted as FAT32, which has a 4GB filesize limit. If your image is larger than the filesize limit:
Copy everything except the Windows image file (sources\install.wim) to the USB drive (either drag and drop, or use this command, where D: is the mounted ISO and E: is the USB flash drive.)
Split the Windows image file into smaller files, and put the smaller files onto the USB drive:
How to boot your Windows 10 computer from a USB drive

- If you have a bootable USB drive, you can boot your Windows 10 computer from the USB drive.
- The easiest way to boot from USB is to open the Advanced Startup Options by holding the Shift key when you choose the Restart option in the Start menu.
- If your Windows 10 computer isn’t booting from the USB drive, you may need to tweak the BIOS (basic input/output system) settings.
- Visit Business Insider’s homepage for more stories.
In the old days, people commonly booted their computer from CDs and even floppy disks, but those days are long gone.
Now, if you need to troubleshoot your PC, boot from a different version of the operating system, or install a Windows upgrade, it’s frequently done by booting from a USB drive.
Windows 10 has made booting from USB very easy to do. All you need is a USB memory drive that has a bootable version of Windows, and to follow a few simple steps.
Check out the products mentioned in this article:
HP ENVY x360 2-in-1 (From $779.99 at Best Buy)
Windows 10 (For $139.99 at Best Buy)
How to boot from USB using Windows 10
1. Make sure your computer is on and the Windows desktop is running.
2. Insert the bootable USB drive into an open USB port on your computer.
3. Click the Start button and then click the Power icon so you can see the Shutdown options.
4. Press and hold the Shift key, then click «Restart.»
5. Your computer will shut down, and when it restarts, you’ll see the Advanced Startup Options screen. Choose «Use a device.»
6. Choose the USB device that you want to boot from, and your computer will then restart using your USB drive.
How to boot from USB using your Windows computer’s startup system
If the Windows 10 boot method doesn’t work, it might be because your PC’s BIOS (basic input/output system) doesn’t support it. You can still boot from the USB drive, though you will need to tweak the BIOS settings.
Unfortunately, every BIOS screen is configured differently, so you will need to explore the options for yourself.
1. Shut off your computer.
2. Turn it back on and press the key indicated briefly on the startup screen to enter your BIOS Setup. It’s usually Escape, F1, F2, F8, F11, or F12. If no such screen appears, your BIOS may be set to «fast boot» mode, so you will need to experiment with different keys at bootup, before the Windows screen appears. For more information, you should consult the documentation that came with your PC.
3. In the boot menu, look for the boot order controls and move the USB drive to the top of the list.
4. Save your settings and restart the computer with the USB key installed.
Related coverage from How To Do Everything: Tech:
‘How much is Windows 10?’: A cost breakdown of all three versions of Windows 10
How to take a screenshot on any Windows 10 computer in several different ways
How to boot your Windows 10 computer into ‘Safe Mode,’ to diagnose and troubleshoot problems
How to properly uninstall programs on Windows 10, to protect your computer and free up space
Insider Inc. receives a commission when you buy through our links.
How to Set Computer Boot from USB Drive
This document shows how to set your computer to boot from USB flash drive. You can set your computer to boot from USB flash drive by the following ways.
Method 1: Set computer Boot from USB device by Boot Menu
Guide to set your computer boot from USB drive:
Step 1: Insert USB flash drive to computer.
Step 2: Power on or restart computer. When vendor logo appears on screen, press Boot Option Key repeatedly until Boot Option Menu appears. You can find the Boot Option Key for your computer from the following table.
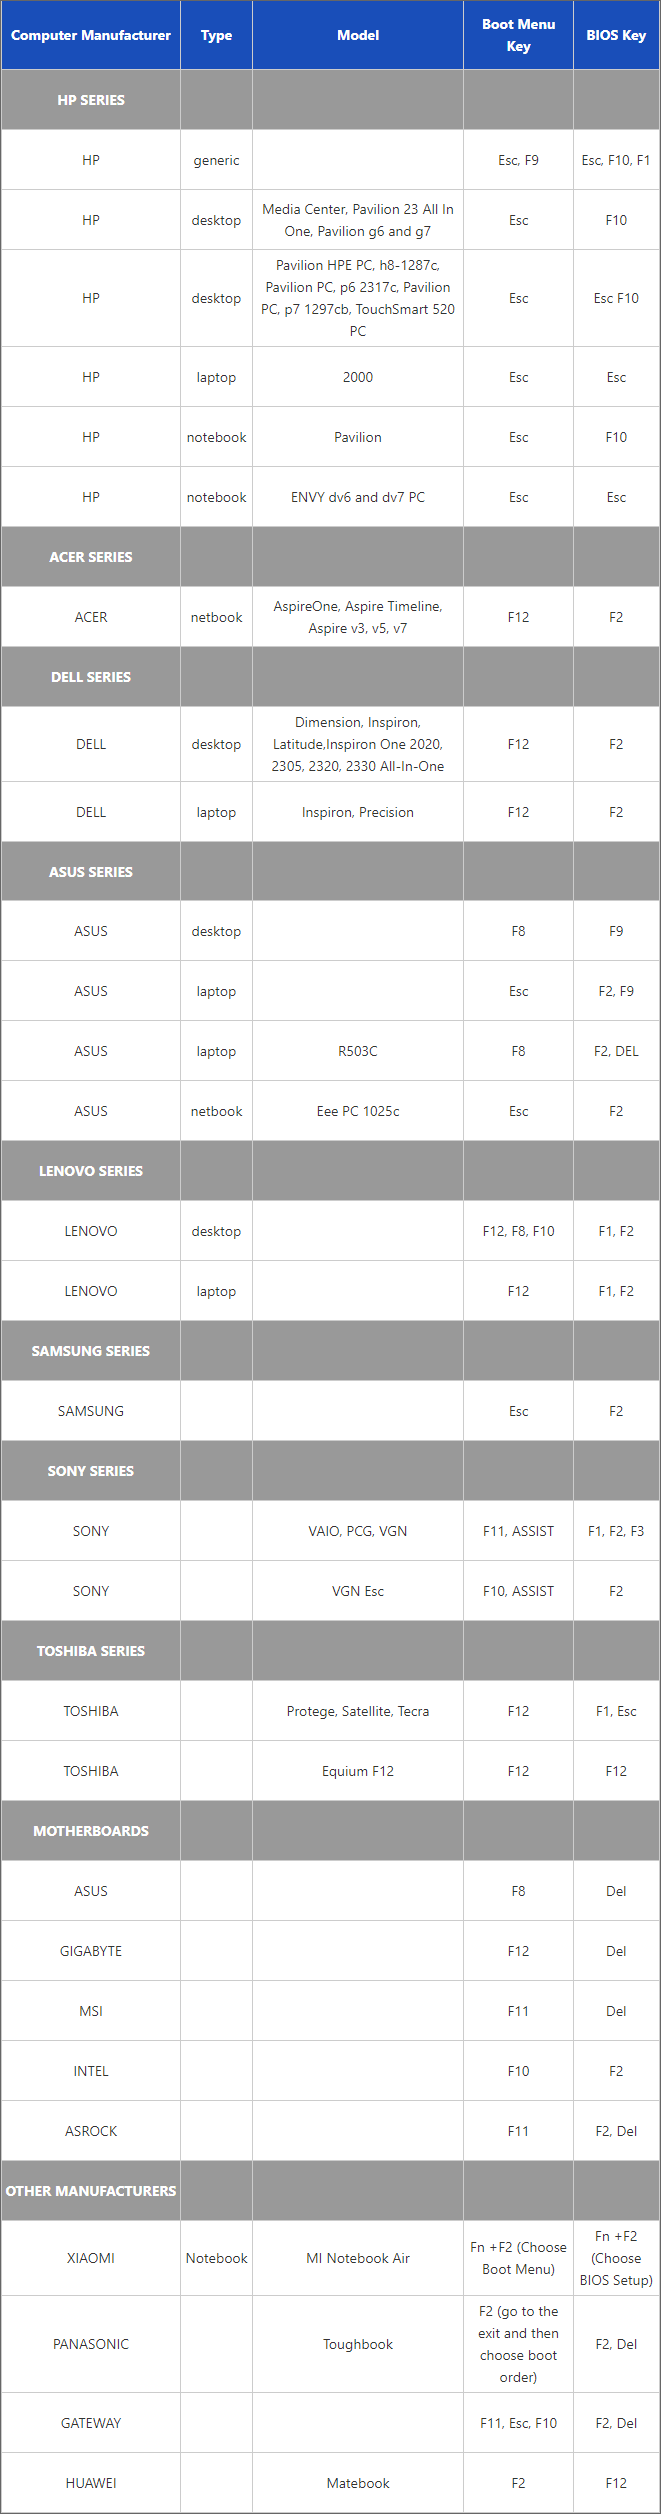
. Click here to see more.
Step 3: When Boot Menu appears, choose USB Disk or UEFI: USB Disk to boot your computer. Tips: Boot Menu may show USB drive name as USB HDD or other name. If fail, please try again.
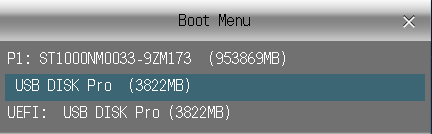
Tips: USB Disk and UEFI: USB Disk, both of them allow you to boot from iSunshare Password Reset disk.
Examples:
Example 1. Set Dell laptop or computer boot from USB Drive.
Insert the USB stick into a USB port and start or restart computer. When F12 = Boot Menu appears in the upper-right corner of the screen, press . When Boot Option Menu appears, choose USB stick to boot from.
Example 2. Set HP laptop to boot from USB flash drive.
Insert USB memory stick to computer and start or restart HP computer. When HP Logo appears on screen, press F9 to enter BOOT MENU (Boot Device Options), and then choose USB memory stick to boot from.
Example 3. Set Acer laptop to boot from USB flash drive.
Insert USB memory stick to Acer laptop and start or restart Acer laptop. When Acer logo appears on screen, press F12 to enter Boot Device Options, and then choose USB memory stick to boot from.
Method 2: Set USB drive as first Boot device Priority in BIOS/UEFI
If you boot your compouter from USB drive in this way, a few more steps are needed to do. But because of differences between traditional BIOS and UEFI BIOS, this method will talk about how to set USB drive as first boot device in BIOS Setup in two parts.
For new computers pre-installed with Windows 8/10:
Step 1: Start computer (Eg. Asus) and press UEFI key to enter UEFI BIOS Utility window.
Step 2: Click Exit/Advanced button in the upper right side of window.
Step 3: Choose Advanced Mode.
Step 4: Choose Boot in sub-menu.
Step 5:Turn to «1st Boot Device» by PgUp and PgDown buttons, and press Enter.
Step 6: Select USB flash drive in pop-up dialog. Press Enter. It will be shown in «1st Boot Device» option.
Step 7: Press F10 to save changes and exit.
For older computers with traditional BIOS:
Step 1. Insert USB flash drive to the computer.
Step 2. When power on or restart your computer, press BIOS Key to enter BIOS Setup Utility.
Step 3. Enter Boot option tab, and go to Boot device Priority item. On Boot device Priority item, choose USB drive or USB HDD as the first boot device.
Step 4. Press F10 to save the BIOS setting, and restart computer.
Example for setting traditional computer boot from USB drive:
1. Phoenix Award BIOS
1-1 Press Del to enter BIOS setting screen while powering on computer.
1-2 Choose Advanced BIOS Features.
1-3 On the Advanced BIOS Features screen, choose Hard Disk Boot Priority.
1-4 Move USB device to the first place of Hard Disk Boot Priority by pressing “+” or “—“, press ESC back to the previous step.
1-5 Select First Boot Device.
There is no option such as USB-HDD, USB-ZIP, so choose Hard Disk as the first boot device.
2. Award BIOS (older)
2-1 Press Del and enter BIOS setting screen while powering on computer.
2-2 Choose Advanced BIOS Features.
2-3 On the Advanced BIOS Features screen, choose Hard Disk Boot Priority.
2-4 Move USB device to the first place of Hard Disk Boot Priority by pressing «+» or «-«, press ESC back to the above step.
2-5 there are options like USB-HDD, USB-ZIP etc. Select Hard Disk or USB-HDD, USB-ZIP as the first boot device.
3. AMI BIOS
3-1 Press Del or other Bios Key to enter BIOS.
3-2 Press direction keys to move your mouse to BOOT.
3-3 Press up and down arrow keys to move mouse to Boot settings/Boot device Priority, and press Enter.
3-4 In Boot device Priority menu, press up and down keys to move mouse to 1st boot Device. And then press Enter.
3-5 Select Removable Device as the first boot device.
If you have not chosen USB device as the first boot device for Hard Disk Drives, there will not be USB device. But you can choose Removable Device as the first boot device. If you have set the first boot device for Hard Disk Drives, now you can select USB device as the first boot device directly.
3-6 Press F10 to save BIOS settings and exit.
How to Boot From a USB Device
Make your PC boot from a USB flash drive or external hard drive
:max_bytes(150000):strip_icc()/tim-fisher-5820c8345f9b581c0b5a63cf.jpg)
:max_bytes(150000):strip_icc()/ryanperiansquare-de5f69cde760457facb17deac949263e-180a645bf10845498a859fbbcda36d46.jpg)
There are lots of reasons you might want to boot from a USB device, like an external hard drive or a flash drive, but it’s usually so you can run special kinds of software.
When you boot from a USB device, what you’re doing is running your computer with the operating system installed on the USB device. When you start your computer normally, you’re running it with the operating system installed on your internal hard drive—Windows, Linux, etc.
Time Required: Booting from a USB device usually takes 10–20 minutes, but it depends a lot on if you have to make changes to how your computer starts up.
How to Boot From a USB Device
Follow these easy steps to boot from a flash drive, an external hard drive, or some other bootable USB device.
:max_bytes(150000):strip_icc()/how-to-boot-from-a-usb-device-2626091-D-v1-5b1183bd04d1cf00371e7aeb.png)
If the USB boot option is not first in the boot order, your PC will start «normally» (i.e., boot from your hard drive) without even looking at any boot information that might be on your USB device.
The BIOS on most computers lists the USB boot option as USB or Removable Devices, but some confusingly list it as a Hard Drive option, so be sure to dig around if you’re having trouble finding the right one to choose.
After setting your USB device as the first boot device, your computer will check it for boot information each time your computer starts. Leaving your computer configured this way shouldn’t cause problems unless you plan on leaving the bootable USB device attached all the time.
Attach the USB device to your computer via any available USB port.
:max_bytes(150000):strip_icc()/usb-plug-5c433f4546e0fb0001f804f1.jpg)
Creating a bootable flash drive or configuring an external hard drive as bootable is a task in itself. Chances are you made it to these instructions here because you know whatever USB device you have should be bootable after properly configuring BIOS.
See our How to Burn an ISO File to a USB Drive tutorial for general instructions on doing exactly that, which tends to be the reason most people need to figure out how to boot from one.
Since you’re not actually inside of the operating system at this point, restarting isn’t the same as using normal restart buttons. Instead, BIOS should explain which key to press—such as F10—to save the boot order changes and restart the computer.
Watch for a Press any key to boot from external device. message.
:max_bytes(150000):strip_icc()/boot-from-usb-message-57c76dae3df78c71b65d7c9e.png)
You may be prompted with a message to press a key on some bootable devices before the computer boots from the flash drive or another USB device.
If this happens, and you do nothing, your computer will check for boot information on the next boot device in the list in BIOS (see Step 1), which will probably be your hard drive.
Most of the time, when trying to boot from a USB device, there is no key-press prompt. The USB boot process usually starts immediately.
Your computer should now boot from the flash drive or USB based external hard drive.
What happens now depends on what the bootable USB device was intended for. If you’re booting from Windows 10, Windows 8, or Windows 7 installation files on a flash drive, the operating system setup will begin. If you’re booting from a DBAN flash drive you created, it will start. You get the idea.
What to Do When the USB Device Won’t Boot
If you tried the above steps, but your computer didn’t boot from the USB device, check out some of the tips below. There are several places that this process can get hung up at.
Recheck the boot order in BIOS (Step 1). The number one reason a bootable flash drive or another USB device won’t boot is that BIOS isn’t configured to check the USB port first.
Didn’t find a «USB Device» boot order listing in BIOS? If your computer was manufactured around 2001 or before, it might not have this ability.
If your computer is newer, check for some other ways that the USB option might be worded. In some BIOS versions, it’s called «Removable Devices» or «External Devices.»
Remove other USB devices. Other connected USB devices, like printers, external media card readers, etc., could be consuming too much power or causing some other problem, preventing the computer from booting from a flash drive or another device. Unplug all other USB devices and try again.
Or, if you have multiple bootable devices plugged in at once, the computer might simply be booting to the wrong device, in which case the easiest fix would be to remove all USB storage devices but the one you want to use right now.
Copy the files to the USB device again. If you created the bootable flash drive or external hard drive yourself, which you probably did, repeat whatever steps you took again. You may have made a mistake during the process.
See How to Burn an ISO File to USB if you started with an ISO image. Getting an ISO file onto a USB drive, like a flash drive, isn’t as easy as just expanding or copying the file there.
Switch to another USB port. The BIOS on some motherboards only checks the first few USB ports. Switch to another USB port and restart your computer.
Update your motherboard’s BIOS. If your computer is ancient, the BIOS version running on the motherboard may not support booting directly from a USB device. Try flashing the BIOS and checking again for this feature.


