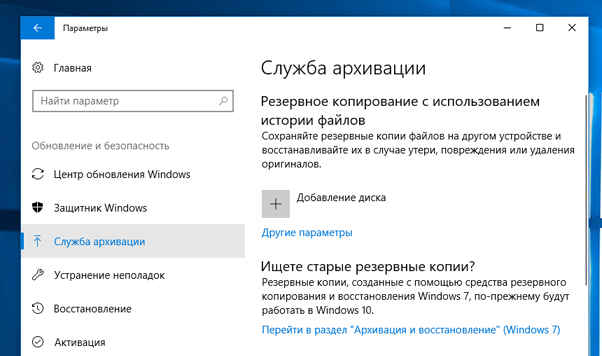
- Резервное копирование и восстановление в Windows 10
- Как сделать бэкап Windows
- Варианты создания образа Windows
- Создаем бэкап компьютера
- Автоматическое создание резервной копии
- Back up and restore your PC
- Back up
- Create a system image
- Keeping different versions of system images
- Create a restore point
- Restore
- Restore a backup made on another computer
- Find files that were restored from a backup made on another computer
- Restore files from a file backup after restoring your computer from a system image backup
- How to make a full backup of your Windows 10 PC
- How to create a backup with system image tool on Windows 10
- How to restore a backup with system image tool on Windows 10
- Wrapping things up
- More Windows 10 resources
- Halo: MCC’s live service elements make it better, not worse
- Microsoft’s Surface Duo is not ‘failing up’
- Here’s what you can do if Windows 10 update KB5001330 is causing issues
- These are the best PC sticks when you’re on the move
Резервное копирование и восстановление в Windows 10
Использование истории файлов для резервного копирования системы компьютера
Используйте историю файлов для создания резервной копии на внешнем диске или в сетевой папке. Нажмите кнопку Пуск > Параметры > Обновить & безопасность > Архивация> Добавить диск , а затем выберите внешний диск или сетевое расположение для резервных копий.
Восстановление файлов с помощью истории файлов
Если вы заметили, что у вас отсутствует важный файл или папка, резервную копию которых вы создали, выполните приведенные ниже действия.
В поле поиска на панели задач введите восстановление файлов, а затем выберите Восстановление файлов с помощью истории файлов.
Найдите нужный файл, а затем с помощью стрелок просмотрите все его версии.
Когда найдете нужную версию, нажмите Восстановить, чтобы сохранить ее в исходном расположении. Чтобы сохранить копию в другом месте, щелкните правой кнопкой мыши кнопку Восстановить, выберите элемент Восстановить в и укажите новое расположение.
Поиск резервных копий, созданных в предыдущих версиях Windows
Если вы использовали компонент «Резервное копирование и восстановление» для создания резервных копий файлов или образа системы в предыдущих версиях Windows, эти резервные копии будут по-прежнему доступны в Windows 10. В поле поиска на панели задач введите панель управления. Затем щелкните Панель управления > Система и ее обслуживание > Резервное копирование и восстановление (Windows 7).
Как сделать бэкап Windows
 Часто встречается ситуация, когда операционная система Windows никакими способами не хочет загружаться и работать, или она загружается, но тогда в ней просто нереально совершать какие-то действия. Причин этому может быть множество, начиная с ваших ошибочных действий, заканчивая атакой вирусов.
В результате чего возникает вопрос: как сделать бэкап системы? Если вам такая ситуация знакома, и у вас имеется желание исправить все это в короткие сроки, то нужно уже заранее до этого быть готовым к таким проблемам.
Для этого потребуется хотя бы раз в месяц или, в крайнем случае, раз в два месяца, сохранять образ системы, позволяющий при необходимости восстановить работоспособность ОС самостоятельно.
Основная суть заключается в том, что система во время бэкапа компьютера возвращается к прежней работоспособности. Windows 7 уже обладает встроенным архиватором, имеющим простой и понятный для каждого интерфейс. Следовательно, не потребуется устанавливать никакие дополнительные программы и тратить на это собственные деньги.
Варианты создания образа Windows
Как же самостоятельно сделать бэкап Windows? Всего имеется несколько методик запуска в действие архивированной системы, и ниже будет представлен один из них. Для этого потребуется:
1. Зайти в Пуск. Выбрать панель управления. Перейти на вкладку Архивация и восстановление.
2. Откроется новое окно, в котором с левой стороны вы увидите значок Создание образа ОС. Подобный инструмент даст вам возможность создать архив операционной системы один раз.
3. Если вы посмотрите в противоположную сторону, то увидите «Настройку резервного копирования». Такая функция предоставит вам возможность проводить архивирование автоматически.
Вы сами должны решить, какой из этих методов подойдет вам больше, но в статье будут описаны обе методики.
Создаем бэкап компьютера
Для этого потребуется нажать «Создание образа системы». Откроется окно, в котором нужно выбрать место для хранения бэкапа Windows.
Идеальным вариантом станет жесткий диск, либо использование переносных дисков, но стоит учитывать, что потребуется их большое количество. Локальный диск лучше не использовать, так как в случае проникновения вирусов, восстановление с него не всегда предоставляется возможным.
После выбора места вы должны решить, что именно будете архивировать. Если у вас много места, то проведите сохранение всех локальных дисков.
Появится следующее окно, в котором нужно нажать кнопку «Архивировать». После этого начнется процесс создания образа. Все это может длиться долгое время, смотря какой мощностью обладает ваш компьютер и какой объем вы записываете. На этом создание образа будет закончено.
Автоматическое создание резервной копии
При выборе методики, в этом случае вы выбираете «Настроить резервное копирование». После этого откроется окно, в котором вам нужно будет снова определиться с местом хранения бэкапа.
Идеальным вариантом также считается внешний жесткий диск, а вот локальный лучше не использовать. В следующем окне потребуется выбрать, какие места вы будете архивировать, или можете использовать такой вариант, как выбор системы.
В таком случае, компьютер самостоятельно выберет, что ему сохранить.
После нажатия кнопки «Далее» нужно выбрать расписание выполнения. Здесь вы все выбираете сами, но лучшим вариантом будет — «один раз в месяц». После этого необходимо нажать «Сохранение параметров и запуск архивации». По времени она также может идти долго, в течение несколько часов, все зависит от мощности вашего компьютера и сохраняемого объема.
Мы надеемся, данная статья ответила на вопрос: как сделать бэкап системы средствами самой Windows. Ситуации могут возникнуть самые разные, и для страховки лучше всегда иметь архивный образ OS.
Back up and restore your PC
To learn how to back up and restore individual files on a Windows-based computer:
To learn how to back up and restore in Windows 10:
Back up
There are several ways to back up your PC.
Select the Start button, then select Control Panel > System and Maintenance > Backup and Restore.
Do one of the following:
If you’ve never used Windows Backup before, or recently upgraded your version of Windows, select Set up backup, and then follow the steps in the wizard.
If you’ve created a backup before, you can wait for your regularly scheduled backup to occur, or you can manually create a new backup by selecting Back up now.
If you’ve created a backup before, but want to make a new, full backup rather than updating the old one, select Create new, full backup, and then follow the steps in the wizard.
Note: Do not back up files to the same hard disk that Windows is installed on. For example, do not back up files to a recovery partition. Always store media used for backups (external hard disks, DVDs, or CDs) in a secure place to prevent unauthorized people from having access to your files; a fireproof location separate from your computer is recommended. You might also consider encrypting the data on your backup.
Create a system image
System images contain all of the info on your PC at a particular state.
Right-click the Start button, then select Control Panel > System and Maintenance > Backup and Restore.
In the left pane, choose Create a system image, and then follow the steps in the wizard.  If you’re prompted for an administrator password or confirmation, type the password or provide confirmation.
Note: To create a system image of a drive, it must be formatted to use the NTFS file system. If you save the system image on a hard drive or USB flash drive, it must be formatted to use the NTFS file system.
Keeping different versions of system images
You can keep several versions of system images. On internal and external hard drives, older system images will be deleted when the drive runs out of space. To help conserve disk space, delete older system images.
If you’re saving your system images in a network location, you can only keep the most current system image for each computer. System images are saved in the format of drive\WindowsImageBackup\computer name\. If you already have a system image for a computer and are creating a new one for the same computer, the new system image will overwrite the old one.
If you want to keep the old system image, you can copy it to a different location before creating the new system image by following these steps.
Navigate to the location of the system image.
Copy the WindowsImageBackup folder to a new location.
Create a restore point
You can use a restore point to restore your computer’s system files to an earlier point in time. Restore points are automatically created each week by System Restore and when your PC detects change, like when you install an app or driver.
Here’s how to create a restore point.
Right-click the Start button, then select Control Panel > System and Maintenance > System.
In the left pane, select System protection.
Select the System Protection tab, and then select Create.
In the System Protection dialog box, type a description, and then select Create.
Restore
Right-click the Start button, then select Control Panel > System and Maintenance > Backup and Restore.
Do one of the following:
To restore your files, choose Restore my files.
To restore the files of all users, choose Restore all users’ files.
Do one of the following:
To look through the contents of the backup, select Browse for files or Browse for folders. When you’re browsing for folders, you won’t be able to see the individual files in a folder. To view individual files, use the Browse for files option.
To search the contents of the backup, select Search, type all or part of a file name, and then select Search.
Tip: If you’re searching for files or folders associated with a specific user account, you can improve search results by typing the location of the file or folder in the Search for box. For example, to search for all JPG files that were backed up, type JPG in the Search for box. To only search for JPG files associated with the user Bill, type C:\Users\Bill\JPG in the Search for box. Use wildcard characters such as *.jpg to search for all JPG files that were backed up.
Restore a backup made on another computer
You can restore files from a backup that was created on another computer running Windows Vista or Windows 7.
Select the Start button, then select Control Panel > System and Maintenance > Backup and Restore.
Choose Select another backup to restore files from, and then follow the steps in the wizard. If you’re prompted for an administrator password or confirmation, type the password or provide confirmation.
Find files that were restored from a backup made on another computer
If you’re restoring files from a backup that was made on another computer, the files will be restored in a folder under the user name that was used to create the backup. If the user names are different, you’ll need to navigate to the folder where the files are restored. For example, if your user name was Molly on the computer that the backup was made on but your user name is MollyC on the computer that the backup is being restored on, the restored files will be saved in a folder labelled Molly.
To find restored files:
Select the Start button, then select Computer.
Double-click the icon of the drive that the files are saved on, for example C:\.
Double-click the Users folder. You will see a folder for each user account.
Double-click the folder for the user name that was used to create the backup. The restored files will be in the various folders based on where they were located originally.
Restore files from a file backup after restoring your computer from a system image backup
After you restore your computer from a system image backup, there may be newer versions of some of your files in a file backup that you want to restore.
To restore files from a file backup that was created after the system image backup was created, follow these steps.
Select the Start button, then select Control Panel > System and Maintenance > Backup and Restore.
Choose Select another backup to restore files from. If you’re prompted for an administrator password or confirmation, type the password or provide confirmation.
In Backup Period, select the date range of the backup that contains the files that you want to restore, and then follow the steps in the wizard.
How to make a full backup of your Windows 10 PC
 Source: Windows Central
As part of your recovery plan, a full backup should be at the top of your list since it is the best strategy against hardware failure, and apps and upgrade problems, as well as malware attacks that can corrupt your files and damage your Windows 10 installation. If you are not proactively creating full backups, you will be putting at risk documents, priceless pictures, and configurations you have spent long hours setting up.
If you use Windows 10, you have many different methods to create a backup. For example, you can use third-party solutions to backup the entire system or copy files to an external drive manually or upload them to a cloud storage service like OneDrive. However, if you do not want to use manual methods or third-party tools, you can always create a full backup using the legacy built-in System Image Backup tool.
A system image is another way to say «full backup,» as it contains a copy of everything on the computer, including the installation, settings, apps, and files. Usually, you will find this tool better suited to restore the entire system from critical hardware or software problems, such as hard drive failure or when trying to roll back to a previous version of Windows 10.
In this Windows 10 guide, we will walk you through the steps to create a full backup with all your custom settings, apps, files, and installation using the system image tool.
Quick note: The System Image Backup tool for Windows 10 is no longer a maintained feature, but you can still use it for the foreseeable future. The instructions outlined in this guide are meant to create a temporary full backup while the feature is still available. You can also read this guide with alternative ways to back up your computer.
How to create a backup with system image tool on Windows 10
The system image tool allows you to create a full backup to an external drive or network shared folder. However, it is best to use removable storage, which you can then disconnect and store in a different physical location.
To create a full backup of Windows 10 with the system image tool, use these steps:
- Open Settings.
- Click on Update & Security.
- Click on Backup.
Under the «Looking for an older backup?» section, click the Go to Backup and Restore (Windows 7) option.
 Source: Windows Central
Click the Create a system image option from the left pane.
 Source: Windows Central
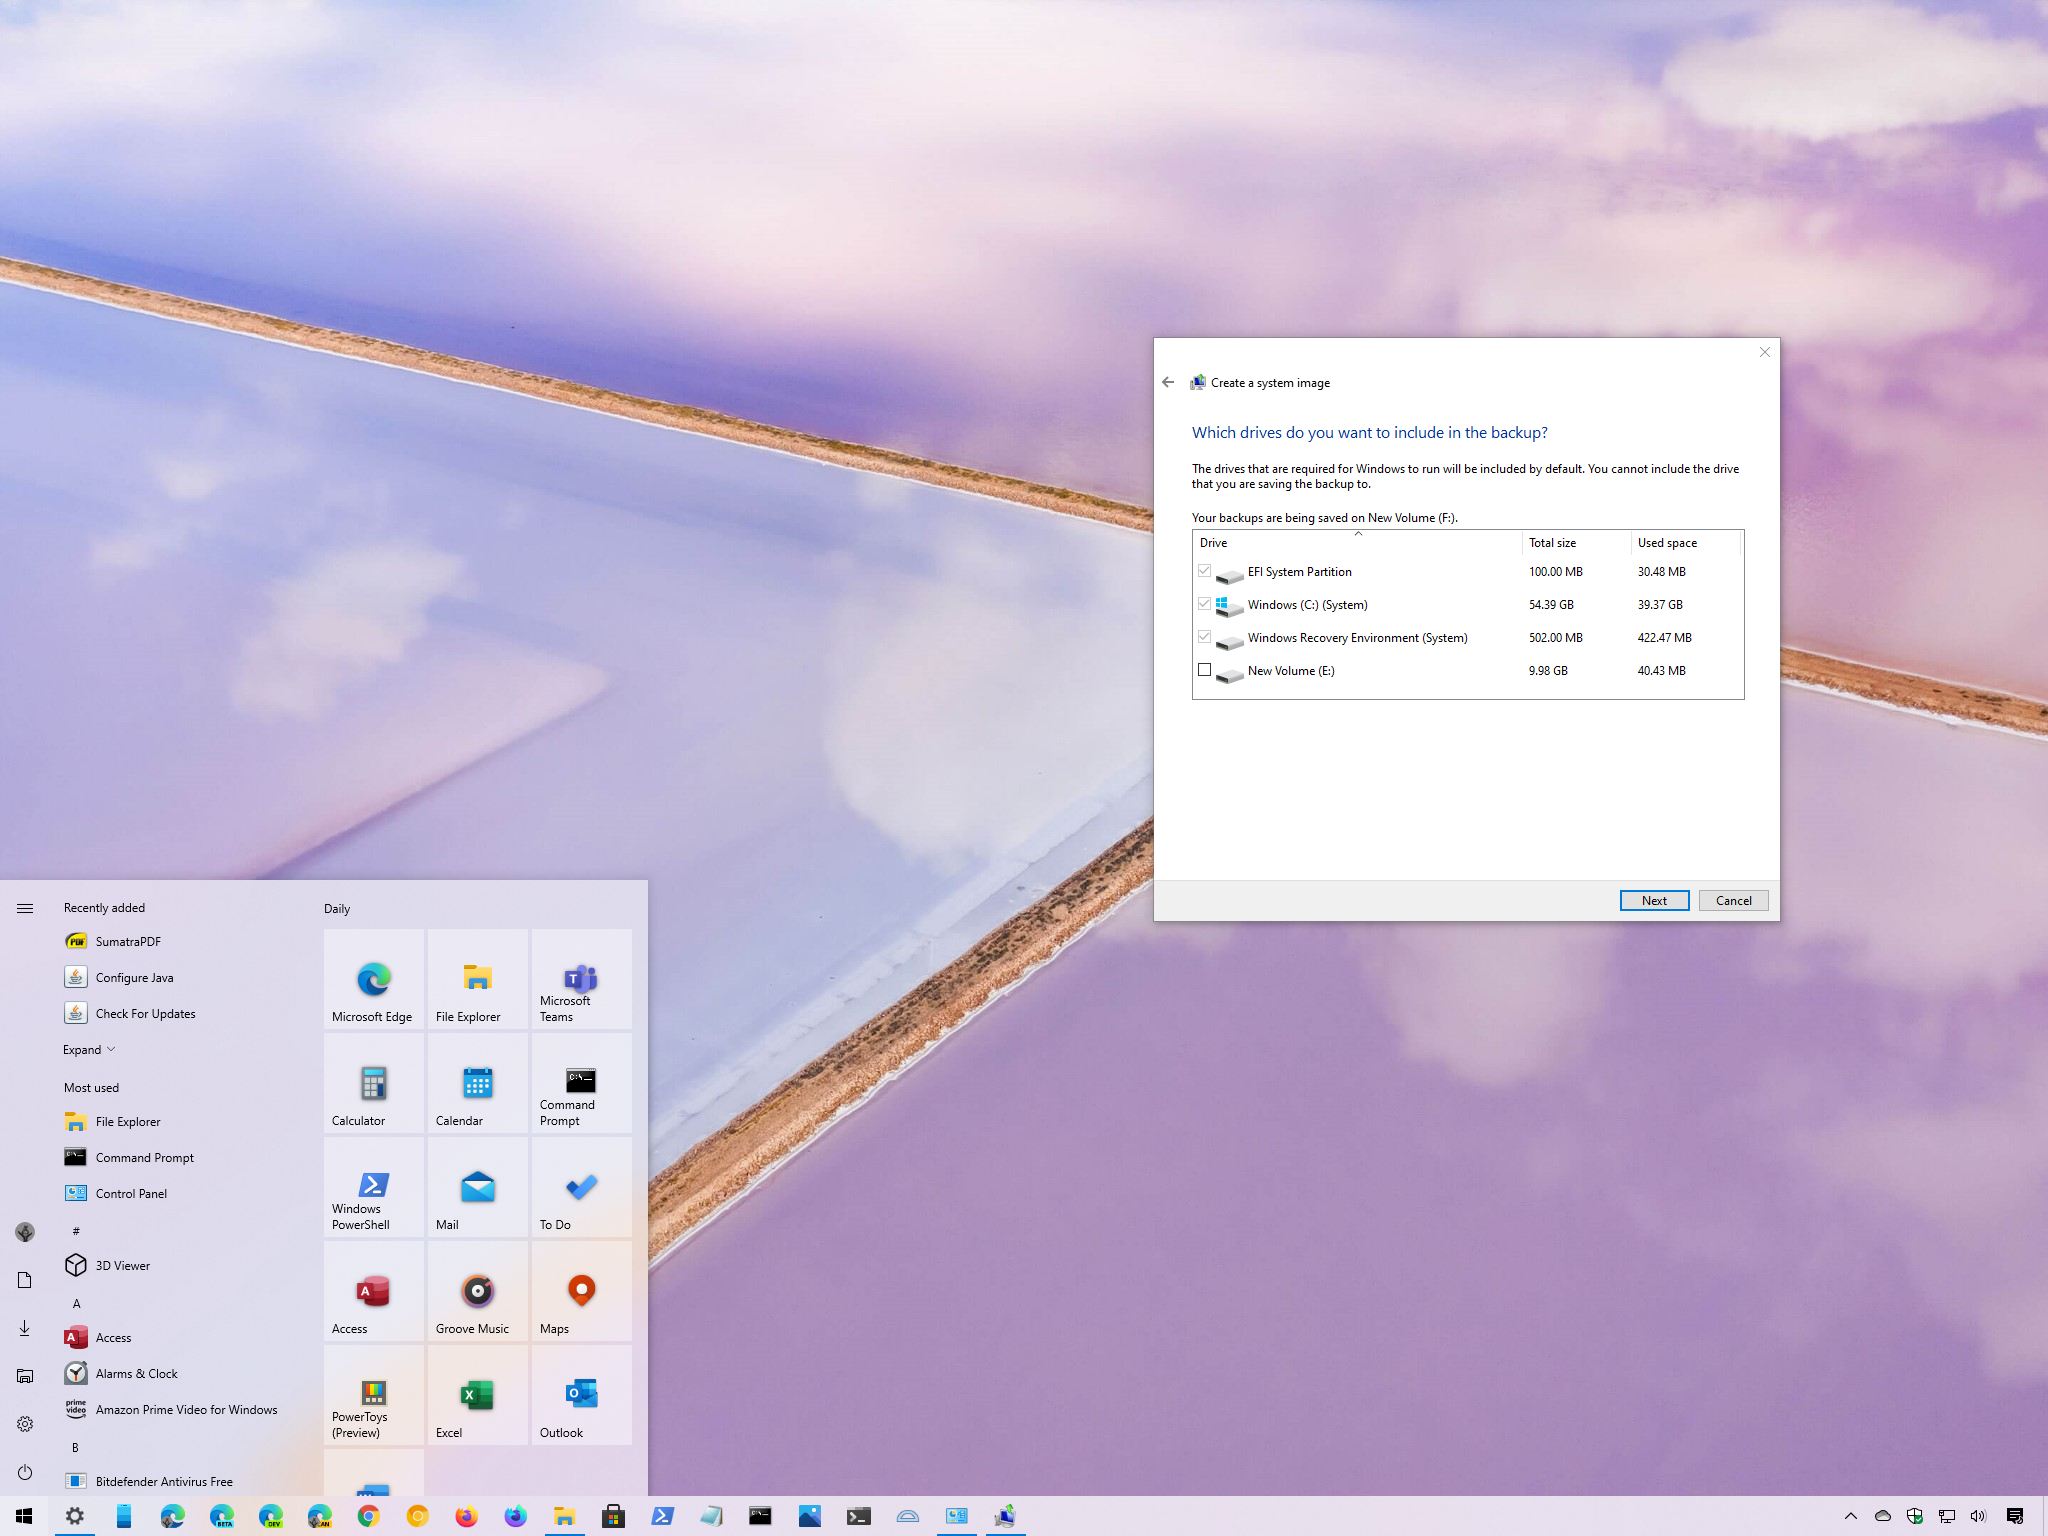
Use the «On a hard disk» drop-down menu and select the location to export the Windows 10 full backup.
![]() Source: Windows Central
Source: Windows Central
(Optional) Select any additional hard drives to include them in the backup.
![]() Source: Windows Central
Source: Windows Central
Click the Start backup button.
![]() Source: Windows Central
Source: Windows Central
Click the No button.
Quick note: You’ll also receive a prompt to create a system repair disc, but because most devices no longer include an optical drive, you can skip it. If you have to restore the machine, you can use a USB installation media to access the recovery enviroment.
Once you complete the steps, the tool will create an image of the entire system that includes everything on the primary hard drive and other drives you may have selected.
While the backup is in progress, you can continue working on the device since it uses the «Shadow Copy» feature to backup files even if files are open and apps are running.
After the process is complete, you can disconnect and store the external drive in a safe place. If you have valuable data, you may want to consider keeping the backup in a different physical location.
How to restore a backup with system image tool on Windows 10
If you need to replace the hard drive or hardware failure occurs, you can use one of the backups to recover the device and files.
To restore a backup on Windows 10, use these steps:
- Connect the drive with the full backup to the device.
- Connect the Windows 10 USB bootable drive to the computer.
- Start the computer.
On the USB bootable drive startup prompt, press any key to continue.
Quick tip: If the device does not start in the Windows Setup wizard, you will need to access the Basic Input/Output System (BIOS) or Unified Extensible Firmware Interface (UEFI) to change the boot order settings. You can use this guide to access the BIOS/UEFI, but the steps are usually different per manufacturer and device model. It is recommended to check your manufacturer support website for more specific details.
On the «Windows Setup» page, click the Next button.
 Source: Windows Central
Click the Repair your computer option from the bottom-left corner of the screen.
Source: Windows Central
Click the Troubleshoot option.
Source: Windows Central
Click the System Image Recovery option.
Source: Windows Central
Select the Windows 10 option as the target OS.
Source: Windows Central
On the «Re-image your computer» page, select the Use the latest available system image option.
Source: Windows Central
Quick tip: You can use the «Select a system image» option if you have multiple backups and you are trying to restore an older version of the system and files.
(Optional) Carefully select the Format and repartition disks option before restoring the backup (if you are restoring the backup on a new drive).
Quick tip: If you choose this option, use the Exclude disks option to prevent formatting secondary drives that may contain data.
(Optional) Check the** Only restore system drivers** option (if the backup contains a copy of multiple drives and you only want to restore the OS).
Source: Windows Central
Click the Finish button.
Source: Windows Central
After you complete the steps, the recovery process will start on the computer. The time to finish the restoration will depend on the amount of data and hardware configuration.
If you are about to restore a device, do not interrupt the process as it can cause the backup to fail, making the device unbootable. It is always recommended to have the laptop connected to a power source and a desktop computer to an uninterruptible power supply (UPS) to avoid problems.
Once the backup has been restored, open Settings > Update & Security > Windows Update, and click the Check for Updates button to quickly install any missing security updates.
Wrapping things up
Although there many other solutions to create a full backup of the entire system and files, there are still many reasons to choose the System Image Backup tool. For instance, when you do not have another solution, and you are about to upgrade to a new version of Windows 10. You can use the built-in tool to create a temporary full backup in case you need to rollback.
Or when you are about to replace the main hard drive, or you need a quick way to transfer the installation and files without the need for reinstallation. It is also always recommended to periodically backup your computer if the unexpected happens, and you need to recover from system or hardware failure, malware, ransomware, or hacker attacks.
One thing to keep in mind with this tool is that it is meant to recover the entire system, not files and settings individually. If you want to keep updated copies of your files, you should be using other solutions, such as OneDrive or File History. Also, you need to be proactive about creating backups because you can only recover a system since the last backup. Anything after the full backup, such as apps, settings, and files, won’t be available during recovery.
More Windows 10 resources
For more helpful articles, coverage, and answers to common questions about Windows 10, visit the following resources:
![]()
Halo: MCC’s live service elements make it better, not worse
Halo: The Master Chief Collection is more popular than ever, but some fans don’t agree with the live service approach 343 Industries has taken with it. Here’s why those elements are, at the end of the day, great for the game and for Halo overall.
![]()
Microsoft’s Surface Duo is not ‘failing up’
Microsoft announced this week that it was expanding Surface Duo availability to nine new commercial markets. While Surface Duo is undoubtedly a work in progress, this is not a sign of a disaster. It’s also doesn’t mean that Surface Duo is selling a ton either. Instead, the reason for the expansion is a lot more straightforward.
![]()
Here’s what you can do if Windows 10 update KB5001330 is causing issues
In this guide, we’ll show you the steps to get rid of the update KB5001330 to fix profile, gaming, and BSoD problems with the Windows 10 October 2020 Update and May 2020 Update.
![]()
These are the best PC sticks when you’re on the move
Instant computer — just add a screen. That’s the general idea behind the ultra-portable PC, but it can be hard to know which one you want. Relax, we have you covered!


