- Come installare o rimuovere un tipo di carattere in Windows
- Per vedere quali tipi di carattere sono disponibili nel dispositivo
- Per aggiungere un tipo di carattere da Microsoft Store
- Per aggiungere un tipo di carattere da un’origine online
- Per rimuovere un tipo di carattere
- Per scaricare i tipi di carattere supplementari per altre lingue
- How to Install a Font on Windows 10
- What You’ll Need
- 1. How to Install a Font on Windows 10
- Step 1
- Step 2
- Step 3
- Step 4
- Step 5
- 2. How to Uninstall a Font on Windows 10
- Step 1
- Step 2
- Step 3
- Step 4
- And That’s How It’s Done!
- Как установить шрифты в Windows XP 7 8 10
- Общая информация
- Извлечение из архива
- Windows XP
- Windows 7/Vista
- Windows 8/10
- Видео по теме
Come installare o rimuovere un tipo di carattere in Windows
Il tuo dispositivo Windows include una varietà di tipi di carattere ed è possibile scaricare altri utenti da Microsoft Store o da un sito Web o da un’altra fonte online. Ecco come vedere quali tipi di carattere sono già disponibili nel dispositivo e come aggiungere o rimuovere tipi di carattere.
Per vedere quali tipi di carattere sono disponibili nel dispositivo
Selezionare avvia > Impostazioni > personalizzazione > tipi di carattere .Oppure, nella casella di ricerca sulla barra delle applicazioni digitare tipi di caratteree quindi selezionare impostazioni carattere . I tipi di carattere verranno elencati in tipi di carattere disponibili.
Dopo aver aggiunto nuovi tipi di carattere, verranno visualizzati in questo elenco.
Per aggiungere un tipo di carattere da Microsoft Store
Selezionare avvia > Impostazioni > personalizzazione > tipi di carattere e quindi selezionare Ottieni altri tipi di carattere in Microsoft Store.
Selezionare il tipo di carattere da aggiungere e quindi fare clic su Acquista. Il tipo di carattere verrà scaricato e installato automaticamente.
Per aggiungere un tipo di carattere da un’origine online
Scaricare il file del carattere e verificare che il file sia di tipo vero (. ttf) o un file OpenType (con estensione OTF).
Se il file è compresso in un file con estensione zip , fare clic con il pulsante destro del mouse su di esso e scegliere Estrai per estrarre i file.
Fare clic con il pulsante destro del mouse sul file del tipo di carattere e quindi scegliere Installa.
Per eseguire l’installazione per tutti gli utenti di PC, selezionare Installa per tutti gli utenti (Windows 10, versione 1809 o successiva).
Se viene chiesto di consentire al programma di apportare modifiche al computer, verificare di avere attendibile l’origine del file scaricato e quindi selezionare Sì.
Per rimuovere un tipo di carattere
Selezionare avvia > Impostazioni > personalizzazione > tipi di carattere e quindi selezionare il tipo di carattere che si vuole rimuovere.
In metadatiselezionare Disinstalla.
In alternativa, è possibile aprire Esplora file dalla barra delle applicazioni, aprire la cartella C:\Windows\Fonts , fare clic con il pulsante destro del mouse sul tipo di carattere che si vuole rimuovere e quindi scegliere Elimina.
Per scaricare i tipi di carattere supplementari per altre lingue
Selezionare avvia > Impostazioni > app > App & funzionalità e quindi selezionare funzionalità facoltative.
Non tutte le app supportano tipi di carattere personalizzati. Se il tipo di carattere non viene visualizzato in un’app o in un programma, provare a usare un’app diversa per verificare se il tipo di carattere è installato e funziona correttamente.
Per verificare se è stato installato un tipo di carattere, selezionare avvia > Impostazioni > personalizzazione > tipi di carattere e quindi cercare il tipo di carattere in tipi di carattere disponibili.
How to Install a Font on Windows 10
Found a great new font, but not sure how to install it? In this tutorial, we’ll walk through how to do just that—install a font onto your PC running Windows 10. In addition, we’ll look at how to uninstall a font, just in case you’d like to remove one from your list of installed fonts.
Follow along with us over on our Envato Tuts+ YouTube channel:

What You’ll Need
The following assets are used in this tutorial:
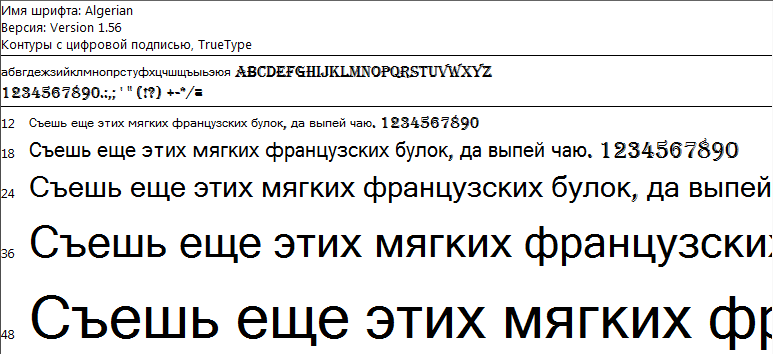
This is the font I’ll install in this example. You’re welcome to use this font with me. Otherwise, you’ll need a font of your choice—the only requirement is that it has not been installed on your computer just yet!
 Here’s the font I’ll install in this tutorial—Modern Serif.
Now, let’s get down to business and install a new font.
1. How to Install a Font on Windows 10
Step 1
First, download your font.
In most cases, font files tend to be delivered in a compressed document, containing more than one file. A common file type for this is a ZIP file. Make sure to open this file up and extract the font files to your computer.
Below is an example. When, for example, I open a ZIP document, it’s like looking inside a folder.

All I need to do is select the contents and drag it to a location on my computer.

I chose to save and store my font files in a folder called «My Fonts» on my Desktop. Here’s what it looks like when my font files are extracted from the zip document and into a folder on my desktop.

Step 2
When it comes to fonts themselves, there are many different file types. I won’t dig deep into the details of that in this article, but here are two of the most common file types that you’ll likely see:
- TTF: this is a TrueType Font.
- OTF: this is an OpenType Font.
What’s the difference? If you’re looking for basic font usage, TTF or OTF would likely serve you just fine. If you’re a designer looking for extras, OTF might be a stronger choice as it can store additional options like ligatures, glyphs, and alternates that a TTF wouldn’t include.
Again, there are other font file types out there, but these are most likely the ones you’ll encounter.

Step 3
So, where do the fonts «go» on our computer, when we want to install them? Just having them in any old folder on your computer won’t install them.
On Windows 10, you’ll want to navigate to your C drive. Double-click to «go inside» and view its contents. Note, if your operating system (Windows) is installed on a different drive, go there instead. However, in most cases, this is assigned to the drive named «C».
Then, go to the Windows folder. Again, double-click to go inside this folder.
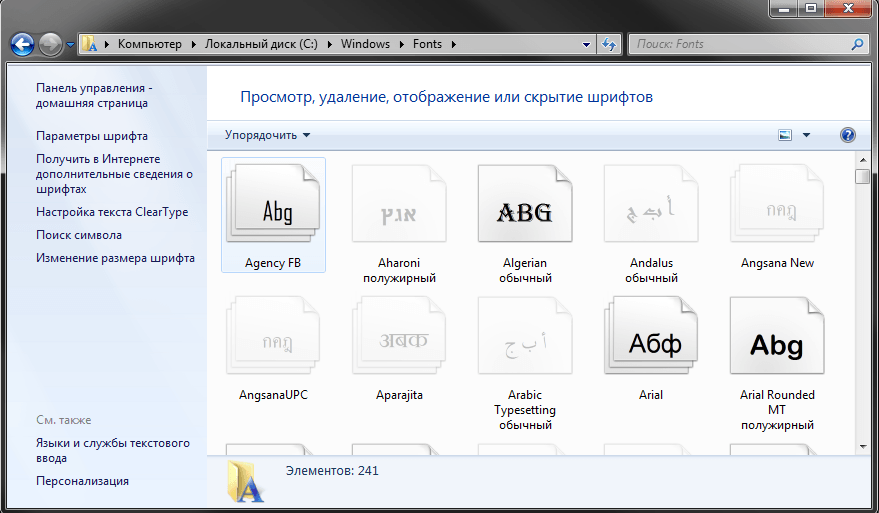
Inside the Windows folder, select the Fonts folder. We’re going to go inside this folder too.
Here’s what the Fonts folder looks like, once I’ve double-clicked to go inside it.
Tip: Not sure where you «are» on your computer? Check out the highlighted square, below. You’ll see that I’m currently viewing «Fonts» inside of Windows, on my C drive.

Step 4
Next, we’re going to take our font files and drag them into the Fonts folder.
Just select a font file, click and hold, and then drag it to the folder. When you do so, you’ll get visual confirmation that Windows is installing the font.
If there’s any concern or conflict, your computer will let you know. For example, if the font is already installed, it will ask you what you would like to do.

Step 5
And now, your font is installed! However, before we wrap up, let’s look at one additional way that we can install fonts. This way is even faster and even easier.
Go to your font file and double-click it to open it. You’ll get a visual preview, and in the upper left-hand corner, you’ll see a button that says Install. Super easy, right?
When I’m installing a lot of fonts at once, I tend to prefer the first method—dragging multiple font files into my Fonts folder. However, for just one, single font, either method is just fine. Choose the one that’s most convenient for you!

2. How to Uninstall a Font on Windows 10
Step 1
Now, let’s uninstall a font that we don’t want on our computer anymore.
Before we do so, I’d like to recommend backing up your fonts.
I like to keep a copy of my font files, just in case. Keep in mind that licensing might limit your installations, but keeping a backup for your records is typically acceptable.
Remember the «My Fonts» folder I made earlier, on my Desktop? This isn’t my live fonts folder—having font files here doesn’t mean they’re installed. They’re just files on my desktop. However, I can store them here as a backup if I’d like to.
I can also select fonts from my Fonts folder (where they are installed)—and copy and paste them to another folder, to back them up. For example, here’s my backup folder with an extra font I copied from my Fonts folder (the font is Mattea!)

Step 2
Let’s go to the Fonts folder in our Windows folder. Again, to get there:
- Go to your C drive. Double-click to go «inside» it and look at its contents. Note, you’ll want to go to where your operating system is installed. This is typically assigned to «C», but may vary if your system was set up differently.
- Go to the Windows folder. Double-click to go inside and view its contents.
- Go to the Fonts folder. Again, double-click to go inside this folder.
Remember this folder? We can browse through all the fonts installed here.

Step 3
Now, browse through the list of fonts and find the one that you want to uninstall. Again, I would suggest saving a backup of the font you uninstall, so you have it for your reference—in case you’d like to reinstall it sometime.
Right-click on the font you’d like to uninstall and select Delete.

Step 4
Next, we’re given a warning prompt. It asks us to confirm if we’d like to delete this font from our computer. Click yes if you’d like to, or click no if you’ve changed your mind.

And That’s How It’s Done!
Installing and uninstalling a font on Windows 10 only takes a couple of clicks. Hopefully, this tutorial has helped you figure out how to install fonts and uninstall fonts to your heart’s content.
Love fonts? Check out these tutorials for more how-tos and typographic inspiration.
Как установить шрифты в Windows XP 7 8 10
Операционная система Windows позволяет централизованно управлять шрифтами, которые могут использовать все установленные приложения. Вместо того чтобы загружать данные отдельно в Photoshop, Microsoft Word и еще какие-нибудь программы, можно установить новый шрифт прямо в ОС. После этого он станет доступен для использования с помощью любого софта. В данной статье описывается процесс установки новых шрифтов в разных версиях ОС Windows: XP, 7, 8 и 10.
Общая информация
Шрифт определяет внешний вид печатных символов. Наиболее очевидные области, в которых вам могут понадобиться подобные косметические изменения — работы с текстом или графикой. Написание статей, веб-разработка, создание шаблонов грамот или поздравительных открыток — для всего этого могут потребоваться новые нестандартные шрифты.
Подключения можно разделить на 2 этапа: загрузку файла и установку. Найти нужные файлы можно на специализированных сайтах, дизайнерских форумах и торрент-трекерах. Windows поддерживает все популярные расширения: OpenType (OTF), TrueType (TTF), PostScript (PFM). Процесс установки одинаков для всех типов, но немного различается в разных версиях Виндовс.
Извлечение из архива
Часто загруженные из интернета файлы оказываются запакованными в специальную сжатую папку — архив (например, с расширением .rar или .7z). Это делается для экономии места на сервере и уменьшения трафика.

Чтобы работать с содержимым таких объектов их необходимо распаковать. Для этого используются особые программы – архиваторы. Если на вашем персональном компьютере подобного софта нет, его нужно установить.

Скачайте утилиту WinRar с официального вебсайта разработчика — http://www.win-rar.ru/download/. Не забудьте выбрать правильную разрядность своей операционной системы. Программа запустится на любой версии ОС, в том числе, и на 10-й.

Загрузите нужную версию и установите архиватор, следуя указаниям Мастера Установки (Install Wizard). По завершении процесса кликните правой кнопкой мыши по сохраненному архиву, чтобы вызвать настройки, и выберите опцию «Извлечь» («Extract»). В открывшемся окне нужно указать папку, в которую нужно распаковать содержимое. Теперь можно приступать к установке.
Windows XP
В Виндовс XP доступно 2 способа установки новых шрифтов. Оба очень просты – достаточно минимальных навыков владения персональным компьютером.
Первый способ — копирование загруженных файлов в нужную директорию вручную:
- Запустите Проводник Виндовс XP. Это делается с помощью значка «Мой компьютер» в меню «Пуск» или на рабочем столе.
- Откройте раздел диска, на который установлена система (как правило, он имеет букву «C:/»).
- Перейдите в папку «Windows/Fonts».

- Скопируйте сюда файлы шрифтов, которые хотите установить (не забудьте их предварительно разархивировать).
Вы также можете воспользоваться стандартным инструментом Windows XP:
- Вызовите меню «Пуск».
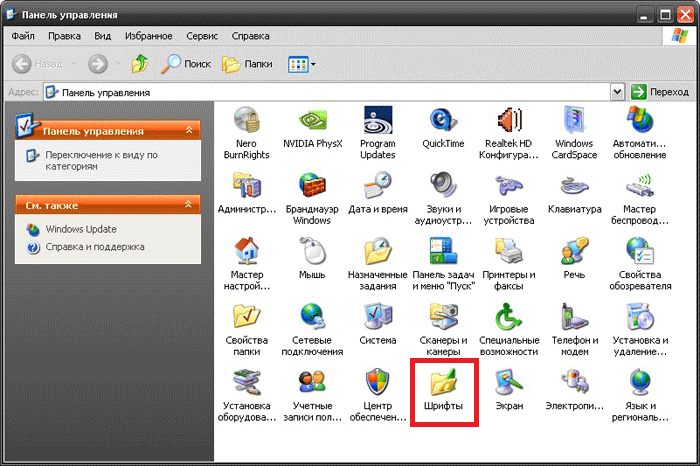
- Откройте «Панель Управления».
- Перейдите в каталог «Шрифты».
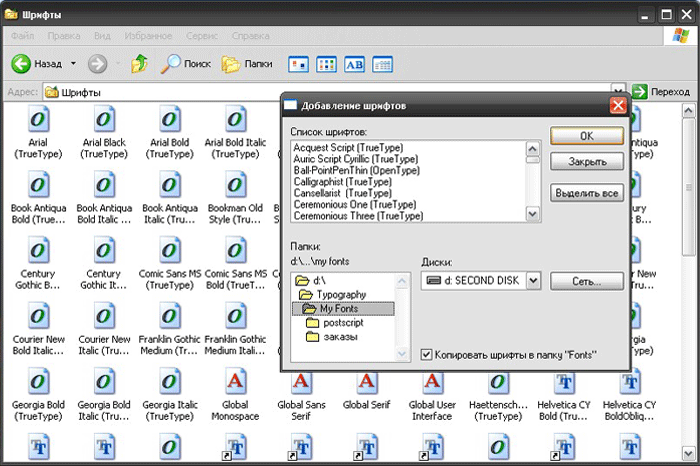
- Кликните по кнопке «Файл», которая расположена в меню сверху.
- В ниспадающем списке нужно выбрать опцию «Установить шрифт».
- Нажмите Сеть… и укажите путь к подготовленным файлам.
- Щелкните OK .
Теперь требуется перезапустить все активные программы, чтобы их настройки обновились. После этого вы сможете выбрать в них новый шрифт.
Windows 7/Vista
По сравнению с версией XP в Windows 7 и Vista разработчики сделали процесс подключения шрифтов еще более простым:
- Выделите файлы шрифтов, которые нужно установить. Если вам нужно выделить несколько объектов, зажмите клавишу Ctrl и нажимайте на них поочередно.
- Вызовите контекстное меню, кликнув по одному из выделенных элементов правой кнопкой мыши.
- Выберите опцию «Установить» («Install») в ниспадающем списке.

Аналогично предыдущей версии, пользователи также могут просто скопировать все файлы в папку «Windows/Fonts».
Если на вашем системном диске осталось мало места, вы можете разместить массивное «тело» шрифта в другом месте и подключить его с помощью ярлыка. Сначала эту функцию нужно включить в системных настройках:
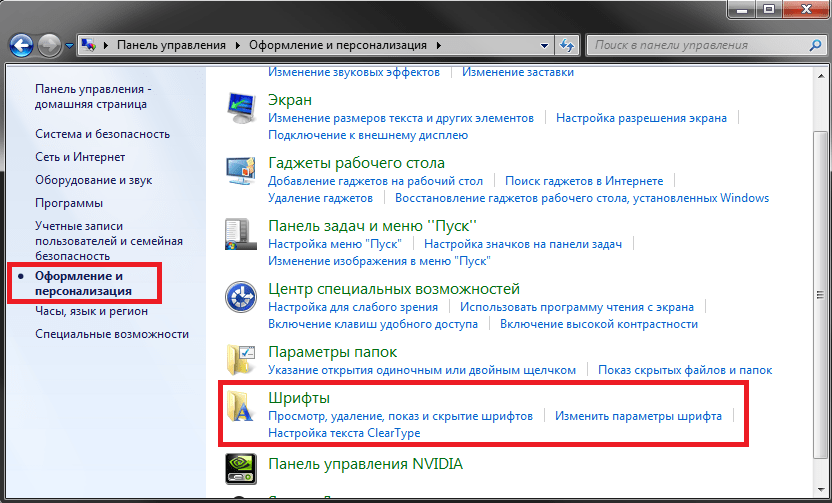
- Вызовите «Пуск».
- Перейдите в «Панель Управления».
- Откройте категорию «Оформление и Персонализация».
- Выберите раздел «Шрифты».
- В меню, расположенном слева, щелкните по гиперссылке «Параметры шрифта».
- В графе «Параметры установки» поставьте отметку напротив пункта «Разрешить установку с помощью ярлыков».
- Нажмите OK .

Теперь при подключении новых шрифтов вы сможете выбрать опцию «Установить как ярлык».
Обратите внимание: если вы удалите файл или перенесете его в другое место, шрифт перестанет работать.
В Виндовс 10 тоже есть подобная функция, и запускается она точно так же.
Windows 8/10
Процесс подключения шрифтов в Виндовс 8-й и 10-й версий аналогичен.
Во-первых, пользователи могут просто переместить нужные файлы в системный каталог «Fonts», как в предыдущих релизах.

Во-вторых, в Виндовс 10 вы можете просто открыть скачанный шрифт, дважды кликнув по файлу. В открывшемся окне будет презентация внешнего вида символов, а также кнопка Установить . Щелкните по ней, и все будет готово. Как и в прежних версиях, вам потребуется перезапустить все работающие программы, чтобы обновить их настройки.


