- Установка загрузчика Grub
- Немного теории
- Установка загрузчика Grub в MBR для BIOS
- Установка загрузчика Grub в GPT для BIOS
- Установка GRUB UEFI GPT
- Выводы
- Grub boot loader to windows boot loader
- Table of contents
- Everything is a file
- Introduction
- What about LILO?
- How does GRUB work?
- GRUB notation
- GRUB configuration
- Installation of GRUB
- GRUB on a floppy disk
- Installing GRUB natively
- Installing GRUB with grub-install
- Setting up GRUB manually (after installation)
- Backup!
- Adding a new operating system to the GRUB menu
- Common problems
- GRUB got deleted; how to restore?
- The easy way
- The hard way
- Windows is installed on a non-first hard disk (Swapping)
- There is more than one Windows operating system installed on one hard disk (Hide/Unhide)
- You resized a partition; GRUB is gone
- Useful tools
Установка загрузчика Grub
Для инициализации ядра и запуска операционной системы Linux используется загрузчик. Это программа, которая запускается после завершения проверки оборудования BIOS, подготавливает оборудование к работе, задает нужные параметры ядра и позволяет выбрать операционную систему. Основная задача загрузчика дать пользователю выбрать операционную систему для загрузки.
Раньше для загрузки Linux использовалось несколько загрузчиков, это isolinux, lilo, grub. Но сейчас чаще всего применяется Grub или полное его название GRand Unified Bootloader. В этой статье будет рассмотрена установка загрузчика Grub через терминал. Также мы поговорим как установить grub на компьютер с UEFI, тоже вручную.
Немного теории
Как я уже сказал, основная задача загрузчика — предоставить возможность выбора операционной системы перед загрузкой. Не думайте, что в Windows загрузчик не используется, там он тоже есть и работает, подобно тому, как работает Grub.
Загрузчик может быть установлен в различные таблицы разделов диска. Сейчас самые используемые это GPT и MBR. Установка загрузчика Grub немного отличается для каждой из этих таблиц, учитывая их особенности. Подробнее об отличиях MBR vs GPT можно почитать в отдельной статье. Тут же я скажу, что GPT — более новая и функциональная таблица разделов, MBR — уже устаревшая, но до сих пор часто используемая.
В MBR вариантов немного, Grub записывается в область MBR на диске. Размер сектора MBR занимает первых 512 байт и этого вполне достаточно для того, чтобы установить туда загрузчик.
GPT предоставляет более широкие возможности. Во-первых, для совместимости в GPT эмулируется сектор MBR, и мы можем установить GRUB туда, но такой вариант очень ненадежный и не рекомендуемый. Во-вторых, теперь появилась возможность устанавливать Grub на раздел диска. Мы просто создаем раздел на диске размером 1 Мб и записываем туда то, что раньше записывалось в MBR, это делает установку загрузчика более надежной и защищенной от сбоев.
UEFI предоставляет совсем иной способ установки загрузчика. Тут его не нужно никуда записывать, загрузчик — это обычное приложение EFI, которое помещается на раздел EFI и уже там полностью успешно работает наряду с другими приложениями.
Для установки Grub будет использоваться команда grub-install, во всех случаях. Давайте кратко рассмотрим ее синтаксис и параметры. Синтаксис:
$ grub-install опции диск
Параметров здесь достаточно много, но нам будут нужны только некоторые:
- —compress — сжать файлы загрузчика;
- —install-modules=модули — установить только эти модули;
- —modules — записать эти модули в MBR;
- —boot-directory — использовать другой каталог для файлов Grub;
- —bootloader-id — имя загрузчика в меню EFI;
- —core-compress — сжимать образ, загружаемый в MBR;
- —efi-directory — использовать системный раздел EFI;
- —force — установить несмотря на ошибки;
- —recheck — удалить существующую карту устройств, помогает если возникают ошибки;
- —removable — установка grub на флешку (только EFI);
Основу разобрали. Теперь перейдем к установке. Дальше я буду предполагать, что все действия выполняются из системы, для которой нужно установить загрузчик или из chroot окружения этой системы.
Установка загрузчика Grub в MBR для BIOS
Начнем с самого просто и привычного. Данная инструкция как установить загрузчик Grub подойдет для любого дистрибутива, поскольку команды везде почти одинаковые. Здесь не нужно устанавливать никаких дополнительных пакетов или создавать разделов. Установка Grub на жесткий диск выполняется командой:
sudo grub-install /dev/sda
sudo grub2-install /dev/sda
Утилиты grub в разных дистрибутивах могут включать двойку, а могут и не включать. Здесь /dev/sda — ваш жесткий диск. Теперь генерируем конфигурационный файл, чтобы автоматически определились установленные операционные системы:
sudo grub-mkconfig -o /boot/grub/grub.cfg
sudo grub2-mkconfig -o /boot/grub2/grub.cfg
Готово. По поводу двойки здесь такое же замечание. Если вы хотите установить Grub на флешку в MBR, то тут тоже нет проблем просто примонтируйте флешку и выполните такую команду:
sudo grub-install —root-directory=/mnt/USB/ /dev/sdb
Здесь /mnt/USB — папка, куда была смотирована ваша флешка, а /seb/sdb — сама флешка. Только здесь есть одна проблема, конфигурационный файл придется делать вручную.
Установка загрузчика Grub в GPT для BIOS
Во-первых, мы можем ничего не менять и установить Grub так, как описано в предыдущем способе. Но тогда он будет установлен в область совместимости с MBR, а это не надежно. Поэтому рекомендуется установить grub так, как описано ниже, на отдельный раздел.
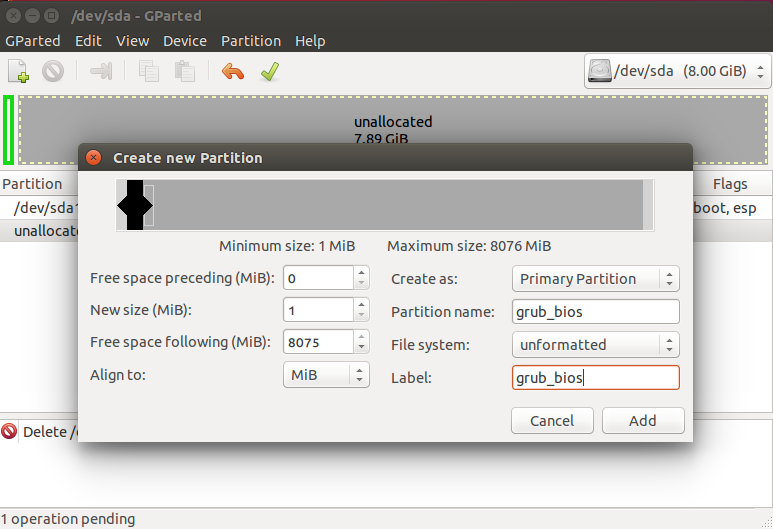
Нужный нам раздел можно создать в установщике любого дистрибутива, если вы выполняете установку в графическом интерфейсе или с помощью gparted. Нам нужен раздел размером 1 Мегабайт без файловой системы и с меткой grub_bios:
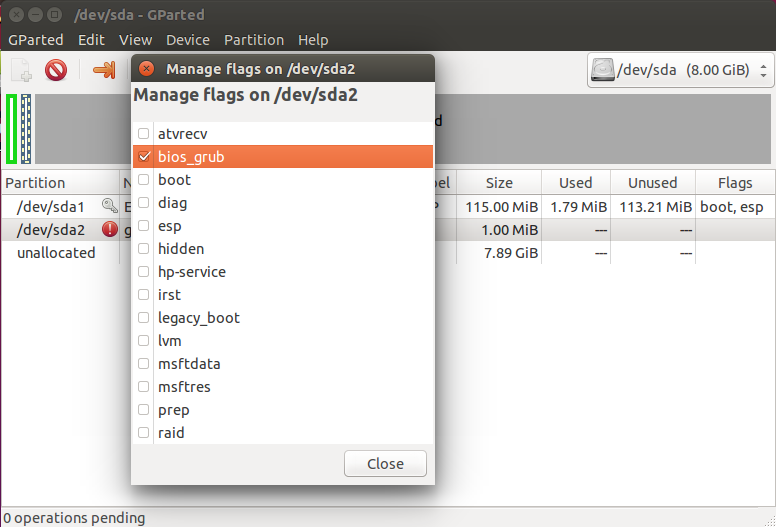
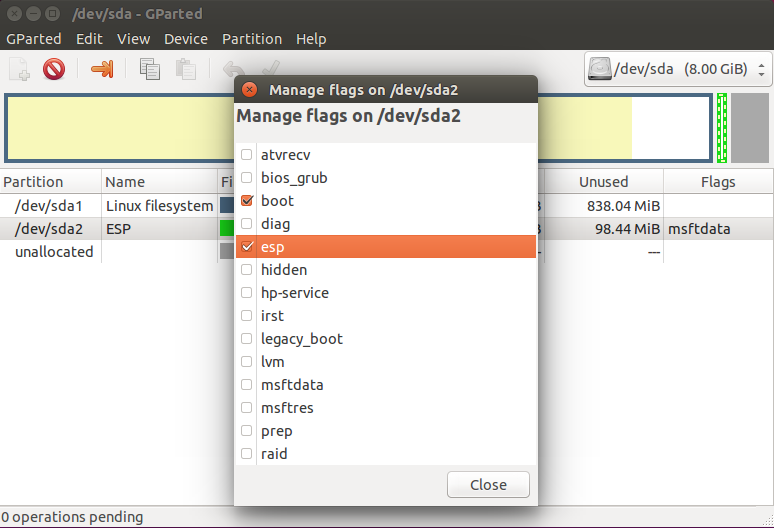
Дальше примените изменения, нажмите на разделе правой кнопкой, выберите manage flags и добавьте флаг grub_bios:
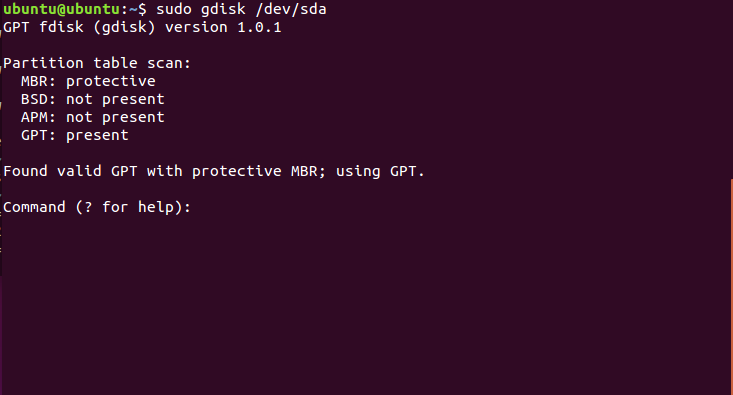
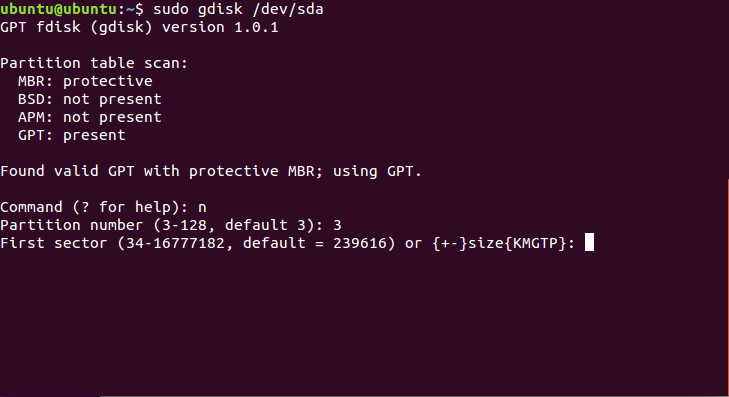
Готово. Если у вас нет под рукой доступа к графическому интерфейсу, вы можете создать такой раздел через терминал. Утилита fdisk не поддерживает работу с gpt, поэтому будем использовать gfdisk. Сначала запустите утилиту:
sudo gdisk /dev/sda
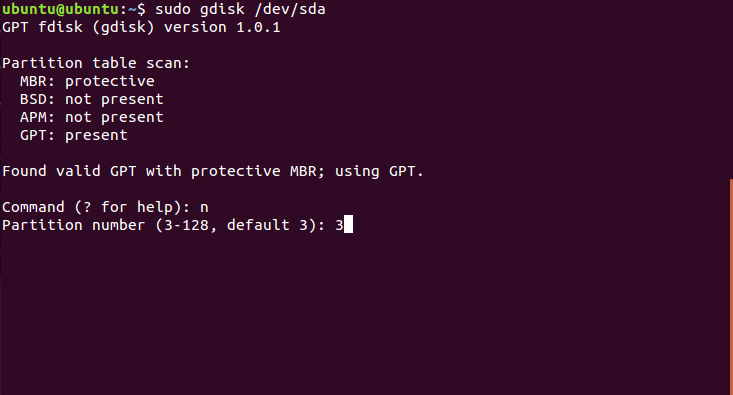
Чтобы создать новый раздел нажмите n и выберите номер раздела:
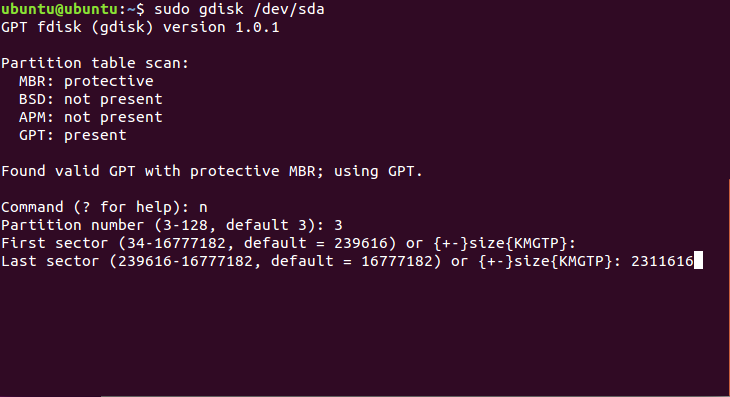
Соглашаемся с начальным сектором, будет использован первый же свободный:
Выбираем конечный сектор раздела. По умолчанию будет использоваться максимальный. Нам нужен раздел размером 1 Мб. Размер одного сектора GPT — 512 байт, поэтому нам нужен раздел размеров 2048 секторов. Таким образом, конечный сектор будет 24000 с чем-то.
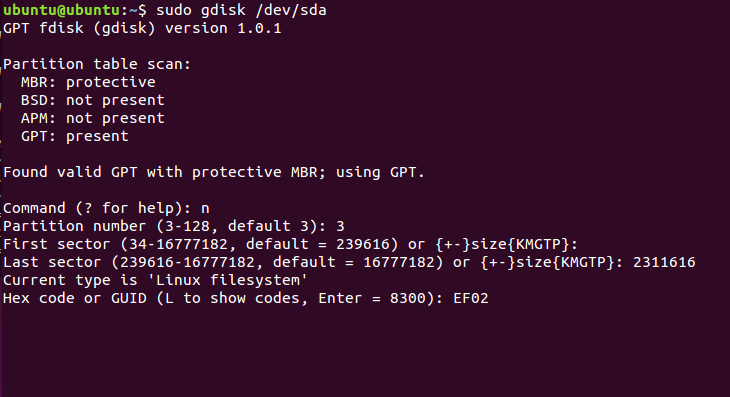
HEX Code — это тот код, который скажет системе, что этот раздел нужно использовать для Grub, нужно установить ef02:
Готово, осталось нажать w для записи изменений на диск:
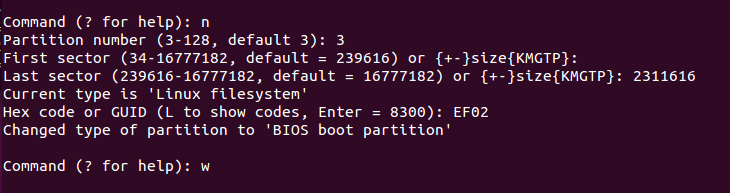
Установка grub на жесткий диск дальше выполняется точно так же, как и в предыдущем способе:
sudo grub-install /dev/sda
Осталось создать конфигурационный файл grub:
sudo grub2-mkconfig -o /boot/grub2/grub.cfg
Теперь переходим к самому сложному, как установить grub efi.
Установка GRUB UEFI GPT
Установка Grub UEFI чем-то похожа на установку в GPT, тут у нас тоже будет отдельный раздел, только на этот раз не для загрузчика, а раздел EFI. Если у вас уже установлена Windows, то, скорее всего, он уже существует. Этот раздел обычно занимает 100 Мб, имеет файловую систему fat32 и флаг ESP. Вот так он будет выглядеть:
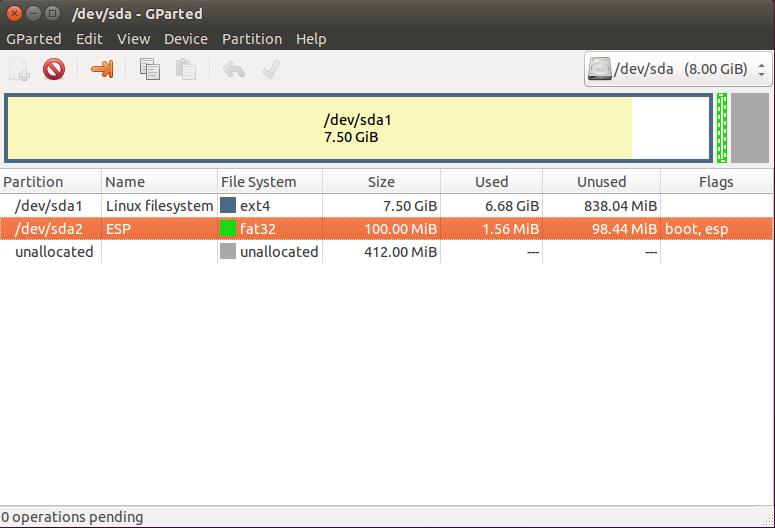
Если же такого раздела нет, мы можем его создать с помощью gparted. Для этого создаем раздел с такими параметрами:

Размер 100 Мегабайт, имя раздела ESP, файловая система fat32. Дальше примените изменения и установите для раздела флаг ESP:
То же самое вы можете сделать в Gdisk, только на этот раз нужно устанавливать HEX Code раздела ef00. После того как раздел был создан, подключаем его к нашей файловой системе:
sudo mkdir /boot/efi
$ sudo mount /dev/sda2 /boot/efi
Здесь /dev/sda2 — это наш EFI раздел. Далее необходимо установить нужные пакеты, если они еще не установлены. В Ubuntu это будет выглядеть вот так:
sudo apt install grub-efi efibootmgr
Дальше останется только установка grub efi. Система сама определит нужный раздел и скопирует туда все файлы:
Установка Grub efi на MBR все выглядит точно так же, только тут есть несколько ограничений. Раздел ESP нужно создавать только в начале диска. В режиме EFI тоже можно установить GRUB на флешку, и это не очень сложно. Для этого используется команда:
grub-install —boot-directory=/mnt/sdb2/boot —efi-directory=/mnt/sdb1 —target=x86_64-efi —removable
Рассмотрим опции: —boot-directory — задает папку с файлами загрузчика на флешке, —efi-directory — папка куда смонтирован раздел efi, —target — архитектура целевой системы и —removable говорит, что это установка на съемный носитель. С UEFI все. После перезагрузки и выбора в меню EFI пункта связанного с Grub, вы получите доступ к привычному меню grub и сможете выбрать нужный параметр.
Выводы
Теперь установка Grub не вызовет у вас проблем. Мы разобрали не только как установить Grub2 в MBR но и в EFI. Кроме того, всю приведенную здесь информацию вы можете использовать для восстановления Grub. Так вы будете лучше понимать что происходит во время восстановления. А настройку параметров и ручное создание конфигурационного файла мы рассмотрим в одной из следующих статей.
Grub boot loader to windows boot loader
Updated: September 13, 2007; November 30, 2017
One of the most frightening things about Linux is the horrible word bootloader. The primary reason for this is the fact that most new Linux users have only ever used Windows operating systems. In the Windows world, they have never bothered with bootloaders. For them, the issue of a system booting was a transparent one. At most, they would use Windows Recovery Console to fix problems for them. Thus, they have been spared the need to learn about the single most important piece of software on a computer — the little program that makes it all work.
This article is supposed to provide you with basic understanding of the GRUB bootloader. If you have read my other Linux articles, you are familiar with partitioning and Linux notation, as well as with the command line. The next logical step is to enhance this knowledge by taking one step further. Understanding how GRUB works and what boot entries in the boot menu mean will help you understand how the operating systems work, how to fix, recover or modify the GRUB menu to suit your needs, and how to setup different work environments with several operating systems.
In the past, we have relied on the installation setups to make the hard work for us. In fact, setting up GRUB, while frightening, is a quite simple and fully reversible procedure. Mastering the GRUB is a very important step in building up the confidence to use Linux. So if you are ready, read on.
But first of all, a foreword of wisdom. This article is a compilation of sources and examples that will help you learn about GRUB. Of course, it’s all out there somewhere, on the Internet. However, new Linux users will probably find the notion of spending hours searching for relevant pieces of information (especially if their PC won’t boot) somewhat frustrating. The goal of this guide is to help provide simple and quick solutions to most common problems regarding multi-boot setups and installation of Linux operating systems.
Table of contents
Everything is a file
To be able to successfully master the secrets of GRUB, you must understand one of the basic foundations of *NIX-based operating systems. Everything is a file. Even hard disks and partitions are treated as files. There is no magic. If you remember this, you will find the supposedly perilous taskВ of tampering with partitions no different than playing with files using a file explorer (or the command line). Now that we have established this, we can move on to the more technical parts of grubbing.
Introduction
GNU GRUB is a bootloader (can also be spelled boot loader) capable of loading a variety of free and proprietary operating systems. GRUB will work well with Linux, DOS, Windows, or BSD. GRUB stands for GR and U nified B ootloader.
GRUB is dynamically configurable. This means that the user can make changes during the boot time, which include altering existing boot entries, adding new, custom entries, selecting different kernels, or modifying initrd. GRUB also supports Logical Block Address mode. This means that if your computer has a fairly modern BIOS that can access more than 8GB (first 1024 cylinders) of hard disk space, GRUB will automatically be able to access all of it.
GRUB can be run from or be installed toВ any device (floppy disk, hard disk, CD-ROM, USB drive, network drive) and can load operating systems from just as many locations, including network drives. It can also decompress operating system images before booting them. You can learn much, much more from the official GNU GRUB Manual 0.97.
What about LILO?
You may have heard about another Linux bootloader called LILO (stands for LI nux LO ader). While a sensible option for many Linux users, I believe that GRUB is a better choice, for several reasons:
- LILO supports only up to 16 different boot selections; GRUB supports an unlimited number of boot entries.
- LILO cannot boot from network; GRUB can.
- LILO must be written again every time you change the configuration file; GRUB does not.
- LILO does not have an interactive command interface.
All in all, it seems that GRUB is the winner. So let’s see what this baby can do.
How does GRUB work?
When a computer boots, the BIOS transfers control to the first boot device, which can be a hard disk, a floppy disk, a CD-ROM, or any other BIOS-recognized device. We’ll concentrate on hard disks, for the sake of simplicity.
The first sector on a hard is called the Master Boot Record (MBR) . This sector is only 512 bytes long and contains a small piece of code (446 bytes) called the primary boot loader and the partition table (64 bytes) describing the primary and extended partitions.
By default, MBR code looks for the partition marked as active and once such a partition is found, it loads its boot sector into memory and passes control to it.
GRUB replaces the default MBR with its own code.
Furthermore, GRUB works in stages .
Stage 1 is located in the MBR and mainly points to Stage 2 , since the MBR is too small to contain all of the needed data.
Stage 2 points to its configuration file, which contains all of the complex user interface and options we are normally familiar with when talking about GRUB. Stage 2 can be located anywhere on the disk. If Stage 2 cannot find its configuration table, GRUB will cease the boot sequence and present the user with a command line for manual configuration.
Stage 1.5 also exists and might be used if the boot information is small enough to fit in the area immediately after MBR.
The Stage architecture allows GRUB to be large (
20-30K) and therefore fairly complex and highly configurable, compared to most bootloaders, which are sparse and simple to fit within the limitations of the Partition Table.
GRUB notation
This section is intended to help you get familiar with GRUB, without touching anything. The next section deals with actual files and manual configuration. GRUB has its own notation, which is very similar yet somewhat different from the general notation a typical Linux user might be used to. Now, here’s an example of a typical GRUB entry:
- The brackets are a must; all devices listed in GRUB menu must be enclosed in brackets.
- hd stands for hard disk; alternatively, fd stands for floppy disk, cd stands for CD-ROM etc.
- The first number (integer for geeks) refers to the physical hard drive number ; in this case, the first drive, as they are counted from zero up. For example, hd2 refers to the third physical hard drive .
- The second number refers to the partition number of the selected hard drive ; again, partitions are counted from zero up. In this case, 1 stands for the second partition.
From here, it is evident that GRUB (menu) does not discriminate between IDE or SCSI drives or primary or logical partitions. The task of deciding which hard drive or partition may boot is left to BIOS and Stage 1. As you see, the notation is very simple.
Primary partitions are marked from 0 to 3 (hd?,0) , (hd?,1) , (hd?,2) , (hd?,3) . Logical partitions in the extended partition are counted from 4 up, regardless of the actual number of primary partitions on the hard disk, e.g. (hd1,7) .
The entries alone are not enough to boot an operating system though. GRUB also needs to know what operating system images to load. These are assigned as parameters to each of the called devices, including special flags (switches). For example, Windows Safe Mode is a special flag. Here is an example of a GRUB menu booting only Ubuntu.
Here’s an example of a GRUB menu from a computer with triple boot (SUSE 10.2, Ubuntu 6.10 and Windows XP). This is the actual menu.lst on one of my real machines.
Let’s try to understand what the entries mean. Only uncommented lines count. Comments are marked with # . The lines that have a series of small gray x s showing are in indication that text therein belongs to the line preceding it. In other words, there text simply dropped to another line to visually accommodate the text editor and screen resolution limitations.
The first line ( default 0 ) means that the first operating system listed will be booted. In this case, it’s SUSE 10.2. The second line ( timeout 8 ) tells how much time (seconds) the user has to make his choice before the default entry is loaded. Simple, isn’t it?
The GRUB menu can also be graphic. The fancy stuff needed to present the user with a colorful background and possibly some extras is located on the first physical disk, third partition (hd0,2). This is a primary partition, as we have seen earlier.
This is the first operating system entry in the menu.
- title is as simple as it sounds. It’s merely a string that’s meant to help the user read the menu in human terminology.
- root (hd0,2) tells GRUB where its configuration files are located. In this instance, they can be found under (hd0,2)/boot/grub .
- kernel /boot/vmlinuz-. boots the actual kernel image . There can be many such images available. The fact there is no device specified before the /boot/vmlinuz indicates the image is located on the same partition as the GRUB itself. This is often the default case for your primary choice of operating system.
- initrd /boot/initrd.img-. is the temporary file system that makes system preparations — adapts generic kernel image to specific hardware — before the real root is loaded.
The extra switches used after the kernel indicate where the actual root is located, what graphic mode is used and where the swap partition resides. This article will not go into detail regarding the more advanced GRUB configurations.
- Again, title indicates a name, in this case fancily adorned with technical details.
- kernel (hd0,8)/boot/vmlinuz-. points to the 9th partition on the first hard disk (hd0,8) . Accidentally, the root flag (/dev/sda9) indicates that the root partition is the same as the one containing the kernel image. Normally, this is the case, and for the sake of simplicity, you will want this option during your installations.
- initrd (hd0,8)/boot/initrd.img-. nothing new here.
Note regarding kernel images and root partitions: On older computers with BIOS that do not support access to more than the first 1024 cylinders, you might setup a boot partition that contains the kernel image, while the root itself is located elsewhere. But people with computers younger than the botched Y2K crisis need not worry.
Another thing you might notice is that the Ubuntu entry is fairly detailed. This feature is called Multi-boot Compliance ; openSUSE recognizes Ubuntu and can accurately call its images (including special switches) and mount the partitions. However, most operating systems are only partially multi-boot compliant. A little later on, I will show you how the Ubuntu entry could have been treated differently, with the same results.
- rootnoverify (hd0,0) means that openSUSE cannot understand Windows operating system, i.e. no multi-boot compliance. Therefore, the operating system is called without any fore-knowledge of the kernel. GRUB assumes that the relevant boot images will be found on the target partition and mounted by the other operating system bootloader. As you can see, Windows was installed on the first partition of the first hard disk. This is the most convenient option.
- chainloader (hd0,0)+1 feature is used for operating systems that cannot be booted directly. Not surprisingly, Windows operating systems cannot be booted directly. They are booted by the method of chainloading . As the name implies, GRUB passes the control of the boot sequence to another bootloader, located on the device to which the menu entry points. This can be a Windows operating system, but also any other, including Linux.
Back to Ubuntu. You remember that I have told we could have booted Ubuntu in an alternative way? Indeed, we could have simply chainloaded it, just like Windows.
This would have worked equally well. The last option in the menu allows you to boot SUSE in the failsafe mode (sort of Safe Mode, no graphics) and does not contribute to our knowledge, therefore we will skip it at the moment. Let’s see some more examples. The example below is actually written in the Ubuntu menu.lst (commented, of course).
title Windows 95/98/NT/2000
root (hd0,0)
makeactive
chainloader +1
title Linux
root (hd0,1)
kernel /vmlinuz root=/dev/hda3 ro
By now, you should be able to «read» GRUB language with ease. We begin with the title . root specifies the partition where we expect to find the Windows kernel and mounts it ( rootnoverify would leave this job to the Windows bootloader). makeactive command sets the active partition on the root disk (above) to GRUB root device . This means that the next command, chainloader , is executed without the target partition specified (as the target partition is the same, now).
The second entry is even simpler. We name a Linux, we call its partition and we boot the kernel. In this case, we see the very interesting case where the kernel image and root (/) partition of the operating system are NOT located on the same partition. This would be a very likely case for older computers — or ones with a specific boot partition. Finally, the crazy stuff: A GRUB menu booting 100+ systems of DOS, Windows, Linux, BSD, and Solaris.
You see, it’s very simple! Once you get the hang of it, it actually becomes fun. For more information, you must read the GNU GRUB Manual 0.97. In particular, you need to familiar with The list of command line and menu entry commands.
GRUB configuration
Most of the time, you will not want or need to touch GRUB. When you install operating systems, especially in the right sequence (inconsiderate OS first — like Windows, flexible OS later — Linux and family), the GRUB will be installed automatically and relevant entries appended.
Nevertheless, you should know when and what to do if things go wrong.
Installation of GRUB
GRUB can be installed to a variety of devices. Most people will be interested in setting up GRUB on their hard disk. Nevertheless, it does not hurt to know learn about other options. Of course, you can skip forward. Before we install anything, we need to know where our files are. If installed, GRUB menu is located on the root partition under:
Always, always back this file up before making any changes! The GRUB files can be found in the image of your operating system (usually a CD), under:
You should also be aware of the basic Linux commands regarding the hard disks and partitions. To this end, you might want to try my article Highly useful Linux commands & configurations. Nevertheless, for those who do not fancy reading yet another article, here’s a brief version:
You can display your PC environment information either through terminal or a text editor. Files through text editor are invoked by specifying the text editor and a target file (with su or sudo for system files).
Alternatively, you can simply print the contents of the files in the terminal by using the cat (concatenate) command.
Some useful commands that one might need when dealing with boot, hard drives and partitions: Display the partition table:
Display the mounted partitions:
Now that we know what we need and where to find it, it’s time to install GRUB.
GRUB on a floppy disk
To create GRUB on a floppy disk, we must copy the Stage 1 and Stage 2 files from the image directory to the first and second sector of the floppy disk. We’ll use the dd command, which copies information sector by sector. Here’s the set of commands that you need to execute (taken from the Manual):
Just a short explanation: if stands for input file, of stands for output file, /dev/fd0 refers to the first mounted floppy device, bs specifies the block size (in bytes), count instructs how many blocks should be copied, and seek tells how many blocks should be skipped before writing. Not surprisingly, since we need to write the files to the first two sectors of the floppy disk, we write stage1 to the first sector, and copy stage2 to the second (skip first, then write). Now that we have taken this deep fancy for the command line, I’ll leave you with the nuances of different commands for homework. More on dd on Wikipedia.
Regarding the GRUB on floppy, that’s it. Since we have copies the stages from OS image, all of the required information is there. Of course, you can always make manual adjustments. But that’s the next chapter.
Installing GRUB natively
Native install means placing GRUB Stage 1 in the first sector of the hard disk ( MBR or Partition Table ). This means you will be able to boot without a secondary device, like a floppy disk (which have become a rarity nowadays). However, this also means that if you install an inconsiderate OS later on (like Windows) or try to repair the MBR for some reason (by running fdisk /MBR from DOS prompt), you will erase the GRUB and render all systems listed in the menu.lst unbootable.
To install GRUB in MBR, you will need to boot from external media (floppy, live Linux CD). Then, once you reach the GRUB prompt, execute the following commands:
Find the GRUB root device :
GRUB will search for all available Stages 1 and present them. If you have more than one operating system image present (e.g. SUSE, Kubuntu, Mandriva), you will have more than one stage1 available. Example -В Let’s say the computer has the following operating systems installed on different partitions:
- SUSE on (hd0,1)
- Kubuntu on (hd0,2)
- Mandriva on (hd0,4)
All these will be returned as potential roots for GRUB device (as each OS has its own files). If you wish to use SUSE GRUB , then you will setup the GRUB root device to (hd0,1) :
If you want Mandriva’s GRUB , then:
If you know in advance what you want to do, you can skip the find command. Once you have decided on the root, you need to write the information to the MBR:
Finally, quit the GRUB prompt:
As a sequence, the commands that you need are:
You can also setup GRUB on another drive or partition, but then you will have to chainload GRUB to another bootloader for this to work. That’s it. Easy peasy orange squeasy!
Installing GRUB with grub-install
This method is considered less safe (according to the Manual), as it guesses the mapping. Still, for total newbs in need of dire help, this might be the preferred method. You only need to invoke a single command — namely, where to install the bootloader. Furthermore, this command can be written in several ways, all equivalent:
After you have installed the GRUB, your operating systems should boot. Once booted, you can once again start playing with GRUB, manually changing settings — adding and removing entries, chainloading other bootloaders, or even hiding and unhiding partitions.
Setting up GRUB manually (after installation)
You can reconfigure or reinstall GRUB at any moment.
Backup!
First, before you make any changes to the GRUB configuration file, it is most warmly recommended that you backup the existing menu. You might even consider copying to another machine or printing the menu, in case things go bunkerous.
To access GRUB, execute the following command in Linux terminal:
After a few moments, the GRUB command line should show up. You can identify it by the grub> prompt.

Alternatively, you can reach the GRUB command line during bootup. When the GRUB menu loads, press C on the keyboard.
Adding a new operating system to the GRUB menu
Let’s say you have installed yet another operating system on your machine, Sabayon. During the installation, you skip the GRUB setup. This means that the original GRUB remains untouched — and it does not contain an entry about Sabayon. For all practical purposes, Sabayon is not bootable.
Note: GRUB menu entries are called stanzas (probably a twist of instance?). So, we need to add Sabayon to the list. If you know where Sabayon is installed, you just need to add its entry to the menu.lst.
That’s it. You can also do this while booting the computer, without editing the menu. When the original GRUB comes up, press C to reach the command line. And then:
Optionally, you will use the find command to get around. Basically, this is the whole of GRUB magic. As you can see, it’s very very simple. But for people who have never heard of GRUB and see long lists of strange commands, the prospect can be daunting. Now that we have covered the basics of grubbing, it’s time for extras and some more common problems.
Common problems
GRUB got deleted; how to restore?
This will often happen if you install Windows after Linux. Windows assumes it’s the only operating system in the world and does not try to live with existing information present in the MBR; it overwrites it. For people with dual-boot and very little knowledge of Linux, this is a disaster. Luckily, it’s very easily recoverable one.
The easy way
Use Super Grub Disk. I have written about this tool in detail in my article A (cool) list of Linux tools, under Rescue.
The hard way
- Boot from floppy disk or CD (any Linux live CD should do).
- Get to the grub command line.
The same as before!
Windows is installed on a non-first hard disk (Swapping)
GRUB cannot directly boot Microsoft operating systems. And sometimes, even chainloading may not work, especially if Windows is not installed on the first hard disk. Once again, you should remember that you should always install Windows first, on the first hard disk, on the first partition (the rule of three first). Nevertheless, even if you have Windows installed on a separate disk, you can solve the problem by swapping . You need to perform a virtual swap between hard disks. Like this:
After you add these two lines, you should be able to boot into Windows (or DOS, for that matter).
There is more than one Windows operating system installed on one hard disk (Hide/Unhide)
Again, Windows can cause problems if there’s more than one instance present on a hard disk, especially if installed on primary partitions. When you use the chainloader command, the control is transferred to the Windows boot loader, but which one?
The problem is easily solved by hiding and unhiding partitions. If GRUB hides a partition, it will not be visible by Windows and prevent a possible confusion. Vice versa, if you unhide a partition, Windows will detect it and be able to boot from it, without getting confused.
Here’s the example taken from the Manual that demonstrates this point. Let’s say we have Windows installed on the first and the second partition of your hard disk. We wish to boot the first instance of Windows. Then, we need to execute the following set of commands to make it all work:
You resized a partition; GRUB is gone
This is an interesting case. It can happen after you use a partitioning or an imaging software to make changes to the Partition Table. Usually, this will happen when you make such a change in Windows. Linux will not be informed of the change, because Windows is blind to anything else on the machine save Microsoft thingies. Consequently, GRUB will suffer.
The solution is that most likely the filesystem is damaged and needs to be repaired. Boot from a live CD and execute the following commands, assuming you know where Linux partitions are. Check the filesystem:
Replace X and Y with hard disk letter and partition number that you want to check (hda2, hdb3, etc.). Create the ext2/3 filesystem parameters again.
Now mount the root filesystem on /mnt/sysimage and run grub :
mount -t ext2 /dev/hdXY /mnt/sysimage
OR
mount -t ext2 /dev/hdXY /mnt/sysimage
cd /mnt/sysimage/sbin
grub
You’re back to the familiar grounds. For more information on Linux commands, including fsck.ext2 , tune2fs and others, see Manual pages on Linux Reviews.
Finally, some more tricky questions answered in Ubuntu wiki:
Useful tools
GParted is a Gnome Partition Editor. Although Linux-based, it fully supports the NTFS file system. It runs from a CD.
This is a live CD specifically geared toward rescue and recovery. The tools package includes some of the most important tools available for Linux user, like GParted, QTParted, Partimage, Grub, Lilo, sfdisk, security tools, network tools, and more.
Super Grub Disk is intended to run from a floppy disk or CD and is used for system rescue. Most importantly, it can be used to restore boot loaders, including GRUB, LILO and even Windows boot loader.
TestDisk is a utility specially designed to recover lost partitions and make non-booting disks bootable again. This highly useful tool can be found on a number of live CDs, including Knoppix and GParted. It supports NTFS partitions and also comes in Windows flavor.


