- Как включить аппаратное ускорение планирования GPU в Windows 10
- Включите или выключите аппаратное ускоренное планирование GPU в настройках
- Включить аппаратное ускоренное планирование GPU с использованием реестра
- Функция аппаратного ускорения планирования GPU
- Планирование GPU с аппаратным ускорением в Windows 10 действительно повышает производительность в играх
- Как включить Планирование GPU с аппаратным ускорением
- How to monitor GPU Usage in Windows 10 using Task Manager
- Monitor GPU Usage using Windows 10 Task Manager
- How to set default GPU for apps on Windows 10
- Specify preferred GPU for apps using Settings
- Windows 10 stock programs causing high GPU usage (also the lockscreen)
- Replies (9)
Как включить аппаратное ускорение планирования GPU в Windows 10
Если вы вообще следите за разработкой Windows 10, вы, вероятно, слышали это модное словечко «Аппаратное ускорение планирования GPU», которое используется с прошлого года.
Если вы хотите опробовать новую функцию и посмотреть, насколько она важна для ваших приложений или игр, вам сначала нужно проверить, что у вас установлена Windows 10 версии 2004 или Build 19041 в меню «Параметры»> «Система»> «О системе».
После обновления до Windows 10 May 2020 Update вам нужно будет скачать драйвер NVIDIA GeForce 451.48+ или Adrenalin 2020 Edition 20.5.1 Beta. В то время как NVIDIA GeForce 451.48 обеспечивает поддержку планирования GPU для всех, в настоящее время AMD ограничила доступность своего нового драйвера для бета-тестеров.
Получив последнюю версию Windows 10 и драйверы, вы можете включить или отключить эту функцию, используя Параметры и Реестр Windows.
Включите или выключите аппаратное ускоренное планирование GPU в настройках
Чтобы включить аппаратное ускоренное планирование GPU в Windows 10, выполните следующие действия:
- Откройте меню «Пуск» и нажмите на значок «Параметры».
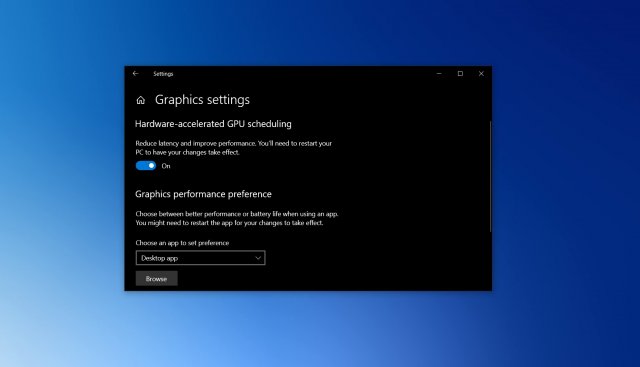
В меню «Параметры» нажмите «Система» и откройте вкладку «Дисплей».
В разделе «Несколько дисплеев» выберите «Настройки графики».
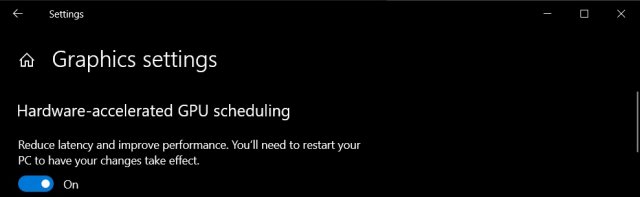
Включите или выключите опцию «Аппаратное ускорение планирование GPU».
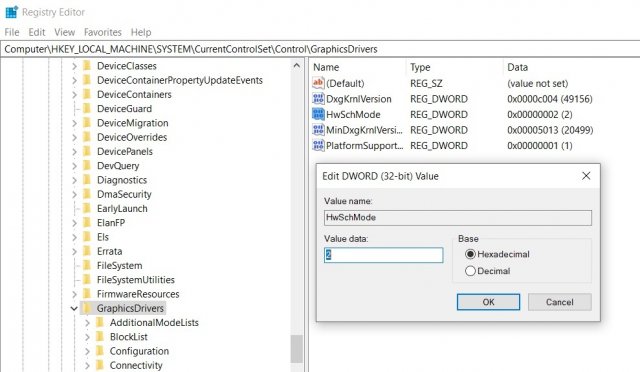
Включить аппаратное ускоренное планирование GPU с использованием реестра
Для принудительного аппаратного планирования GPU в Windows 10 выполните следующие действия:
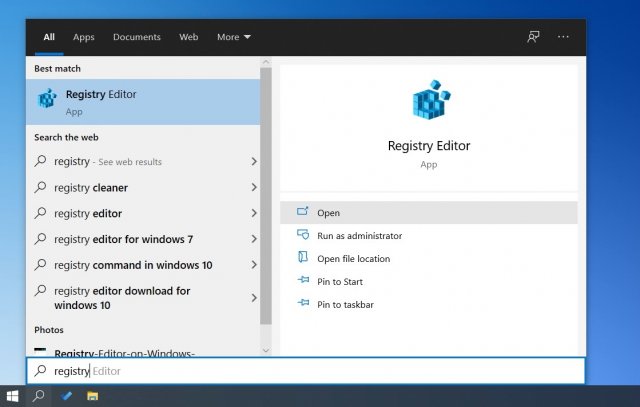
- Откройте поиск Windows.
- Найдите «Редактор реестра».
Функция аппаратного ускорения планирования GPU
Короче говоря, функция аппаратного ускорения планирования GPU в Windows 10 представляет собой принципиально новый дизайн работы модели драйвера дисплея Windows (WDDM). Хотя Microsoft говорит, что пользователи не увидят каких-либо существенных изменений после ее активации сейчас, некоторые считают, что эта функция в конечном итоге уменьшит задержку ввода на процессорах младшего и среднего уровня.
Теоретически, функция аппаратного ускорения GPU в Windows 10 передает большинство задач планирования GPU выделенному процессору планирования на основе GPU, который должен немного высвободить процессор и потенциально может привести к небольшому улучшению входной задержки.
Планирование GPU с аппаратным ускорением в Windows 10 действительно повышает производительность в играх
Функция «Планирование графического процессора с аппаратным ускорением» предназначена для улучшения планирования GPU и, как следствие, повышения производительности при запуске приложений и игр, использующих графический процессор.
Новая функция имеет некоторые ограничения: она доступна только в Windows 10 версии 2004 или выше, требует наличия современного графического процессора и драйверов, поддерживающих эту функцию. Опция становится доступной, только если система отвечает всем этим требованиям.
Как включить Планирование GPU с аппаратным ускорением
Вы можете проверить доступность функции планирования GPU на вашем устройстве следующим способом:
- Убедитесь, что вы используете графические драйверы, которые поддерживают эту функцию.
- Пользователям Nvidia, например, необходим драйвер GeForce 451.48 или новее, так как в этой версии компания представила поддержку планирования GPU с аппаратным ускорением.
- В настоящее время только графические процессоры AMD серии RX 5600 и RX 5700 на базе RDNA поддерживают GPU с аппаратным ускорением с драйвером AMD Radeon 20.5.1 Optional.
- Убедитесь, что вы используете Windows 10 версии 2004, например, введя winver в меню «Пуск» и выбрав предлагаемый результат.
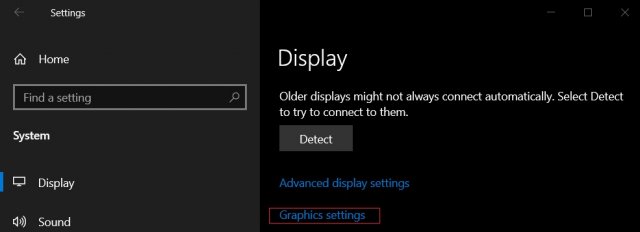
- Откройте приложение Параметр с помощью горячей клавиши Windows + I или выберите меню «Пуск»> Параметры.
- Перейдите в Система > Дисплей> Настройки графики.
- Если вы увидите параметр Планирование графического процессора с аппаратным ускорением, то вы используете поддерживаемый графический процессор и драйверы.
- Используйте переключатель для включения функции.
- Утилита TechPowerUp GPU-Z показывает состояние функции в меню Advanced > WDDM.
Microsoft рассказала о механизме работы новой функции планирования GPU в блоге Microsoft Dev. Компания объясняет, что эта функция «является существенным и фундаментальным изменением модели драйверов, и сравнивала нововведение с «перестройкой фундамента дома, в котором вы живете».
Компания собирается отслеживать производительность функции и продолжит работу над ней.
Пользователи Windows 10, особенно любители компьютерных игр, интересуются, стоит ли включать эту функцию уже сейчас или лучше ее активировать позже.
Немецкий компьютерный журнал PC Games Hardware провел тестирование на оборудовании Nvidia. Тестеры учли рекомендации Nvidia и выбрали для испытания одну из самых быстрых видеокарт — MSI GeForce RTX 2080 Ti Gaming Z (Ранее Nvidia заявила, что самые мощные карты получают наибольшую выгоду от этой функции).
Тесты проводились в Doom Eternal, Read Dead Redemption 2 и Star Wars Jedi Fallen Order, с включенной и отключенной функцией планирования графического процессора с аппаратным ускорением.
Основной вывод тестирования: Планирование GPU с аппаратным ускорением действительно повышает производительность во всех случаях. В среднем, тестеры заметили увеличение на 1-2 кадра в секунду при запуске игры в разрешении 2560×1440 пикселей.
Неизвестно, будет ли улучшение производительности более скромным с менее мощным оборудованием, но Nvidia предполагает, что это может быть именно так.
Тем не менее, для геймеров имеет смысл включить планирование GPU при условии, что на машинах, на которых эта функция активирована, не наблюдается падение производительности.
Какая видеокарта установлена на вашем компьютере?
How to monitor GPU Usage in Windows 10 using Task Manager
The Task Manager is one stop application to monitor all processes, memory, Network, CPU, and resource usage that Windows requires. However, there is no way to monitor GPU usage in Windows 10 because that feature is smartly hidden into Task Manager. If you have a gaming PC or use applications which take a lot of GPU usage, then this feature comes in handy.
Monitor GPU Usage using Windows 10 Task Manager
This feature was first rolled out with Windows 10 Creators Update, and it works if you have PC with WDDM 2.0 compatible GPU. You can check if you have a WDDM driver using the DirectX Diagnostics Tool.
- Type dxdiag in the Run prompt, and hit Enter.
- In the Directx Diagnostic tool, switch to the Display tab, and see if you have Driver model 2.XX or above.
- If yes, Task Manager can show you GPU usage for each application. If you see a “WDDM 1.x” driver here, your GPU isn’t compatible.
Now that you know you have a compatible system follow the steps to enable GPU Monitor usage in the Task Manager.
- Right click on the Taskbar, and select Task Manager.
- On the Task Manager, click on More details to see all the metrics.
- Under Processes, right click on any of the usage metrics, ie, .e CPU or RAM and select GPU and GPU engine.
This will give details of GPU usage on per application basis. It shows which physical GPU usage an application is using, and which engine is in use. If you switch to the Performance tab, you will get to see a complete graph of GPU usage with details about dedicated and shared GPU usage.
To find out how much of video memory an application is consuming, you can see that it under Details Tab.
- Switch to Details tab, and right-click on any of the headers.
- Click on select columns, and then select the checkbox against GPU, GPU Engine, Dedicated GPU Memory, and Shared GPU Memory.
The only drawback about this process is there is no way to keep the GPU section stay forever. Every time you close the Task Manager, the GPU section disappears. However the column we just enabled under Details section stays.
Let us know if you find this feature useful.
How to set default GPU for apps on Windows 10
If you have a multi-GPU system running Windows 10, you can now manually specify the preferred graphics processor an app should use for performance or to improve battery life.

On Windows 10, computers with multiple GPUs have the ability to select the preferred graphics card an app should use within the graphics control panels software available from Nvidia and AMD.
However, since version 1803 (April 2018 Update) and later versions, the Windows 10 Settings app includes a page that allows you to select the preferred graphics card for traditional and Microsoft Store apps to improve system performance or battery life.
In this guide, you will learn the steps to set the GPU an app uses on your Windows 10 laptop or desktop with multiple graphics processors.
Specify preferred GPU for apps using Settings
To force an app to use a discrete GPU instead of the integrated adapter, use these steps:
Open Settings on Windows 10.
Click on System.
Click on Display.
Under the “Multiple displays” section, click the Graphics settings option.
 Graphics settings option
Select the app type using the drop-down menu:
- Classic app — traditional (Win32) desktop programs.
- Microsoft app — apps available through the Microsoft Store.
If you select the Classic app option, you will need to click the Browse button to locate the “.exe” file to specify the app. On the other hand, if you select the Microsoft Store app option, you will see a second drop-down menu to select the app.
Use the drop-down menu and select the app.
Click the Add button.
 Set GPU for app
Click the Options button.
 App GPU options
Set the graphics preference you want to use for the app:
- System default — (default) Windows 10 decides which GPU to use automatically.
- Power saving — runs the app on the GPU that uses the least power, usually the integrated graphics processor.
- High performance — runs the app on the most capable GPU, usually an external or discrete graphics processor.
Click the Save button.
 Select GPU preference per app
Once you complete the steps, the app you selected will use the graphics processor you specified to optimize battery life or performance the next time you launch it.
It is important to note that these settings will take precedence from the same settings available in other control panels (which you can continue to use).
While you can manually set the preferred GPU for an app on Windows 10, the app always decides which processor to use. This means that if you change the settings and the app continues to use a different GPU, you may need to change the preferences in the app itself.
If you want to stop an app from using this feature, then in the “Advanced graphics settings” page, select the app from the list, and click the Remove button. Or select the app, click the Options button, and select the System default option.
We may earn commission for purchases using our links to help keep offering the free content. Privacy policy info.
All content on this site is provided with no warranties, express or implied. Use any information at your own risk. Always backup of your device and files before making any changes. Privacy policy info.
Windows 10 stock programs causing high GPU usage (also the lockscreen)
I’ve recently been wondering why my GPU temps have been so high on idle. I did some investigating and found that all stock programs on windows 10 (even if they aren’t open, but running in the background) cause over 50% GPU usage. The problem is, some of these programs open on their own (Calculator, Mail, & Settings). As soon as I force quit all of these programs, my GPU usage drops back down to
20%. Locking my PC also causes the same issue, so if I lock my PC my temps get high again.
Note: Cortana is the one program that does not effect it.
I’ve done multiple malware/ virus scans using different programs and nothing has been caught.
My simplified specs:
2x GTX 780’s (SLI) (Newest drivers)
Win. 10 (All updated)
Screenshot Proof (Note the top 2 graphs of MSI Afterburner) :
Mail & Settings running in background (High GPU usage)
Force quit Mail. Settings is still running (Still high GPU usage)
Force quit Settings, no background programs running (low GPU usage)
Replies (9)
![]()
Let us run System Maintenance troubleshooter on the computer and check if it helps.
Follow the below steps:
1. Press Windows and X key together and select Control Panel .
2. Click on Troubleshooting .
3. Click on View all option on the left side of the Windows.
4. Click on System Maintenance option.
5. Click on Next and follow the onscreen instructions.
Reply us back with the update of the issue.
We will be glad to help.
4 people found this reply helpful
Was this reply helpful?
Sorry this didn’t help.
Great! Thanks for your feedback.
How satisfied are you with this reply?
Thanks for your feedback, it helps us improve the site.
How satisfied are you with this reply?
Thanks for your feedback.
3 people found this reply helpful
Was this reply helpful?
Sorry this didn’t help.
Great! Thanks for your feedback.
How satisfied are you with this reply?
Thanks for your feedback, it helps us improve the site.
How satisfied are you with this reply?
Thanks for your feedback.
![]()
Thank you for your reply, appreciate the time taken by you in keeping us updated on the status of the issue.
The issue might also occur due to conflicts of third party applications. I suggest you to place your system in a Clean Boot state and check if this helps.
Placing your system in Clean Boot state helps in identifying if any third party applications or startup items are causing the issue. Check this issue in clean boot state.
- Press Windows key + X key. And select Run.
- Type msconfig in the Run box and hit Enter.
- On the Services tab of the System Configuration dialog box, tap or click to select the Hide all Microsoft services check box, and then tap or click Disable all .
- On the Startup tab of the System Configuration dialog box, tap or click Open Task Manager .
- On the Startup tab in Task Manager, for each startup item, select the item and then click Disable .
- Close Task Manager.
- On the Startup tab of the System Configuration dialog box, tap or click OK , and then restart the computer.
For more information refer the below link.
How to perform a clean boot in Windows
Note: After troubleshooting, refer to this section » How to reset the computer to start normally after clean boot troubleshooting «.
Hope this helps. Please do let us know if you need any further assistance.


