- Restart your Mac in macOS or Windows
- How to start up in macOS from Windows
- How to start up in Windows from macOS
- Learn more
- Move your data from a Windows PC to your Mac
- Before you begin
- Move your data
- How to move your information from a PC to your Mac
- After you move your data
- If you have issues moving your data
- What data can I transfer?
- Switching from Windows to Mac? Everything You Need to Know
- Desktop
- Finder
- Keyboard Shortcuts
- Trackpad Basics
- Launching Applications
- Launchpad
- Spotlight
- Closing Apps is not the same as Quitting Apps
- Multi-tasking
- Installing and Uninstalling Apps
- Where is the Window Snapping?
- Siri… a kind of powerful Virtual Assistant
- So you use NTFS Formatted Drives?
- Taking Screenshots
- Android Phones with Mac
- Backup Your Mac, Please
- Non Responsive Apps
- Ports, Accessories and More
- Moving from Windows to Mac? Get started now
Restart your Mac in macOS or Windows
After installing Microsoft Windows on your Mac, you can choose whether your Mac starts up in macOS or Windows.
How to start up in macOS from Windows
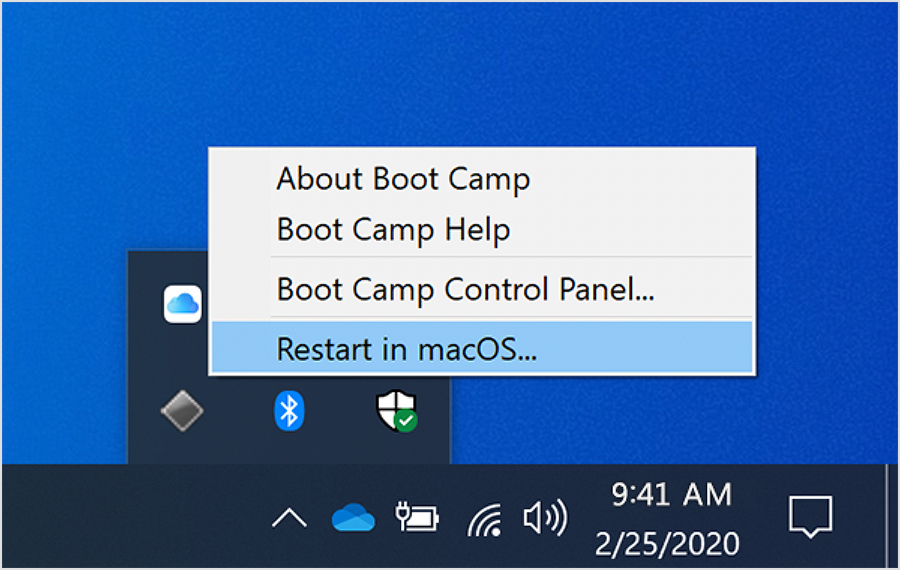
- From the notification area on the right side of the Windows taskbar, click to show hidden icons.
- Click the Boot Camp icon .
- From the menu shown, choose Restart in macOS.
If you haven’t installed the latest Boot Camp updates, you might get the message ”Could not locate the OS X boot volume.»
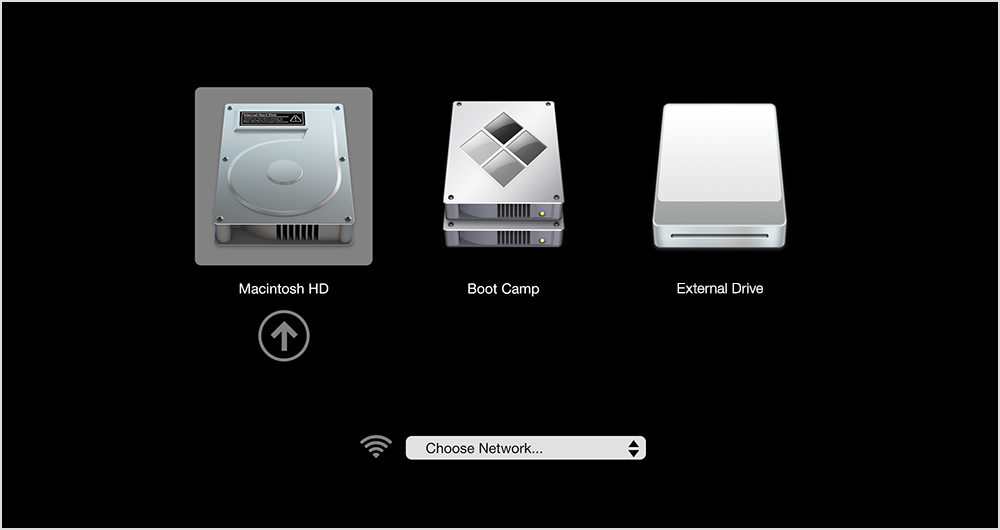
Or use Startup Manager as your Mac starts up:
- Restart your Mac from the Start menu in Windows.
- Press and hold the Option (or Alt) ⌥ key as your Mac begins to restart.
- Select your Mac startup volume (Macintosh HD) in the Startup Manager window, then press Return or click the up arrow:
How to start up in Windows from macOS
- Use Startup Manager to choose your Windows (Boot Camp) volume during startup.
- Or select your Boot Camp volume in Startup Disk preferences, then restart.
Learn more
- If you’re having difficulty using VoiceOver or another screen reader to complete these steps, please contact Apple Support.
- Learn how to install Windows 10 on your Mac.
Information about products not manufactured by Apple, or independent websites not controlled or tested by Apple, is provided without recommendation or endorsement. Apple assumes no responsibility with regard to the selection, performance, or use of third-party websites or products. Apple makes no representations regarding third-party website accuracy or reliability. Contact the vendor for additional information.
Move your data from a Windows PC to your Mac
Use Windows Migration Assistant to transfer your pictures, documents, and other data from a Windows PC to your Mac.
Windows Migration Assistant transfers your contacts, calendars, email accounts, and more from a PC. It migrates this data to the appropriate places on your Mac. After migrating data to your Mac, authorize your computer for iTunes Store purchases. It’s important to authorize before you sync or play content that you download from the iTunes Store.
If you’re migrating from one Mac to another Mac, follow the steps to move your content to a new Mac.
Before you begin
To prepare for a smooth migration:
- Make sure that Windows is up to date. Migration Assistant works with Windows 7 and later.
- Make sure that you know the name and password of an administrator account on your PC.
- Connect your Mac and PC to the same network, such as your home Wi-Fi network. Or connect an Ethernet cable between the ports on your Mac and PC to create a direct network connection. Some Mac models require an Ethernet adapter, such as the Belkin USB-C to Gigabit Ethernet Adapter or Apple Thunderbolt to Gigabit Ethernet Adapter.
- If you’re using Microsoft OneDrive on your PC, follow Microsoft’s instructions for uninstalling OneDrive before continuing. You can reinstall OneDrive after migration is complete.
Then use the check disk (chkdsk) utility on your PC to make sure that your Windows hard drive doesn’t have any issues:
- Right-click the Start button, then click Run.
- Type cmd and press Enter. Command Prompt opens.
- At the prompt, type chkdsk and press Enter.
- If the utility reports that it found problems, type the following, where drive is the letter that represents your Windows startup disk, such as D:
- Press Enter.
- At the prompt, type Y , then restart your PC.
- Repeat this process until the check disk utility reports no issues. If the utility can’t fix every issue that it finds, you might need to have your PC serviced. Then migrate your data to your Mac.
Move your data
This section guides you through migration, post-migration, and what to do if the steps don’t work for you.
How to move your information from a PC to your Mac
- On your PC, download and install the appropriate Windows Migration Assistant, based on the version of macOS on your Mac:
- Windows Migration Assistant for macOS Big Sur
- Windows Migration Assistant for macOS Mojave and macOS Catalina
- Windows Migration Assistant for macOS Sierra and High Sierra
- Windows Migration Assistant for OS X El Capitan or earlier
- Quit any open Windows apps.
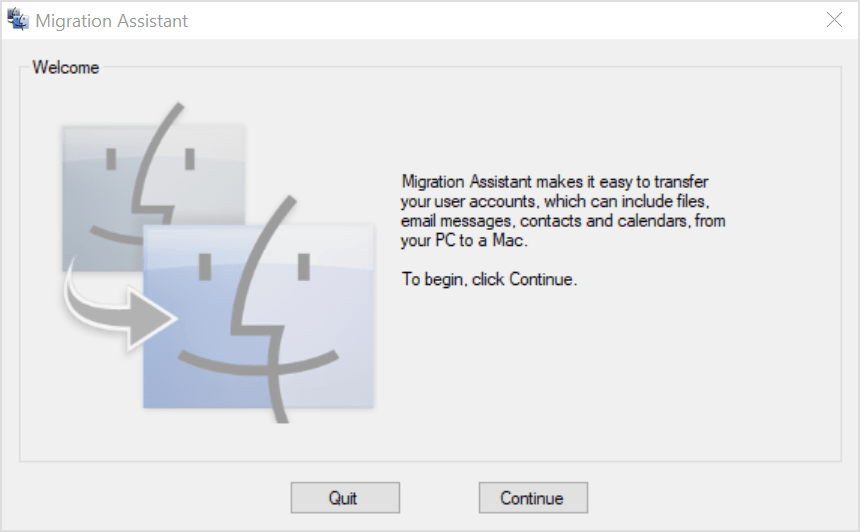
- Open Windows Migration Assistant, then click Continue.
- Start up your Mac. Setup Assistant automatically opens the first time you turn on your Mac. If you’ve already set up your Mac, open Migration Assistant, which is in the Utilities folder of your Applications folder.
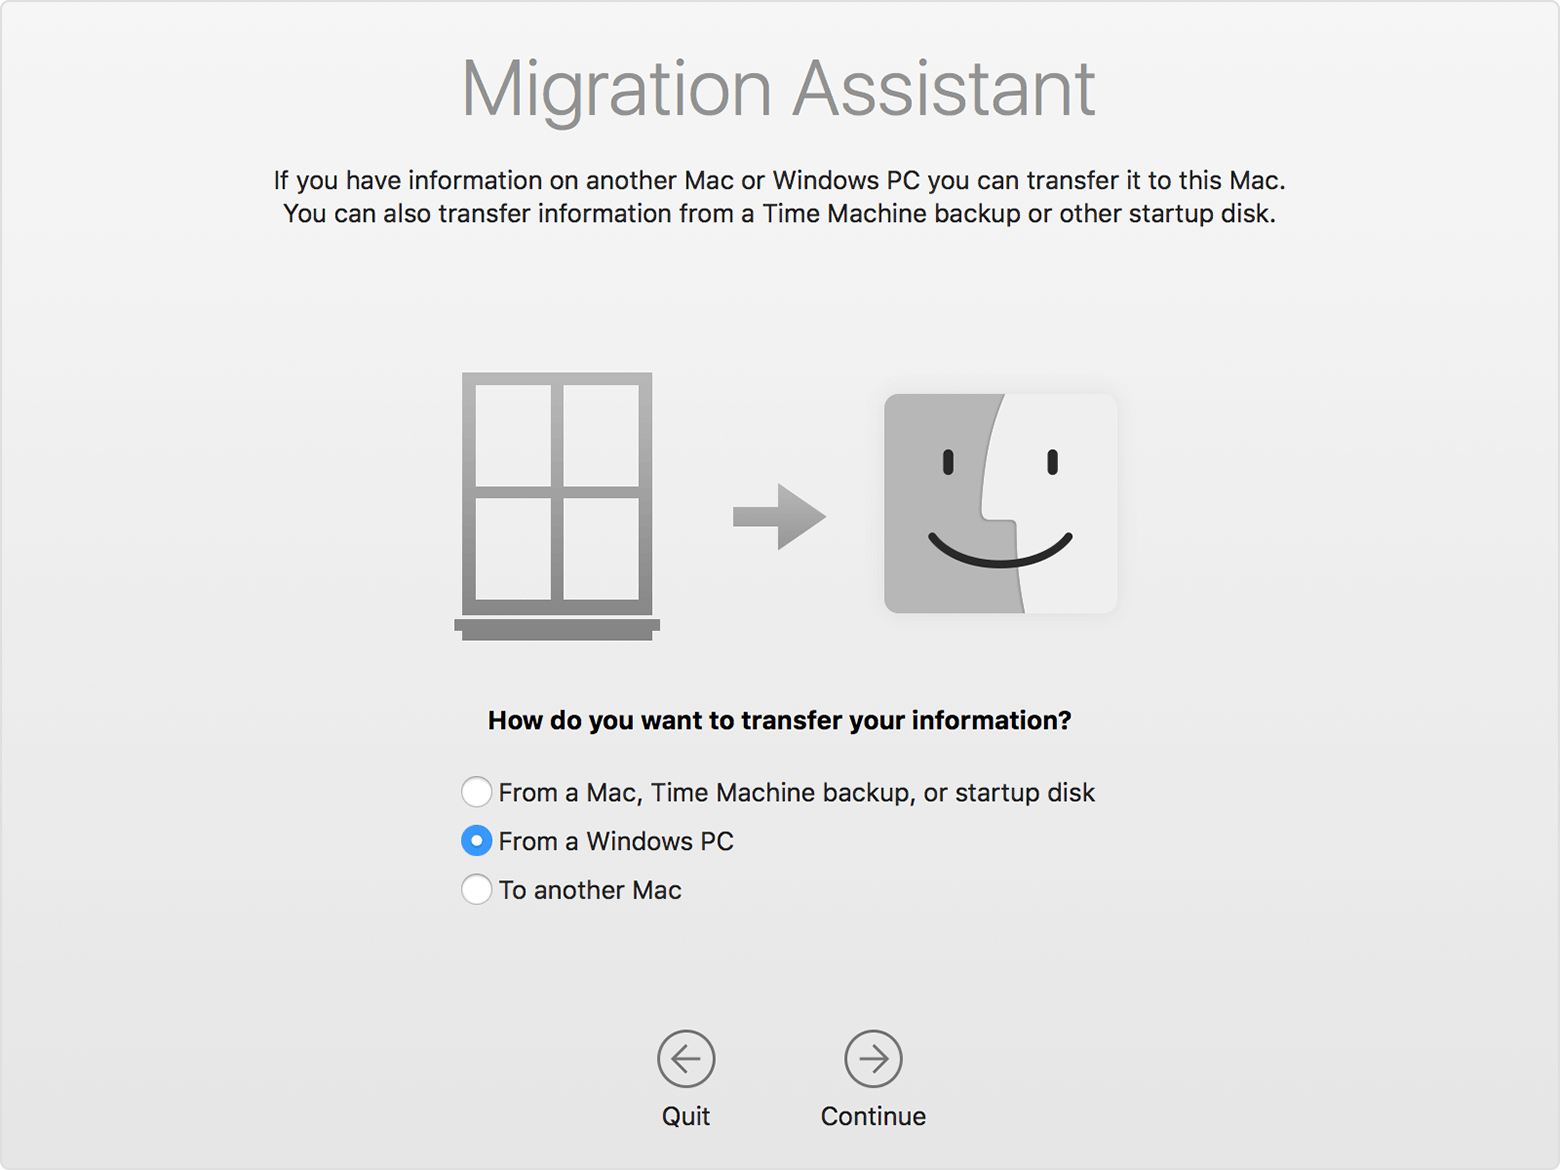
- On your Mac, follow the onscreen prompts until you get to the migration pane of the assistant. Select the option to transfer your information “From a Windows PC,” then click Continue.
- When prompted, enter an administrator name and password.
- Click Continue to close any other open apps.
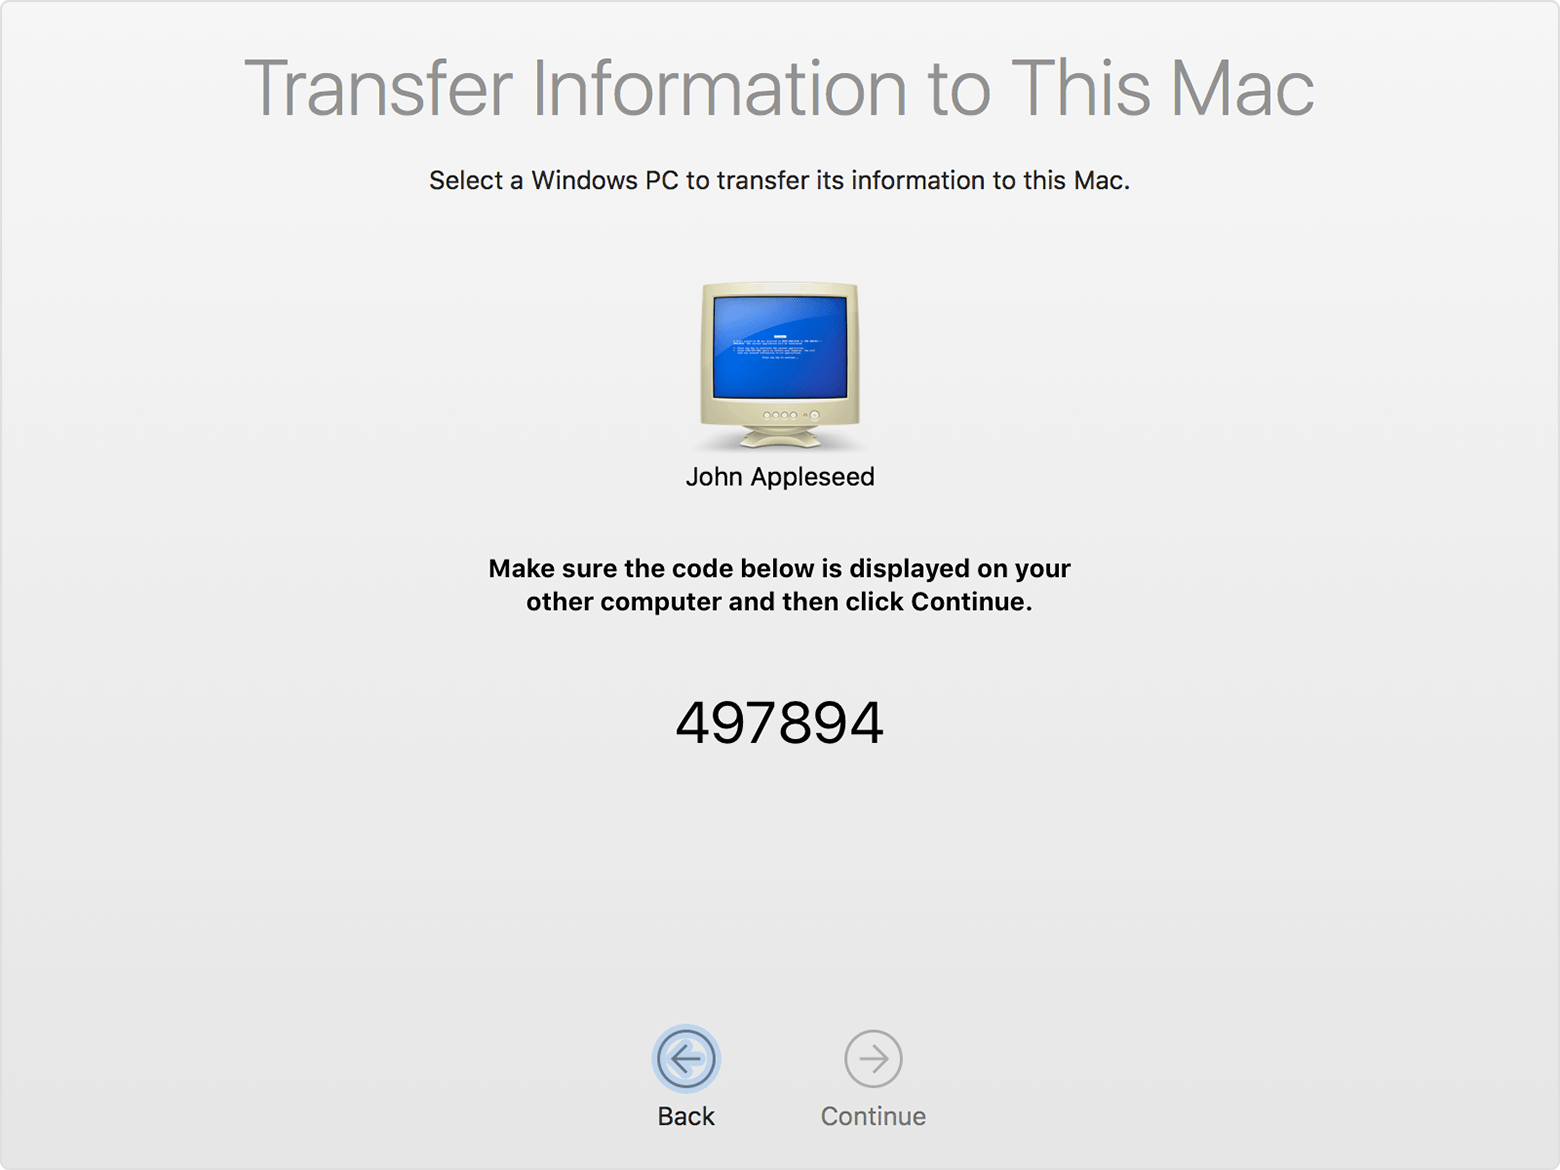
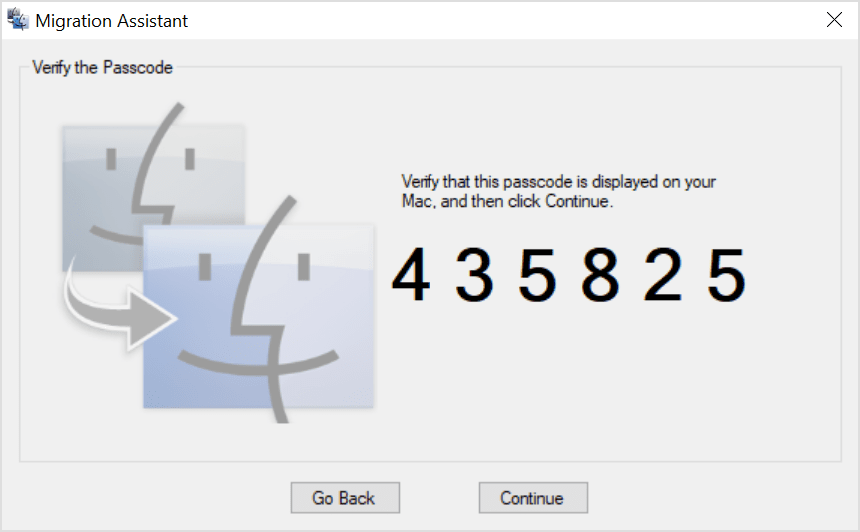
- In the migration window on your Mac, select your PC from the list of available computers. Then wait for the PC to show the same passcode that your Mac shows.
- When both computers display the same passcode, click Continue on your PC and Mac.
- Your Mac scans the drives on your PC to build a list of information to migrate. When the scan completes, select the information that you want to migrate to your Mac and click Continue. Learn about some of the data that you can transfer.
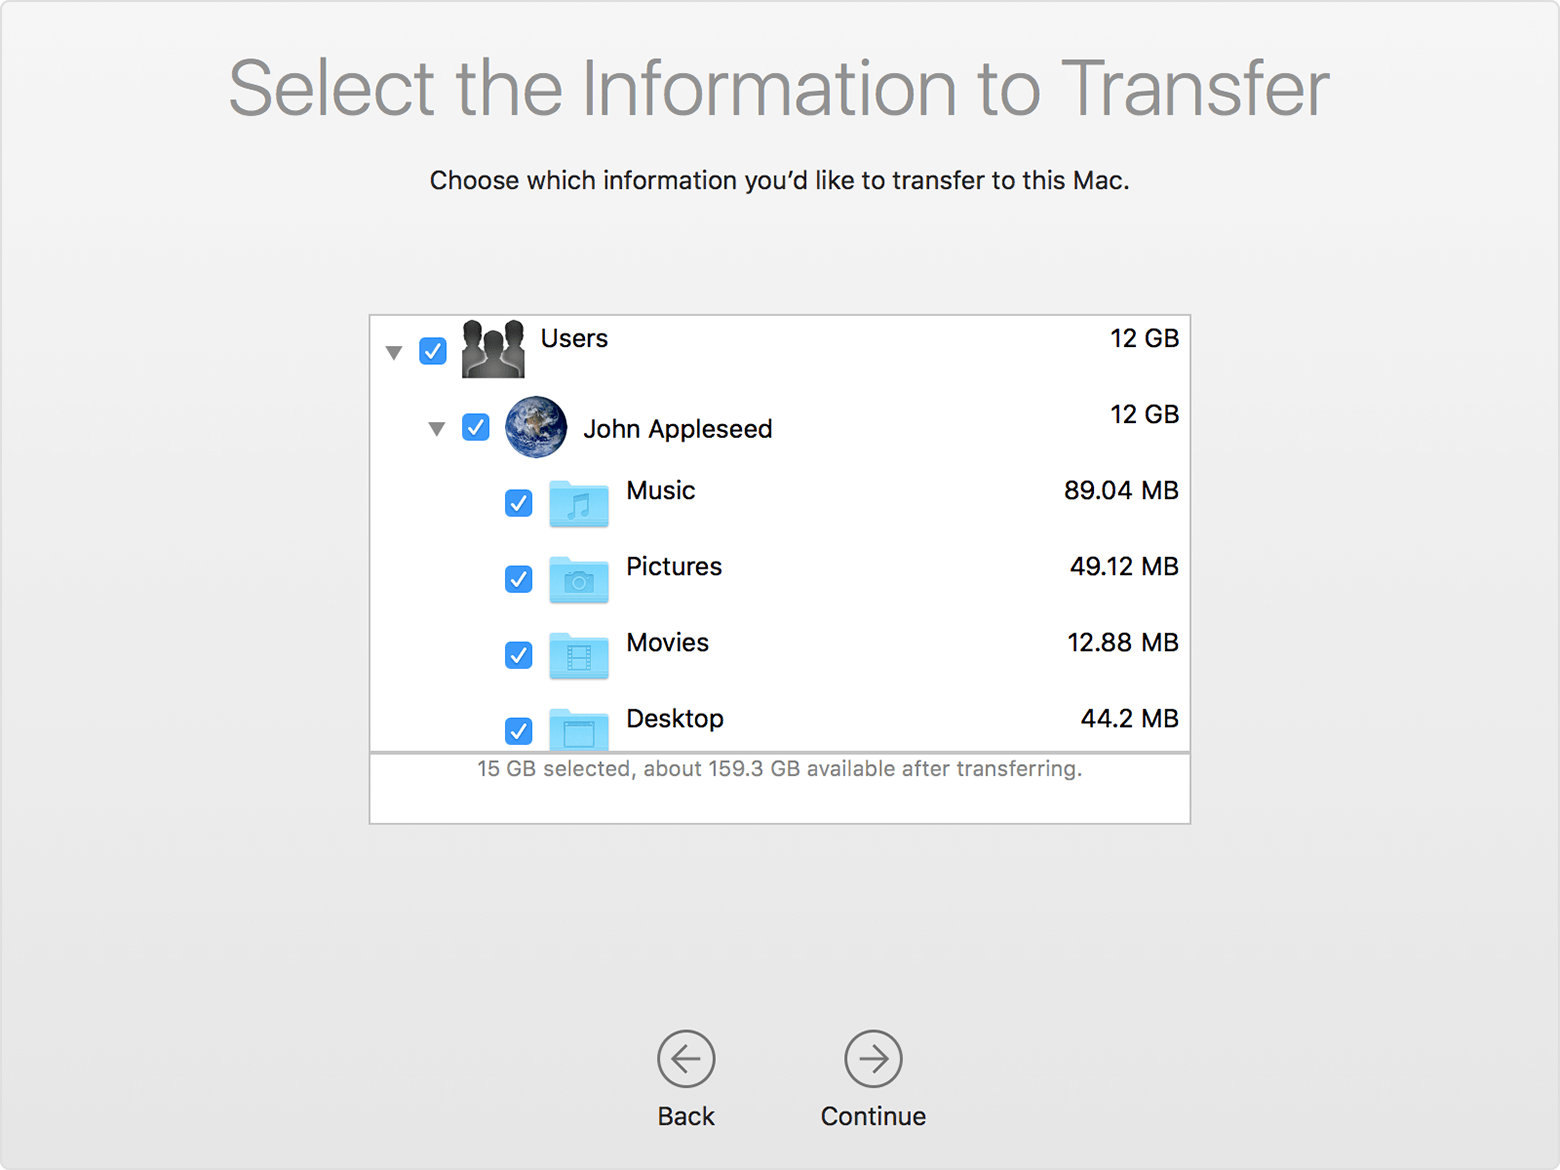
You can watch the progress and estimated time remaining on both the PC and your Mac. They tell you when migration is complete.
After you move your data
When migration completes, close Windows Migration Assistant on your PC. Then log in to the new user account on your Mac. The first time you log in to a user account migrated from your PC, you’re asked to set a password. You can use the same password that you used on your PC, or create a new password.
After logging in to the user account that you migrated, authorize your computer for iTunes Store purchases. It’s important to authorize before you sync or play content downloaded from the iTunes Store.
If you have issues moving your data
- Quit all open apps on your PC, then try migrating your content again. For example, you can press Alt-Tab to choose an open application, then press Alt-F4 to quit it.
- If your PC doesn’t appear in the Setup Assistant or Migration Assistant window on your Mac, make sure the computers are connected to the same network. You can create a network by connecting a single Ethernet cable between your Mac and PC. If that doesn’t help, check for firewall software on your PC and turn it off. After migration completes, you can turn firewall software on again.
- If Migration Assistant doesn’t open on your PC, turn off any antivirus software on your PC. Then try to open Migration Assistant again. After migration completes. You can turn that software on again.
- If you still can’t migrate your information successfully, you can use an external drive or file sharing to manually copy important data to your Mac.
What data can I transfer?
Migration Assistant lets you choose the data to move to your Mac. Here’s what moves over for specific apps and data types:
Email, contacts, and calendar information
Email messages, email-account settings, contacts, and appointments move based on which version of Windows you’re using and which accounts you have.
Outlook 1
Data from 32-bit versions of Outlook in Windows 7 and later move as follows:
- People move to Contacts 2
- Appointments move to the Calendar app
- IMAP and Exchange settings and messages move to the Mail app
- POP settings and messages move to Mail 2
Windows Live Mail
Data from Windows Live Mail in Windows 7 and later moves as follows:
- IMAP settings and messages move to Mail
- POP settings and messages move to Mail 2
Windows Mail
Data from Windows Mail in Windows 7 and later (excluding Windows 8) move as follows:
- IMAP settings and messages move to Mail
- POP settings and messages move to Mail 2
- People move to Contacts
Bookmarks
Bookmarks from Internet Explorer, Safari for Windows, and Firefox move to Safari.
System settings
Language and location settings, and custom desktop pictures move to System Preferences. Your web browser homepage moves to Safari preferences.
Pictures
Photos and other images move to your home folder. You can then add them to Photos, or open Photos and let it search your Mac for photos to import.
iTunes content
Migration Assistant transfers your iTunes media as follows: music to the Apple Music app, videos to the Apple TV app, podcasts to the Apple Podcasts app, and audiobooks to the Apple Books app.
Other files
Migration Assistant also moves these files:
- Files from the top-level folder of the currently logged-in user’s home directory
- Non-system files located in the Windows or Program Files folders
- Top-level folders located on the Windows system disk and other attached disks
1. Migration Assistant doesn’t support 64-bit versions of Outlook. You can manually migrate Mail, Contacts, or Calendars from Outlook 2013 or Outlook 2016 by signing in and entering the content on your Mac manually.
2. Migration Assistant transfers only the Mail or Contacts data that belongs to the logged-in Windows user. To transfer data from another user account, use Migration Assistant again while you’re logged in to another Windows account. Each time you migrate, your Mac creates a new user account.
Information about products not manufactured by Apple, or independent websites not controlled or tested by Apple, is provided without recommendation or endorsement. Apple assumes no responsibility with regard to the selection, performance, or use of third-party websites or products. Apple makes no representations regarding third-party website accuracy or reliability. Contact the vendor for additional information.
Switching from Windows to Mac? Everything You Need to Know
So you decided to switch from your Windows PC, to a Mac; and now you’re wondering what you should expect, and what you should know in order to fully appreciate your brand new, shiny piece of hardware? Well, that’s the first thing – to appreciate a Mac for what it is, you need to realise that it’s not just hardware; a Mac is a software and hardware bundle, nay, experience, that you will fall in love with. As proficient as you may be with using Windows, there are a host of things about the Mac (both big, and small; good, and bad) that you should be aware of. That is exactly what I’m here for. Let me walk you through the entire process of using a Mac.
Note : I’m writing this article from the point-of-view of what a complete newbie to the macOS environment should know. People who have used a Mac before would probably know these things already.
Desktop
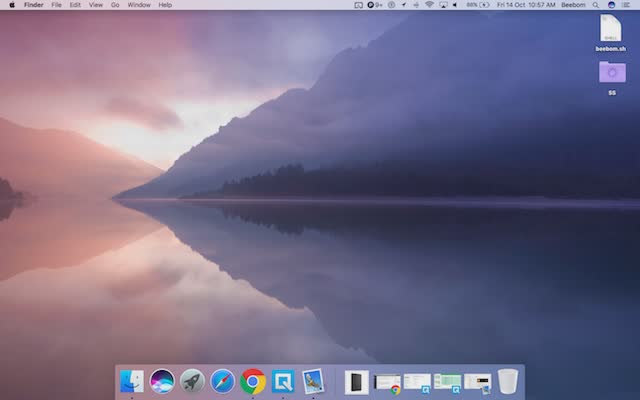
The first thing you’ll notice when you start up your Mac, is how different the interface looks. Well, actually the first thing you’ll probably notice, is that it boots up almost instantly, but we’ll ignore that. You’ll be greeted with your desktop, once you’ve logged in, and you won’t find any “This PC” sort of icons there. That’s because a Mac is not a PC.
The fundamental way in which you’ll use a Mac is very different from how you might have been using a Windows PC. The desktop on a Mac is usually clean, and there is absolutely no “This PC”, “Control Panel” icons on there. Oh, and also, there is no option to “Refresh”. Sorry.
Finder
Before you start wondering where the “Explorer” has gone off to, let me tell you that a Mac uses what Apple calls a “Finder”, and it is always open… waiting to help you manage your files. On the “Dock” (that’s the thing on the bottom of the screen), you’ll notice a few (a lot of) standard things that you might want to get started with. All open apps have a small black dot below their icon in the dock, just to help you identify the apps that are currently open. You can see the dots in the screenshot, under the icons for Finder, Chrome, and Quip.

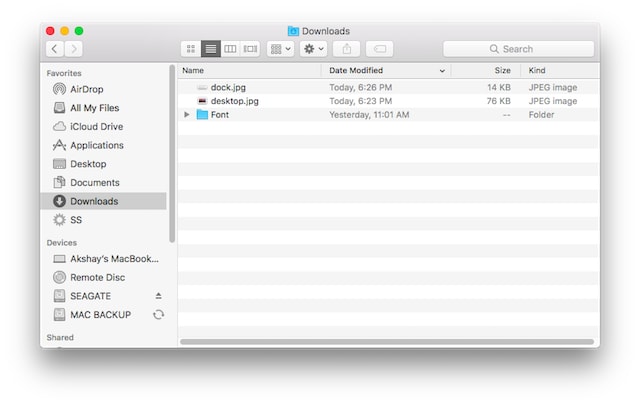
The first on this list is the Finder. Click on it, and you’ll see a “Finder Window” open up for you. This is the Mac equivalent of the “Windows Explorer”, and this is where you’ll manage your files, create folders, smart folders, add tags, and basically do everything related to file management.
If you have connected a USB drive, or an external hard disk to your Mac, they will appear on the Finder side-bar as well, along with an eject icon next to their names. You can click on this icon to safely remove the drive from your Mac, before disconnecting it.
Closing the Finder window is easy, as well – just click on the red button on the top left corner. You’ll see that it reveals an “X” mark as soon as your cursor hovers over it. You can also use the shortcut “command + W” to close the window.
Note : You can actually use “command + W” in any app, actually, and it is extremely handy while closing tabs in a browser, or in the Finder. That’s right, the Finder supports tabbed browsing. Believe me, you’ll love it.
Some useful Finder Shortcuts:
- Create new folder: command + shift + N
- Open new Finder Window: command + N
- Open new Finder Tab: command + T
- Rename File/Folder: Press Enter
- Open File/Folder: command + O
- Get Information (Properties) about a File or Folder: command + I
While you’re still in the Finder, you should probably get acquainted with the way your files are managed by macOS. Macs don’t organise files the way Windows does, and you will not see any drive partitions like “C, D, E, etc”. Instead, macOS treats your entire drive as one drive, and creates a single tree of destinations on it. If you’ve ever used a Linux machine, you’ll be right at home with the macOS way of handling files. If you haven’t, don’t worry, it’s not too hard to figure out.
To teach by analogy, it’s as if there was only a C: drive on your PC, and all your files were stored in there. The most common places you need to know about, are all available in your Finder sidebar. Pay heed to Applications, this is where all of your applications are.
Keyboard Shortcuts
Copying and pasting files on a Mac works just as it does on Windows… almost. While you do have a “control” key on the Mac keyboard, the shortcuts to copy and paste files, folders on a Mac is by using “command + C“, and “command + V“, respectively. Now that you’re about to copy your files into the work folder that you created, maybe you realised you actually want to move them there. But there is no option to cut files in the Finder. We’re in a pickle here… or are we? You can simply copy the files (command + C), and instead of pasting them, you just press “command + option + V“. That shortcut basically moves your files to the new destination. So, yeah, Macs do kinda have an option to “cut and paste” files, even though they don’t really call it that. Heh.
Deleting files on a Mac is also a little different from that on Windows. While in Windows, you could simply select a file, and press “delete“, or “shift + delete” to move it to the recycle bin, or permanently delete it; on a Mac, you have to use “command + delete” to move a file to the trash, and “command + option + delete” to permanently delete it.
While we’re talking about using the delete button, you should also be aware that the delete button on a Mac is not the same as the delete button on a Windows keyboard. On a Mac, the delete button is treated as backspace, and if you want to use it as a forward delete, you’ll have to use “fn + delete”
| Action | Windows Shortcut | Mac Shortcut |
|---|---|---|
| Copy | Ctrl + C | command + C |
| Paste | Ctrl + V | command + V |
| Cut | Ctrl + X | NA |
| Select All | Ctrl + A | command + A |
| Switch Applications | Ctrl + Tab | command + tab |
| Quit Program | Alt + F4 | command + Q |
| Open a File/Folder | Enter | command + O |
| Rename File/Folder | F2 | Enter |
| Find in Document | Ctrl + F | command + F |
| New | Ctrl + N | command + N |
| Format Bold/Italic/Underline | Ctrl + B / Ctrl + I / Ctrl + U | command + B / command + I / command + U |
Trackpad Basics
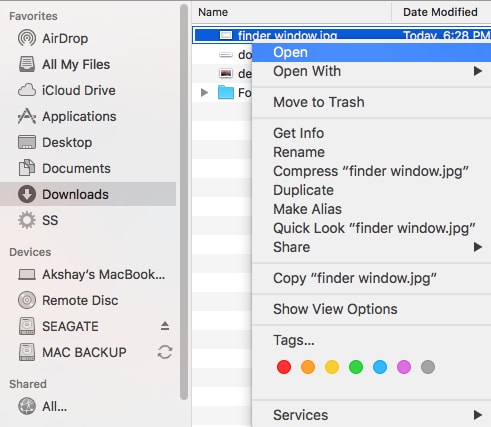
If you’re like me, you prefer using the keyboard. But, you just bought a brand new Mac, and you’ve heard so much about the trackpad, it’s obvious you want to give it a go. It looks really clean, and simple, yet hides a spectacular amount of complexity. The first thing that might confound you, is that there are no buttons, or even demarkations for the “left, and right click”. The thing is, you can click anywhere on your trackpad and it’ll be registered as a click (a left click, to be precise). So how in the world would someone perform a right click. Well, it’s a matter of using more than just the one finger. You can tap on your trackpad with two fingers, and viola! You have a right click. Go try it out on the files you copied. Select them (hover the cursor over them, and tap anywhere on your trackpad), and then perform a two finger tap on the trackpad. You’ll see a context menu with a lot of options, including sharing, renaming, copying, etc.
Some trackpad gestures available on Mac:
- Launch Mission Control: Perform a three finger swipe up.
- App Expose: Perform a three finger swipe down.

- Show Desktop: Perform a four finger pinch out.
- Launchpad: Perform a four finger pinch in.
Launching Applications
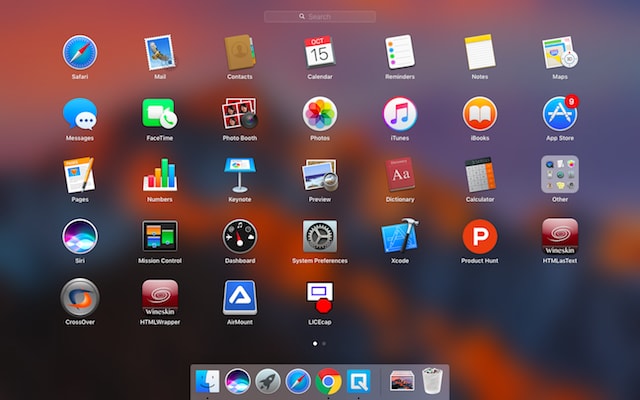
Launchpad
Now that you’ve started working on your Mac, you probably want to know what applications your Mac comes with, out of the box, but there is no start menu! The selection of apps on the Dock is a small subset of what you actually get access to. So, how do you access all of your apps? Well, quite simply, you do it using either a gesture on your trackpad (Yes!), by opening the Launchpad from the dock (that second icon, with the rocket), or by pressing the “F4” key. Let’s try that gesture, shall we? It’s really simple. Simply pinch in on the trackpad with 4 fingers, and you’ll see the Launchpad animate onto your screen. You can pinch out with 4 fingers to get out of there. Seriously, get out of there, once you’ve taken a good look at the kinds of apps available to you.
Spotlight
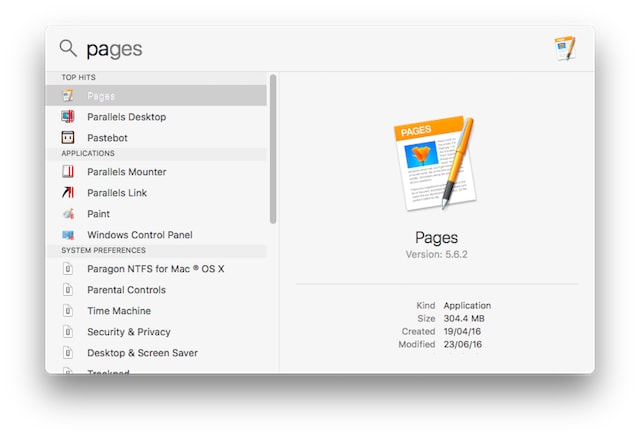
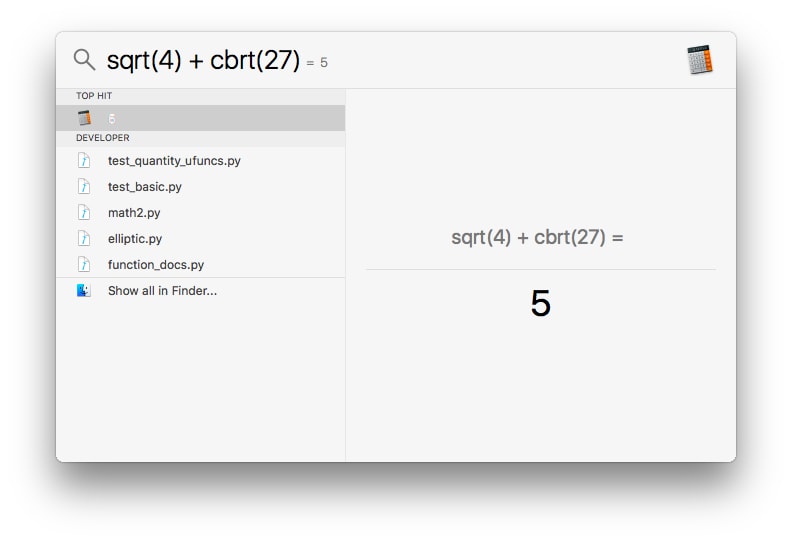
If I’m being honest, no one really uses the Launchpad to launch apps. People prefer the Spotlight. Try pressing “command + space“, or clicking on that “lens” icon on the top right of the menu bar.

That’s the spotlight search. You can use it to launch apps, perform calculations and conversions, get information from the web, and even look up meanings of words from the Dictionary. Oh, you can also use it to search for your files. Since, we were talking about getting some work done, how about typing in “Pages”, in the Spotlight. Pages is the iWork version of MS Word, by the way. See how Spotlight tries to guess what you might be looking for? It gets to Pages as soon as you type “Pa”. At this point, you can simply hit Enter to launch the app.
I’m sure you’re wondering why people prefer using the Spotlight, more than the Launchpad, but as you use your Mac more, you’ll realise that it’s just easier. Spotlight opens up on top of any app that you might be working on, so you can quickly look up things on the internet, or perform quick calculations. It’s extremely handy, and you’ll find yourself using it more and more, every day.
Closing Apps is not the same as Quitting Apps
 Closing Apps is not the same as Quitting Apps
Another thing to know about the way your Mac handles apps, is that clicking on the red button on the top left doesn’t really “quit” the app. It just closes the window you were working on. You can try it right now in Pages. If you have multiple windows of an app open, the clicking on the red button simply closes the window that was open; the other windows remain open.
Take Skype for example. If you used Skype on Windows, you will know that clicking on the close button in the Skype app on Windows didn’t actually quit Skype. It just closed the Skype window, even though the app still remained open. This is the case with every app in macOS.
To quit an app, you can use the following methods:
- Click on the app’s name in the menu bar, and click on “Quit“.
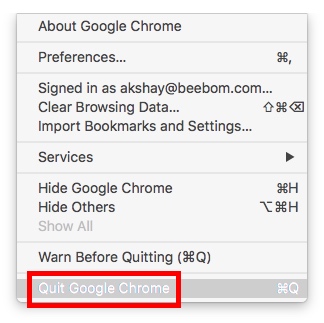
- Right click on the app’s icon on the Dock, and click on “Quit”.
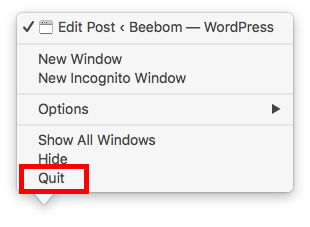
- Press “command + Q” to quit the app.
If you had typed anything in the Pages document we just had opened, you’ll see a dialog box asking you if you want to save the file. I’ll leave the decision making up to you.
Multi-tasking
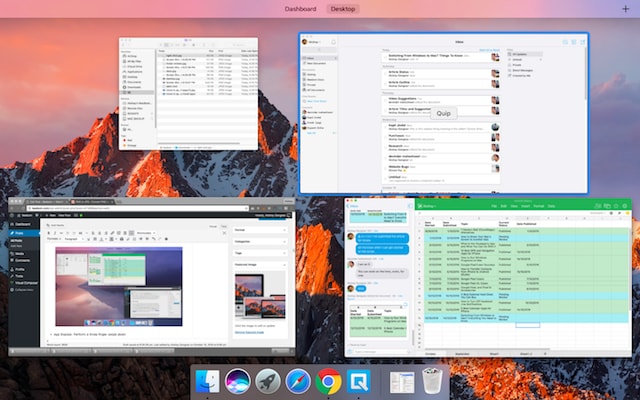
While I’m still talking about apps, let me tell you a little bit about how macOS handles multi-tasking. You can have multiple apps open, obviously, and you can switch between them using “command + tab” (similar to “alt + tab” on Windows). However, the trackpad again provides a gesture for this. First, open a couple of apps on your Mac, just for the fun of it. Then, perform a three finger swipe up gesture on the trackpad, and you will see all of the open apps displayed on your screen. This is called the “Mission Control“, and it can also be accessed by pressing the F3 key. Here, you can either click on the app you want to switch to, or simply hover your cursor over the app, and perform a three finger swipe down. Think of it like pulling the app towards you.
Swipe up with three fingers again. Do you see “Desktop 1” on the top of the screen?
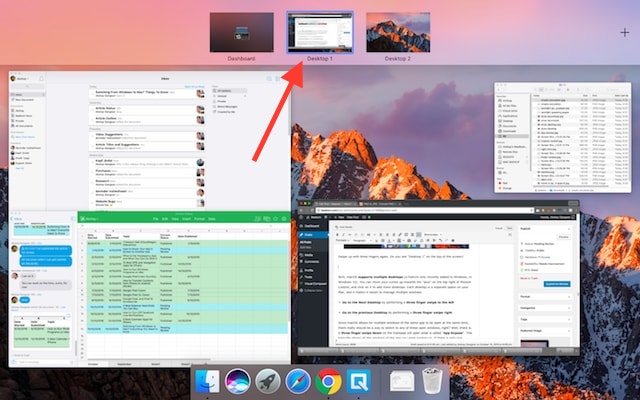
Well, macOS supports multiple desktops (a feature only recently added to Windows, in Windows 10). You can move your cursor up towards the “plus” on the top right of Mission Control, and click on it to add more desktops. Each desktop is a separate space on your Mac, and it makes it easier to manage multiple windows.
- Go to the Next Desktop by performing a three finger swipe to the left.
- Go to the previous Desktop by performing a three finger swipe right.
Since macOS allows for multiple windows of the same app to be open at the same time, there really should be a way to switch to any of these open windows, right? Well, there is. A three finger swipe down on the trackpad will open what is called the “App Expose“. This basically shows all the windows of the app you were working in. If there is only one window, it’ll just show that. You can switch to any window easily, using this gesture. You can actually do this by pressing “command + `” as well.
Installing and Uninstalling Apps
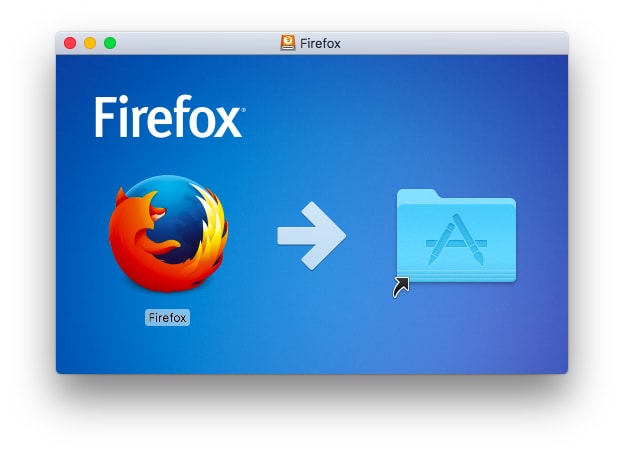
It’s possible that you did not like the apps that iWork offers. I mean, if you’re a spreadsheet power user, Numbers is quite obviously underpowered. In such cases, you might want to install another app that is more to your liking. Installing apps on a Mac is very different from Windows. You don’t get an exe file, or an install wizard (in most cases) for a Mac app. Instead, you get a “dmg” disk image, that you simply have to double click on, to mount it on the system. Then, you have to simply drag the application’s icon into your Applications folder, and that’s it. The app gets copied onto your Mac, and it simply works. No install wizard, no DLL files, no cluttered mess.
Uninstalling apps on a Mac, is an equally easy task. You don’t have to go looking for an uninstaller. All you need to do, is open Finder, and go to your Applications folder. Select the app you want to uninstall, and simply delete it. You can do this by pressing “command + delete“, or by right clicking (two finger tap), and clicking on “Move to Trash”. I admit, it’s not nearly as satisfying as seeing an uninstall progress bar fill up, but it’s much easier, and that’s what matters.
Note : I have not suggested any third party apps that you “must” install, because I think you should explore the applications that come with the Mac, before using something else. More often than not, the built-in applications suffice.
Where is the Window Snapping?
Getting back to your work, maybe you want to read an article on Safari (by the way, use Safari as much as you can. It’s amazing on the Mac. Really.), and write a report based on it. So you dragged the Safari window to the side of your screen, hoping to get it to snap to the side, but it doesn’t. Well, unfortunately, macOS still doesn’t support the window-snapping features that Windows does, and it’s disappointing. However, you can use a third party app like Better Touch Tool, or Better Snap Tool to get this functionality. Better Touch Tool actually offers you the ability to create custom gestures, as well.
Siri… a kind of powerful Virtual Assistant
While I’m telling you about things that Windows did better than macOS, let me talk about personal assistants. You might have used Cortana, on Windows 10. Well, with macOS Sierra, Apple’s virtual assistant, “Siri”, arrived on the Mac.
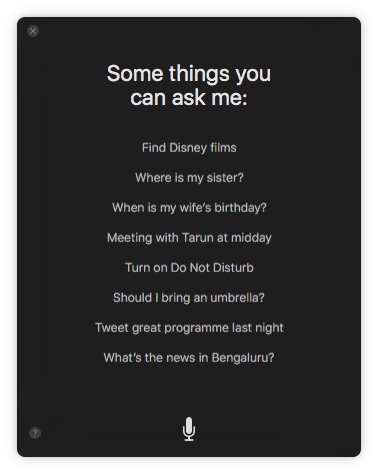
With Siri, Apple gets a lot right, and a bit wrong. For one, there is no way to interact with Siri using text. You have to speak to it, and have everyone else glance sideways at “the person talking to their laptop”. However, that aside, Siri can be quite helpful. It can look up things on the web, create notes for you, do calculations, and even control your Mac’s settings for you. It has uses, but I think it will take some time before Siri becomes properly integrated with the Mac experience.
So you use NTFS Formatted Drives?
Okay, so you’ve installed all the apps you wanted to use, and it turns out you need to move some files into a flash drive? That’s cool, you just connected your flash drive into the USB port, and oh, there it is on the Desktop! In a perfect world, that’d be all, but unfortunately, now that you’re trying to copy files into the drive, it turns out there isn’t an option to do that? Or maybe there is. It actually depends upon how your flash drive is formatted. Natively, macOS doesn’t support writing to NTFS formatted drives. Note that I said “writing”. You can still access (“read”) files saved on drives formatted using the NTFS filesystem. So what do you do now?
Well, you have two options. You can format your flash drive into a format like FAT32, or exFAT. That way it’ll work with both macOS and Windows. However, that might not always be feasible. What if you had a 1 TB external hard disk? Formatting it would lose you all your data! If that is the case, you can go with using a third party application that adds NTFS support to macOS, such as Paragon NTFS for Mac. These are mostly paid apps, but free ones exist, as well.
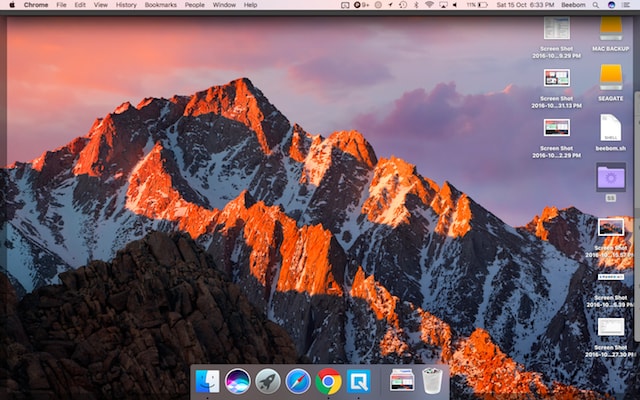
Taking Screenshots
Now, I understand that the interface on a Mac is appealing, to say the least, and you may want to show it off to your friends, and family. The easiest way to do this would probably be sharing screenshots with them. I know you’re used to “Windows + Print Screen” (or maybe you use the Windows Snipping Tool?) for that, but the Mac shortcuts for screenshots are superb (once you get used to them, I mean). Okay, let’s take a bunch of screenshots on your Mac, to give you an idea about the kind of flexibility you get while taking screenshots on a Mac.
- To take a full screen screenshot, just press “command + shift + 3“.
- To take screenshots of a part of the screen, press “command + shift + 4“. This will turn your cursor into a crosshair. You can press and hold on the trackpad, and drag the crosshair around to take a screenshot of a particular region of the screen.
- To take screenshots of app windows, press “command + shift +4“, and then tap on “space“.
If you don’t like the shadow around the screenshot (and why don’t you?), you can simply press and hold “option” while taking the screenshot, and the screenshot will come out without any shadow surrounding it! I know it sounds overwhelming right now, but trust me, you’ll get used to these very soon.
Android Phones with Mac
If you have an iPhone, you’re golden. Thanks to the seamless integration between Apple products, your devices will work together in ways that will make your life easy. But, if you have an Android device, you’re going to face some issues. Most glaring of which, is the fact that Android devices don’t get detected by macOS in the same way as they are detected by Windows. That is to say, that they… well, don’t. If you do want to use your Android device with your Mac, to transfer files and such, you can download Android File Transfer. It is the official app to transfer files between a Mac and an Android device.
Backup Your Mac, Please
Backups are really important. Go to any computer community, anywhere on the internet, and you’ll not find a single person against backing up your data.
While backups on Windows are done using Windows Backup, which allows users to select the files and folders that they want to back up, along with the destination of the backup, on macOS, they are done using the Time Machine. If you’re laughing at that name, you’re not the only one. I laughed at the name, too. But Time Machine is named so, because it really is a Time Machine. Taking backups using Time Machine is easy, and you’ll get started in no time. The first backup you take might take a very long time, depending on how much data you have created on your Mac, but the ones after that get completed really quickly.
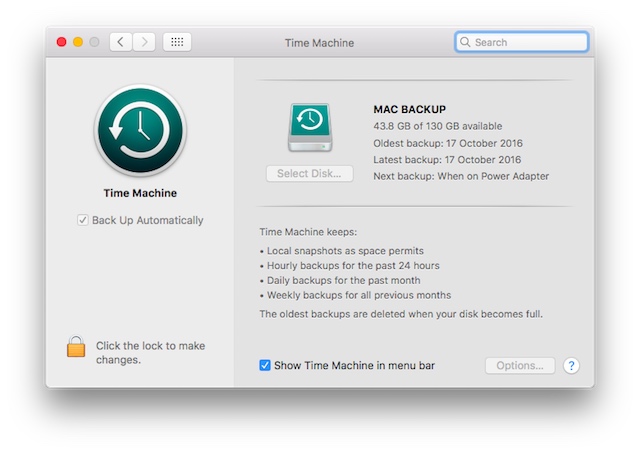
The basic functionality of Time Machine is similar to what Windows has, only Time Machine has a much better interface, and feels more intuitive. The good thing about Windows Backup is, that you can create backups on your internal hard disk as well. Although (and this is important), you should never create backups on the internal hard disk of your computer.
Time Machine will help you, and I’m not kidding. You might lose data on your Mac, you might accidentally delete it, or you might just switch to a new Mac after some time. In each of these cases, Time Machine will save you a lot of hassle. If you need to restore files using Time Machine, that’s easy to do, as well. So, please, back your Mac up.
Non Responsive Apps
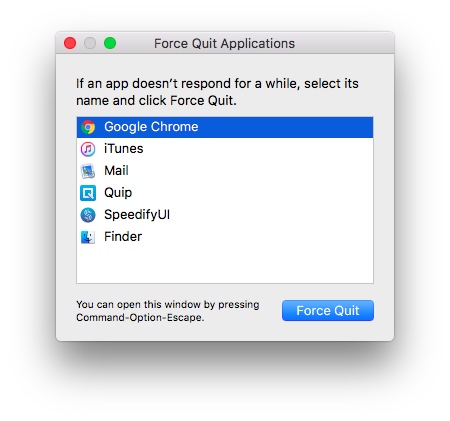
This is not a situation that you will encounter on your Mac very often, but every now and then, you might see an app that has stopped responding. This usually only happens when an app is demanding more resources than the computer can spare, and the only way to sort it out is to force close the app, or, in the worst case, shutdown your laptop by pressing and holding the power button.
On a Mac, you can simply click on the Apple menu in the menu-bar, and click on “Force Quit“. Otherwise, you can also press command + option + esc. Either way, you’ll see a Force Quit window, where you can select the app that you want to quit.
You should only improperly shutdown your laptop in situations where you can’t even get to the Force Quit window, and your Mac remains non-responsive for a very long time.
Ports, Accessories and More
One good thing about the number of manufacturers making Windows laptops, is that you have such a wide range of products to choose from. This means that you get the flexibility to choose the kind of I/O you want on your Windows PC. On a Mac, however, you’re gonna get what Apple has decided is fit for their laptops, and for extra I/O, you’ll have to buy adapters, and such.
Depending on the Mac you bought, you’ll get a variety of ports (or port, if you’re using a MacBook). So you may need to get accessories for your Mac. I’m using a MacBook Air, and the important accessories to have with the Air, are a thunderbolt to Ethernet Adapter (for LAN connectivity), a mini-display to HDMI (if you want to use external monitors), and more, depending on the kind of devices you want to connect to your Mac. You can even get an Optical Disk Drive, if you need to use CDs and DVDs on your Mac. My point is, that the connectivity options on the MacBook, MacBook Air, and MacBook Pro are kind of limited, out of the box. The MacBook Pro at least has an HDMI out, so, one less thing to buy.
Moving from Windows to Mac? Get started now
Those were the basics of using a Mac. It may seem a little strange, switching to the macOS environment, especially if you’ve been a lifelong Windows user. People who have used Linux distros such as Ubuntu, will find the macOS environment quite relatable (except for the trackpad gestures, mostly).
So, how has your experience been on making the switch from Windows to macOS? Do you like the features that a Mac offers? And what features do you wish it supported? Let us know about your thoughts and opinions in the comments section below.


