- Fuzzy Lookup For Mac Using Python and Fuzzywuzzy
- How to use Fuzzy Lookup on Mac with Python
- Using 2 lists from an Excel or CSV file
- How to use Fuzzy Lookup on Google Drive with Collab & Sheets.
- Using FuzzyWuzzy in Google Colab
- Step 1: Create your in-put file
- Step 2: Create your Colab file in your Google Drive File
- Cell 1: google-auth
- Code Cell 2: Pytrends
- Linking your input Sheet
- Output «Fuzzy_Lookup_DOWNLOAD_ME.csv»
- Step 3: Finish, Test & Configure
- Final thoughts
- GET IN TOUCH
- Нечеткий текстовый поиск с Fuzzy Lookup в Excel
- Нюансы и подводные камни
Fuzzy Lookup For Mac Using Python and Fuzzywuzzy
Jack Minot — 05 July 2021 — SEO


Fuzzy Lookup is a great tool for several different scenarios in search marketing, with one of its most common use cases being for site migrations.
At Honcho we work on Macs fairly exclusively which is a problem as Excel for Mac doesn’t support Fuzzy Lookup in the same way it’s available on Windows. An alternative is to use an addon within Google Sheets, however, that comes with limitations and a premium subscription. Which hardly seems fair as it’s free on windows.
Using the Fuzzy Wuzzy Python package and either Jypter Notebook (other IDE’s are available) or Google Sheets and Google Collab we can use Fuzzy Lookup on Mac, for free.
In the first part of the article, we’ll go through how we can use it with VSC on your machine and in the second, how we can add this to Google Drive so it can be used on multiple machines without any sort of set-up.
How to use Fuzzy Lookup on Mac with Python
I’m going to assume you already have Python on your machine and you have a new file ready. At the most basic level, we can use 2 strings to compare the match, seen below.

Using 2 lists from an Excel or CSV file
Next is how we can use 2 lists to lookup List 1 vs List 2, finding the closest match for a single variable in List 1, against the variables in List 2.
In my example below I have used an Excel (.xlsx) document with 2 columns. When creating your own you may need to change the 2 points below to reflect what you have in your reference documents.
IMPORTANT: My Document is named “fuzzy_dump.xlsx” and is referenced in the code, your document name will need to change to your naming convention.


The above script will output a new excel file named “FuzzyWuzzy_output.xlsx” in the same directory as your script
How to use Fuzzy Lookup on Google Drive with Collab & Sheets.
This is going to be very similar to the Google Trends Collab method we’ve done previously.
Using FuzzyWuzzy in Google Colab
Few things we’ll need before starting this section of the project:
- Google Drive Account
- A directory created for your files in Google Drive
- Basic understanding of Python 3 & Colab
Step 1: Create your in-put file
Using the link below, view and copy our Google Drive Sheet. This controls the input and the scoring parameters.
Feel free to create your own data input, we go over all the referencing later on which can be used to edit and play around with fields. The most important thing to note is the lookup and reference columns are in the correct order.
In the below doc, we have..
- Column E as our queries
- Column G as our Choices
- B6 as our threshold, if you want every query to return a value set this to 0
Link to our sheet: Google Sheet

Step 2: Create your Colab file in your Google Drive File
In your file with your keyword input, right-click and select More > Google Collaboratory . If you don’t see it, select “connect to more apps” and search for Colaboratory and install.
Within your Colab file we’re going to create 2 code cells, the first which verifies your Google Account giving you access to drive and allowing our input file to control our script, and then the second cell is our script.
Cell 1: google-auth
google-auth is the Google authentication library for Python and what we’re using to verify our account. Copy the code below into your first code cell

Our aim when moving this to Google drive is to make it accessible. So in our case for all of our staff, some of who aren’t familiar with an IDE. In our code cell 1, we’ve added comments, to direct users and help them through the process.
Code Cell 2: Pytrends
Create a new code cell and copy and paste the below:
Linking your input Sheet
To link your input Google Sheet we need to copy the shareable URL and paste it into line 10. This can be done via the green share button (top right) on the Google sheet.
Output «Fuzzy_Lookup_DOWNLOAD_ME.csv»
To output our file we need to give the script a file path. The easiest way to do this is to Mount Google Drive in Google colab, navigate to your directory and «Copy path».

If your directory by default is higher in the file structure than your Google Drive folder, your drive files can be found in Content > Drive > My Drive.
Step 3: Finish, Test & Configure
Test your script, this should now create a downloadable CSV file with all your data. I’d recommend users download or copy files to another drive, as this keeps the directory clean. Opening the CSV file within Google drive will create a Google sheets version.
If that all works, you are done 👍
Final thoughts
Fuzzy Lookup is a great tool, for all digital marketers and anyone working with data. Hopefully you’ve found this useful. Any questions drop us an email or DM on any of our social channels.
GET IN TOUCH
Find out more about how we can maximise your search marketing performance. Fill in the form below or call us on 01438 870220.
RELATED BLOGS
Fuzzy Lookup For Mac Using Python and Fuzzywuzzy

The Future of Marketing — three emerging trends that will rewrite how we reach customers
How To Scrape Youtube Video Views With Python

Our BrightonSEO highlights (Spring 2021)
Источник
Нечеткий текстовый поиск с Fuzzy Lookup в Excel
Одна из самых неприятных ситуаций, с которой может столкнуться пользователь при работе в Microsoft Excel — это поиск и подстановка данных с неточным совпадением. Когда вам надо подставить данные из одной таблицы в другую, но вы при этом уверены, что в обеих таблицах совпадающие элементы называются одинаково, то проблем нет — к вашим услугам множество способов: функции ВПР и её аналоги, надстройка Power Query и т.д.
А вот если в одной таблице «Пупкин Василий», а в другой просто «Пупкин», или «Пупкин В.», или даже «Пупкен», то все эти красивые способы не работают. Причем на практике такое встречается постоянно, особенно с почтовыми адресами или названиями компаний:
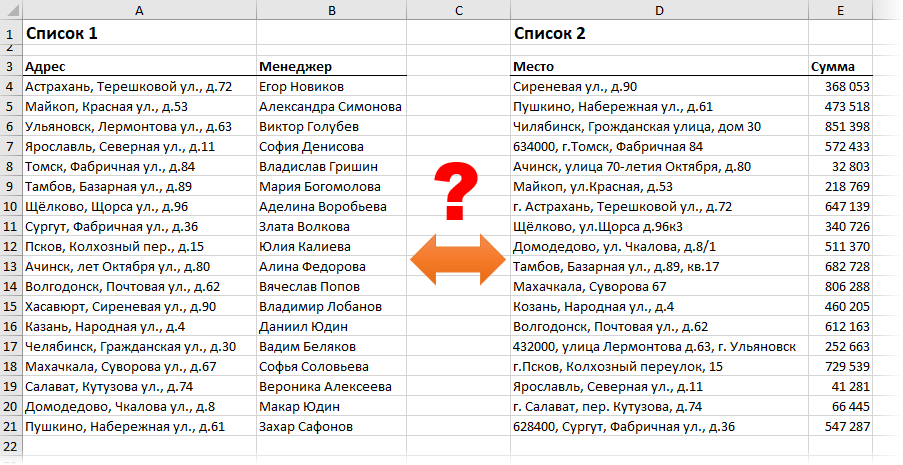
Обратите внимание на различные типы несоответствий, которые могут встречаться:
- переставлены местами улица, город, дом
- отсутствует какая-то часть адреса или, наоборот, есть что-то лишнее (индекс, номер квартиры)
- по-разному записан город (с буквой «г.» или без) или улица
- опечатки и ошибки (Козань вместо Казань)
Про точное соответствие или даже поиск по маске тут говорить не приходится. Помочь в таком случае могут только специальные макросы или надстройки для Excel. Про одну из таких макро-функций на VBA я уже писал, а здесь хочется рассказать про еще один вариант решения подобной задачи — надстройку Fuzzy Lookup от компании Microsoft.
Эта надстройка существует с 2011 года и совершенно бесплатно скачивается с сайта Microsoft. Системные требования: Windows 7 или новее, Office 2007 или новее, соответственно. После установки у вас в Excel появляется одноименная вкладка с единственной кнопкой на ней:

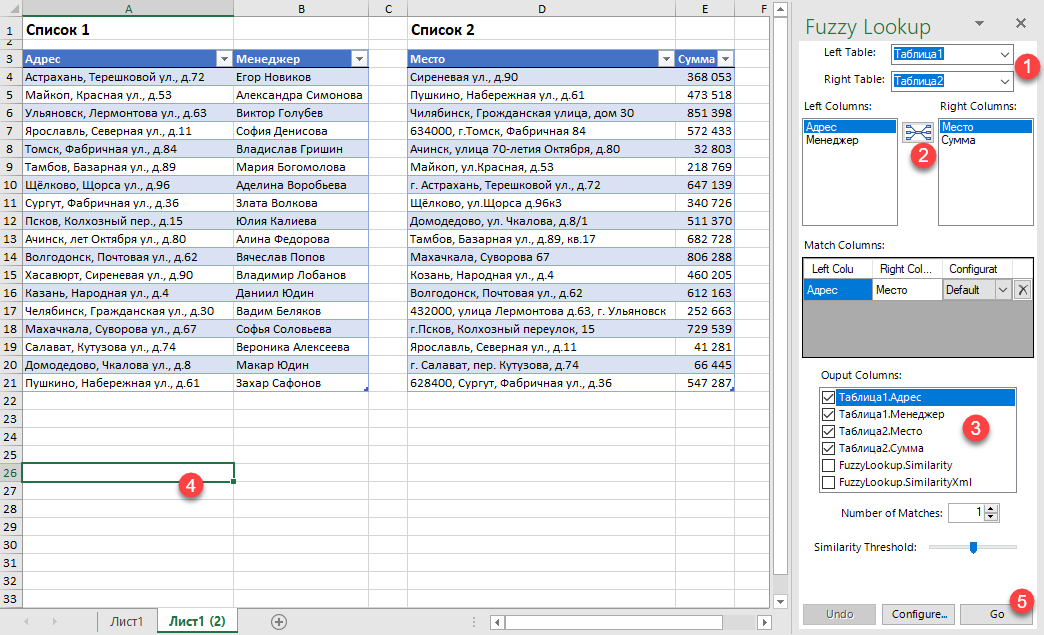
Нажатие на эту кнопку включает специальную панель в правой части окна Excel, где и задаются все настройки поиска:
Сразу хочу отметить, что эта надстройка умеет работать только с умными таблицами, поэтому все исходные таблицы нужно конвертировать в умные с помощью сочетания Ctrl + T или кнопки Форматировать как таблицу на вкладке Главная (Home — Format as Table) :
Алгоритм действий при работе с надстройкой Fuzzy Lookup следующий:
- Выберите какие таблицы нужно связать в выпадающих списках Left и Right Table.
- Выберите ключевые столбцы в левой и правой таблицах, по которым нужно проверить соответствие и нажмите кнопку для добавления созданной пары в список Match Columns
- В списке Output Columns отметьте галочками столбцы, которые вы хотите получить на выходе в качестве результата.
- Установите активную ячейку в пустое место на листе, куда вы хотите вывести данные
- Нажмите кнопку Go
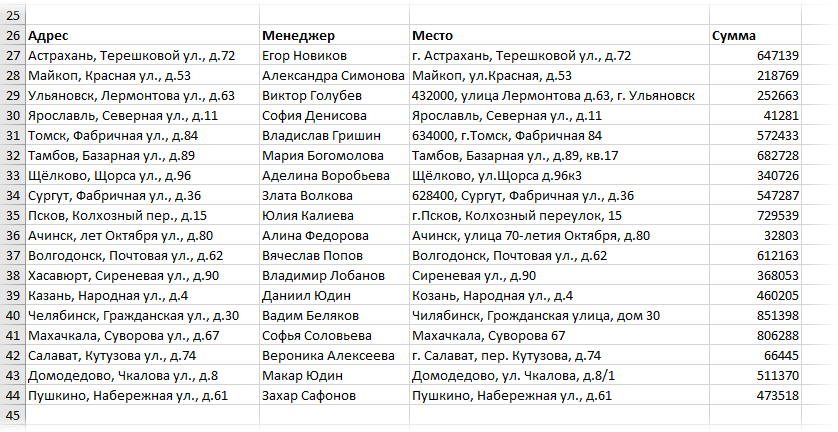
После анализа мы получаем таблицу, где каждому элементу ключевого столбца из первой таблицы подобрано максимально похожее значение из второй:
Нюансы и подводные камни
- Точность подбора можно регулировать с помощью ползунка Similarity Threshold в нижней части панели Fuzzy Lookup. Чем правее его положение, тем строже будет поиск, и — как следствие — тем меньше результатов надстройка будет находить. Если сдвинуть его влево, то результатов станет больше, но возрастет риск ошибочного совпадения. Тут все зависит от вашей конкретной ситуации — экспериментируйте.
- На больших таблицах поиск может занимать приличное количество времени (до нескольких десятков секунд), хотя многое, конечно, зависит от мощности вашего компьютера. Как вариант, для ускорения в настройках (кнопка Configure в нижней части панели) можно попробовать включить параметр UseApproximateIndexing в разделе Global Settings.
- Перед нажатием на кнопку Goне забудьте выделить пустую ячейку, начиная с которой вы хотите вывести результаты. Если случайно вы оставите активную ячейку где-нибудь в исходных данных, то надстройка выведет итоговую таблицу прямо поверх них, и вы их потеряете. Причем отмена последнего действия будет невозможна, а кнопка Undo в нижней части панели не всегда срабатывает почему-то.
- Для вывода столбца с коэффициентом подобия FuzzyLookup.Similarity необходимо, чтобы у вашего Excel была точка в качестве десятичного разделителя (целой и дробной части). Если это не так, то эту настройку временно можно поменять через Файл — Параметры — Дополнительно (File — Options — Advanced) .
- Fuzzy Lookup — это не обычная надстройка, написанная на VBA (как мой PLEX, например), а COM-надстройка. Разница в том, что она устанавливается как отдельная программа, т.е. вам нужны соответствующие права на установку ПО на вашем компьютере. Дома, ясное дело, проблем не будет, а вот многим корпоративным пользователям, скорее всего, придется обращаться к вашим айтишникам. После установки отключать и подключать ее в дальнейшем можно на вкладке Разработчик — Надстройки COM (Developer — COM Add-ins) .
В любом случае, при всех имеющихся минусах, эта надстройка однозначно стоит того, чтобы находиться в арсенале любого продвинутого пользователя Microsoft Excel.
Источник


