bhyve Windows Virtual Machines
The bhyve hypervisor now supports Microsoft Windows virtual machines as of FreeBSD HEAD SVN tag r288524
Supported Windows Versions
bhyve supports Windows desktop versions Vista, 7, 8/8.1/8.2 and 10, as well as Windows Server versions 2008/2008R2, 2012/2012R2 and 2016 Technical Preview 2 and 3
Simple alternative install method
The information below is outdated. You can use the howto of the package vm-bhyve. It offers a very simple and almost effortless installation of Microsoft Windows (tested with 1909). For a full graphical installation see UEFI Graphics (VNC)
Requirements
- A Windows ISO and matching license key
An AutoUnattend.xml automatic installation file
A Windows VirtIO network driver
A RDP Remote Desktop Protocol client (net/freerdp)
At this time of writing, the Windows Sever 2016 Technical Previews provide the easiest means of testing Windows support with bhyve. The Technical Previews:
- Are free to download and use
- Are automatic installation-friendly
- Include the Special Administration Console (SAC) (The windows serial console)
- Are meant to be tested!
ISO Remastering
Manually copy or GIT clone (requires the git package) a prepared AutoUnattend.xml file for your version of Windows
Fetch the following Windows VirtIO driver ISO
Windows 10 requires virtio-win-0.1.118:
Later releases have various issues with various Windows versions.
Windows Vista requires a previous version of the drivers:
With the Windows ISO, XML auto installation file and VirtIO obtained, the ISO is ready to be remastered. 7z is suggested because it is UDF-friendly, unlike the in-base tar(1).
The remastering steps are as follows:
This will result in a remastered Windows ISO named install.iso
You will also require the EFI loader and a disk image:
Note that 15GB will only leave 4GB free space. Consider far more for production use.
Windows ISO Boot
The install.iso is only required for the first boot of Windows Server and must be removed from the bhyve command after the first boot. Desktop editions of Windows require that a null install.iso file remains and it can be created with touch install.iso
The trick is to have the CD configured only for the first boot. It has to be removed from the bhyve command line for the second and subsequent boots, since there isn’t currently a boot selection in UEFI and a CD is automatically given preference, resulting in an endless cycle of CD installs. For Windows-desktop installs, the ahci-cd drive *must* be kept there, and a 0-byte file used instead e.g. ‘touch null.iso’.
There are currently some slot limitations with UEFI:
- — AHCI devices must be in slots 3/4/5/6 — The PCI-ISA bus aka lpc must be in slot 31 — virtio-net devices can be in any slot
virtio-block devices have an issue with descriptor overflow that is being worked on, so avoid using it for the time being.
A typical bhyve command for Windows is:
Only one or two VCPUs should be used during installation but this number can be increased once Windows is installed.
This should produce many pages of EFI debugging information and land you in the Windows SAC:
The initial SAC> prompt will appear immediately, followed by the three EVENTs.
Each SAC channel performs a different role. You can list available channels at any time with:
You can toggle between channels with ESC-TAB.
Some useful SAC commands to shutdown, display the network configuration (once Windows is installed) and set a fixed IP on the 3rd network device are:
The CMD event indicates that the Windows command line is available. Typing cmd will create this channel and should get:
If you only see the CMD channel with another version of Windows, your installation has probably had an error with regard to license keys. To exit the CMD channel back to SAC, type exit.
The SACSetupAct is most useful during installation as it will show the installation steps and is your best indication of success or failure. The SACSetupErr channel will provide the specific error should one occur.
The process will move quickly until the main Windows image extraction begins:
This will cause moderate disk activity on the host and high CPU activity because of the image decompression. These can be monitored with gstat and top to get a sense of a «normal» installation. This knowledge will be useful for blind installations of desktop versions of Windows that do not include the SAC.
If you attempt to boot to a blank disk image, you will see:
Windows Hard Disk Boot
Remove or adjust the ahci-cd,install.iso line of the bhyve command as appropriate and allow the VM to boot to the hard disk image. This will involve a SYSPREP boot that will attempt a restart. Boot the system again and you should eventually get a fully-installed system that will default to DHCP networking and be available by CMD in the SAC and RDP.
Note that the delete key does not work and you must type carefully. The default password in the XML file is «Test123»
You can determine the DHCP IP of the VM from the SAC:
Note that you might not be able to ping the Windows virtual machine because of the default firewall configuration.
RDP Connection
You can initiate an RDP connection to this IP address with:
The Windows, OSX, iOS and Android RDP clients from Microsoft will also work.
Note that xfreerdp stores host fingerprints in a manner similar to OpenSSH and will prevent you from connecting to a host whose fingerprint has changed. These keys can be managed in
Notes
Windows Server «Essentials» and other variations have one installation image rather than four. These will give a «missing image» error during installation if you do not set the correct «IMAGE/INDEX» value to «1»:
You can list the available install images on a given ISO with:
This page is an expansion of this documentation:
bhyve/Windows (last edited 2020-04-27 21:49:45 by RobertGierzinger )
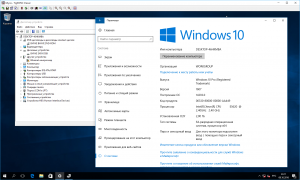
Пчёлки в деле, или Запускаем Windows на BSD Hypervisor
Я джва года этого ждал! В январе 2014 года прочитал в FreeBSD 10.0-RELEASE Release Notes следующее:
[amd64] The BSD Hypervisor, bhyve(8) is included with FreeBSD. bhyve(8) requires Intel CPUs with VT-x and Extended Page Table (EPT) support. These features are on all Nehalem models and beyond (e.g. Nehalem and newer), but not on the lower-end Atom CPUs.
И сразу подумал, что bhyve — это отличная штука, особенно при использовании в паре с ZFS. Это позволит расширить область задач, которые можно решать с помощью FreeBSD, и увеличит популярность данной системы у IT-специалистов. На тот момент поддержка гостевых ОС была ограничена BSD-семейством и Linux, но время шло и вот, с выходом FreeBSD 11.0-RELEASE, уже официально стало возможно запустить гостя с Windows, да ещё с установкой в графическом режиме.
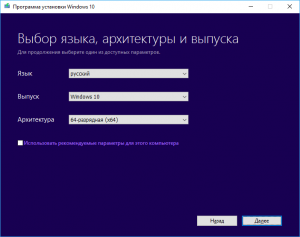
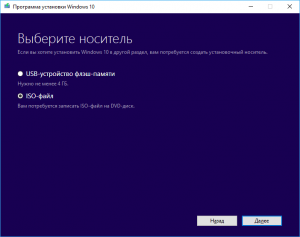
Устанавливать буду Windows 10 — её можно ставить как есть, а для установки более старых версий потребуется интегрировать драйвера virtio в ISO-образ (инструкция). Утилиту для создания ISO-образа с последней актуальной версией можно загрузить с сайта Microsoft. 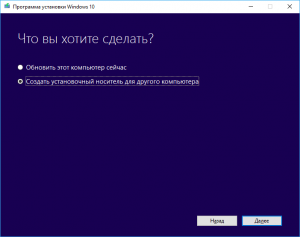
- Создадим том ZFS для хранения данных ВМ (при необходимости замените pool/usr/bhyve):
- Чтобы было проще управлять ВМ, установим sysutils/vm-bhyve:
- Дополнительно можно скопировать типовые шаблоны для ВМ:
А при использовании csh есть смысл прописать в файле
/.cshrc правила автодополнения:
И активировать их:
Настроем сеть. Для этого создадим виртуальный коммутатор и свяжем его с физическим интерфейсом (при необходимости замените em0):
Если требуется, то можно аналогичным образом настроить NAT и VLAN.
Для запуска Windows потребуется эмулятор UEFI. Установим его:
Обновление от 27.02.2018. Перед выполнением следующего шага рекомендую ознакомиться с комментарием Александра. Лично я тормозов не наблюдаю, но решение за вами.
И добавим следующие строки:
Обязательный параметр только graphics, остальные добавляем по вкусу. Параметр graphics_res позволяет задать более удобное разрешение экрана (значение по умолчанию 800×600). С помощью graphics_wait можно приостановить загрузку ВМ до тех пор, пока не будет установлено подключение по VNC, чтобы не пропустить самое интересное. А xhci_mouse позволит использовать USB-эмуляцию мыши вместо PS/2 (работает только в новых версиях Windows, но работает лучше).
Теперь всё готово к началу установки. Предполагается, что в директории /usr/bhyve/.iso вы уже разместили подходящий ISO-образ:
Снова подключаемся по VNC и устанавливаем драйвера из директории D:\NetKVM\w10\amd64.
На этом, пожалуй, всё. Если необходимо, то можно включить автоматический запуск ВМ при старте системы, только не забудьте удалить параметр graphics_wait:
FreeBSD: Bhyve
Введение
Bhyve — это гипервизор, любезно открытый компанией NetAPP (имеющий свои наработки на базе FreeBSD ОС) под лицензей BSD и в данный момент входящий в коробочную/базовую версию ОС FreeBSD, в отличие от ряда аналогичных проектов, которые не являются частью ОС и их (или модифицированые для них ядра) необходимо предварительно скачать и установить. Другими словами, все релизы FreeBSD начиная с 10.0, в состоянии запустить *BSD, Linux и различные другие ОС прямо из коробки.
На данный момент, существует достаточно большое количество оберток для управления bhyve, наравне с базовым скриптом /usr/share/examples/bhyve/vmrun.sh и отличающиеся между собой поставленными целями
Основные цели, которые ставит CBSD:
- Требовать от пользователя минимум действий, чтобы полноценно начать использовать bhyve;
- Требовать от пользователя минимум по заучиванию команд и аргументов, а также пресечь постоянные обращения к документации: все должно быть доступно для управления через WEB или text user-interface;
- Интеграция bhyve с другими компонентами FreeBSD (NFS, glusterfs, iscsi, HAST, carp) из коробки
- Интеграция bhyve с внешними службами (DHCPD, Consul)
- Ориентированность на большие инсталляции, за рамками применения на localhost-only
Для удобства, команды управления bhyve в CBSD аналогичны командам управления jail, но начинаются с буквы b:
- jstart (jail start) ->bstart (bhyve start)
- jstop (jail stop) ->bstop (bhyve stop)
- jls (jail list) ->bls (bhyve list)
- jconstruct-tui (jail constructor) ->bconstruct-tui (bhyve constructor)
- и тд.
Пользуясь CBSD, вы можете совмещать в одном инструменте управление как для контейнеров jail, так и виртуальных машин на гипервизоре bhyve, используя тот или иной подход в разных задачах
Дополнительно, можете ознакомится со статьей: Jails против Bhyve
Начало работы с bhyve
Для начала работы с bhyve через CBSD, введите в командной строке:
Если в вашей системе не хватает каких-либо компонент или настроек, вы увидете соответствующие подсказки, которые необходимо выполнить.
По готовности, вы увидете dialog-based меню для создания виртуальной машины:
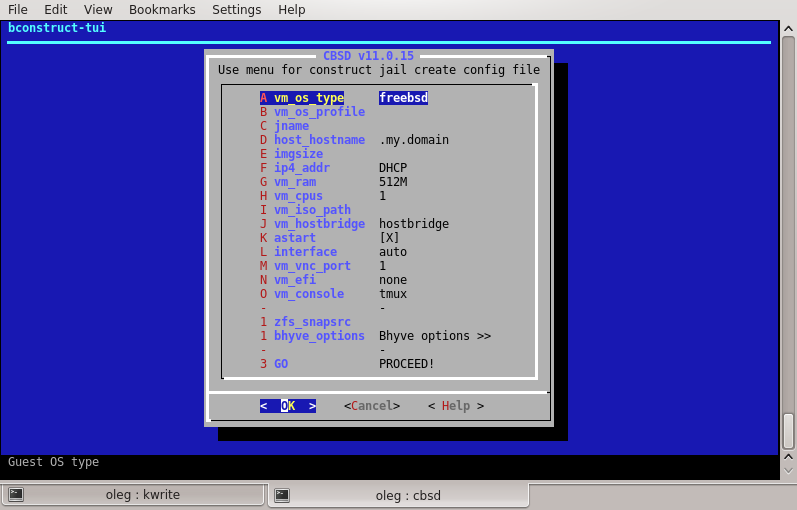
Параметры vm_os_profile,jname и imgsize — являются обязательными для ручного ввода
Начните создание виртуальной машины с выбора типа ОС и выбора профиля ОС
Если вы запускаете виртуальную машину первый раз, при старте автоматически будет скачиватся соответствующий образ с официальных сайтов
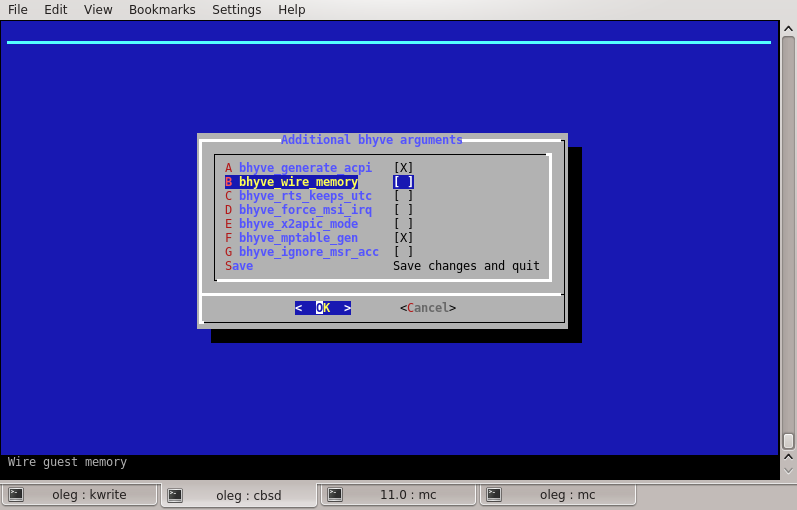
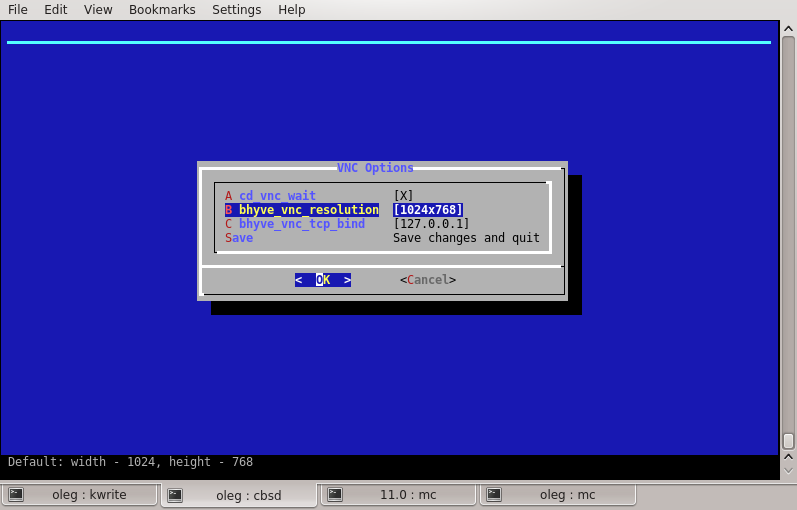
Ряд параметров (ключи запуска bhyve) доступны в подменю bhyve_options:
Имейте ввиду, что при вводе параметра imgsize, вы задаете объем первого (загрузочного) виртуального жесткого диска.
Для добавления дополнительных дисков или сетевых карт, используйте команду cbsd bconfig уже после создания VM.
О сети bhyve
По-умолчанию, виртуальные машины используют tap интерфейс, который CBSD автоматически коммутирует в bridge на ваш uplink интерфейс (вы можете изменить интерфейс через меню nic_parent в ‘cbsd bconfig’ — bhyvenic — nic1
Вы можете предпочесть два других варианта коммутации, доступных в CBSD
- Использовать виртуальный свич на базе vale(4). Для этого, воспользуйтесь диалогом создания свича через: cbsd valecfg-tui
- Вы можете исключить bridge и использовать point-to-point соединение. Для этого, через ‘cbsd bconfig’ — bhyvenic — nic1, вам необходимо изменить параметр nic_parent в значение disable. В этом режиме, вы должны назначить какой-либо Ip адрес в качестве шлюза вашей виртуальной машины на tap интерфейсе
Внимание! Обратите внимание на присутствие меню для выбора IP адреса bhyve в меню bconstruct-tui. Имейте ввиду, что без вспомогательных скриптов внутри дистрибутива или виртуальной машины, вы не можете управлять настройками в самой виртуальной машины извне. Данный пункт меню сохраняет IP адрес в базе данных CBSD для того, чтобы вы могли сторонними методами (например через DHCP) сконфигурировать автоматическую настройку ОС без необходимости помещать внутри собственный скрипты. В качестве примера, посмотрите на статью: CBSD/bhyve и DHCPD


