- Set Default Folder When Opening Explorer in Windows 10
- Set Default Folder to This PC
- Set Any Folder as Default for Explorer
- Pin Folders to Quick Access
- How to Customize Folder Options in Windows 10 File Explorer
- Customize Folder Options in Windows 10 File Explorer
- General
- Open File explorer to
- Browse folders
- Click items as follows
- Privacy
- Clear File Explorer history
- Reset to Defaults
- Folder view
- Advanced Settings
- Search
- How to search
- When searching non-indexed locations
Set Default Folder When Opening Explorer in Windows 10
How to change from Quick Access to This PC
After upgrading to Windows 10 recently, I noticed that whenever I opened Explorer, it would always show me Quick Access. I like the new Quick Access feature, but I preferred to have Explorer open to This PC instead.
For me, being able to access the different drives on the computer and my network devices was far more important than accessing frequently used folders or recently opened files. It’s a useful feature, but I don’t mind having to click once to access it.
In this post, I’ll show you how to change the default folder from Quick Access to This PC when opening Explorer. In addition, I’ll also show you a trick whereby you can set any folder to be the default folder when opening Explorer in Windows 10.
Set Default Folder to This PC
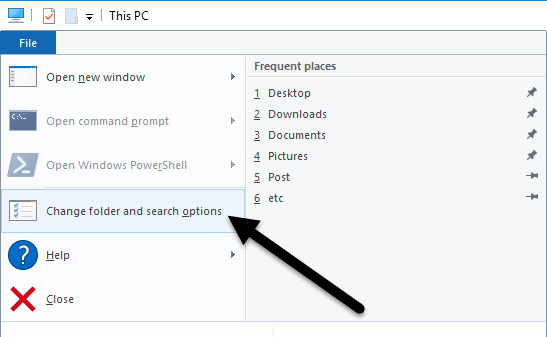
To change the setting, open Explorer, click on File and then click on Change folder and search options.
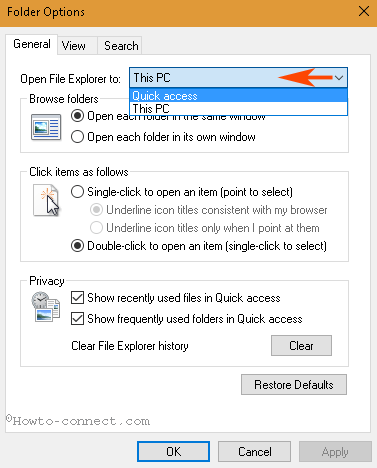
In the dialog that pops up, you should already be on the General tab. At the very top, you’ll see Open File Explorer to where you can select from This PC and Quick Access.
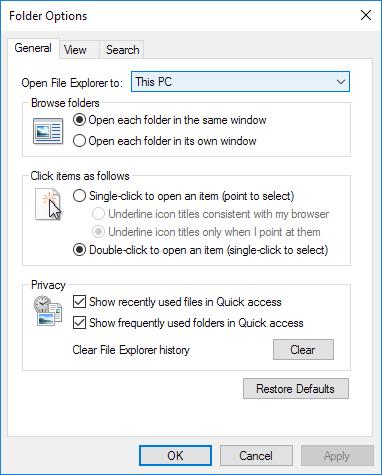
Just pick whichever folder you prefer and you’re good to go! Now when you open Explorer, you should see it open to This PC selected instead of Quick Access.
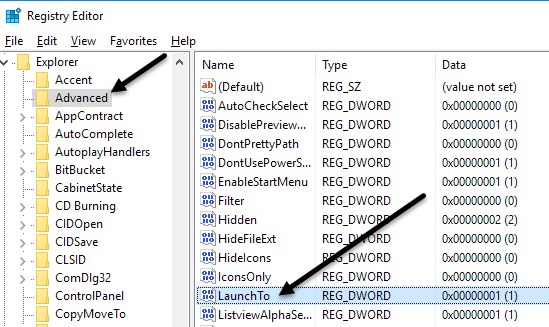
If you need to do this on many machines in a corporate environment, you’ll be happy to know that there is a registry entry that controls this setting also. Just navigate to the following key:
On the right hand side, look for a DWORD key named Launch To. 1 means This PC and 2 means Quick Access.
Finally, let’s talk about how we can configure Explorer to open up to any folder as the default folder.
Set Any Folder as Default for Explorer
Since there really isn’t any official way to do this, we have to kind of hack Windows to get it to do what we want. I’ve tested it out and the process seems to work just fine. To get started, find your folder and create a shortcut to the folder on your desktop.

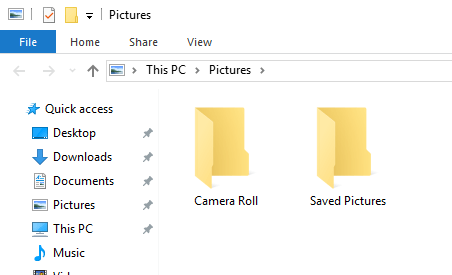
For example, if I wanted to use the Pictures folder as my default folder, I would right-click on it, choose Send to and then click on Desktop (create shortcut). Next, we need to copy that shortcut into a special location in Windows. First, let’s open Explorer and go to that special location. Just copy and paste the following path into the address bar in another Explorer window:
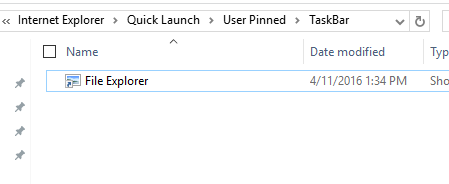
Make sure to press Enter after you paste the path into Explorer. Depending on what else is pinned to your taskbar, you might see shortcuts to several programs here, but you should always see a File Explorer shortcut.
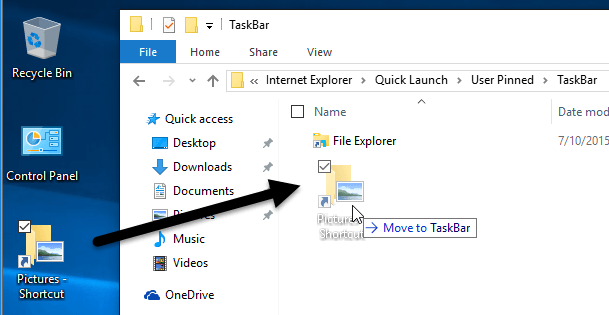
Now go ahead and drag the shortcut that we just created from your desktop into the special folder you have open in Explorer. Now we have to do one last thing. Go ahead and delete the File Explorer shortcut and rename the Pictures Shortcut to File Explorer. If you chose a different folder than Pictures, then change whatever the name of that shortcut is to File Explorer.
That’s about it! Now open File explorer from your taskbar and you should be viewing the contents of whichever folder you chose to be the default folder.
It’s worth noting that this little trick will only work when you click on the Explorer icon on your taskbar. If you open Explorer by double-clicking on This PC on the desktop or by clicking on Start and then File Explorer, you’ll either see This PC or Quick Access, depending on which option is chosen in the settings.
If you want to undo what we just did above, all you have to do is right-click on Explorer in the taskbar and choose Unpin from taskbar. After that, just drag the This PC icon from your desktop and drop it onto the taskbar again. This will create a new Explorer shortcut and it’ll work normally.
Pin Folders to Quick Access
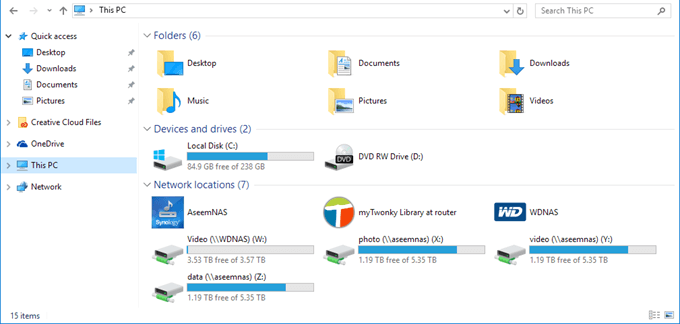
If you don’t like any of the two options above, you do have one other choice in Windows 10. You could use the new pinned folders feature that is associated with Quick Access. When you open Explorer, you’ll see a pin icon next to several folders under Quick Access.
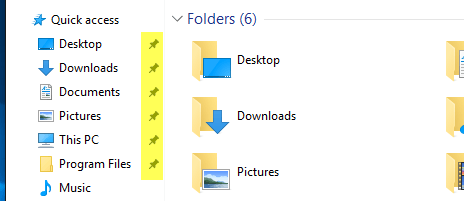
The Desktop, Downloads, Documents, Pictures, This PC and Music folders are pinned by default in Windows 10. If you want to remove any of them, just right-click and choose Unpin from Quick Access.
However, if you want one click access to any folder on your computer, navigate to that folder, then right-click on Quick Access and choose Pin current folder to Quick Access.
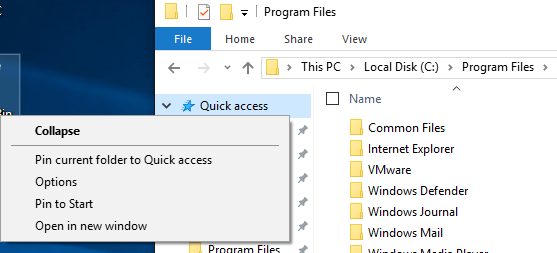
As you can see, this is how I pinned the Program Files folder to my Quick Access section. Using this method, you don’t have to resort to any hacks and you can also quickly access any folder on your system with two clicks.
Lastly, you can also get to that pinned folder quickly by simply right-clicking on the File Explorer icon in your taskbar and choosing your pinned folder, which will show up in the jumplist.

So in summary, if you want to change the default folder system-wide, you can only pick between This PC and Quick Access. If you use the second method involving the shortcut hack, then you have to use the shortcut from the taskbar.
Lastly, if you just need quick access to a folder, try using the pin to Quick Access option as that will also be system-wide and will remain in the left-hand side even as you browse through other folders. If you have any questions, post a comment. Enjoy!
Founder of Online Tech Tips and managing editor. He began blogging in 2007 and quit his job in 2010 to blog full-time. He has over 15 years of industry experience in IT and holds several technical certifications. Read Aseem’s Full Bio
How to Customize Folder Options in Windows 10 File Explorer
Folder Options Windows 10 File Explorer Complete Customization guide. – Folder options Settings ensures the look and features you view and use in File Explorer. In addition, the options also control indexation in Windows 10 search engine so that you may get accurate results.
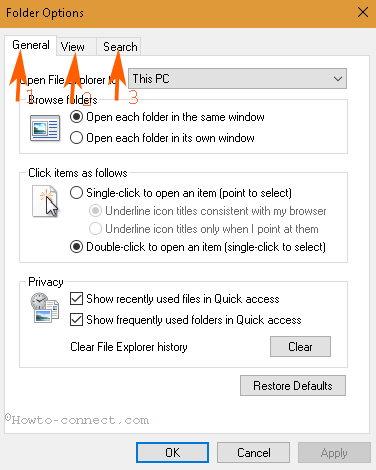
When you progress to Customize Folder options in Windows 10 you come across 3 tabs and names of these are General, View, and Search.
Customize Folder Options in Windows 10 File Explorer
Since the Folder options Window includes 3 tabs – 1. General, 2. View,3. Search so you will see the process guide for each tab separately.
General
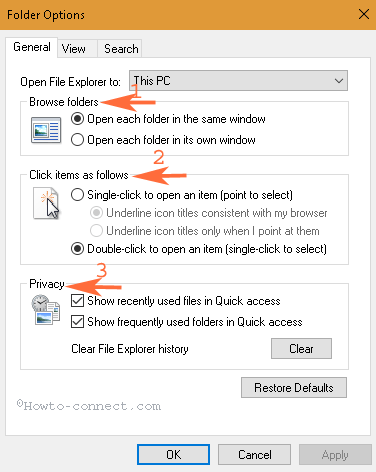
View tab displays Open file explorer to dropdown at the top moreover, 3 sections are there – 1. Browse folders, 2. Click items as follows and Privacy.
Open File explorer to
By inbuilt nature of Windows 10, it launches File explorer into Quick access But it offers you to select This PC in a dropdown as well.
Browse folders
Browse folders section helps open folders in either same Window either separate Window.
When you point Open each folder in the same window you will enter the folder deep into an identical window. With this setting of folder, options browse in the same windows tool works.
Oppositely, when you point “Open each folder in its own window“, it appears in distinct Window when on launching.
Click items as follows
File Explorer allows launch items using either Single click as well as double click. This option lets you choose the custom choice for opening an item.
When you point Single click to open you will open folders, files, docs, images, etc after pressing just once.
Oppositely, when you point Double click to open an item you will open folders, files, docs, images, etc after pressing twice.
Privacy
Privacy ensures the items to be visible when you open file explorer. This section includes two options that allow what you need to display in File explorer in Quick access selection.
When you move along with the choice “Show recently used files in Quick access“, you will view the Recent files.
While pointing “Show frequently used files in Quick access” you will find Frequent files.
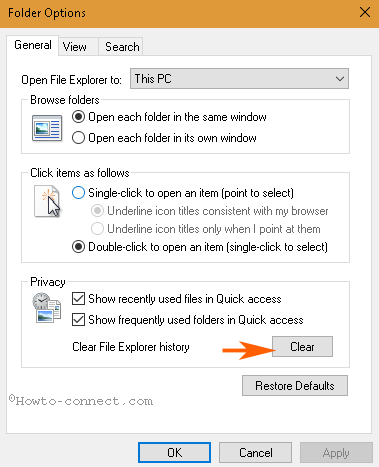
Clear File Explorer history
At the skirt of General tab of Folder options, you find a very significant option Clear File explorer history. This option lets delete the entire collection of history existing in File explorer.
Reset to Defaults
Finally, in this tab, you find Reset to defaults option that returns back all the General Folder options to the built-in condition.
View tab includes 2 sections – Folder view and Advanced settings

Folder view
The first section determines Folder view means you can choose either of 2 options to apply the changed setting or not.
Apply to Folders – For applying similar options for folders as in files, Apply to Folders works. When you change a setting in the Advanced Settings sections, it is directly applied to all the files. But if you want the same to be applied to folders then you need to click Apply to folders.
Reset folders – In case, you Customize Folder options in Windows 10 File Explorer on your own preferences unlike files then you will select Reset Folders.
Advanced Settings
In these settings, you find 25 different Folder options making sure the appearance, privacy, and navigation of folders.
Files and Folders –
Always show icons never thumbnails – This setting is obligated to change folders and files appearance. When you point this option the folders and files will automatically turn into thumbnail view.
Always show menus – This setting determines to display menu bar appearing on internet explorer. However, the option has been working to show menus on folders in the earlier editions of Windows. But until now this is not effective in Windows 10 File explorer but only effective only in Internet Explorer. We hope Microsoft will take cognizance of this to show the menus on file explorer too.
Display icon on thumbnails – For viewing the content available in a folder without browsing then this option is helpful. When you select you will see icons of the file living inside the folder from outside.
Display file size information in folder tips – It allows seeing folder volume without going tits properties. Generally, you go to File or folder Properties to find out respective size details. But once you select this option you become able to view the detail by only hovering on its tip.
Display the full path in the title bar – This Folder options Advanced setting is accountable for showing the overall path of the browsed folder on the title bar.
Hidden files and folders
These Advanced settings enable you to make a file or folder hidden or unhidden on your choice. Two options are here to hide and unhide the same.
1. Don’t show hidden files, folders, or drives – This is an important option to organize the content for those privacy matters for you. You can change the visibility of the Folder, file or drive using this setting. Simply select this option and keep your stuff invisible to you and others as well.
2. Show hidden files, folders, or drive – In contrast, This option allows make the content visible. Once you select you can make the stuff unhidden.
Hide empty drives – This Folder options Advanced settings facilitate you to make a drive invisible when it is totally vacant.
Hide extensions for known file type – You know each file includes its own extension at the end of its name. For example, image – jpg, png, gif, etc, files – docs, txt, etc, for audio – amr, mp3. When you select this option will never see the extension until changing it again. On the contrary, using the folder options file types will be seen if you have unchecked
Hide folder merge conflicts – From Windows 8 this option was included. When you keep two folders having identical names then you get an error dialog while copying pasting.
The error dialog indicates “This destination already contains a folder named”. By default, this option remains enabled so yo don’t see the error on your PC. But when you unselect this option you will see the message.
Hide protected system files Recommended – Many system files are very sensitive and if anyone changes or manipulates either of them the system can corrupt. So windows 10 provides the option so that the files could be protected.
Launch folder window in a separate process – This option is by default disabled. The option helps you take precautionary measures. When you open a folder file explorer.exe runs along with. In this case, when you close the folder Explorer.exe may also stop. You can launch a folder in a separate process in the same circumstance.
Restore previous folder windows at logon – This option allows launching a specific group of folders, for example, Video, Picture, Downloads in the condition you closed earlier.
Show Drive letters – Once you check this option, you will view the Letter such as C, D, etc in the Local disk located at your C drive.
Show Encrypted or Compressed NTFS files in color – This option helps recognize or differentiate files. After you select, you see encrypted files into a particular color. Furthermore, if an NT File System file gets compressed you notice it colorful. This file encryption option is so important to trace out the unprotected items.
Show pop up description for folder and desktop items – This option offers to see inside details of the content without even clicking. You doubtlessly have experienced a pop up demonstrating somewhat while hovering over an item. This pop up is the outcome of the selection of the option.
Show preview handlers in preview pane – This Advanced Setting of Folders options renders the view of the selected item in the right pane. Once you have pointed this option you will view a pane in the right displaying preview of the file you click.
Show status bar – Windows 10 including earlier Windows versions display a shaft. The status bar indicates your activity in real time in a folder’s bottom.
Show sync provider notifications – In specific builds, this option works, but not in all. You see a pane in file explorer that educate everything about the new build.
Use check boxes to select items – This Advance setting of Folder options simplifies the selection of stuff in file explorer. Once you have selected the option, you will notice checkbox against every item existing in a folder. You can use it for making a selection of your files and folders.
Use sharing wizard – Windows 10 offers this option that permits sharing your stuff. You can share an item with different users and administrator. In addition, Stop sharing can be used to prevent the item from sharing with others.
When typing into list view
Automatically type into the search box – Commonly you establish your cursor into the search box in file explorer prior to typing a query. But once you have selected this Folder option, you need to simply type. The cursor automatically set in the search box using this advanced setting.
Select the typed item in view – This Folder options setting enables you to see an item only on typing a letter.
Navigation pane
Expand to open folder – This option supports organize Quick access navigation pane on Windows 10. When you select, you will get a list of inbuilt items in the left pane and a click on each item will display the respective content in the right pane.
Show all folders – You will notice a list of entire folders present on your computer in the Quick access field.
Show library – This Folder options Win10 advanced setting ensures inclusion or exclusion of Library in File Explorer navigation pane.
Search
Search tab in Folder options includes 2 sections – 1. How to search and 2. When searching non indexed locations.

How to search
Don’t use the index when searching in file folder for system files – This option helps protect the sensitive installation files. If you select, the search engine will not peep into the system file on Windows 10 for searching. However, it will take a long time so decide on your own.
When searching non-indexed locations
Include system directories – Contrast to the above option you can take installation files into account for search operations.
Include compressed file – If you hold compressed files on your computer then using this setting in File explorer you can get the content in the search result.
Always search file name and content – This setting provides explore an item from name and also content. This will consume a huge amount of time in the search process.
And the final in the Folder Options, you can apply the built-in settings using Restore defaults.
Conclusion
So this is a complete guide How to Customize Folder options in Windows 10 File Explorer. As you can see the guide includes entire settings folder options. Still, if you think anything remains, suggest us through your response below.


