- Как очистить DNS кэш в MacOS Big Sur и Catalina
- Как очистить DNS кэш в macOS Catalina и Big Sur
- Reset Mac DNS Cache in MacOS Monterey, Big Sur On MacOS (Flush DNS Cache)
- How to Flush or Reset DNS Cache in MacOS Monterey On Mac
- How to clear DNS Cache in MacOS Monterey on Mac
- How to Reset And Flush DNS Cache in macOS Monterey
- Using Dig to Check Query Times
- jaysukh patel
- How to Flush DNS Cache in MacOS Catalina & Big Sur
- How to Flush DNS Cache in macOS Catalina & Big Sur
- Как очистить DNS кеш на Mac
- Как очистить DNS кеш на Mac
- Как очистить DNS кеш в macOS Catalina, mac OS Mojave, mac OS High Sierra, Sierra и mac OS El Capitan
- Как очистить DNS кеш на более старых версиях macOS
- Как очистить DNS кеш без использования Терминала
Как очистить DNS кэш в MacOS Big Sur и Catalina
Иногда пользователям macOS может понадобиться очистить DNS кэш на их Mac для решения каких-либо проблем с сайтами. Сброс DNS кэша обычно это занятие для системных администраторов, но в случае с macOS это может сделать и продвинутый пользователь мака. В этой инструкции расскажем как очистить кэш DNS в MacOS Big Sur и macOS Catalina.
Если какой-то сайт перестал открываться, а раньше вы на него спокойно заходили, то конечно сперва убедитесь работает ли вообще интернет, возможно другие сайты также не открываются. Но если действительно не работает только один сайт, то проблема может крыться в ошибках DNS (Domain name server) и в этом случае вам может помочь очистка DNS кэша.
Ваш Mac хранит IP-адреса веб-серверов сайтов, которые вы недавно посещали. И если у сайта изменился IP-адрес, а в кэше по-прежнему хранится старая информация об IP-адресе сервера, то вы не сможете открыть этот сайт пока не сбросите кэш DNS. Очистка кэша вашего Mac как раз удаляет все несуществующие записи и при следующем посещении сайта macOS получит новый адрес этого сайта.
Как очистить DNS кэш в macOS Catalina и Big Sur
Прежде чем приступить убедитесь, что у вас установлена MacOS Catalina или новее, поскольку в macOS предыдущих версиях сброс DNS кэша выполняется немного по-другому.
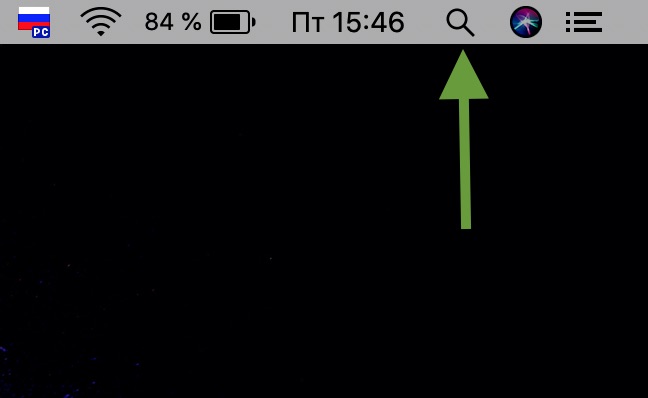
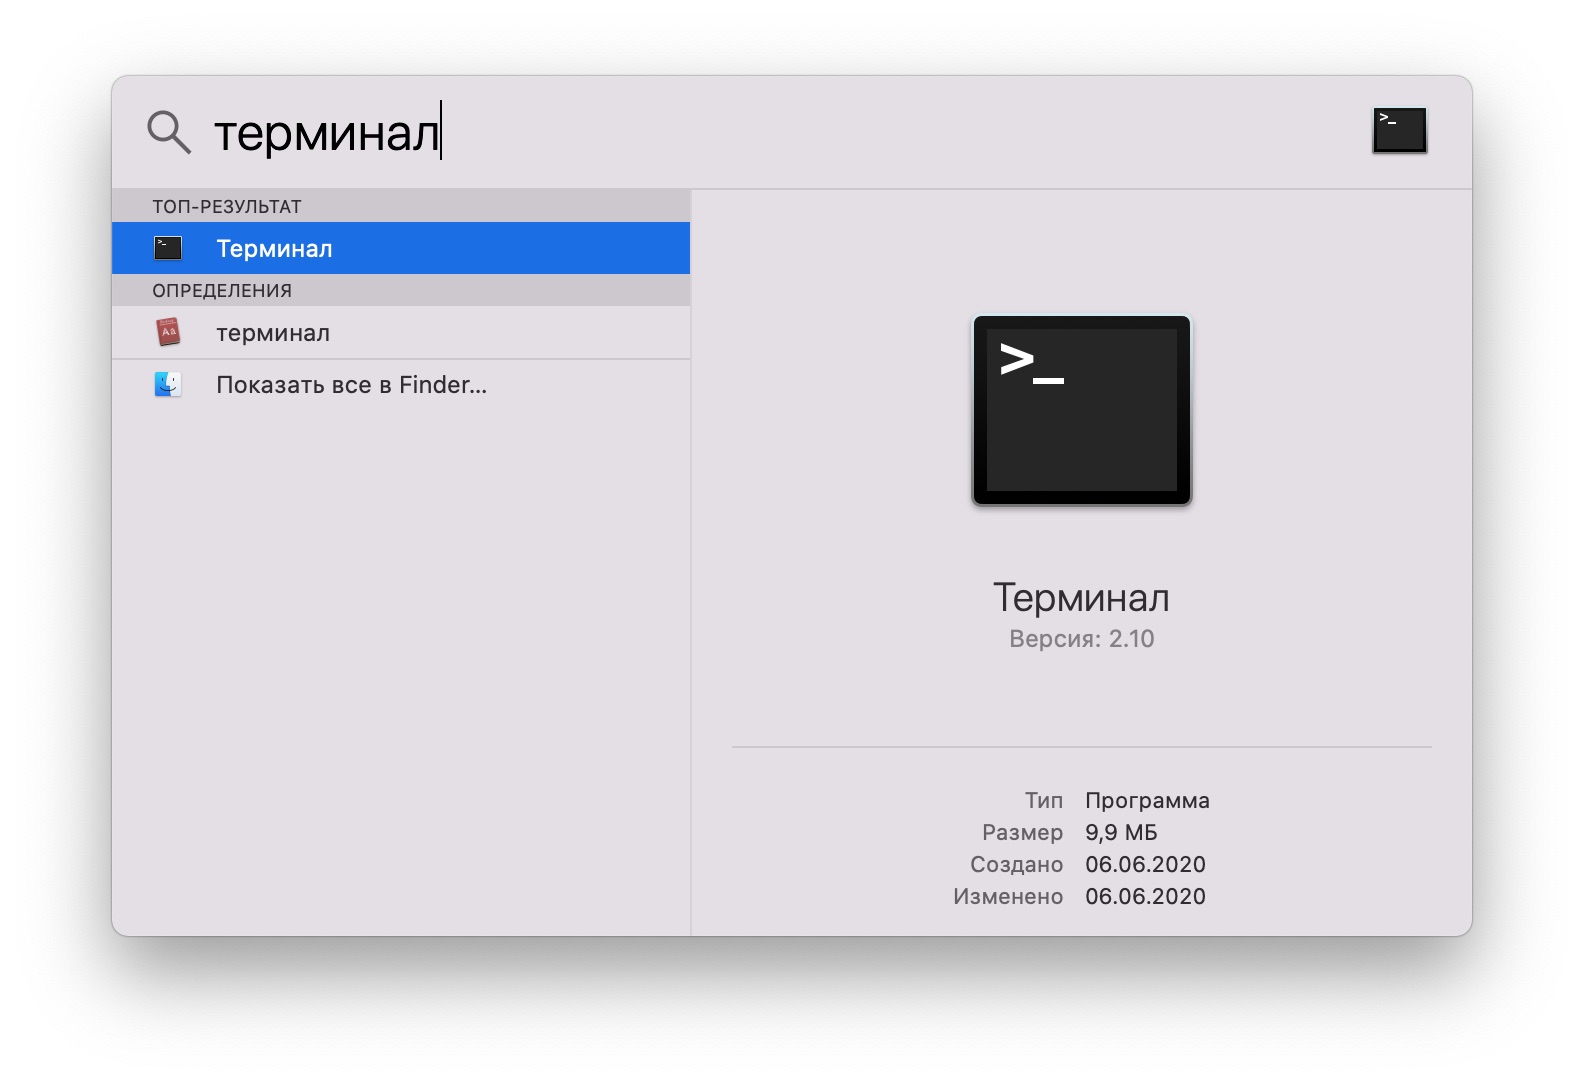
- Для сброса кэша будем использовать терминал. Вызовите поиск Spotlight (иконка увеличительного стекла в правом верхнем углу экрана или комбинация клавиш CMD+пробел) Наберите слово «терминал»

- Теперь наберите в терминале следующую команду.
Не смотря на отсутствие каких-либо сообщений об успешном сбросе кэша, операция прошла успешно. Теперь можете зайти на тот сайт, который у вас не открывался и проверить его работу.
Рекомендуется время от времени очищать кэш DNS, так как он может быть поврежден из-за технических сбоев. Кстати, не только Mac имеет кэш DNS, но и ваш Wi-Fi-роутер, поэтому техническая поддержка интернет-провайдеров первым делом просят вас перезагрузить маршрутизатор, для того чтобы сбросить кэш.
Если вы пользуетесь другой версией macOS, то ознакомьтесь как сбросить кэш DNS в macOS High Sierra. Процесс похожий, лишь немного отличается команда в терминале.
Если сброс кэша DNS не помог, в решении вашей проблемы, то попробуйте воспользоваться нашей статьей как решить проблемы с Wi-Fi в macOS.
Источник
Reset Mac DNS Cache in MacOS Monterey, Big Sur On MacOS (Flush DNS Cache)
Last Updated on Jun 26, 2021
flushdns mac with MacOS Monterey is easy with MacOS Monterey on All Macs (iMac, MacBook, MacBook Pro, MacBook Air, Mac Mini). Are you looking to clear and reset the DNS cache in macOS Monterey? Then we have listed some best methods to do so. Periodically users need to reset the DNS cache because sometimes a specific domain or name server is cached or Mac DNS settings have been changed. At that time you need to remove the existing DNS cache. So moving further we will see how to reset the DNS cache in macOS Monterey.
we are happy to help you, submit this Form, if your solution is not covered in this article.
Execute Command in Terminal: Below commands are case sensitive and use space where it needs
How to Flush or Reset DNS Cache in MacOS Monterey On Mac
Step 1: Launch “Terminal” directly from the Home screen using Spotlight. Or “Applications” > “Utilities” > “Terminal.app” or Type “Terminal” in Spotlight search.
Step 2: Now, enter the command below, To execute use your Mac’s system administrator password [Not an Apple ID].
sudo killall -HUP mDNSResponder; sleep 2; echo macOS DNS Cache Reset | say

Step 3: Hit “return key” and then enter the Admin password and again enter.
Step 4: Wait until “DNS cache has been cleared” appears on the terminal screen.
Step 5: Quit “Terminal”.
You must close all the applications running connected to the internet and wait for the changes to take place. Sometimes the changes take place through a simple refresh in the apps.
If in case the above terminal code doesn’t workout for you then you should break that command and write like this,
sudo killall -HUP mDNSResponder && echo macOS DNS Cache Reset
How to clear DNS Cache in MacOS Monterey on Mac
If you have made DNS servers and still you didn’t encounter any changes, then you should clear the DNS cache and again check it this workout for you. It is not necessary to close all the applications which use DNS like Firefox, Safari and other web browsers.
Step 1: Launch “Terminal” from the “Utilities” which you will find in “Applications”.
Step 2: Enter the command with accuracy,
Sudo killall –HUP mDNSResponder;say DNS cache has been flushed

Step 3: Hit return key and enter Admin password.
Step 4: It will take some time to “clear DNS cache”.
Also, you will get a kind of voice message from the system that DNS cache has been flushed.
Alternatively, we have one more command to clear DNS cache if the above one doesn’t work for you,
sudo killall -HUP mDNSResponder;sudo killall mDNSResponderHelper;sudo dscacheutil -flushcache;say MacOS DNS cache has been cleared
![]()
How to Reset And Flush DNS Cache in macOS Monterey
Follow the steps to Reset and flush the DNS Cache,
Step 1: Launch “Terminal”.
Step 2: Enter the following command,
sudo killall -HUP mDNSResponder && echo macOS DNS Cache Reset
Step 3: Once you enter the command tap return key and enter the Admin password.
Step 4: It will take few moments to clear cache.
Using Dig to Check Query Times
This method is used to check whether the DNS is perfectly working or not.
Step 1: Open “Terminal”.
Step 2: Type “dig howtoisolve.com”. In place of our website, you can enter any website to check query time.

Step 3: You can check result in “Query Time”.If query time is more then change macOS DNS settings to Google DNS.
After changing the DNS server to Google DNS, you can verify the query time again by the same dig command.
Hope you get pro tips, why you shouldn’t share this helpful guide with others. Share this page on your profile and recommend to your friends for more tips and guide on MacOS Monterey issues and problems.
jaysukh patel
Jaysukh Patel is the founder of howtoisolve. Also self Professional Developer, Techno lover mainly for iPhone, iPad, iPod Touch and iOS, Jaysukh is one of responsible person in his family. Contact On: [email protected] [OR] [email protected]
Источник
How to Flush DNS Cache in MacOS Catalina & Big Sur

MacOS users may occasionally need to flush DNS cache on their Macs in order to access certain websites, domains, or for troubleshooting purposes. Flushing DNS cache is particularly common with web developers and network admins, but it’s used with some regularity by other advanced users too. This guide will walk through how to flush DNS cache in MacOS Big Sur and MacOS Catalina.
If you’re unable to access a website that you visited recently, then of course the first thing you’d check is whether you have a working internet connection. But if you’re only facing connectivity issues on that particular website, then it could be a DNS error, and this is an example when clearing out DNS cache can be helpful.
Your Mac stores the IP addresses of web servers that contain pages that you’ve recently visited. However, if this IP address changes prior to the entry in your DNS cache updates, you won’t be able to access the site without resetting your DNS cache. Flushing the DNS cache on your Mac removes all the invalid entries and forces the system to recollect those addresses the next time you visit the website.
How to Flush DNS Cache in macOS Catalina & Big Sur
Before you go ahead with the following procedure, make sure that your Mac is running macOS Catalina or later, as clearing DNS cache on older versions of macOS varies slightly. Now, without further ado, let’s take a look at the necessary steps.
- We’ll be using Terminal to flush the DNS cache on your machine. You can open Terminal using Spotlight search. Click on the “magnifying glass” icon located at the top-right corner of your desktop to access Spotlight search. Alternatively, you can open Spotlight by pressing Command + Space bar.
Next, type “Terminal” in the search field and open the app from the search results.
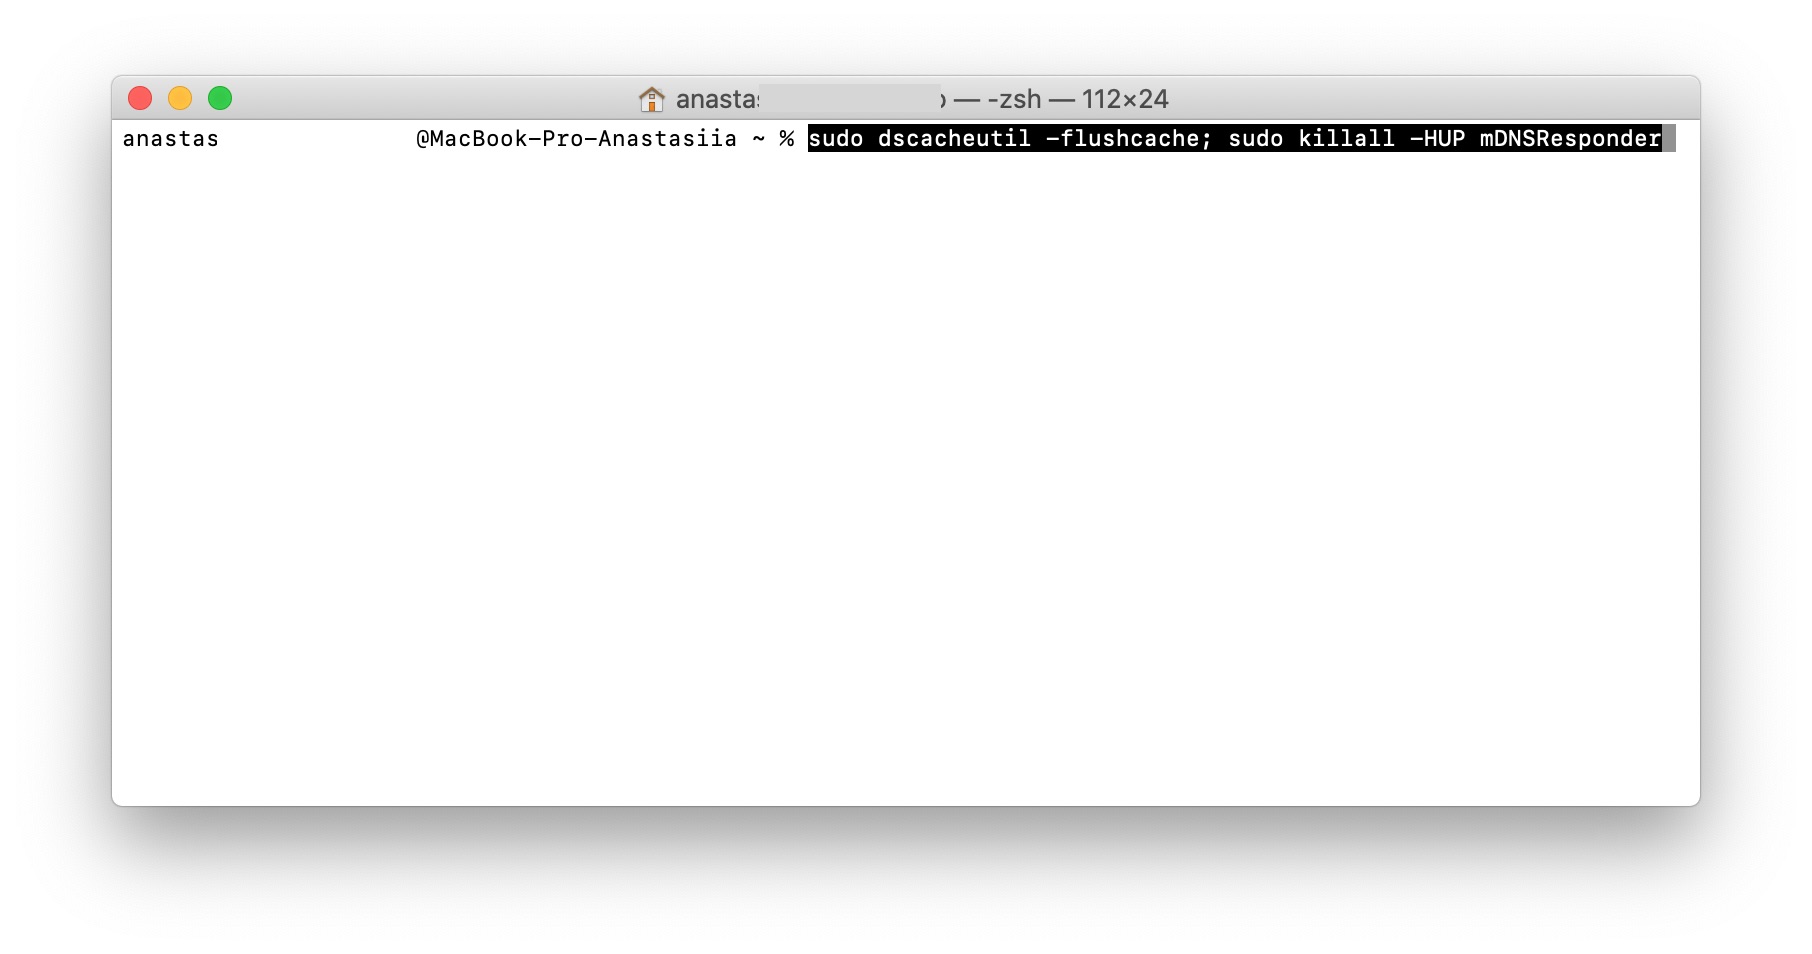
Now, type the following the following command in terminal.
sudo dscacheutil -flushcache; sudo killall -HUP mDNSResponder
Hit the Return key and you’ll now be prompted to enter the macOS user password. Type in your password and press Return again.
Close the Terminal window when finished.
That’s pretty much all there is to it. You’ve successfully cleared and reset the DNS cache on your macOS machine.
It’s worth noting that you won’t get a “successful” message after you’ve typed in the command. Just know that it’s done and you can confirm it by opening the website you weren’t able to access before.
It’s good to clear DNS cache every now and then, as occasionally, they could get corrupted due to technical glitches. Similarly, your Wi-Fi router has a DNS cache as well. This is why most people recommend rebooting the router as a troubleshooting step, as it flushes the DNS cache as well.
If your Mac is running an older version of macOS, you might want to learn how to reset DNS cache in macOS High Sierra, or flushing the DNS cache in macOS Sierra and so on. The procedure is similar and involves the Terminal, except for the fact that you’d be typing in a slightly different command.
We hope you were able to correct whatever network issues you were experiencing, or you’re able to access all the websites again after flushing the DNS cache on your Mac. And if you’re having general internet connectivity problems, you may want to try troubleshooting steps to resolve Wi-Fi connectivity issues on your Mac as well.
If you know of another approach to flushing DNS cache on the latest macOS releases, or you have any particular insight, opinions, or advice, share in the comments!
Источник
Как очистить DNS кеш на Mac
Благодаря наличию в системе DNS кеша пользователи могут быстрее получать доступ к посещенным ранее сайтам. Однако в ряде случаев кеш может повреждаться, что в свою очередь приведет к проблемам с подключением. Решить эту проблему можно очисткой DNS кеша. Также эта процедура пригодится в том случае, если наблюдаются проблемы с отображением ресурсов, недавно переехавших на новый сервер.

Как очистить DNS кеш на Mac
Сразу стоит отметить, что процесс очистки DNS кеша не отличается особой сложностью. Для этого владельцам яблочных компьютеров будет достаточно просто ввести команду в терминале и подождать некоторое время. Однако вид команды несколько отличается в зависимости от версии операционной системы.
Как очистить DNS кеш в macOS Catalina, mac OS Mojave, mac OS High Sierra, Sierra и mac OS El Capitan
Как уже было сказано выше процесс очистки очень прост. Для удаления кеша надо:
- Открыть приложение Терминал. Сделать это можно двумя способами, используя Spotlight (Command + пробел) и введя в открывшейся строке «Терминал» или найти Терминал в Finder – Приложения – Утилиты.

- В окне терминала ввести команду:
sudo killall -HUP mDNSResponder
- Ввести пароль от учетной записи администратора. При вводе пароль может не отображаться.
Процесс очистки кеша может занять несколько минут.
Как очистить DNS кеш на более старых версиях macOS
В случае с macOS Yosemite в Терминал нужно ввести команду вида:
sudo discoveryutil udnsflushcaches
На macOS Lion, Mountain Lion и Mavericks команда будет иметь вид:
sudo killall -HUP mDNSResponder
На старых системах процесс очистки кеша также происходит не мгновенно.
Как очистить DNS кеш без использования Терминала
Очистить DNS кеш можно и без использования Терминала. Для этого владельцам яблочных компьютеров нужно будет воспользоваться одной из специальных утилит для чистки системы. Одним из таких приложений является PowerMyMac.
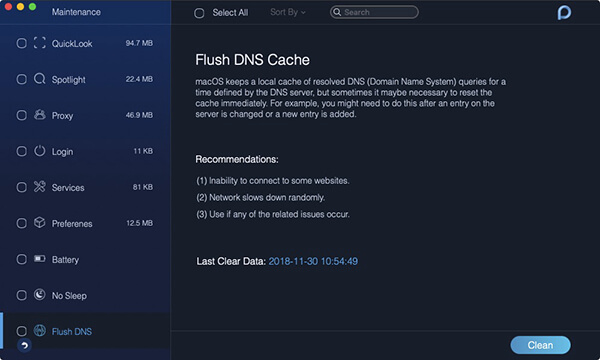
Утилита подходит не только для очистки кеша. Она также позволяет отслеживать показатели работоспособности компьютера, удалять ненужные приложения, искать дубликаты файлов, бороться с остатками от удаленных программ и т.д.
В итоге, в лице PowerMyMac владельцы яблочных компьютеров получают в свое распоряжение многофункциональный инструмент. Опробовать приложение можно совершенно бесплатно. Однако полная версия PowerMyMac стоит 20 долларов. Приобрести программу можно на официальном сайте.
Источник


