- FlashBIOS
- Preparation
- Identifying the motherboard
- Working directory
- USB stick
- Packages
- Install Grml to USB stick
- Option 1: Insert BIOS update into the Grml FreeDOS image
- Option 2: Insert BIOS update into the Grml image
- Test the FreeDOS image
- Perform the update
- Flashing with BIOS FreeDOS from a USB Stick when the flash .exe is too big for a floppy image
- Обновление UEFI/BIOS в Linux
- FAT32 ESP
- Подготовка
- Flash your Lenovo Ideapad laptop BIOS from Linux using UEFI capsule updates
- Different machines, different firmware updates
- Capsule what?
- Compatible models
- Step 1: locate and extract the firmware update file
- Step 2: install the UEFI Linux firmware update tools
- Step 3: flash the firmware!
- Step 4: reconfigure the BIOS to boot Linux again
- Step 5: restore the UEFI boot entry
- FlashBIOS
Most BIOS update utilities for PCs expect to run in a DOS like environment. This page describes how to flash a BIOS, using Debian, FreeDOS, Grml Live Linux, and a USB stick, no matter what Operating System is installed, without using a Windows Operating System.
A USB stick allows the use of >1.2MB files in the FreeDOS image, where the traditional floppy based methods would not work. Many BIOS files and tools are bigger than can fit on a floppy image.
If the hardware works, there is often no need to flash the BIOS. If something goes wrong, this might cause permanent damage to your BIOS and you might lose your warranty. Flashing motherboard BIOS is a dangerous activity that can render your motherboard inoperable!
Preparation
Identifying the motherboard
You should know your motherboard and have any necessary BIOS files available. If you have not identified your motherboard, you should do so now for reference and any potential troubleshooting later. Check any manuals that came with the computer.
You can also use the dmidecode package to retrieve some info:
If you have physical access to the motherboard, you may find the required information directly on the motherboard itself.
Working directory
Make a directory to work in and change into it:
Move or copy your BIOS update files into your working directory.
USB stick
You need USB flash drive that can be completely overwritten. grml2usb should take care of any necessary formatting. Insert the stick, and it will be recognized in the /dev/ system, probably as /dev/sdb with primary partition /dev/sdb1 but this can vary based on your system config.
Note, we will assume that the USB stick is recognized as /dev/sdX with primary partition /dev/sdX1.
Packages
grml2usb for copying the downloaded Grml .iso to USB
qemu-kvm (optional) for testing the Grml/FreeDOS image
Install Grml to USB stick
Download a Grml iso. grml-small is fine. Use grml2usb to install Grml to a usb stick:
See the grml2usb manual for more information.
Option 1: Insert BIOS update into the Grml FreeDOS image
After Grml is installed on a usb stick, mount it, e.g.
Next we need to unzip and mount the embedded FreeDOS image:
Now, just copy any necessary BIOS update files into the mounted image:
Unmount FreeDOS, re-zip it, and put it back on the USB stick:
Option 2: Insert BIOS update into the Grml image
Option 1 did not work for me (I could not find the files afterwards). However, I figured out that the grml media is visible in the FreeDOS environment, in particular the boot/addons directory. It is accessible in FreeDOS as C:\boot\addons.
So it worked for me to copy the bios update files to /media/grml_usb/boot/addons…
Test the FreeDOS image
Unmount the USB stick and test it with Qemu / KVM:
After booting Grml, select FreeDOS from the menu:
If you see a message about ‘cannot find command.com’ then try:
Boot into DOS / command.com and check that your BIOS files are present.
Perform the update
We can’t flash the BIOS from within Qemu obviously. Now you can reboot from the Grml USB stick and flash your BIOS from FreeDOS running on the metal. You may need to press a key on boot to access the BIOS menu or a boot menu. When the motherboard powers on you ought to see a message about which buttons to press, or check your motherboard manual. Then you can boot into FreeDOS from the USB stick and run the BIOS update program.
Some useful commands in DOS:
change to the directory
list the files in the current directory
display the contents of a file
e.g. switch to the A drive
For Example, flashing a Foxconn H67S motherboard:
Flashing with BIOS FreeDOS from a USB Stick when the flash .exe is too big for a floppy image
It may be that the flash image your manufacturer provides is too large to fit on the floppy image of Grml. An alternative is to use a larger FreeDOS image, you can find FreeDOS images with more space on Joe’s Blog
Источник
Обновление UEFI/BIOS в Linux
Не секрет, что производители материнских плат и ноутбуков не всегда дают возможность пользователям Linux обновить UEFI/BIOS прошивку так же ненавязчиво, как это делают пользователи Windows. Тем не менее для HP EliteBook 840G1, которым я пользуюсь, сделать это немногим сложнее.

Для этого дела понадобятся следующие артефакты:
- FAT32 EFI System Partition (ESP)
- WINE
- Переменный электрический ток
FAT32 ESP
Ноутбуки линейки HP EliteBook содержат 3 режима загрузки. Узнать какой из режимов выбран можно в настройках UEFI/BIOS → System Configuration → Boot Mode . Данный раздел следует читать, если только выбран последний, бескомпромиссный режим UEFI , в остальных случаях можно проскочить.
- Legacy
- UEFI Hybrid with compatibility support module (CSM)
- UEFI Native without CSM
Если вы внимательно читали топик про Linux kernel EFI Boot Stub, то вы наверняка знаете, что и как нужно сделать, для того, чтобы создать дисковый раздел. Можно использовать gdisk , parted или KDE Disk Partition для создания ESP раздела. Вот так выглядит уже готовый раздел.

Рекомендуется ESP раздел монтировать в /boot/efi , а не просто в /boot , для того чтобы можно было хранить образы ядра Linux и файлы загрузчика ОС на штатных линуксовых ФС, вместо того, чтобы все держать в FAT32 EFI System Partition.
Мы уже знаем, что UEFI/BIOS будет искать \EFI\BOOT\bootx64.efi , для чего абсолютный путь к файлу должен быть /boot/efi/EFI/Boot/Bootx64.efi , иначе все пропало и UEFI/BIOS не найдет загрузчик ОС! Обновлению системной прошивки это не помешает, но для чего же тогда нужна прошивка, если нельзя загрузить операционную систему? Очень немаловажно, что по-умолчанию GRUB-2 не копирует необходимый файл и поэтому bootx64.efi надо скопировать вручную.
Подготовка
Берем свежую прошивку с сайта HP, выбираем Linux в выпадающем списке ОС, затем BIOS, скачиваем… и обнаруживаем исполняемый файл для Windows — sp64081.exe . Нет, глаза нас не подвели.
Опытные пользователи бывают готовы к подобным сюрпризам, для чего держат Windows VM либо пользуются не-эмулятором WINE или и то и другое вместе, бо случаи бывают разные. Для распаковки файла возможностей WINE вполне достаточно. Запускаем:
Программа завершает работу с бестактной ошибкой, напоминая лишний раз о том, что нам подсунули не то, что мы ожидали.
Однако, это не должно никого волновать, так как файлы распакованы верно а сверх этого ничего и не требовалось.
Из этого списка нам понадобятся только 3 файла: L71_0137.bin , HpBiosUpdate.efi и HpBiosUpdate.s12 и теперь внимание: скопировать файлы нужно точно в указанные места.
Чтобы попасть в меню настройки UEFI/BIOS надо после включения нажать клавишу Esc или F10 а далее File → Update System BIOS .
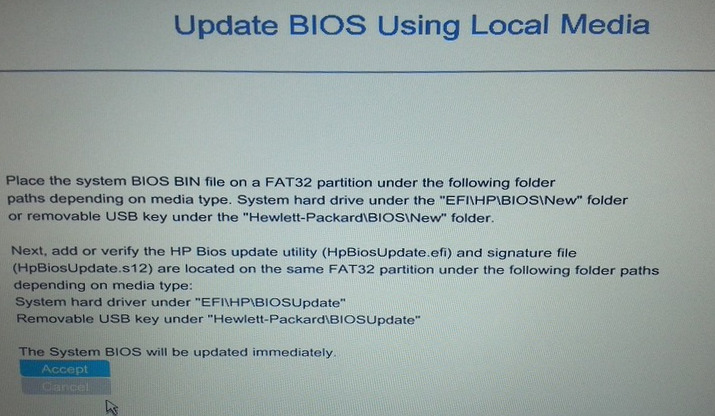
После выбора Accept , процесс обновления стартует без прочих реверансов. Видимо зная цену своим аккумуляторам, производители обновляют прошивку только при включенном электрическом питании компьютера. 2-3 минуты, и процесс благополучно завершен.
UPDATE: По итогам здравых идей в комментариях необходимы некоторые дополнения.
- Можно скопировать те же самые 3 файла на USB флешку, в прописанных путях и используя её обновить прошивку. Разметка файловой системы должна быть FAT32 ESP.
- Можно обновиться из File → Update System BIOS напрямую по интернету, если подключен сетевой кабель. Обновление не будет работать через WiFi соединение.
- Вместо WINE для распаковки архива достаточно использовать 7z e sp64081.exe .
Источник
Flash your Lenovo Ideapad laptop BIOS from Linux using UEFI capsule updates

Jul 14, 2018 · 7 min read

I’m the happy owner of a Lenovo Ideapad laptop (model 710S-13IKB). It’s comparable to the Dell XPS 13 and runs beautifully under Linux, but one detail has always been bugging me: Lenovo only provides BIOS updates for its Ideapad laptops in the form of Windows 10 executable files. System firmware updates are important, especially to mitigate newly found vulnerabilities like Meltdown and Spectre. Since I wiped Windows off my machine a long time ago, I was wondering if there was an alternative (and secure) way to flash firmware updates on it.
And it tu r ns out there is! After months of investigation, I found an elegant and stable update procedure which doesn’t require Windows at all. It doesn’t even need the creation of a bootable USB key: everything is done from the existing Linux installation. How is that possible? Let me introduce you to an interesting new feature of the UEFI specification.
Different machines, different firmware updates
Many latop brands like Dell or Asus provide firmware files that you can put on a USB key and flash from an update application located in the BIOS menu itself. Lenovo does not. Instead, they give you two options:
- For the higher-end ThinkPad series inherited from IBM, they provide bootable CD images that can be turned into bootable USB keys. That’s another good OS-agnostic solution.
- For the Ideapad and Yoga series, you’re stuck with a Windows executable file. The contents of this file and the actual flashing procedure varies depending on the BIOS/Firmware brand.
If you have a modern machine with a Phoenix firmware, chances are that the Windows executable contains the update in the form of an UEFI Capsule Update.
Capsule what?
When a firmware is distributed in that form, the update program won’t flash it directly under Windows. Instead, it will delegate the task to the standard UEFI update mechanism called Capsule Update. In practice, it will ask the operating system to copy an update file to the system partition then program the UEFI to verify this update and install it after the next reboot of the machine, before the operating system starts.
This standard update system is part of the UEFI 2.5 specification released in 2015 and is also available for Linux thanks to efforts from Intel and Red Hat. To be able to use it, your Linux distribution must already boot in UEFI mode from a disk including an EFI system partition.
Compatible models
I compiled the following list of Lenovo laptops which come with a firmware update in the form of a Capsule Update installer. If you find more (including from other brands), please mention them in the comments.
700–15ISK, 700–17ISK
710S-13ISK, 710S-13IKB
720S-15IKB, 720S Touch-15IKB
E42–80, E52–80, E53–80
300S-14ISK, 500S-14ISK, Edge 2–1580, Flex 3–1480, Flex 3–1580, Yoga 500–14ISK, Yoga 500–15ISK
720–15IKB (Type 81AG)
K21–80, K22–80, K32–80
K41–80/M41–80
XiaoXin Rui7000
Rescuer E520–15IKB
V110–14IAP, V110–15IAP
V110–15IKB, V110–15ISK
V310–14IKB, V310–15IKB, V510–14IKB, V510–15IKB
V310–14ISK, V310–15ISK
V330–15IKB, V330–15ISK
V730–13IKB, V730–13ISK
V730–15IKB
Step 1: locate and extract the firmware update file
Go to the Lenovo support website and download the latest BIOS executable file for your machine. This is actually a Windows self-extracting archive built using Inno Setup. You can extract the files in these archives using the command line tool innoextract which is available for many Linux distributions. I’m using Arch Linux so I install it using pacman :
Now let’s extract the files:

Warning: Make sure you use the latest version of innoextract which is compatible with BIOS update executable files generated by Inno Setup version 6.0.0, the version that Lenovo is currently using.
If you have a compatible model you will find a .cap file, which is the file format for UEFI Capsule Updates. Keep that file and delete the rest.
Step 2: install the UEFI Linux firmware update tools
There is a high-level tool called fwupd which allows to automatically detect, download and install updates from the Linux Vendor Firmware Service. This tool also integrates with the Gnome Software graphical user interface in order to display firmware updates next to regular software updates.
Unfortunately, there are only a handful of machines supported on that site at the time of this writing, mostly from Dell. Other vendors don’t (yet) make the effort of publishing their software updates for Linux users.
Instead of the fwupd daemon and its companion tool fwupdmgr , we’re going to use a lower-level tool called fwupdate. It’s normally installed along with fwupd, but on some Linux distributions you may have to install it separately.
On Arch Linux, fwupdate is located in: /usr/lib/fwupd/fwupdate .
We can use this tool to check if our machine provides a firmware compatible with Capsule Updates:

If nothing shows up for you, your firmware or your Linux kernel is not compatible and you can’t go any further. Otherwise, copy the GUID number of your system firmware for the next step.
Step 3: flash the firmware!
Now it’s time to prepare and schedule the update for the next system reboot, using our extracted .cap file and the GUID noted above:
Note that I manually specify the ESP path which defaults to /boot/efi . Use the appropriate path for your Linux installation.
If you see no error message, all went well. You can check that the update is pending using the following command:

Plug your laptop to a power source before rebooting or the update will be cancelled and you’ll have to repeat the last step.
Reboot. Now go to the BIOS setup menu of your machine (for Lenovo laptops, press F2 or Fn + F2 at boot time) and make sure the “Linux-Firmware-Updater” entry is moved first in the “Boot Priority Order”.

Save and exit. Now the updater will kick in, load the Capsule Update file into RAM, verify it and restart the machine again.

Hold your breath during the actual flashing procedure.

Success! Your machine has just been updated to its latest firmware.
Step 4: reconfigure the BIOS to boot Linux again
Now the system won’t boot. Don’t panic, it’s just because the BIOS settings have been reset to the factory defaults. You need to configure a few things to put Linux back in charge. At boot, enter the BIOS menu by pressing Fn + F2.
In the “Configuration” tab, put the “SATA Controller Mode” back to AHCI because Linux can’t boot in RAID mode. You can also enable “Intel Virtual Technology” if you’re using KVM (it’s used by virtualization and emulation software).

Next, in the “Security” tab disable “Secure Boot”. Only Windows and a few Linux distributions provide a suitably signed boot loader.

In the “Boot” tab, you’ll notice that the Linux boot loader entry is gone as well, but that shouldn’t be a problem because most systems will attempt to detect previously installed UEFI boot loaders automatically from the disks. Save and exit and your machine should boot back into your Linux installation. If it doesn’t, you can always use a bootable Linux USB stick for the next step.
Step 5: restore the UEFI boot entry
If you want to add back the Linux option in your UEFI boot menu, the simplest way is to reinstall your boot loader. Check the documentation of your Linux distribution to find the correct procedure, which usually consists of a single command line. Many distributions install GRUB2 by default; I prefer using systemd-boot for simplicity.

Everything is back to normal.
I’m excited to see that there are now better options to safely and quickly update our machine firmwares from Linux. I’m waiting for more manufacturers to publish their updates on the Linux Vendor Firmware Service or for a community effort to appear. In the meantime, you can always use this procedure to download, extract and install the update files yourself, if you own a compatible system. Happy flashing!
Источник


