- How to Find Files in Linux Using the Command Line
- Find a File in Linux by Name or Extension
- Using Common find Commands and Syntax to Find a File in Linux
- Basic Examples
- Options and Optimization for find
- Find a File in Linux by Modification Time
- Use grep to Find a File in Linux Based on Content
- How to Find and Process a File in Linux
- How to Find and Delete a File in Linux
- More Information
- nixtutor.com
- Finding Files in Linux
- Meet the Tools
- locate/slocate
- which
- whereis
- Google Desktop
- Gnome Search Tool
- The Usage
- locate/slocate
- Find Files by Size
- Find Files by Time
- Find Files by Owner
- which
- whereis
- How to Check OS Version in Linux
- Check Linux Version
- 1. From /etc/os-release
- 2. Using lsb_release command
- 3. Using Hostnamectl command
- 4. From /etc/issue file
- 5. From /etc/*release or /etc/*version
- Conclusion
How to Find Files in Linux Using the Command Line


When you have to find a file in Linux, it’s sometimes not as easy as finding a file in another operating system. This is especially true if you are running Linux without a graphical user interface and need to rely on the command line. This article covers the basics of how to find a file in Linux using the CLI. The find command in Linux is used to find a file (or files) by recursively filtering objects in the file system based on a simple conditional mechanism. You can use the find command to search for a file or directory on your file system. By using the -exec flag ( find -exec ), files can be found and immediately processed within the same command.
Find a File in Linux by Name or Extension
Use find from the command line to locate a specific file by name or extension. The following example searches for *.err files in the /home/username/ directory and all sub-directories:
Using Common find Commands and Syntax to Find a File in Linux
find expressions take the following form:
- The options attribute will control the find process’s behavior and optimization method.
- The starting/path attribute will define the top-level directory where find begins filtering.
- The expression attribute controls the tests that search the directory hierarchy to produce output.
Consider the following example command:
This command enables the maximum optimization level (-O3) and allows find to follow symbolic links ( -L ). find searches the entire directory tree beneath /var/www/ for files that end with .html .
Basic Examples
| Command | Description |
|---|---|
| find . -name testfile.txt | Find a file called testfile.txt in current and sub-directories. |
| find /home -name *.jpg | Find all .jpg files in the /home and sub-directories. |
| find . -type f -empty | Find an empty file within the current directory. |
| find /home -user exampleuser -mtime -7 -iname «.db» | Find all .db files (ignoring text case) modified in the last 7 days by a user named exampleuser. |
Options and Optimization for find
The default configuration for find will ignore symbolic links (shortcut files). If you want find to follow and return symbolic links, you can add the -L option to the command, as shown in the example above.
find optimizes its filtering strategy to increase performance. Three user-selectable optimization levels are specified as -O1 , -O2 , and -O3 . The -O1 optimization is the default and forces find to filter based on filename before running all other tests.
Optimization at the -O2 level prioritizes file name filters, as in -O1 , and then runs all file-type filtering before proceeding with other more resource-intensive conditions. Level -O3 optimization allows find to perform the most severe optimization and reorders all tests based on their relative expense and the likelihood of their success.
| Command | Description |
|---|---|
| -O1 | (Default) filter based on file name first. |
| -O2 | File name first, then file type. |
| -O3 | Allow find to automatically re-order the search based on efficient use of resources and likelihood of success. |
| -maxdepth X | Search current directory as well as all sub-directories X levels deep. |
| -iname | Search without regard for text case. |
| -not | Return only results that do not match the test case. |
| -type f | Search for files. |
| -type d | Search for directories. |
Find a File in Linux by Modification Time
The find command contains the ability to filter a directory hierarchy based on when the file was last modified:
The first command returns a list of all files in the entire file system that end with the characters conf and modified in the last seven days. The second command filters exampleuser user’s home directory for files with names that end with the characters conf and modified in the previous three days.
Use grep to Find a File in Linux Based on Content
The find command can only filter the directory hierarchy based on a file’s name and metadata. If you need to search based on the file’s content, use a tool like grep . Consider the following example:
This searches every object in the current directory hierarchy ( . ) that is a file ( -type f ) and then runs the command grep «example» for every file that satisfies the conditions. The files that match are printed on the screen ( -print ). The curly braces ( <> ) are a placeholder for the find match results. The <> are enclosed in single quotes ( ‘ ) to avoid handing grep a malformed file name. The -exec command is terminated with a semicolon ( ; ), which should be escaped ( \; ) to avoid interpretation by the shell.
How to Find and Process a File in Linux
The -exec option runs commands against every object that matches the find expression. Consider the following example:
This filters every object in the current hierarchy ( . ) for files named rc.conf and runs the chmod o+r command to modify the find results’ file permissions.
The commands run with the -exec are executed in the find process’s root directory. Use -execdir to perform the specified command in the directory where the match resides. This may alleviate security concerns and produce a more desirable performance for some operations.
The -exec or -execdir options run without further prompts. If you prefer to be prompted before action is taken, replace -exec with -ok or -execdir with -okdir .
How to Find and Delete a File in Linux
To delete the files that end up matching your search, you can add -delete at the end of the expression. Do this only when you are positive the results will only match the files you wish to delete.
In the following example, find locates all files in the hierarchy starting at the current directory and fully recursing into the directory tree. In this example, find will delete all files that end with the characters .err :
More Information
You may wish to consult the following resources for additional information on this topic. While these are provided in the hope that they will be useful, please note that we cannot vouch for the accuracy or timeliness of externally hosted materials.
This page was originally published on Monday, October 25, 2010.
Источник
nixtutor.com
Helping you Learn Linux

© 2020. All rights reserved.
Finding Files in Linux
Finding files is one of the first things I see new Linux users struggle with on the command line. Users coming from a Windows background are not introduced to command line style search tools as they are used to point and click search forms. There are GUI search programs in Linux as well; however, it is worth learning the command line tools as they can be linked with other programs to save you tremendous amounts of time.
For example, lets say you want to find all rename and resize all .png files in a directory and all subdirectories while ignoring jpgs. This is something you can do with the command line search tools. Programmers might use find in conjunction with grep to find all python modules that contain a specific import module.
find . -name “*.py” -exec grep -n -H -E “^(import|from) math” <> \;
If the above command scares you don’t worry, there are also very good GUI search programs available for Linux.
Meet the Tools
locate/slocate
Depending on the distribution you should have a either locate or slocate installed. Locate is pretty straight forward. Once a day (cron.daily) locate runs a program called updatedb that goes through files and indexes them in a database. This is similar to what Google does on the web. It finds files and remembers them for later.
To use locate all you have to do is type in locate and the search term.
If you are curious the database for slocate can usually be found at: /var/lib/mlocate/mlocate.db
If you want to update the index you can do:
The find command is what I would call a powerhouse program.
The biggest difference between slocate and find is that find will actually look for current files in real time based on the criteria where slocate relies on its indexed files stored in the database to find files. This means if the file was created recently find will be the correct tool to use. It is also worth noting that slocate does not index temp folders.
Although find is arguably much more powerful, locate is much faster as it indexes and stores files in a database instead of traversing through each directory.
Basic usage syntax is:
find [starting path] [qualification]
which
The which command is pretty simple. It shows you the full path of shell commands.
whereis
Whereis is the same as which but it returns the path to the source and the man page.
Google Desktop
 The Google Desktop Search is basically a gui version of locate
It has a built in webserver to display search results which has the option to open the file or folder. It can also do pretty much anything Google’s web search does including indexing PDFs and Word documents.
The Google Desktop program also comes with a shortcut so you can start searching easily.
Another cool feature is it actually will keep caches of files so you can use it as a mini version control system to keep track of previous revisions or restore deleted files.
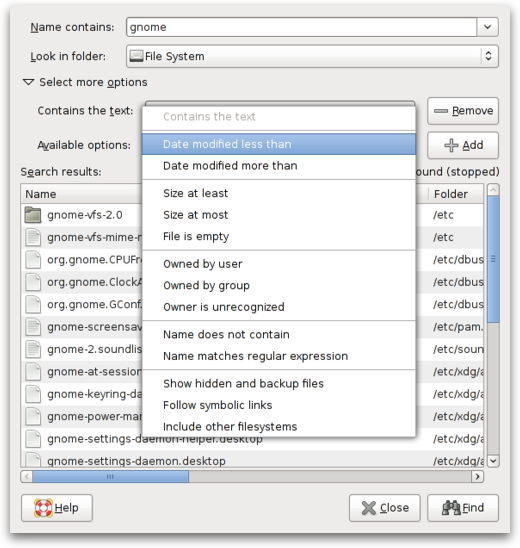
Gnome Search Tool
The Gnome Search Tool is basically a GUI version of locate and find. By default, when performing a basic search it first uses the locate command, and then uses the slower but more thorough find command.
You can find the Gnome Search Tool by going to Places > Search For Files
The Usage
GUI search applications like Google Desktop Search and Gnome Search Tool are pretty self explanatory so we are going to focus on the command line tools for this section and give you examples of some useful commands.
locate/slocate
Misplaced your css file?
locate style.css | less
Not sure if it was Style.css or style.css? The ‘-i’ flag will search case insensitive.
locate -i style.css
Locate all hidden files
If you pass the ‘-r’ flag to locate you can search using regular expressions.
find [starting point] [search criteria] [action]
So the basic usage would be:
_Explination: find is the command, the dot ‘.’ means start from the current directory, and the -name “*.jpg” tells find to search for files with .jpg in the name. The ***** is a wild card. _
Find all css files in the ‘/var/www’ directory.
find /var/www -name “*.css” -print
Find all files that are writable. This is handy when securing directories down.
Find Files by Size
Find all ‘.txt’ files that are less than 100kb in size.
find . -name *.txt -size -100k -ls
Find Files over a GB in size
/Movies -size +1024M
Find all files that are over 40kb in size.
find . -size +40k -ls
Find Files by Time
Find all files in ‘/etc’ that have changed in the last 24 hours.
find /etc -mtime -1
Find Files by Owner
find . -user mark
The power comes when you want to apply an action with the search. This command will find all css files and then remove them.
find . -name “*.css”-exec rm -rf <> \;
It is worth noting that find is recursive so be very careful when using the ‘-exec’ flag. You could accidentally delete all css files in your computer if you are in the wrong directory. It is always a good idea to run find by itself before adding the -exec flag.
which
This command is useful for finding out “which” binary the system would execute if you were to type the command out. Since some programs have multiple versions installed the which command comes in handy to tell you which version it is using and where it is located.
which perl /usr/bin/perl
whereis
The whereis command does the same thing as which but it will also return the path to source and corresponding man page.
Источник
How to Check OS Version in Linux

Linux version can be checked using inbuilt commands or can read from specific files. It is important to determine the distribution name and version on many occasion like when doing package updates or OS update.
There are a lot of Linux distributions available like Debian, Ubuntu, CentOS, Mint, Arch, Fedora, RHEL, and more.
In this tutorial, I will show how to check the Linux version from the command line.
Check Linux Version
There are mainly 5 ways we can get Linux distribution name and its version.
1. From /etc/os-release
Use cat command to read the content of the file /etc/os-release , run the following command:
Output from CentOS
Output from Ubuntu
2. Using lsb_release command
The lsb_release -a displays the Linux version information from the command line. The output will display distribution ID, description, release and codename. To display only the description you can use lsb_release -d .
If you get «command not found» and then you need to install ‘lsb-core’ package.
Output of lsb_release -a
To display only the description, run:
3. Using Hostnamectl command
In modern Linux distributions which use systemd init systems, you can use hostnamectl command to display operating system version.
4. From /etc/issue file
You can get version information from /etc/issue file, to read file content use cat or less command:
5. From /etc/*release or /etc/*version
Some distribution use release and version file and those files are specific to that distro.
$ echo /etc/*version /etc/*release
/etc/debian_version /etc/ec2_version /etc/lsb-release /etc/os-release
To read the content from /etc/*release or /etc/*version, run the following command:

If you are interested to know the Linux kernel version and architecture then use uname command or you can read the content from /proc/version file.
Conclusion
In this tutorial, we learned different ways to find Linux OS name and version from I hope you enjoyed reading and please leave your suggestion in the below comment section.
Источник


