- Find files by date modified in Windows
- How to find the date of modified files
- Правда о «правде» — папка Recent в системе Windows
- 💾Go — to паранойя
- 💾Что такое папка Recent
- 💾Можно ли чистить?
- 💾Некоторые известные коды
- 💾Итого
- Windows batch file: find most recent file with space in name
- 1 Answer 1
- Скрытая папка Recent в Windows о которой вы точно не знали, но в ней есть всё про вас
- Что означает папка Recent на диске С:?
- Отключаем слежение за действиями пользователя через групповые политики Windows
- Комментариев: 2
- How do I find the largest files on my PC in Windows 10?
- How do I search for files by size in Windows 10?
- 1. Use a third-party tool
- Copernic Desktop Search
- 2. Use File Explorer
Find files by date modified in Windows
Using the date modified feature in Windows File Explorer allows you to find any files that were modified on a specific date or over a range of dates. Using this tip can be helpful for anyone who had lost a file, but knows when they last modified it.
How to find the date of modified files
- Press the Windows key + E on the keyboard to open File Explorer.
- On the left side scrolling menu, select the drive or folder where you’d like to view dates ( 1 ).

- Then, on the right side of the screen, type datemodified: (make sure to include the colon) into the search box ( 2 ).
- Once done, a menu similar to the one shown below should appear.

- From here, you have a few options:
- View a single day — Navigate to the day you’re interested in and click it.
- View a range within a month — Click and hold down your left mouse button on the starting date, and then drag your mouse cursor to the ending date.
- View a range over a long period — If you need information that spans more than one month or year, you utilize a specific format in the search box. As an example, if you’d like to view the modified dates between October 13, 2018, and November 10, 2018, you would type: datemodified:10/31/2018 .. 11/10/2018 exactly as it is written there, and then press Enter .
Правда о «правде» — папка Recent в системе Windows
Приветствую! Вы находитесь на канале Ты ж программист! ✨, где просто и доступно поделюсь своим опытом и расскажу о различных лайфхаках.
💾Go — to паранойя
🙈🙈🙈 Рука — лицо не меньше — вот, что приходит в голову от мнений «экспертов» и мастеров, считающих, что папка Recent в системе опасна, нарушает конфиденциальность и необходима её чистка наравне с «отключением конфиденциальности» в групповых политиках или галочек интерфейса, которые, доказано на практике, всё равно пересылают в облако информацию о вас.
Поверьте, что кому надо (корпорации) — уже и так знают, какое пopнo с орками, людьми и лошадьми вы посещаете по пятничным вечерам и знают ваши предпочтения, ровно как и необходимую им статистику.
Так стоит ли вредить себе еще больше, пытаясь ограничить и так полезные функции? Вопрос, как всегда, риторический, а « У страха глаза велики ».
💾Что такое папка Recent
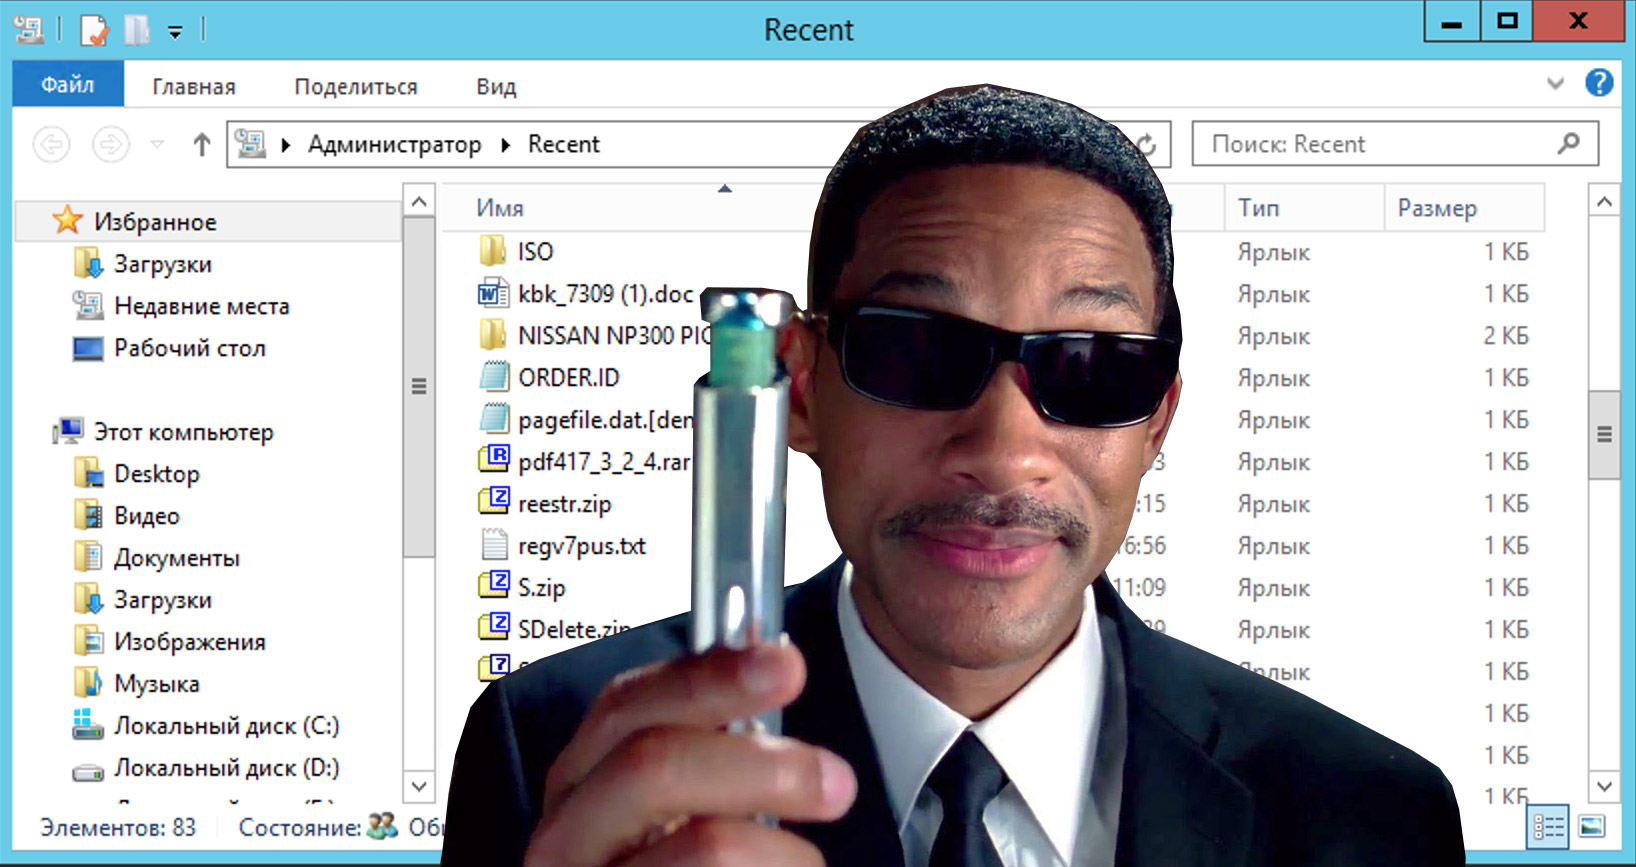
Абсолютно безобидная папка, которая не скрыта в системе и расположена по пути: %USERPROFILE%\AppData\Roaming\Microsoft\Windows\Recent\
Есть папка не просит (весит очень мало), никак не тормозит систему (смейтесь в лицо тем, кто говорит об обратном, что она тормозит работу дисковой подсистемы или операционной системы).
Можно скопировать путь выше и вставить его в меню пуск Win+Q или в строку ввода команды Win + R .
После чего вы увидите директорию Недавние документы , где хранятся последние используемые данные текущего пользователя . По факту, чистить её бесполезно и не имеет никакого практического смысла, если вам нечего скрывать.
Здесь вы найдёте лишь » ярлыки » — ссылки на реальные объекты, процессы, которые были использованы в последних сеансах.
В прочем, есть там две полезные и невидимые директории:
Первая директория отвечает за автоматическое определение «ярлыков» быстрого доступа на панели задач. Нажимали ПКМ в windows 10 на проводнике, например? Вот весь перечень ссылок из недавно открытых путей и есть то, что расположено внутри. То же касается и других приложений.
Вторая директория аналогична первой, но хранит кастомные, нестандартные файлы.
💾Можно ли чистить?
Знаете пословицу про » С дуру можно и x*й сломать «? Вот это тот самый случай. Можно то можно, а нужно ли?
Я вот считаю более, чем удобным иметь доступ к последним используемым путям, документам, процессам и файлам. Экономит кучу времени, а главное — не наносит никакого вреда ни системе ни адекватному пользователю.
Если уж есть, что скрывать, то можете очищать это добро под свою ответственность. Плохо точно не сделаете, но и лучше навряд ли.
💾Некоторые известные коды
- 28c8b86deab549a1.automaticDestinations-ms = InternetExplorer8 Закреплённое на панели задач и недавнее
- a7bd71699cd38d1c.automaticDestinations-ms = Word 2010 Закреплённое на панели задач и недавнее
- adecfb853d77462a.automaticDestinations-ms = Word 2007 Закреплённое на панели задач и недавнее
- a8c43ef36da523b1.automaticDestinations-ms = Word 2003 Закреплённое на панели задач и недавнее
- 1b4dd67f29cb1962.automaticDestinations-ms = Windows Explorer Закреплённое на панели задач и недавнее
- 918e0ecb43d17e23.automaticDestinations-ms = Notepad Закреплённое на панели задач и недавнее
- d7528034b5bd6f28.automaticDestinations-ms = Windows Live Mail Закреплённое на панели задач и недавнее
- c7a4093872176c74.automaticDestinations-ms = Paint Shop Pro Закреплённое на панели задач и недавнее
- b91050d8b077a4e8.automaticDestinations-ms = Media Center Закреплённое на панели задач и недавнее
- f5ac5390b9115fdb.automaticDestinations-ms = PowerPoint 2007 Закреплённое на панели задач и недавнее
- 23646679aaccfae0.automaticDestinations-ms = Adobe Reader 9 Закреплённое на панели задач и недавнее
- aff2ffdd0862ff5c.automaticDestinations-ms = Visual Studio 2012 Закреплённое на панели задач и недавнее
28c8b86deab549a1.customDestinations-ms = InternetExplorer8 Часто используемое и задачи планировщика.
С помощью программ — парсеров можно расшифровать такие коды, например, с помощью JLECmd .
💾Итого
Без всякого ужаса и страха можно и, считаю, даже нужно оставлять папку Recent в покое. Плюсов от её действий куда больше, чем от её чистки.
Но если вы так сильно боитесь, что кто-то из родителей или друзей, мастеров компьютера узнает о ваших активностях, то можете почистить её или создать задачу в планировщике событий на очистку, но это уже нездоровая паранойя.
Для желающих полностью себя обезопасить всегда есть выход: обрезать провод интернета, огородиться от всего и всех, надеть фольгированный пакет на голову и трястись от страха.
Windows batch file: find most recent file with space in name
This works except when there is space
Is there a way if there is space ?
1 Answer 1
You need to deal with the delimiters, because the default delimiters are the and the TAB . My suggestion therefore is either use all tokens, * , or preferably no delimiters. It should also be noted that the default beginning of line, EOL , is the semicolon, ; , so a robust command would prevent names beginning with that character from being omitted from the results too.
Using all tokens, and setting the beginning of line to a character which cannot be included as the first in a file or directory name:
The very small, but possible, issue with this method is that filenames could begin with one or more space characters, and, as those are the default delimiters, they would be consumed and removed in the returned results.
Using no delimiters and setting the beginning of line to a character which cannot be included as the first in a file or directory name:
The above code examples will define the variable named LAST , with the name of each file, until all of the files have been iterated, set ting each and overwriting the previous. If you have a very large number of files in the, (current in this case), directory, you could alternatively reverse your sort method, (instead of /O:D use /O:-D ), define the first value, then break out of the loop:
Скрытая папка Recent в Windows о которой вы точно не знали, но в ней есть всё про вас
Ко мне часто обращаются с просьбами «почистить комп, потому что тормозит». Порой попадаются весьма интересные экземпляры, когда компьютер оказывается забит троянами и скрытыми криптомайнерами просто под завязку, несмотря на кучу установленных антивирусов и прочих «оптимизаторов».
Вычислить происхождение всего этого безобразия бывает довольно просто — достаточно открыть историю браузера. и тут может произойти неловкий момент, если вдруг попросят озвучить причину. В общем, перед тем как сдавать ноутбук или компьютер в сервис, для начала бывает не лишним немного прибраться и начнём со скрытой папки Recent.
Что означает папка Recent на диске С:?
Лично мне никогда не нравилось, как навязчиво «винда» сохраняет историю открытия документов и запущенных программ. Всё это дело копится в скрытой папке Recent, которою не так то просто найти на просторах жёсткого диска. Подавляющее число пользователей и вовсе не подозревает о её существовании.
Конечно, активировав показ скрытых файлов и папок, можно найти её вручную, но есть способ проще. Жмём Windows + R и в открывшемся окошке набираем recent, после чего не забываем нажать Enter.
Откроется список всех файлов и папок, к которым текущий пользователь обращался в последнее время. Содержимое этой папки можно смело почистить (выделяем всё содержимое Ctrl + A и жмём Del).
Аналогичным образом можно почистить и папки:
где хранятся пути к файловым объектам и используемым приложениями Windows.
Отключаем слежение за действиями пользователя через групповые политики Windows
Чтобы «винда» впредь самостоятельно прибивала лишние файлы, следует внести изменения в локальные групповые политики. Снова жмём Windows + R и набираем строку gpedit.msc.
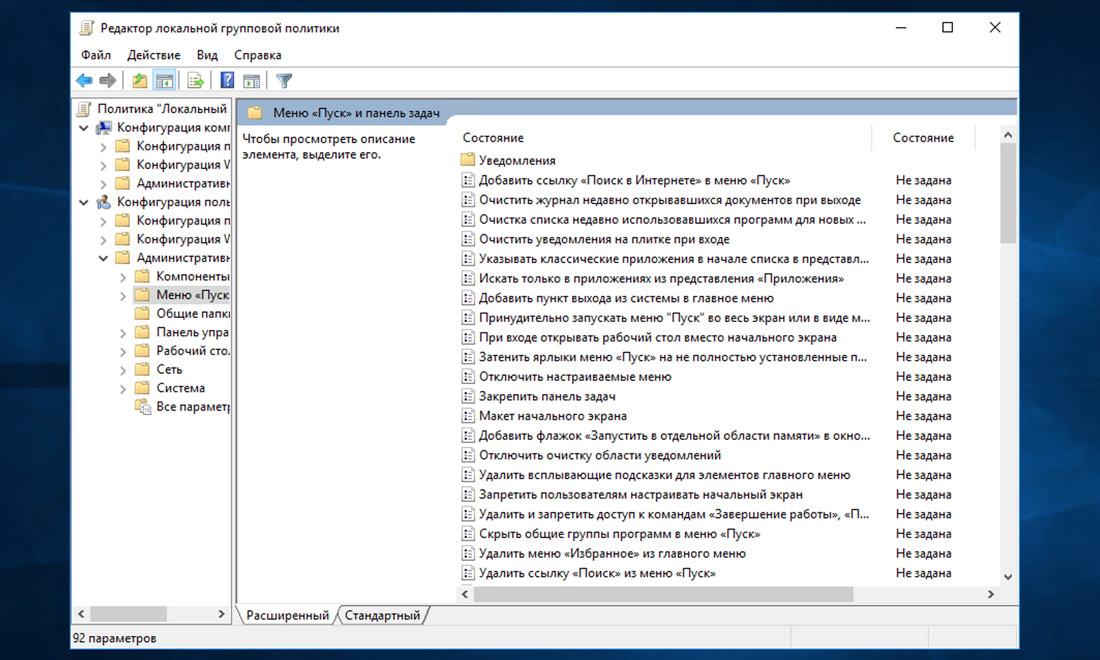
Открываем раздел «Конфигурация пользователя → Административные шаблоны → Меню «Пуск и панель задач» и активируем перечисленные ниже политики:
- Очистить журнал недавно открывавшихся документов при выходе;
- Очистка списка недавно использовавшихся программ для новых пользователей;
- Очистить уведомления на плитке при выходе;
- Удалить список программ, закрепленных в меню Пуск;
- Удалить список часто используемых программ в меню Пуск;
- Отключить слежение за действиями пользователя;
- Не хранить сведения о недавно открывавшихся документах;
- Удалить меню Недавние документы из меню Пуск;
- Не отображать и не отслеживать элементы переходов в списках удаленных расположений;
- Удалить список Недавно добавленные из меню Пуск.
Если считаете статью полезной,
не ленитесь ставить лайки и делиться с друзьями.
Комментариев: 2
А если пишет файл (gpedit.msc.)не найден?
«Жмём Windows + R и в открывшемся окошке набираем recent» — поскольку recent не является внешней командой то ничего не происходит.
How do I find the largest files on my PC in Windows 10?

- Sometimes, you need to free up some space by removing large, unused files.
- The two quick tips listed below will surely be of great help to you.
- If you want to use less storage space, find some inspiration in our File Management Hub.
- For 24-hour professional guidance, don’t hesitate to bookmark this Tech Tutorials Hub.

- Find files on your PC, laptop and other devices
- Locate themin multiple places: local, network or cloud storage
- Get back pretty much everything you lost at a snap
find all the files,
even in cloud and network
Is your laptop’s or desktop’s hard drive more than 75% full? If so, you need to free up some hard drive space.
Erasing temporary files with disk cleaner software tools is one convenient way to free up some storage space.
To do that, you’ll just need to find the largest files on your PC ‘s hard drive first. We’re here to help you out with that.
How do I search for files by size in Windows 10?
1. Use a third-party tool

A dedicated file finder tool such as Copernic Desktop Search will help you with the utmost accuracy to find documents depending on your needs.
The tool comes with a Refine search feature to allow you to dig deep into the computer files and get exactly what you’re looking for.
As a result, you can search a file by:
Copernic comes in several subscription versions, including a free one, that has some limitations, in terms of the file types it retrieves.
However, you can rest assured that the most popular ones ( such as Office files, Outlook emails, and attachments, text documents, archived, and multimedia files ) are covered.
After finding the largest files, in case you need to keep some of them, you can still free up HDD space by moving the files from your hard drive into Google Drive or OneDrive cloud storage.
Copernic Desktop Search
2. Use File Explorer
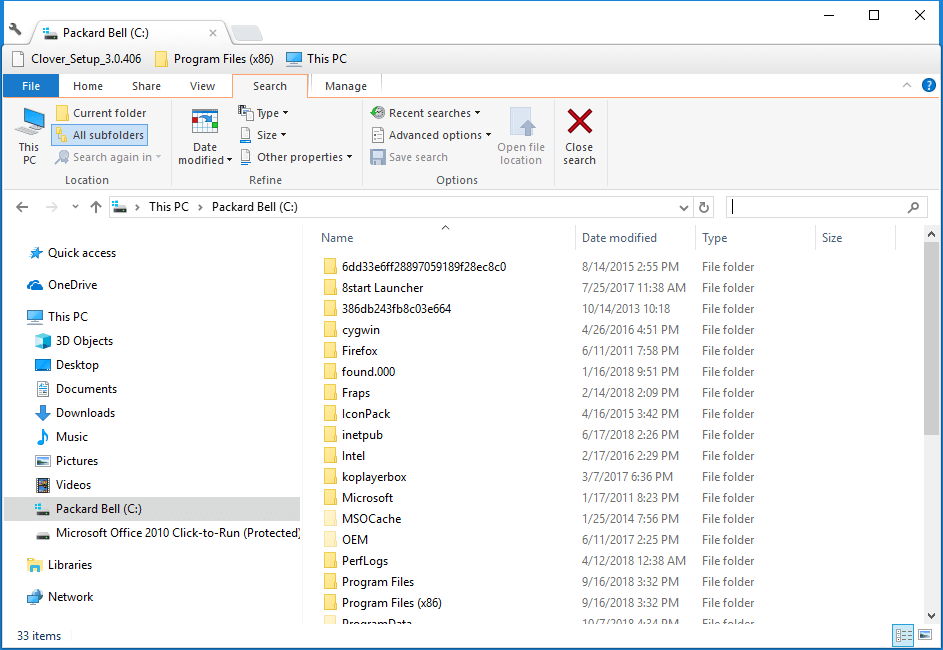
- Press the File Explorer button on the Windows 10 taskbar.
- Select your C: drive or an alternative drive partition to search for files on. (Alternatively, you can select a specific folder to search for files in.)
- Click inside the Search box to the right of Explorer’s window to open the Search tab.

- Select the All subfolders option.
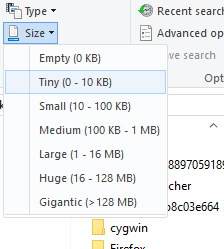
- Click the Size button to open the drop-down menu shown below.
- Select the Gigantic (>128 MB) option to search for the largest files. (File Explorer will then list all files that eclipse 128 MB within your selected directory or drive.)
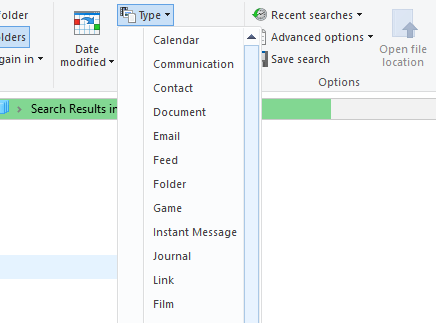
- Press the Type button to further modify your search.
- Select to search for a more specific file type, such as image, music, or video.
- Erase files by selecting them and pressing the Delete button.
- Select the Empty Recycle Bin option in the Recycle Bin to erase the deleted files.

Although many users utilize Cortana to search in Windows 10, File Explorer remains the best built-in utility for file searching.
So, if you don’t want to go for a dedicated tool, Explorer is a decent Windows file manager with numerous search options.
You can find your PC’s largest files with the options on Explorer’s Search tab, simply as described in the procedure above.
You might find that some of your desktop’s or laptop’s largest files are system files in subfolders within the Windows folder. Never delete any large file that might be a system file.
If you’re not sure whether a file is a system one or not, do not erase it. Stick to deleting the largest image, video, document, and other files within your user folder.
File Explorer might also find large program (EXE) files. Don’t delete program files from within Explorer as they’ll probably be listed within the Programs and Features Control Panel applet.
The Windows 10 tips detailed in this useful post will also free up more hard drive space.
Let us know if you managed to achieve your goal in the comments area below.


