- Configuring the Network
- 5.1. Configuring the Network
- 5.1.1. On the Desktop with NetworkManager
- 5.1.2. On the Command Line with Ifupdown
- Using sudo to access Administrative Privileges
- 5.1.3. On the Command Line with systemd-networkd
- Ethical hacking and penetration testing
- InfoSec, IT, Kali Linux, BlackArch
- How to configure Kali Linux to use a static IP address
- Table of contents
- What are advantages of a static IP address usage?
- Manually assigning IP addresses bypassing DHCP in the router
- What are Address, Netmask, Gateway and DNS server when setting up a static address
- Setting up a static IP address in Kali Linux (in Xfce)
- Configuring a Static IP Address in Network Manager in Kali Linux (GNOME)
- Setting up a static IP address in Kali Linux (in Cinnamon)
- Configuring a Static IP Address in the Kali Linux Command Line
Configuring the Network
September 30, 2017 by digip Comments are off
5.1. Configuring the Network
5.1.1. On the Desktop with NetworkManager
In a typical desktop installation, you’ll have NetworkManager already installed and it can be controlled and configured through GNOME’s control center and through the top-right menu as shown in Figure 5.1, «Network Configuration Screen».

Figure 5.1. Network Configuration Screen
The default network configuration relies on DHCP to obtain an IP address, DNS server, and gateway, but you can use the gear icon in the lower-left corner to alter the configuration in many ways (for example: set the MAC address, switch to a static setup, enable or disable IPv6, and add additional routes). You can create profiles to save multiple wired network configurations and easily switch between them. For wireless networks, their settings are automatically tied to their public identifier (SSID).
NetworkManager also handles connections by mobile broadband (Wireless Wide Area Network WWAN) and by modems using point-to-point protocol over ethernet (PPPoE). Last but not least, it provides integration with many types of virtual private networks (VPN) through dedicated plugins: SSH, OpenVPN, Cisco’s VPNC, PPTP, Strongswan. Check out the network-manager-* packages; most of them are not installed by default.
5.1.2. On the Command Line with Ifupdown
Alternatively, when you prefer not to use (or don’t have access to) a graphical desktop, you can configure the network with the already-installed ifupdown package, which includes the ifup and ifdown tools. These tools read definitions from the /etc/network/interfaces configuration file and are at the heart of the /etc/init.d/networking init script that configures the network at boot time.
Using sudo to access Administrative Privileges
The sudo (super user do) command allows privileged users to run commands with administrative permissions. This gives full access to items that may be restricted to only the root user, such as programs in /sbin/ or access to network options that are useful for common penetration testing tools.
The command takes one argument, being the subsequent command that will be run with administrative permissions. One useful use case when dealing with services is to elevate to the root user account. To elevate to root user, we will use the command su (substitute user) to create a shell under the root user. The substitute user command takes a user account as an argument. Additionally, the su command has a useful flag ( —login, or -l, or -) to use the substituted user’s login environment. Multiple commands in the following chapter require the use of sudo, as such we will elevate to the root user to seamlessly execute these commands.
Each network device managed by ifupdown can be deconfigured at any time with ifdown network-device. You can then modify /etc/network/interfaces and bring the network back up (with the new configuration) with ifup network-device.
Let’s take a look at what we can put in ifupdown’s configuration file. There are two main directives: auto network-device, which tells ifupdown to automatically configure the network interface once it is available, and iface network-device inet/inet6 type to configure a given interface. For example, a plain DHCP configuration looks like this:
Note that the special configuration for the loopback device should always be present in this file. For a fixed IP address configuration, you have to provide more details such as the IP address, the network, and the IP of the gateway:
For wireless interfaces, you must have the wpasupplicant package (included in Kali by default), which provides many wpa-* options that can be used in /etc/network/interfaces. Have a look at /usr/share/doc/wpasupplicant/README.Debian.gz for examples and explanations. The most common options are wpa-ssid (which defines the name of the wireless network to join) and wpa-psk (which defines the passphrase or the key protecting the network).
5.1.3. On the Command Line with systemd-networkd
While ifupdown is the historical tool used by Debian and Kali, and while it is still the default for minimal installations, there is a newer tool worth considering: systemd-networkd . Its integration with the systemd init system makes it a very attractive choice. It is not specific to Debian-based distributions (contrary to ifupdown ) and has been designed to be very small, efficient, and relatively easy to configure if you understand the syntax of systemd unit files. This is an especially attractive choice if you consider NetworkManager bloated and hard to configure.
Источник
Ethical hacking and penetration testing
InfoSec, IT, Kali Linux, BlackArch
How to configure Kali Linux to use a static IP address
Table of contents
What are advantages of a static IP address usage?
On a local network, a static IP address allows you to use the Web server, SSH, FTP and other network services without having to get to know IP of a system on which these services are running each time. If you do not use these services, then there is no need to configure a static IP.
A static address for a particular computer or other device can be set in several ways:
- in the settings of your router, bind the MAC address to the IP address: in different routers the configuration process may be slightly different, but usually these functions are located in the Local network (LAN settings) -> DHCP server -> The list of manually assigned IP addresses bypassing DHCP.
- setting up a static IP address in Network Manager
- setting up a static IP address in the command line
Manually assigning IP addresses bypassing DHCP in the router
A static IP address can be configured on the router. The router uses a MAC address to identify devices, so you can save pairs of MAC and IP addresses in the router settings (see also “How to find the MAC address and How to find the manufacturer by MAC address”).
The specific steps for binding the MAC address to the IP address in the router depend on the device model. Therefore, if you have any questions or you can not find the desired setting in your router, then refer to its manuals. In this case, the actions do not depend on the device to which you want to assign a permanent IP address, since all the configuration is performed in the router. Also, after resetting the settings on the device to which the permanent IP address was assigned (for example, when reinstalling the OS on the computer or Factory Reset of the phone), then the binding of the IP address to the device is preserved, since the MAC address is always unchanged.
This method is not suitable for virtual machines, even if a network connection of the Bridge type is used.
What are Address, Netmask, Gateway and DNS server when setting up a static address
Whichever method of setting a static IP address you choose, and in whatever graphical environment you set a static IP address, you will need to enter values for the following fields:
Address is a static IP address that you want to assign to this computer. Typically, home routers have addresses like 192.168.0.* or 192.168.1.*, where instead of an asterisk there is a number from 2 to 254. An IP address ending in one is usually the router itself, and an IP address ending in 255 is broadcast.
Netmask – If you are setting up a home router, then usually the netmask is 255.255.255.0, this same value in another notation is written as “/24”.
Gateway is the IP address of the router. This is usually 192.168.0.1 or 192.168.1.1
DNS is a DNS server, if you do not know what to specify, you can use the following IP addresses as DNS servers: 8.8.8.8 and 8.8.4.4.
When done, click the Apply button.
By the way, if you are already connected to the local network, to find out the gateway (IP address of the router), run the command:
The following will be displayed:
After the ‘default via’ line, the IP router will follow, in my case it is 192.168.0.1.
To apply made changes enter:
Check your current local IP with the command:

Setting up a static IP address in Kali Linux (in Xfce)
Xfce is the default graphical desktop environment in Kali Linux.
Since the computer is already connected to the network and it received network settings (IP address, gateway address, etc.), then to see the current values, run the command:

Pay attention to the line
It means that the IP address 192.168.1.51 is assigned to the eth0 network interface, the subnet mask is /24. To find out the gateway address, replace the last digit in the IP address with “1”, that is, in this case, the gateway address is 192.168.1.1.
Suppose I want the computer to be configured to have a static IP address of 192.168.1.101.
Next to the clock, right-click on the network connections icon.

In the context menu that opens, click on “Edit Connections…”.
Select the network for which you want to configure a static IP address and click the gear icon.

In the window that opens, go to the “IPv4 Settings” tab. Select “Manual” for the “Method”. Then click the Add button and enter the values you want.

When everything is ready, click the “Save” button.

Changes will take effect after reconnecting to the network.
Using the command
make sure that the IP address that was assigned to the computer is actually used:

Configuring a Static IP Address in Network Manager in Kali Linux (GNOME)
GNOME is the default graphical desktop environment in previous versions of Kali Linux. Currently, you can still select GNOME (or any other graphical desktop environment) when installing the OS.
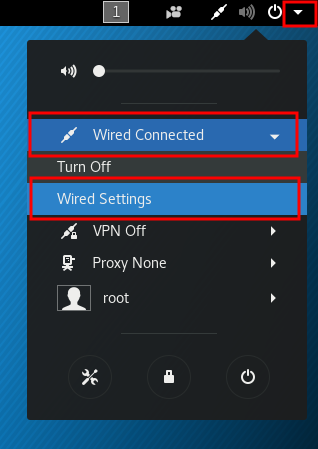
In Linux, a static address in a graphical environment can be set in the Network Manager settings. To do this, click on the arrow in the upper right corner of the screen, in the menu that appears, click on ‘Wired Connected’, and then on ‘Wired Settings’:
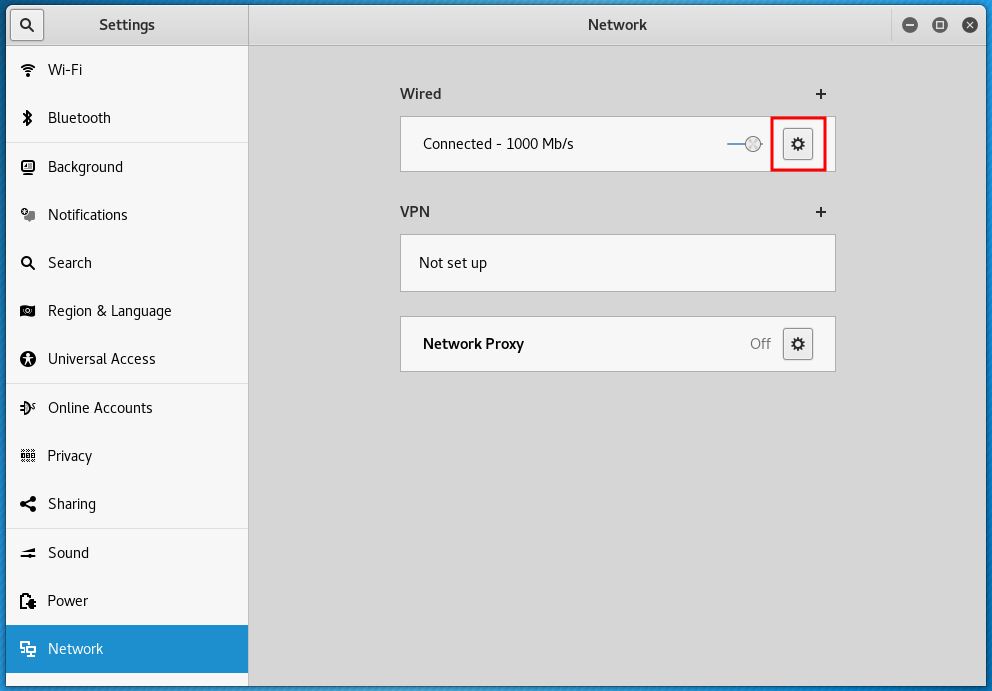
A new window will open, in it click on the gear icon:
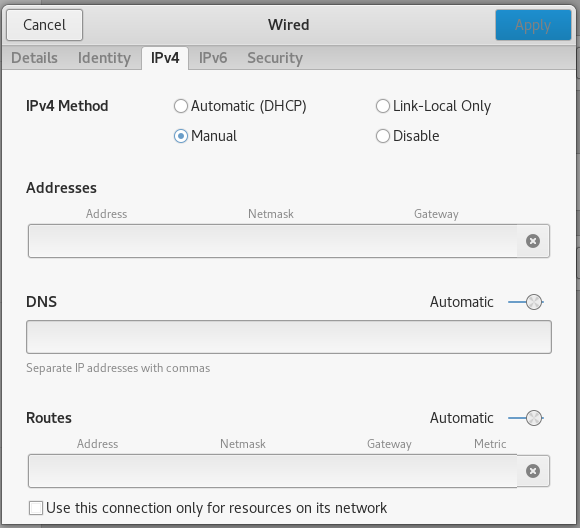
Another window will open, in which go to the IPv4 tab:

select ‘Manual’:
then enter the desired static IP in the ‘Addresses’ field, it should match your network, for example, if the router (default gateway) has the address 192.168.0.1, then the selected address should be 192.168.0.*, if the router has the address 192.168.1.1, then the selected IP should be of the form 192.168.1.* etc. Next, write down the ‘Netmask’, for most tasks 255.255.255.0 is suitable, also write the ‘Gateway’, which is the IP router, an example:
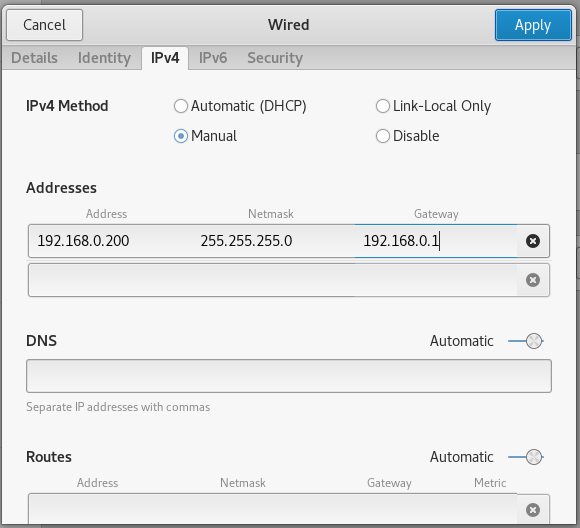
If you wish, you can also set the DNS server settings, but this is not mandatory.
Setting up a static IP address in Kali Linux (in Cinnamon)
Cinnamon is a graphical desktop environment that, although not included by default in Kali Linux, is quite popular among users. Optionally, Cinnamon can be installed on Kali Linux.
To configure a static IP address in Cinnamon, click on the network connection icon and select “Network Settings”.

Select the network adapter for which you want to configure, then select the network and click the gear icon next to it.

Select the “IPv4” tab, switch “Addresses” to “Manual”, enter the information you need and click the “Apply” button.

Changes will take effect after reconnecting to the network.
Configuring a Static IP Address in the Kali Linux Command Line
If for some reason you do not use Network Manager (for example, if you use Linux without a desktop graphical environment), you can configure a static IP address on the command line.
To do this, open the /etc/network/interfaces file with any text editor:
Only four lines should be added to this file. Example strings:

Let us examine them in more detail. eth0 is the name of the network interface. If there is only one network card, then in Debian (i.e., in Kali Linux too), this interface is called eth0. The second network interface is named eth1, etc.
If you are not sure, you can find the name of the wired network interface with the command:
In the second line, you need to use the same interface name (eth0).
Further in the third line, 192.168.0.100 is the IP that we want our system to always have. And /24 is an alternative way to set netmask. These characters correspond to 255.255.255.0.
As you might guess, in the last, fourth line, 192.168.0.1 means a gateway.
All these data need to be changed to fit your needs.
For the changes to take effect, issue the command:
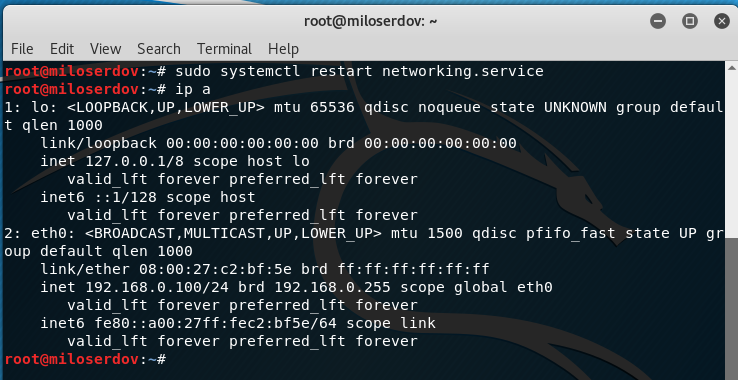
As you can see, the interface is really assigned the required IP and now it will be saved after each reboot.
Источник


