- FTP Firewall Support
- Overview
- Compatibility
- Setup
- Windows Server 2012 or Windows Server 2012 R2
- Windows 8 or Windows 8.1
- Windows Server 2008 R2
- Windows 7
- Windows Server 2008 or Windows Vista
- How To
- How to configure the global firewall settings for the FTP service
- Configuration
- Attributes
- Child Elements
- Configuration Sample
- Sample Code
- How To Enable Passive FTP Transfer Mode in Microsoft IIS Server When Windows Firewall is On?
- Problem
- Solution
- a. Enable direct metabase edit
- b. Add PassivePortRange
- c. Disable direct metabase edit and re-start iis
- d. Open firewall ports
- e. Test
- DATAENGINER
- Настройка FTP-сервера с изоляцией пользователей на Windows Server 2016 / 2012 R2
- Установка роли FTP сервера в Windows Server 2016/ 2012 R2
- Настройка FTP сайта в Windows Server, предоставление прав пользователям
- Настройка изоляции FTP пользователей в Windows Server 2016/2012 R2
- Настройка правил брандмауэра Windows для доступа к FTP серверу
- Проверка подключения к FTP серверу с Windows клиента
FTP Firewall Support
Overview
The element is used to configure the port range that the FTP service will use for data channel activity when you use the FTP PASV command to negotiate passive connections, which contains IP address and port of the server.
When passive connections are negotiated using the FTP PASV command, the FTP server sends a response which contains IP address and port of the server. By specifying the lowDataChannelPort and highDataChannelPort attributes, you can direct FTP clients to communicate with your firewall, which should route the client traffic to your FTP server.
The valid range for TCP/IP ports is 1025 through 65535. (Ports from 1 through 1024 are reserved for use by system services.) You can enter a special port range of «0-0» to configure the FTP server to use the Windows TCP/IP ephemeral port range. In early versions of Windows, the TCP/IP ephemeral port range was set to use ports 1025 through 5000. Starting with Windows Vista and Windows Server 2008, the TCP/IP ephemeral port range has been changed to 49152 through 65535. For more information about the ephemeral port range, see the following article in the Microsoft Knowledge Base:
You can use the to configure the per-site external IP address for your firewall; this allows you to route the firewall traffic for each site through a different firewall.
Compatibility
| Version | Notes |
|---|---|
| IIS 10.0 | The element was not modified in IIS 10.0. |
| IIS 8.5 | The element was not modified in IIS 8.5. |
| IIS 8.0 | The element was not modified in IIS 8.0. |
| IIS 7.5 | The element of the element ships as a feature of IIS 7.5. |
| IIS 7.0 | The element of the element was introduced in FTP 7.0, which was a separate download for IIS 7.0. |
| IIS 6.0 | The element replaces the IIS 6.0 MSFTPSVC/PassivePortRange metabase property. |
The FTP 7.0 and FTP 7.5 services shipped out-of-band for IIS 7.0, which required downloading and installing the modules from the following URL:
With Windows 7 and Windows Server 2008 R2, the FTP 7.5 service ships as a feature for IIS 7.5, so downloading the FTP service is no longer necessary.
Setup
To support FTP publishing for your Web server, you must install the FTP service. To do so, use the following steps.
Windows Server 2012 or Windows Server 2012 R2
On the taskbar, click Server Manager.
In Server Manager, click the Manage menu, and then click Add Roles and Features.
In the Add Roles and Features wizard, click Next. Select the installation type and click Next. Select the destination server and click Next.
On the Server Roles page, expand Web Server (IIS), and then select FTP Server.
To support ASP.Membership authentication or IIS Manager authentication for the FTP service, you will need to select FTP Extensibility, in addition to FTP Service.  .
.
Click Next, and then on the Select features page, click Next again.
On the Confirm installation selections page, click Install.
On the Results page, click Close.
Windows 8 or Windows 8.1
On the Start screen, move the pointer all the way to the lower left corner, right-click the Start button, and then click Control Panel.
In Control Panel, click Programs and Features, and then click Turn Windows features on or off.
Expand Internet Information Services, and then select FTP Server.
To support ASP.Membership authentication or IIS Manager authentication for the FTP service, you will also need to select FTP Extensibility. 
Click OK.
Click Close.
Windows Server 2008 R2
On the taskbar, click Start, point to Administrative Tools, and then click Server Manager.
In the Server Manager hierarchy pane, expand Roles, and then click Web Server (IIS).
In the Web Server (IIS) pane, scroll to the Role Services section, and then click Add Role Services.
On the Select Role Services page of the Add Role Services Wizard, expand FTP Server.
Select FTP Service.
To support ASP.Membership authentication or IIS Manager authentication for the FTP service, you will also need to select FTP Extensibility. 
Click Next.
On the Confirm Installation Selections page, click Install.
On the Results page, click Close.
Windows 7
On the taskbar, click Start, and then click Control Panel.
In Control Panel, click Programs and Features, and then click Turn Windows Features on or off.
Expand Internet Information Services, and then FTP Server.
Select FTP Service.
To support ASP.Membership authentication or IIS Manager authentication for the FTP service, you will also need to select FTP Extensibility. 
Click OK.
Windows Server 2008 or Windows Vista
Download the installation package from the following URL:
Follow the instructions in the following walkthrough to install the FTP service:
How To
How to configure the global firewall settings for the FTP service
Open Internet Information Services (IIS) Manager:
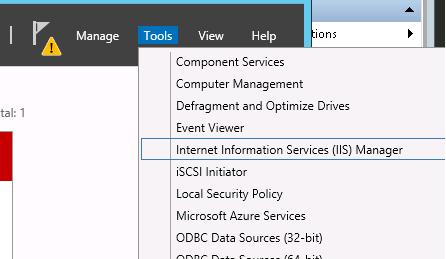
If you are using Windows Server 2012 or Windows Server 2012 R2:
- On the taskbar, click Server Manager, click Tools, and then click Internet Information Services (IIS) Manager.
If you are using Windows 8 or Windows 8.1:
- Hold down the Windows key, press the letter X, and then click Control Panel.
- Click Administrative Tools, and then double-click Internet Information Services (IIS) Manager.
If you are using Windows Server 2008 or Windows Server 2008 R2:
- On the taskbar, click Start, point to Administrative Tools, and then click Internet Information Services (IIS) Manager.
If you are using Windows Vista or Windows 7:
- On the taskbar, click Start, and then click Control Panel.
- Double-click Administrative Tools, and then double-click Internet Information Services (IIS) Manager.
In the Connections pane, click the server name.
In the Home pane, double-click the FTP Firewall Support feature.
In the Data Channel Port Range box, use one of the following options to enter a port range for passive data channel connections:
- Use [low port]-[high port] for a port range, where each port must be between 1025 and 65535. For example, 5000-6000.
- Use «0-0» to configure the FTP server to use the Windows TCP/IP ephemeral port range.


In the External IP Address of Firewall box, type the IPv4 address of the Internet-facing network adapter of your firewall.
In the Actions pane, click Apply.
For additional information about how to configure the firewall settings for the FTP service, see the following topic on the Microsoft IIS.net Web site:
Configuration
The element is configured at the global level in ApplicationHost.config.
Attributes
| Attribute | Description |
|---|---|
| lowDataChannelPort | Optional int attribute. |
Specifies the lowest port for data channel activity for passive data connections.
The default value is 0 .
Specifies the lowest port for data channel activity for passive data connections.
The default value is 0 .
Child Elements
Configuration Sample
The following sample illustrates several configuration settings in the global element for a server. More specifically, the settings in this example demonstrate how to:
Enable FTP credential caching and specify a time-out of 10 minutes (600 seconds.)
Configure the low port as 5000 and the high port as 6000 for data channel communications.
Enable logging and specify that log files will be kept per-site, and that log files will be rotated daily by UTC time.
Specify a custom FTP provider and specify a custom parameter for that provider.
Specify global IP restrictions that allow FTP access from local host and deny access to the 169.254.0.0 to 169.254.255.255 block of IP addresses.
Configure request filtering with the following options:
- Block FTP access to the _vti_bin virtual directory, which is used with the FrontPage Server Extensions.
- Block several file types that are associated with executables.
- Specify 100MB as the maximum file size.
Add a global authorization rule that allows access for the administrators group.
Specify that domain name syntax can be used for FTP virtual host names.
Sample Code
The following examples configure the FTP service to use the port range of 5000 to 6000 for data channel activity when passive connections are used.
How To Enable Passive FTP Transfer Mode in Microsoft IIS Server When Windows Firewall is On?
Problem
When you turn on Windows firwall in Microsoft Windows Server 2008/2003, FTP will only works in «Active Transfer Mode» but NOT «Passive Transfer Mode». Some FTP clients do need passive transfer mode if they are behind a firewall. Some FTP publish services like blogger.com can only support passive ftp transfer mode as well.
Solution
You can enable passive ftp transfer mode in Microsoft IIS server. Please follow these steps.
a. Enable direct metabase edit
Open Start > Programs > Administrative Tools > Internet Information Service (IIS) Manager. Right click «ServerName (local computer)» and choose «Properties». Check on «Direct Direct MetaBase Edit» and click «OK».

b. Add PassivePortRange
Open C:\WINDOWS\system32\inetsrv\MetaBase.xml with NotePad or other editors. Add a new line ‘PassivePortRange=»5001-5008″‘ in «IisFtpService» section.

c. Disable direct metabase edit and re-start iis
d. Open firewall ports
Open Start > Settings > Control Panel > Firewall. Add the TCP ports 5001-5008 to the firewall exception list.

e. Test
Now you should be able to connect to ftp server with passive transfer mode.
DATAENGINER
Добрый день! Сегодня мы продолжаем настраивать наш Ftp — Server для ОС Windows Server 2019! И сегодня мы рассмотрим как открыть порты, для доступа по сети к ftp-серверу.
Для того, чтобы мы могли подключиться к нашему ftp-серверу необходимо в брандмауэре открыть соответствующие порты. Как правило Ftp-сервер использует 21 порт, а sftp 22.
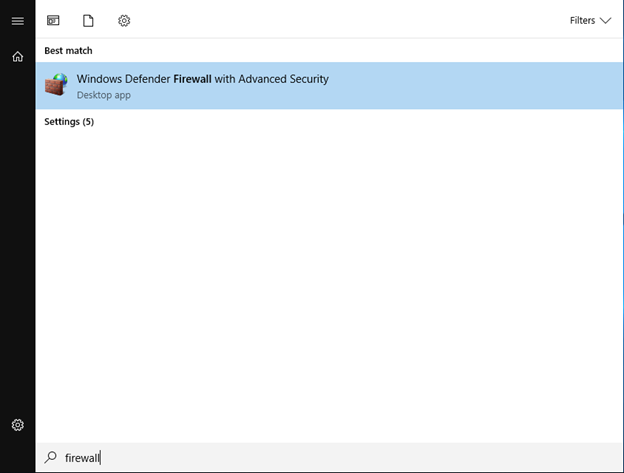
Шаг 1. Для того чтобы открыть порт, для нашего ftp-сервера, нам необходимо открыть firewall windows. Поэтому открываем меню пуск и пишем в поиске firewall.
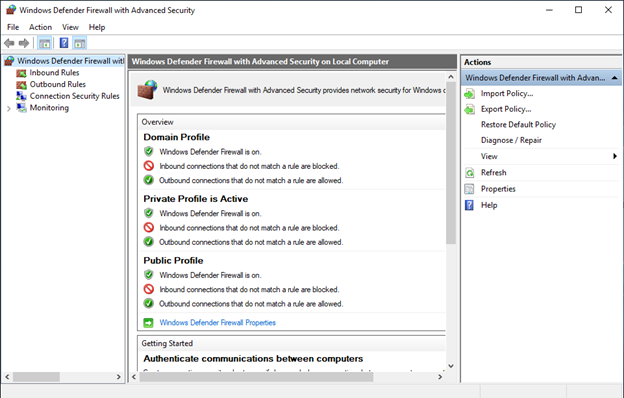
Шаг 2. Открываем приложение Windows Defender Firewall.
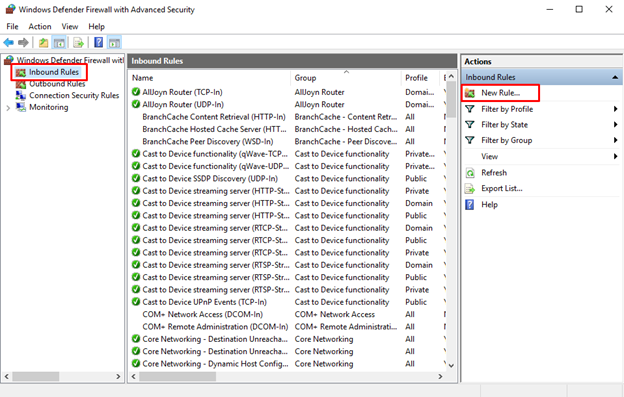
Шаг 3. В левом боковом меню выберем inbound Rules. Далее в правом боковом меню выбираем New Rules.
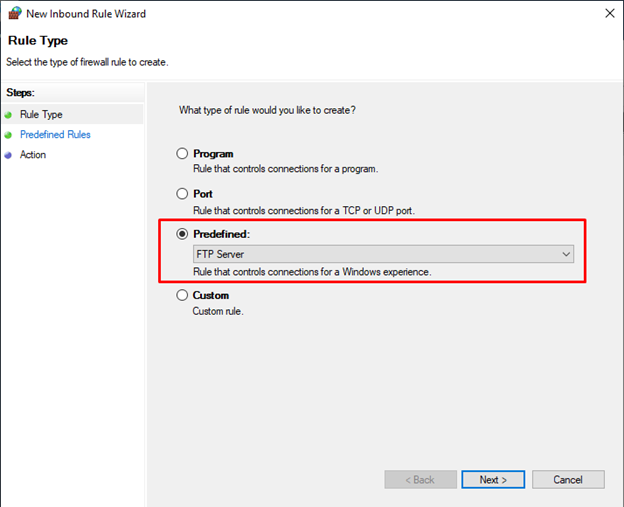
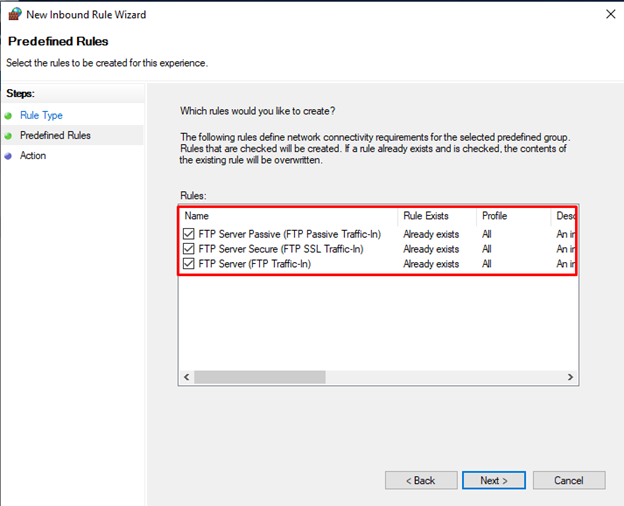
Шаг 4. В появившемся окне добавления новой роли выбираем Predefined (предопределенные), и в выпадающем списке выбираем ftp-server.
Шаг 5. Отмечаем галочкой все предложенные роли.
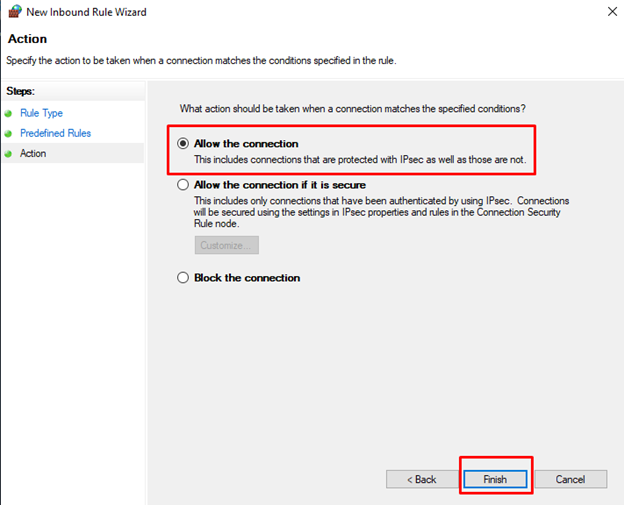
Шаг 6. Теперь на следующей странице выбираем разрешить все подключения (Allow Connection) и нажимаем финиш.
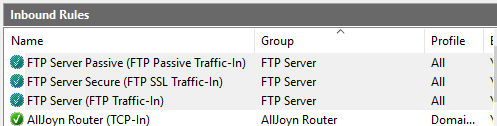
Теперь у нас появится три новых правила, для входящих подключений к ftp-серверу.
Вот мы и рассмотрели как добавить правило для работы ftp — сервера.
Настройка FTP-сервера с изоляцией пользователей на Windows Server 2016 / 2012 R2
Несмотря на то, что протоколу FTP, являющемуся одним из старейших протоколов, уже исполнилось больше 40 лет, он продолжает использоваться повсеместно там, где требуется простой протокол передачи файлов. Сервер FTP можно установить на всех операционных системах Microsoft. Последняя глубокая модернизация этой службы была произведена в Windows 7 / Server 2008 R2 (по сути код сервиса был переписан заново). Была существенно улучшена безопасность службы, и появился ряд новых возможностей. В частности, в FTP сервере на Windows появилась возможность настроить изоляцию FTP пользователей, позволяющая разграничить доступ множества пользователей к собственным папкам на одном FTP сервере.
Благодаря возможности изоляции пользователи могут работать только со своими ftp каталогами, и не могут подняться выше по дереву каталогов, т.к. каталог верхнего уровня пользователя отображается для него, как корень службы FTP. Таким образом можно предотвратить доступ пользователей к чужим файлам на FTP сервере. Изоляция FTP пользователей широко применяется хостинг-провайдерами, когда нужно предоставить индивидуальный доступ различным пользователям к одному файловому хранилищу.
Как и в предыдущих версиях Windows, служба FTP (не путайте с sFTP и TFTP) в Windows Server 2016/2012 R2 основана и глубоко интегрирована в сервис IIS, и имеет единый административный интерфейс управления. В этой статье мы покажем, как установить сервер FTP на базе IIS в Windows Server 2016 / 2012 R2 и настроить на нем изоляцию пользователей (инструкция также применима и к Windows 10 / 8.1).
Установка роли FTP сервера в Windows Server 2016/ 2012 R2
Установить сервис FTP можно через консоль Server Manager, отметив в разделе Web Server(IIS) -> FTP Server опции FTP Service и FTP Extensibility. 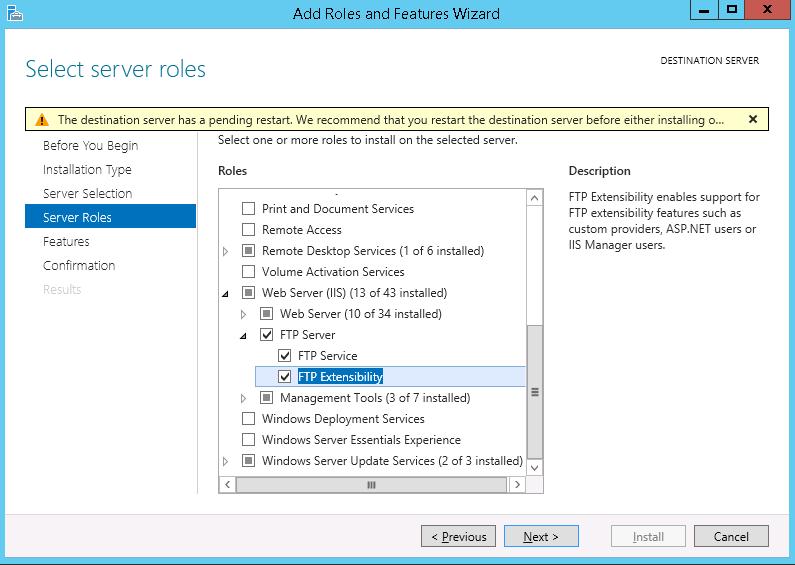
Также можно установить роль FTP сервера одной командой PowerShell:
Install-WindowsFeature Web-FTP-Server 
Чтобы установить консоль управления FTP сервером выполните команду:
Install-WindowsFeature -Name «Web-Mgmt-Console»
Настройка FTP сайта в Windows Server, предоставление прав пользователям
Запустите Server Manager и откройте консоль управления IIS (Internet Information Service Manager).
Создайте новый FTP сайт (Sites ->Add FTP Site). 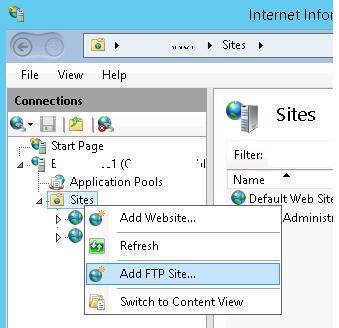
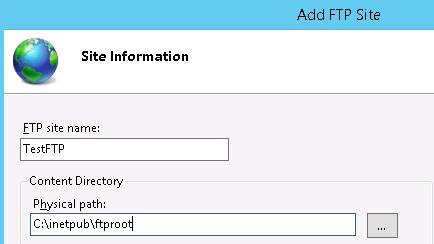
Имя FTP сайта: MyTestSite
Корневой каталог FTP сайта: C:\inetpub\ftproot
Для защиты передаваемых по сети ftp-данных возможно настроить SSL (в этом случае все передаваемые по сети данные и пароли/учетки ftp-пользователей будут зашифрованы), но в нашей демонстрации это не обязательно. Все остальные настройки оставляем стандартными.
Import-Module WebAdministration
#Задаем имя FTP сайта
$FTPSiteName = ‘New FTP Site’
#Каталог FTP сайта
$FTPRoot = ‘E:\www\FTPRoot’
#порт FTP сайта
$FTPPort = 21
New-WebFtpSite -Name $FTPSiteName -PhysicalPath $FTPRoot -Port $FTPPort
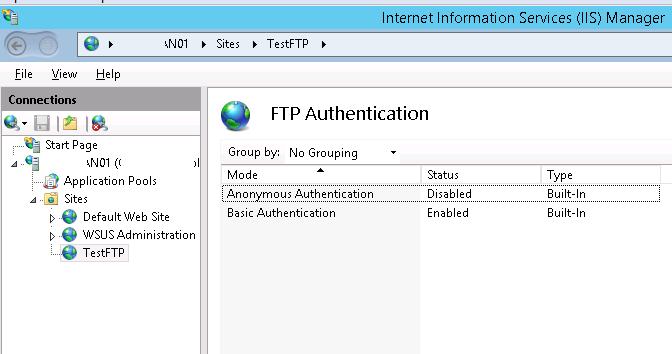
Выберите новый FTP сайт и в секции FTP Authentication (Аутентификация) отключите анонимную аутентификацию Anonymous Authentication. Basic Authentication должна быть включена.
FTP служба на Windows Server 2016 / 2012 R2 может использовать два типа учетных записей: доменные или локальные. В зависимости от типа учетной записи есть различия в структуре каталогов FTP и настройках изоляции пользователей. Мы будем использовать локальные учетные записи Windows.
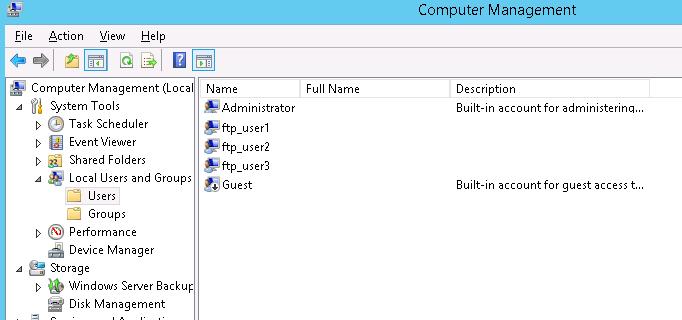
Создайте FTP пользователей, допустим, это будут учетные записи ftp_user1, ftp_user2 и ftp_user3. Также создайте группу ftp_users, в которую включим этих пользователей. Создать пользователей можно в разделе Local Users and Groups консоли Computer Management.
Также можно создать пользователей и группы из командной строки (или с помощью PowerShell). Создайте локальную группу:
net localgroup ftp_users /add 
Создайте нового локального пользователя:
net user ftp_user1 /add *

Добавьте пользователя в группу:
net localgroup ftp_users ftp_user1 /add 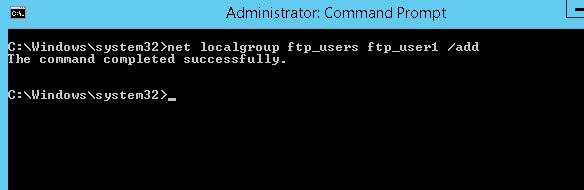
Точно так же создайте еще двух пользователей.
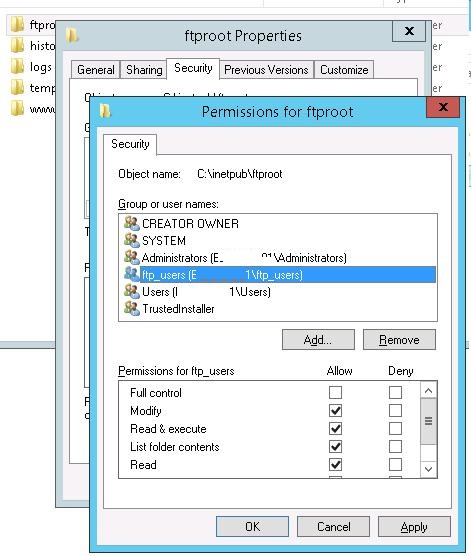
Предоставьте созданной группе ftp_users права (RW) на каталог C:\inetpub\ftproot.
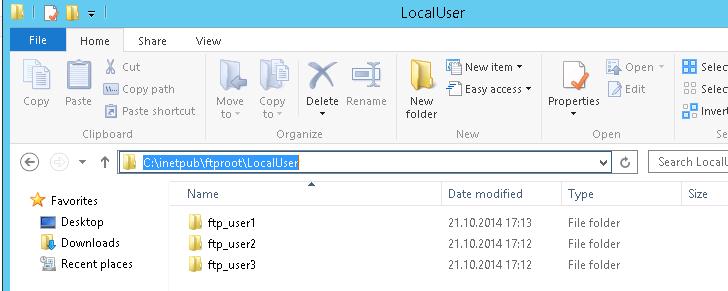
Внутри каталога C:\inetpub\ftproot создадйте каталог с именем LocalUser (имя должно полностью соответствовать, это важно. ). Затем внутри C:\inetpub\ftproot\LocalUser создайте три каталога с именами созданных вами пользователей: ftp_user1, ftp_user2, ftp_user3.
| Тип учетной записи | Синтаксис именования домашних каталогов |
| Анонимные пользователи | %FtpRoot%\LocalUser\Public |
| Локальная учетная запись Windows | %FtpRoot%\LocalUser\%UserName% |
| Доменная учетная запись Windows | %FtpRoot%\%UserDomain%\%UserName% |
| Специальные учетки IIS Manager или ASP.NET | %FtpRoot%\LocalUser\%UserName% |
Вернитесь в консоль IIS и в разделе сайта FTP Authorization Rules создайте новое правило (Add Allow Rule), в котором укажите, что группа ftp_users должна иметь права на чтение и запись (разрешения Read и Write). 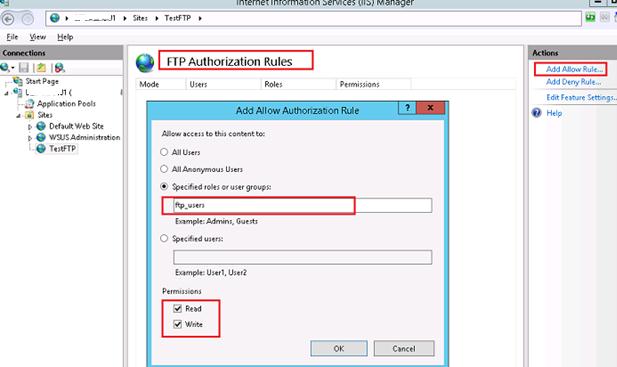
Настройка изоляции FTP пользователей в Windows Server 2016/2012 R2
Перейдем к настройке изоляции пользователей FTP. Изоляция FTP пользователей настраивается на уровне сайта FTP, а не всего сервера и позволяет организовать собственный домашний каталог для каждого пользователя. В настройках FTP сайта откройте пункт FTP User Isolation.
В этом разделе имеются несколько настроек. Первые две не предполагают изоляции пользователей:
- FTProotdirectory (ftp‑сессия пользователя начинается с корневого каталога ftp-сайта);
- Usernamedirectory (пользователь начинает работу с физического/виртуального каталога с именем пользователя. Если каталог отсутствует, сессия начинается с корневого каталога ftp-сайта).
Следующие 3 опции представляют различные режимы работы изоляции пользователей:
- Usernamedirectory(disableglobalvirtualdirectories) – предполагает, что ftp-сессия пользователя изолирована физическим или виртуальным каталогом имя которого соответствует имени пользователя ftp. Пользователи видят только собственный каталог (для них он является корневым) и не могут выйти за его рамки (в вышестоящий каталог дерева FTP). Любые глобальные виртуальные каталоги игнорируются;
- Usernamephysicaldirectory(enableglobalvirtualdirectories) – предполагается, что FTP-сессия пользователя ограничена (изолирована) физическим каталогом с именем учетной записи пользователя FTP. Пользователь не может перейти выше своего каталога по структуре FTP. Однако пользователю доступны все созданные глобальные виртуальные каталоги;
- FTP home directory configured in Active Directory – FTP-пользователь изолируется в рамках своего домашнего каталога, заданного в настройках его учетной записи Active Directory (свойства FTPRoot и FTPDir).
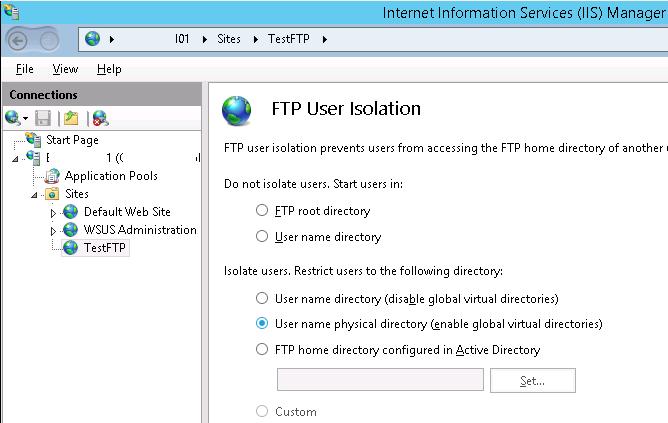
Выберите нужный режим изоляции (я использую второй вариант изоляции ftp пользователей).
Настройка правил брандмауэра Windows для доступа к FTP серверу
При установке роли FTP сервера в настройках Windows Firewall автоматически активируются все необходимые правила, которые нужна для доступа пользователей к FTP.
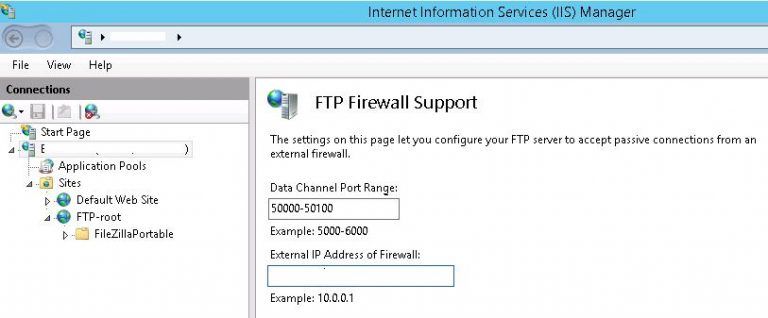
Для корректной работы FTP севера в пассивном режиме FTP пользователям нужно подключаться к RPC диапазону портов (1025-65535). Чтобы не открывать все эти порты на внешнем файерволе, вы можете ограничить диапазон динамических TCP портов, используемых для передачи данных.
- Для этого в настройках FTP сайта в IIS откройте пункт FTPFirewallSupport и в поле DataChannelPortRange укажите диапазон портов, который вы хотите использоваться для FTP подключений. Например – 50000-50100;
- Сохраните изменения и перезапустите IIS (iisreset);
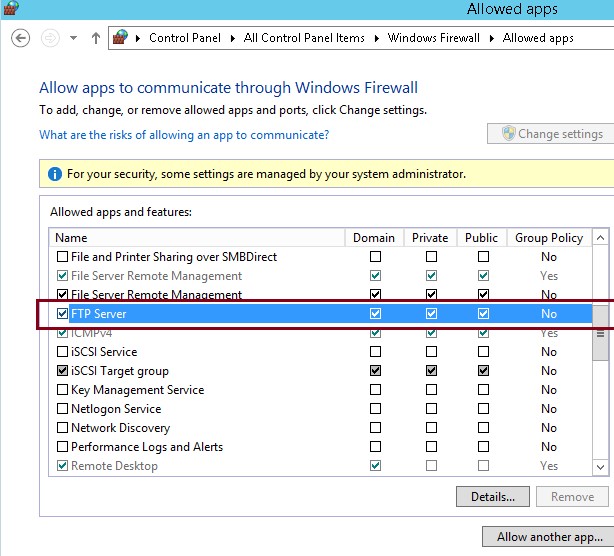
- Откройте панель управления и перейдите в Control Panel\System and Security\Windows Firewall\Allowed apps;
- Убедитесь, что в списке приложении, которым разрешен доступ через брандмауэр присутствуют разрешения для FTP Server.
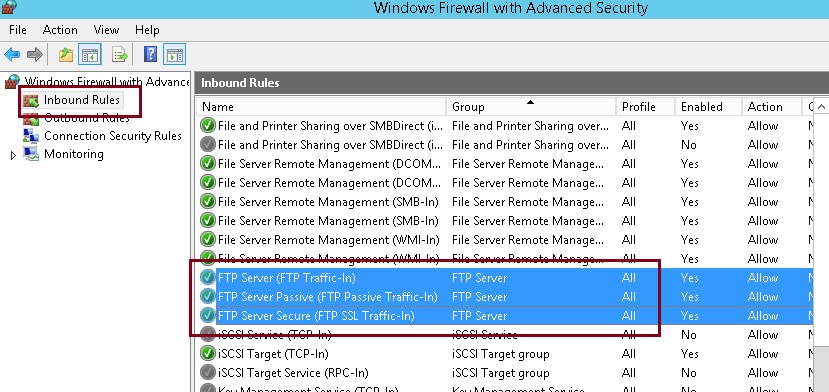
Затем в настройках Windows Firewall with Advanced Security проверьте, что включены следующие правила:
- FTP Server (FTP Traffic-In) – протокол TCP, порт 21;
- FTP Server Passive (FTP Passive Traffic-In) – адрес локального порта 1024-65535 (либо 50000-50100 как в нашем примере);
- FTP Server Secure (FTP SSL Traffic-In) – (при использовании FTP с SSL) порт 990;
- FTP Server (FTP Traffic-Out) – порт 20;
- FTP Server Secure (FTP SSL Traffic-Out) – (при использовании FTP с SSL) порт 989.
Соответственно эти порты нужно открыть на шлюзе (межсетевом экране) для подключения внешних FTP пользователей.
Проверка подключения к FTP серверу с Windows клиента
Вы можете проверить доступность портов на FTP сервере с помощью командлета Test-NetConnection:
Test-NetConnection -ComputerName yourftpservername -Port 21
Или с помощью команды ftp:
Попробуйте подключиться к своему FTP сайту с помощью любого клиента FTP или непосредственно из Explorer (в адресной строке указав ftp://yourservername/ .
Укажите имя и пароль пользователя.
В результате у вас откроется содержимое домашнего каталога с файлами пользователя (являющимся для пользователя корнем FTP сайта). Как вы видите, сессия пользователя является изолированной и пользователь видит на ftp сервера только свои файлы. 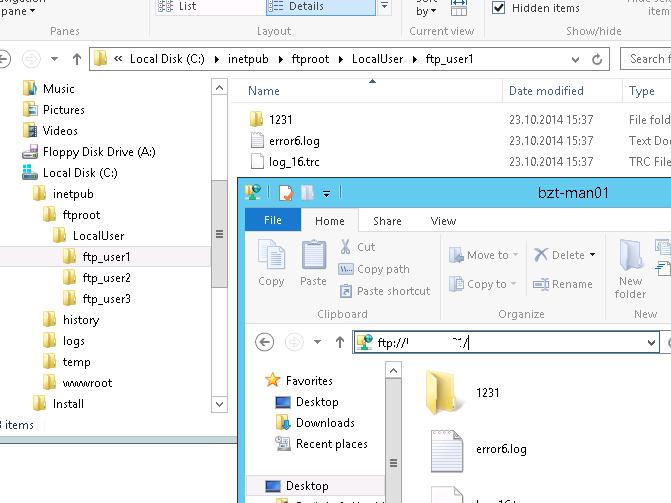
Для просмотра информации о доступе пользователей к FTP серверу можно использовать журналы FTP, которые по умолчанию хранятся в каталоге c:\inetpub\logs\logfiles в файлах формата u_exYYMMDD.log.
Для просмотра текущих подключений пользователей к вашему серверу можно пользоваться значениями счетчиками пользователей IIS через PowerShell или функцией «Текущие сеансы FTP» в консоли IIS. В этой консоли можно посмотреть информацию об имени и IP адресе FTP пользователя и отключить сессию при необходимости.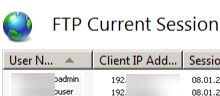
Итак, мы рассмотрели, как настроить FTP сайт с изоляцией пользователей на базе Windows Server 2016 / 2012 R2. В режиме изоляции пользователи аутентифицируются на FTP под своими локальным или доменным учетными записями, после чего они получают доступ к своему корневому каталогу, соответствующему имени пользователя.


