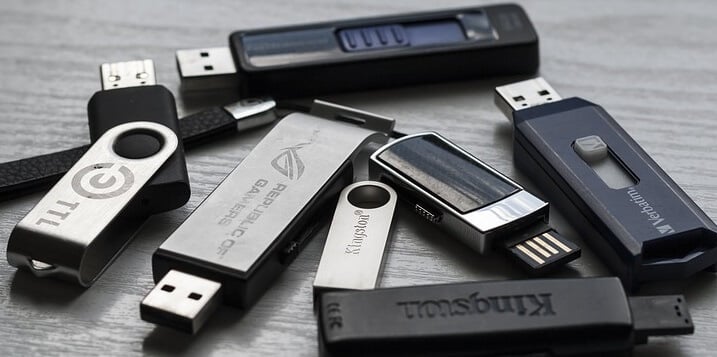
- Fix: Cant Eject External Hard Drive on Windows 10
- What stops Users from Ejecting their External Drive Safely on Windows 10?
- Solution 1: Restart your System
- Solution 2: Checking the Hard Drive policy
- Solution 3: Using Safely Remove Hardware utility
- Solution 4: Run the Windows Hardware and Devices Troubleshooter
- Solution 5: Eject the Drive Using Disk Management
- Solution 6: Update USB Drivers
- How to eject USB devices from Windows 10 without any worries
- How to eject USB from Windows 10
- 1. Create a Safely Remove Hardware shortcut
- 2. Use Windows Explorer
- FIX: Can’t Eject USB Drive in Windows 10
- SOLVED: Problem ejecting USB mass storage device
- Solutions for USB ejecting problems in Windows 10
- 1. Check your USB ports
- 2. Update USB drivers
- 3. Check Bluetooth Support Service settings
- 4. Make sure no USB file is in use
Fix: Cant Eject External Hard Drive on Windows 10
Some users have reported that they are not able to safely eject their external hard drive like USBs etc. This issue is often caused by other processes that are using the contents of the drive or Windows USB drivers which prevent the removal of the external drive. Users have reported that they cannot eject their hard drive using the ‘Safely Remove Hardware and Eject Media’ option which is located on the bottom-left side of the taskbar.
To ensure the safety and integrity of your external hardware, it is always advised to remove your drive only when there is no other process using it. Your drive will most likely get corrupted or damaged if you recklessly eject the drive. Nonetheless, to help you fix your problem, you can follow the solutions down below.
What stops Users from Ejecting their External Drive Safely on Windows 10?
If you are not able to safely eject your external drive and the ‘Safely Remove Hardware and Eject Media’ option is greyed out, the issue is typically due to the following factors —
- Contents of the drive are being used. If the background processes or applications are using the files stored on the external drive, it can cause the issue.
- Windows USB drivers. Sometimes, the obsolete or malfunctioning USB drivers on your system can be causing the hiccup.
To circumvent your issue, please follow the solutions down below in the same order as provided.
Solution 1: Restart your System
The first step in solving your issue would be to reboot your machine. Rebooting your machine will close all the current applications and third-party processes and when the system boots up again, there will be no applications using the files stored on the external hard drive. You can also end such tasks by using the Task Manager, however, that is time-consuming and since a restart is much quicker and efficient, you should restart your system instead of ending the tasks using the Task Manager. Once your system has booted up again, try ejecting the external drive.
Solution 2: Checking the Hard Drive policy
If you can’t see any “Eject” option on your Windows. It means that your Windows is preventing the Hard Drive to be ejected as it might be in the middle of an operation. So Windows doesn’t let you remove the Hard Drive if it thinks that there is a danger of data loss. You can change the policy Windows set for your hard drive by following these steps:-
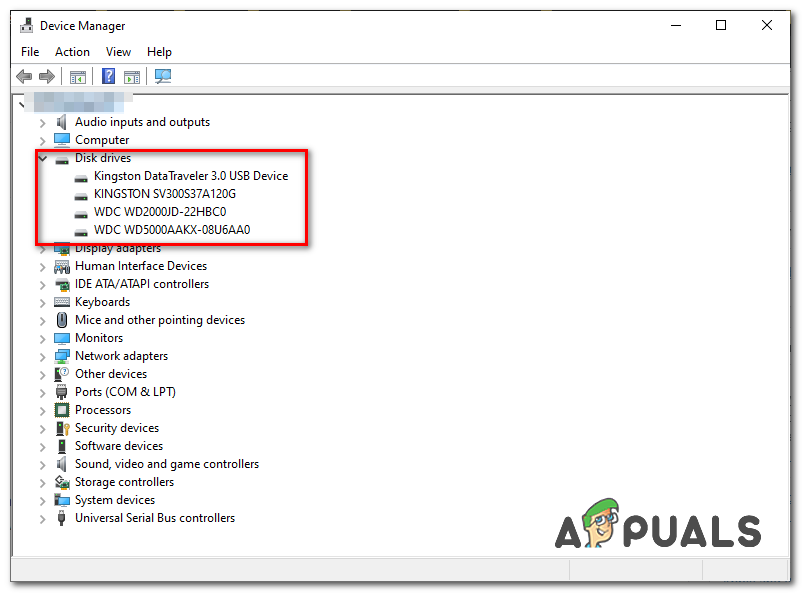
- Hold the Windows Key and Press X. Choose Device Manager.
- Now expand the “Disk Drives” section then find the Drive you want to eject.
 Selecting New Policy
 - Right-click on the drive you want to eject and click “Properties”.
- Head over to the “Policies” tab and make sure to select “Better Performance”.
 Selecting New Policy
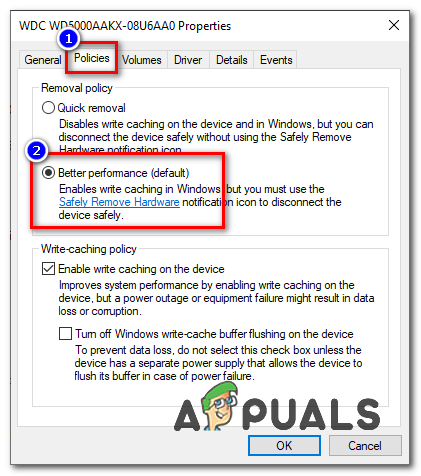 Selecting Policy
Solution 3: Using Safely Remove Hardware utility
There is a shortcut that you can use to access the old “Safely Remove Hardware” tool Windows have. Basically, it will open the whole utility and let you eject the External Hard drive easily. To access this utility, follow these steps:-
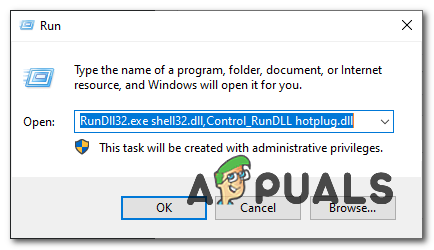
- Press and hold the “Windows + R” keys together to open the Run program.
- Now type this shortcut and press enter:- Accessing the Utility
- It should bring up the Safely Remove Hardware utility for you.
- Now simply select the drive you want to eject and click “Stop”.
 Accessing the Utility
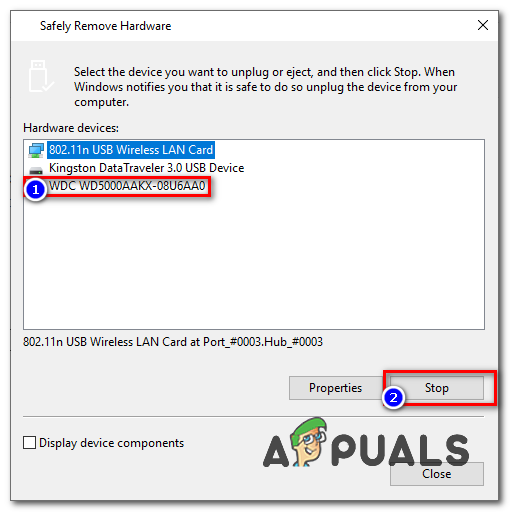 Safely Remove Hard drive
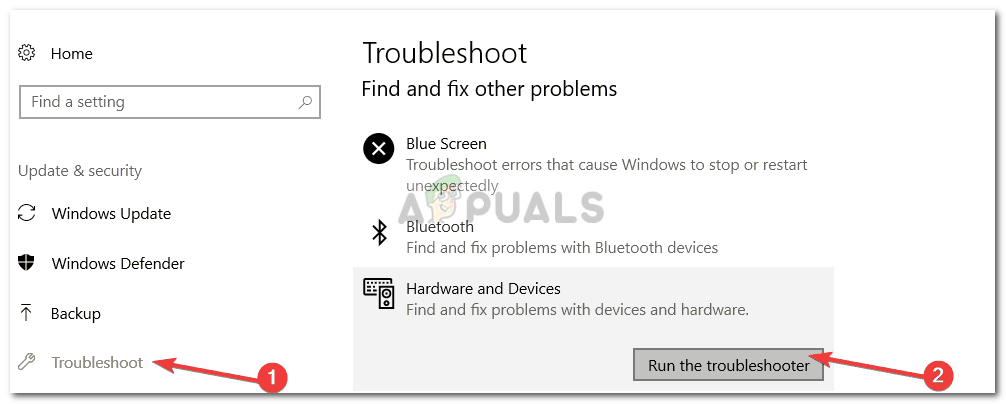
Solution 4: Run the Windows Hardware and Devices Troubleshooter
The built-in troubleshooters are there for a reason and should be utilized whenever needs be. In this case, since you are having issues with your external hardware, executing the Hardware and devices troubleshooter might fix your issue. Here’s how to run the troubleshooter:
- Press Windows Key + I to open Settings.
- Go to Update and security.
- Navigate to the Troubleshoot panel.
- Scroll down and locate ‘Hardware and devices’.
- Select it and click ‘Run the troubleshooter’. Running the Hardware and Devices Troubleshooter
 Running the Hardware and Devices Troubleshooter
Solution 5: Eject the Drive Using Disk Management
Disk Management is a Windows built-in utility that lets you manage all the disks or drives connected to your system. If you are unable to eject the drive using the ‘Safely Remove Hardware and Eject Media’ option, you can easily remove the drive safely using the Disk Management tool. Here’s how to do it:
- Go to the Start Menu, type in Disk Management and hit Enter.
- Locate the external hard drive that you want to eject.
- Right-click on your external hard drive and select ‘Eject’. Ejecting External Drive using Disk Management
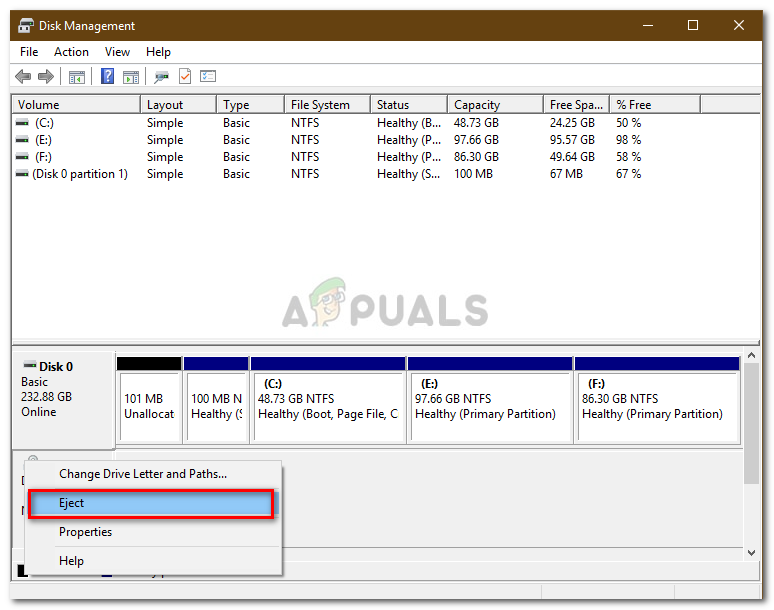 Ejecting External Drive using Disk Management
Note:
It is important to note that once you eject the external hard drive, it will appear as Offline. Therefore, the next time you want to use the drive on your system, make sure to change the status to Online in Disk Management.
Solution 6: Update USB Drivers
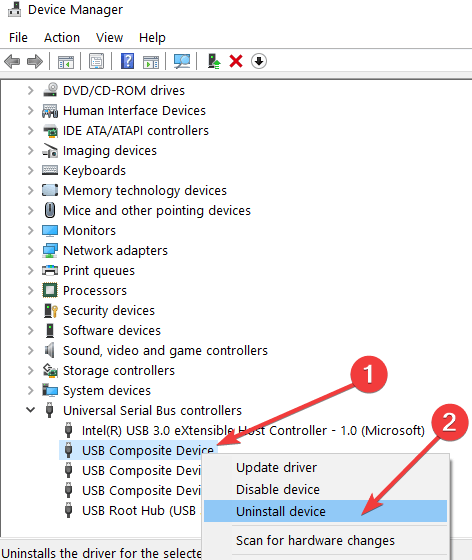
The last step in solving this issue would be to check your USB drivers using the Device Manager. To fix your issue, you will have to see if the drivers are operating properly or not. Here’s how to do it:
- Go to the Start Menu, type in Device Manager and open it up.
- Expand the Universal Serial Bus controllers list.
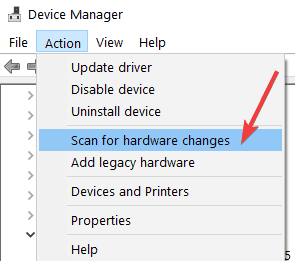
- Check if there’s an entry with a yellow exclamation mark. If there is, right-click on it and select ‘Update Driver Software’.
- If there’s no exclamation mark, uninstall the driver and restart your system so that it can be installed again automatically. Uninstalling USB Driver
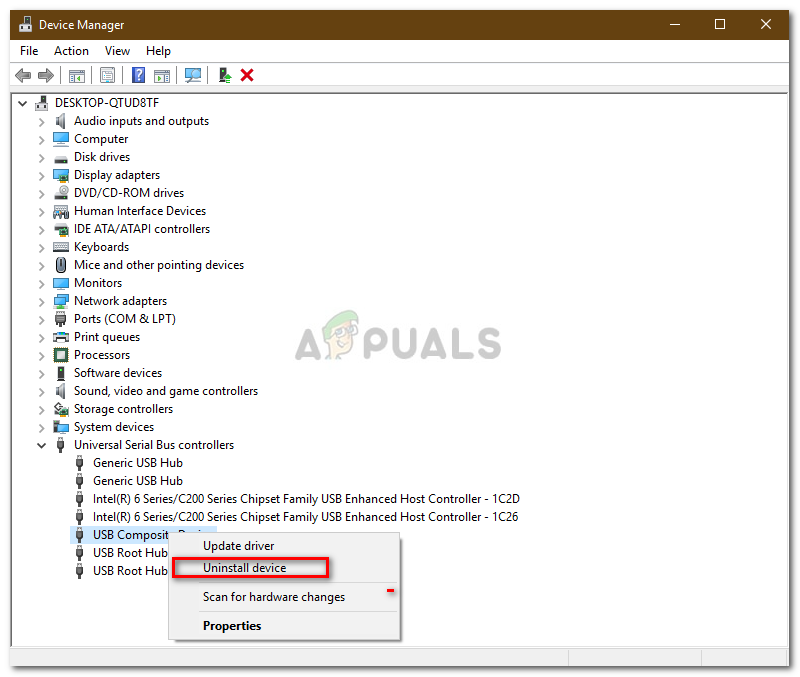 Uninstalling USB Driver
How to eject USB devices from Windows 10 without any worries

Making sure your folders with music, films, and other kinds of data are saved properly on your storage device (USB) is really an important thing to do before removing the USB. So, if you are trying to properly remove the USB hardware on Windows 10, 8.1 and you have trouble doing so, you will see exactly how to access this feature by reading the short tutorial below.  On the older versions of Windows, ejecting the USB drive from the “Safely remove Hardware “shortcut was usually easy to find. Well, since Microsoft introduced us to Windows 10, 8 and Windows 8.1 operating system, a lot of people seem to be having problems finding this icon and using it properly. I will show you exactly how to properly eject the usb drive in a few short steps.
How to eject USB from Windows 10
1. Create a Safely Remove Hardware shortcut
The idea of the steps explained below is to first create a shortcut of your”Safely Remove Hardware” if it is not already on your taskbar and properly eject the USB storage device.
1. Let’s press the “Window + D” buttons on your keyboard in order to see the Windows desktop.
2. Right click on a free space on the desktop and select “New” from the tab that appears by left clicking on it.
3. Now after the “New” tab is opened we need to select “Shortcut” by left clicking on it.
4. We need to copy and paste the command:
RunDll32.exe shell32.dll,Control_RunDLL hotplug.dll in the space where it says “Type the location of the item”
5. Press “Next” button on the lower side of the Shortcut window.
6. Press “Finish” button on the lower side of the Shortcut window.
7. As a shortcut name we can use “Remove Hardware” or any name you find more appropriate.
8. Ok, now that you have the shortcut on the desktop, before you unplug the USB you need to double click (left click) the “Remove Hardware” icon and select the USB you want to remove by left clicking on it.
9. Now select “Stop” on the lower side of the “Safely Remove hardware “window you opened.
10. Windows will notify you with a message when it will be safe to remove the USB hardware from your computer.
2. Use Windows Explorer
First, make sure that your USB hardware is not running any operation (copying or syncing) and then enable the Safely Remove Hardware icon from Taskbar settings:
- To enable the Safely Remove Hardware icon > right-click on the taskbar > select Taskbar settings
- Scroll down to Notification Area > Select which icons appear on the taskbar
- Go to Windows Explorer: Safely Remove Hardware and Eject Media > turn it on.
Of course, if the Safely Remote Hardware icon is already available on your taskbar, you can quickly eject your USB hardware by selecting the icon, then select the hardware you want to remove and confirm your choice.
That is all, this is how you can safely remove your USB storage device on Windows 10, 8.1.If you have any other thoughts don t hesitate to write below.
RELATED STORIES TO CHECK OUT:
FIX: Can’t Eject USB Drive in Windows 10

SOLVED: Problem ejecting USB mass storage device
- Check your USB ports
- Update USB drivers
- Check Bluetooth Support Service settings
- Make sure no USB file is in use
- Scan your computer
- Run the Hardware and Devices Troubleshooter
Even if the Windows 10, Windows 8.1 update fixes a lot of bugs and glitches that were present in previous Windows versions, there are still plenty remaining. We try to solve a problem with USB drives which can’t be ejected in Windows 10 and Windows 8.1. 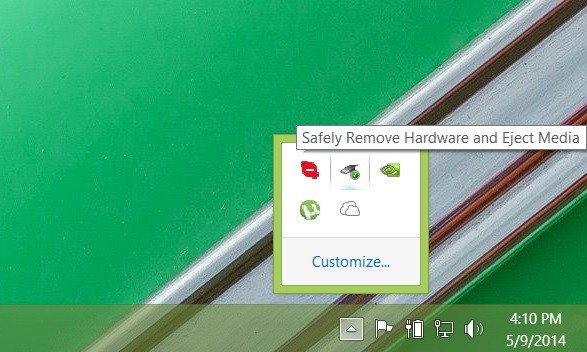 A few Windows 10, Windows 8.1 users have been complaining that they can’t eject USB drives from the ‘Safely Remove Hardware and Eject Media icon’ which usually pops out on the low right corner when you plug in a USB drive, just as in the above image. This is quite a problem, since if you have important data on your device, you want to make sure that it doesn’t get lost. Here is the complaint of one of those suffering from this:
Hi, my partner’s laptop was just upgraded to Win 8.1. Most things seem okay after the upgrade (thank you for the Start/Windows button…), but where before clicking on the ‘Safely Remove Hardware and Eject Media’ icon in the Taskbar showed any USB drives attached to be ejected, the name of the drive is there but is now greyed out and can’t be clicked on. I’ve tried this with several USB stick drives and it’s the same for each of them. I can open My Computer/This PC and eject the drive there, although the some of the icons there are strangely flickering which makes it difficult to right-click and eject the device.
Solutions for USB ejecting problems in Windows 10
1. Check your USB ports
This might seem as a silly, if not stupid advice, but in my case, this was exactly the problem – make sure that your USB port is clean and that there’s no dust inside it, or even worse, that it is not damaged. There might be some faulty circuitry which won’t get fixed if you solve this via software.
2. Update USB drivers
Go to Device Manager and from there pick Universal Serial Bus controllers. The first thing that you can do is scan for hardware changes right after you plug in your USB drive, so that you could force it to “recognize” it better.
If you see an exclamation market, then reinstall the drivers. Even if there isn’t one, then uninstall and install again the drivers for the affected device, as shown in the screenshot below.
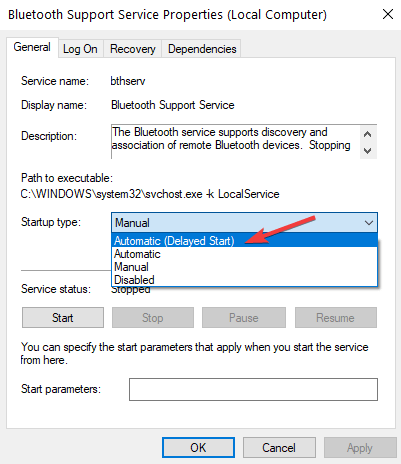
3. Check Bluetooth Support Service settings
Type Services.msc into the run command, look for Bluetooth Support Service, double-click to open its Properties window and then make sure Startup type is NOT set to Disabled. You should set it to Automatic (Delayed Start); and click Apply after that.
4. Make sure no USB file is in use
Your computer won’t eject USB drives if there is any file, folder or app in use. Make sure there is no file or program running from the USB flash drive. Also, make sure that your antivirus is not currently scanning your USB device for malware and virus infections as this may also prevent you from removing the USB device.


