- How to open and change Printer settings in Windows 10
- Open & change Printer settings in Windows 10
- Set Default Printer in Windows 10
- Set the Default Printer using the Control Panel
- About Sergey Tkachenko
- Default Printer keeps changing in Windows 10
- Default Printer keeps changing
- Set your default printer in Windows 10
- Use Registry to set the default printer
- Как установить принтер по умолчанию в Windows 10
- Разрешить Windows управлять принтером по умолчанию
- Установить принтер по умолчанию в параметрах
- Установить принтер по умолчанию в панели управления
- Установить принтер по умолчанию в командной строке
- Full Fix: Default printer keeps changing in Windows 10
- Default printer keeps changing on Windows 10, how to fix it?
- Solution 1 – Turn off the option Let Windows manage your default printer
- Solution 2 – Change the printer settings from the Registry Editor
- Solution 3 – Uninstall the printer software for all printers
- Solution 4 – Remove old printer connections from your registry
- Solution 5 – Check your USB and power cable
- Solution 6 – Set the default printer manually
- Solution 7 – Install the latest updates
- Solution 8 – Create a new user account
- Solution 9 – Perform a System Restore
How to open and change Printer settings in Windows 10
Whether you’re printing a single document or multiple documents from a program on Windows 10, you will have to configure the print settings first. The Printer Settings page in Windows 10 allows you to configure different options like the paper size, the page orientation, and the page margins.
Open & change Printer settings in Windows 10
Following a quick setup, you can start printing immediately. However, you might need to configure a few printer settings. You can even set the default printer here. So, here’s how to open the Printers settings page in Windows 10 and change the settings:
- Type ‘Printers’ in the Windows 10 Search bar
- Select ‘Printers & Scanners’ options
- Right-click the printer icon and choose ‘Printing Preferences’.
- The Printer Settings page will open.
Let us see this in more detail.
Type ‘Printers’ in the Windows 10 Search bar and select ‘Printers & Scanners’ options
See if your printer is listed under ‘Printers & Scanners’ menu.
When seen, right-click the printer icon and choose ‘Printing Preferences’.
Instantly, you’ll get access to the Printer Settings page.
Thus, this way you can open the Printer Settings page in Windows 10.
Here, you can change/modify the Page Size, Paper Layout, and other Printer Settings.
Do note that the names of the tabs and settings may differ, depending on your printer model and driver versions.
You can also access the Printer settings via some applications. Let us take the example of Microsoft Word.
Open Microsoft Word or any other Office application.
Click ‘File’ menu (located in the upper-left corner) and choose ‘Print’ from the list of options displayed.
Adjacent to the option, you’ll find ‘Printer Properties’ link. Click the link to open the Printer Settings page.
The first method lets you set the the default printer and allows defining printer settings for all print jobs, while accessing Printer Settings via an app for single print jobs. We have listed both methods since when you print a document, it’s paper size, page orientation, or page margins differ from what you specified in the printer driver properties.
Read next: How to turn off Let Windows manage my default printer setting.
Set Default Printer in Windows 10
A default printer is the one to which all documents are sent by default for printing. Due to constant changes to the user interface in Windows 10, many novice users may have issues changing the default printer. Here is how it can be done.
As you may already know, Microsoft has implemented a new behavior for printers in Windows 10. Starting in Build 10565, Windows 10 changes the default printer to the last used one automatically. While this can be useful for some users, many others might prefer to set the default printer manually.
Here is how it can be done.
To set the default printer in Windows 10, do the following.
- Open the Settings app.
- Navigate to the following page: Settings -> Devices -> Printers and Scanners.
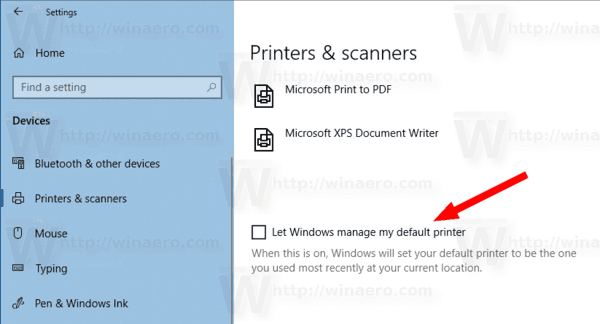
- See the option named «Let Windows manage my default printer». Turn it off as shown below.

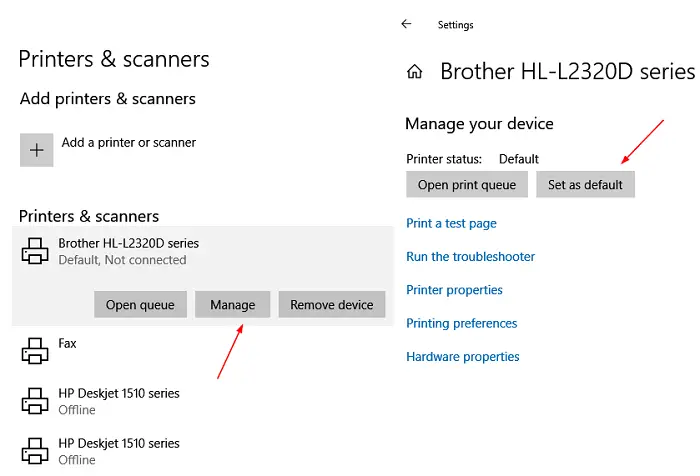
- Now, select the desired printer in the list.
- Click on the ‘Manage‘ button.
- On the next page, click on the ‘Set default‘ button.

The selected printer is now your default printer. Also, Windows 10 will not change your default printer every time you select some other printer in the print dialog.
Alternatively, you can use the classic Control Panel app to set your default printer in Windows 10.
Set the Default Printer using the Control Panel
- Open the classic Control Panel app.
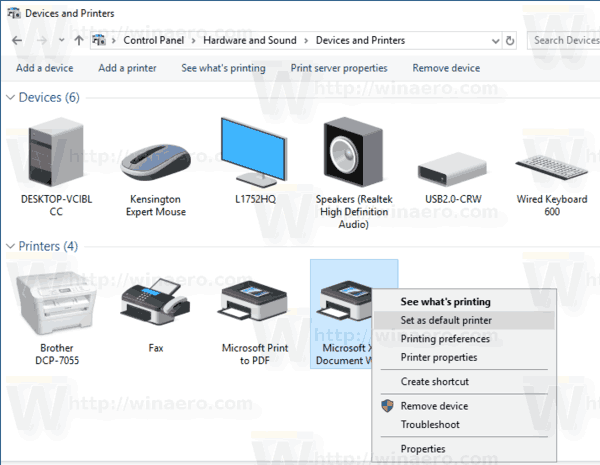
- Go to Hardware and Sound \ Devices and Printers.
- Under Printers, right-click on the desired printer.
- Select Set as default printer from the context menu.
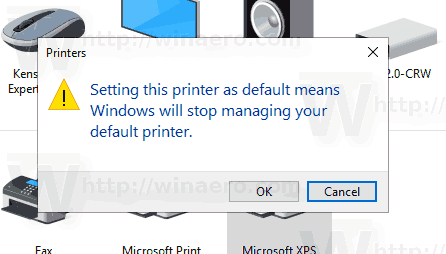
- If you have the Let Windows manage my default printer option enabled, you will need to confirm the operation and disable the feature.
The printer will now be set as your default printer.
Tip: If you have a local or network printer connected to your Windows 10 PC, you may need to open its queue or printing status window occasionally to remove print jobs which have got stuck or pause printing. You can create a special shortcut with a rundll32 command which will allow you to access the printing queue directly with one click. See the article:
Other articles of interest:
Winaero greatly relies on your support. You can help the site keep bringing you interesting and useful content and software by using these options:
Share this post
About Sergey Tkachenko
Sergey Tkachenko is a software developer from Russia who started Winaero back in 2011. On this blog, Sergey is writing about everything connected to Microsoft, Windows and popular software. Follow him on Telegram, Twitter, and YouTube.
Default Printer keeps changing in Windows 10
Microsoft has removed the Network Location aware feature for Printers in Windows 10 and changed its behavior. Windows 10 now sets the last selected printer as the default printer. This can get irritating at times. If you are looking for a way to stop Windows 10 from changing your default printer, you can use Windows 10 Settings app or edit the Windows Registry.
Default Printer keeps changing
From the WinX Menu, open Settings > Devices > Printers & scanners.
Scroll down a bit till you see a setting Let Windows manage my default printer.
When this setting is turned On, the default printer is the last used printer.
Toggle the switch to the Off position.
Set your default printer in Windows 10
Now go set your default printer. You will see the entire list of printers a little above this setting.
Select the printer and click Manage > Set as default button.
Windows 10 will not change it again, even if you use another printer.
Use Registry to set the default printer
If for some reason this does not help you, edit your Registry and see.
Run regedit and navigate to the following key:
Change the value of LegacyDefaultPrinterMode from the default 0 to 1.
Having done this, set your default printer again.
Hope this helps.
See this post if you find that the Printer icon is not showing in your Desktop, Control Panel, Devices, and Printers.
Как установить принтер по умолчанию в Windows 10
Всё, что вы отправляете на печать печатается на принтере выбранном по умолчанию в вашей системе. Когда на вашем устройстве установлено множество принтеров, вы можете каждый раз при печати выбирать нужный, а также можете выбрать тот на который по умолчанию будет печататься всё. В сегодняшней статье рассмотрим как установить принтер по умолчанию в Windows 10.
Разрешить Windows управлять принтером по умолчанию
Если включить данную функцию, Windows установит по умолчанию тот принтер, который использовался последним в текущей сети. То есть, даже если вы постоянно пользуетесь одним принтером, отправили разово печать на другой принтер – он сразу же устанавливается по умолчанию, и чтобы вернуться к предыдущему – нужно выбрать его из списка при следующей печати.
1. Откройте меню “Пуск”, зайдите в “Параметры”.

2. Зайдите в “Устройства”, с левой стороны выберите “Принтеры и сканеры”, с правой стороны поставьте галочку “Разрешить Windows управлять принтером, используемым по умолчанию”.

Установить принтер по умолчанию в параметрах
1. Откройте меню “Пуск”, зайдите в “Параметры”.
2. Зайдите в “Устройства”, с левой стороны выберите “Принтеры и сканеры, с правой стороны уберите галочку возле “Разрешить Windows управлять принтером, используемым по умолчанию”. Нажмите на принтер, который вы хотите выбрать по умолчанию, в появившемся меню выберите “Управление”.

3. Нажмите на “Использовать по умолчанию”.

Выбранный вами принтер установлен по умолчанию, закройте окно с настройками.

Установить принтер по умолчанию в панели управления
1.Откройте “Панель управления” : один из способов – в строке поиска или в меню “Выполнить” (выполнить вызывается клавишами Win+R) введите control и нажмите клавишу Enter.

2. Зайдите в “Устройства и принтеры”.

3. Нажмите правой клавишей мыши на принтер, который вы хотите выбрать по умолчанию, и выберите из открывшегося меню “Использовать по умолчанию”.

4. В некоторых случаях может высветить окно “Установить этот принтер в качестве принтера по умолчанию означает, что Windows прекратит управление вашим принтером по умолчанию”, нажмите на “ОК”.

Установить принтер по умолчанию в командной строке
1.Откройте командную строку : один из способов – нажмите на меню “Пуск” правой клавишей мыши и выберите “Командная строка (Администратор)”.

2. Введите команду wmic printer get name,default и нажмите клавишу Enter. Запомните имя принтера, которого вы хотите установить по умолчанию.

3. Введите команду wmic printer where name=” имя принтера ” call setdefaultprinter (замените выделенное красным на имя, которое вы узнали во втором пункте). К примеру, я хочу установить принтером по умолчанию Canon 4400, нужно ввести команду wmic printer where name=”Canon 4400″ call setdefaultprinter и нажать клавишу Enter.

На сегодня всё, если вы знаете другие способы – пишите в комментариях! Счастья Вам 🙂
Full Fix: Default printer keeps changing in Windows 10

When you use more than one printer, it is extremely annoying when the default printer keeps changing all the time. Before hitting the print button, you always have to check which is the current printer available, so that you don’t use the wrong printer.
Here’s how Windows 10 users describe this issue:
My default printer keeps changing to my last used printer and not the one that I set as my default.
Does any one have any ideas of how to sort this issue?
If you want to prevent your default printer from changing, you can use one of the workarounds listed below.
Default printer keeps changing on Windows 10, how to fix it?
If the default printer keeps changing on your PC, that can be a minor but annoying issue. Speaking of printer problems, here are some issues that users reported:
- Default printer keeps changing Windows 7, 8.1, 10 – This issue can appear on any version of Windows, but even if you don’t use Windows 10, you should be able to use most of our solutions.
- Windows 7 default printer keeps changing to Adobe PDF – If this problem happens on your PC, you just need to set your default printer and the issue should be resolved.
- Default printer keeps changing randomly, after reboot, log off – According to users, their default printer keeps switching after reboot. This can be caused by your drivers, so be sure to update them.
- Default printer keeps switching, reverting back – Sometimes this issue can occur due to certain system bugs. However, you should be able to fix that by installing the latest updates.
Solution 1 – Turn off the option Let Windows manage your default printer
By default, Windows 10 automatically manages your default printer. If your default printer keeps changing, you might want to prevent Windows from managing your default printer. To do that, just follow these steps:
- Go to Settings > click on the Devices icon.
- Click on Printers & scanners on the left side > turn off Let Windows manage my default printer.

Many Windows 10 criticized Microsoft for adding such a feature. They suggested that a drop-down menu would have been much more useful, as it would have easily allowed them to select the printer of their choice.
Solution 2 – Change the printer settings from the Registry Editor
If your default printer keeps changing, the issue might be related to your registry. However, you can fix the problem simply by making a couple of changes in Registry Editor. To do that, just follow these steps:
- Press the Windows key + R > type regedit
- Go to HKEY_CURRENT_USERSOFTWAREMicrosoftWindows NTCurrentVersionWindows.
- Select LegacyDefaultPrinterMode > set the value to 1.
Solution 3 – Uninstall the printer software for all printers
If the two solutions listed above don’t work, uninstall the printers‘ drivers and install the latest driver versions again. To uninstall the printer driver, you need to do the following:
- Press Windows Key + X to open Win + X menu. Now choose Device Manager from the list of results.
- Locate your printer driver, right-click it and choose Uninstall device from the menu. If you can’t find your printer, make sure that you reveal hidden devices.
- When the confirmation dialog appears, select Delete driver software for this device and then click Uninstall.
After doing that, restart your PC, and the default driver will be installed again. If the default driver doesn’t work, your next step would be to install the latest printer driver.
To do that, you just need to visit your printer manufacturer’s website and find the latest drivers for your model. After downloading and installing the latest driver, check if the problem is resolved.
If you’re having trouble finding the appropriate driver, you can always use third-party tools such as TweakBit Driver Updater to automatically download the missing drivers.
Solution 4 – Remove old printer connections from your registry
If you used multiple printers with your PC, it’s possible that some old entries are still in your registry. If your default printer keeps changing, the old entries in your registry might be the problem. However, you can fix the issue simply by removing the problematic entries from your registry.
To fix the problem, you just need to do the following:
- Start Registry Editor.
- Go to the HKEY_USERSUSERS_SID_HEREPrintersConnections key in the left pane. Be sure to select your own user SID. Usually, your SID is the one that’s the longest, so be sure to select it.
- You should see some old printer connections. Delete them all.
- Now go to HKEY_USERSUSERS_SID_HEREPrintersSettings key and delete the old printer settings from there.
Once you remove them, check if the problem with your default printer is resolved.
Solution 5 – Check your USB and power cable
In some rare cases, the issues with the default printer can occur due to problems with cables. If the default printer keeps changing on your PC, be sure to check if your cables are working properly. Sometimes your power or USB cable might be broken, and that can lead to this and many other problems.
Carefully inspect the cables and make sure that your printer is constantly connected to your PC. If you lose a connection even for a moment, Windows will change the default printer automatically. In case your cables are damaged, replace them and check if that solves your problem.
Solution 6 – Set the default printer manually
According to users, if the default printer keeps changing, you might be able to fix the problem by manually setting the default printer. To do that, you just need to follow these steps:
- Press Windows Key + S and enter control panel. Choose Control Panel from the list of results.
- Navigate to Devices and Printers.
- Select the printer you want to use as default, right-click it and choose Set as default printer from the menu.
Solution 7 – Install the latest updates
If the default printer keeps changing on your PC, the issue might be caused by certain bugs on your system. The best way to fix this problem is to install the latest Windows updates. Microsoft is constantly fixing bugs and releasing new updates, so if you’re having problems with your printer, we advise you to update your system.
By default, Windows 10 usually installs the missing updates automatically, but sometimes you might miss an update or two. However, you can check for updates manually by doing the following:
- Press Windows Key + I to open the Settings app.
- Now go to the Update & Security section.
- Click Check for updates button.
If any updates are available, Windows will download them automatically in the background. Once the updates are downloaded, just restart your PC to install them.
Once your system is up to date, check if the problem with the default printer is still there.
Solution 8 – Create a new user account
If you’re having issues with your printer, you might be able to fix the problem by creating a new user account. To do that, you just need to follow these steps:
- Open the Settings app and navigate to the Accounts section.
- Now navigate to the Family & other people section and choose Add someone else to this PC.
- Select I don’t have this person’s sign-in information.
- Now select Add a user without a Microsoft account.
- Enter the desired username and click Next.
After creating a new user account, switch to it and check if the problem is still there. If the issue doesn’t appear on the new account, you need to move your personal files to it and start using it instead of your old account.
Solution 9 – Perform a System Restore
If the default printer keeps changing on your PC, the problem might be caused by a recent update or change on your system. However, you can fix the problem by performing a System Restore. To do that, follow these steps:
- Press Windows Key + S and enter system restore. Choose to Create a restore point option from the menu.
- Now click System Restore button.
- When System Restore window opens, click Next.
- Check Show more restore points option if available, select the desired restore point and click Next.
- Follow the instructions on the screen to complete the restoration process.
Once your system is restored, check if the problem is still there.
RELATED STORIES YOU NEED TO CHECK OUT:


