- Как переключаться между TTY без использования функциональных клавиш в Linux
- Переключение между TTY в Linux
- chvt описание
- unixforum.org
- [Решено]Как избавится от tty1 при запуске системы? (Ubuntu 9.10)
- [Решено]Как избавится от tty1 при запуске системы?
- Re: [Решено]Как избавится от tty1 при запуске системы?
- Re: [Решено]Как избавится от tty1 при запуске системы?
- Re: [Решено]Как избавится от tty1 при запуске системы?
- Re: [Решено]Как избавится от tty1 при запуске системы?
- Re: [Решено]Как избавится от tty1 при запуске системы?
- Re: [Решено]Как избавится от tty1 при запуске системы?
- Re: [Решено]Как избавится от tty1 при запуске системы?
- Re: [Решено]Как избавится от tty1 при запуске системы?
- установка debian
- Виртуальные консоли GNU/Linux и с чем их едят
- Рекомендуемый контент
- ChapterВ 1.В GNU/Linux tutorials
- 1.1.В Console basics
- 1.1.1.В The shell prompt
- 1.1.2.В The shell prompt under GUI
- 1.1.3.В The root account
- 1.1.4.В The root shell prompt
- 1.1.5.В GUI system administration tools
- 1.1.6.В Virtual consoles
- 1.1.7.В How to leave the command prompt
- 1.1.8.В How to shutdown the system
- 1.1.9.В Recovering a sane console
- 1.1.10.В Additional package suggestions for the newbie
- 1.1.11.В An extra user account
- 1.1.12.В sudo configuration
- 1.1.13.В Play time
- 1.2.В Unix-like filesystem
- 1.2.1.В Unix file basics
- 1.2.2.В Filesystem internals
- 1.2.3.В Filesystem permissions
- 1.2.4.В Control of permissions for newly created files: umask
- 1.2.5.В Permissions for groups of users (group)
- 1.2.6.В Timestamps
- 1.2.7.В Links
- 1.2.8.В Named pipes (FIFOs)
- 1.2.9.В Sockets
- 1.2.10.В Device files
- 1.2.11.В Special device files
- 1.2.12.В procfs and sysfs
- 1.2.13.В tmpfs
- 1.3.В Midnight Commander (MC)
- 1.3.1.В Customization of MC
- 1.3.2.В Starting MC
- 1.3.3.В File manager in MC
- 1.3.4.В Command-line tricks in MC
- 1.3.5.В The internal editor in MC
- 1.3.6.В The internal viewer in MC
- 1.3.7.В Auto-start features of MC
- 1.3.8.В FTP virtual filesystem of MC
- 1.4.В The basic Unix-like work environment
- 1.4.1.В The login shell
- 1.4.2.В Customizing bash
- 1.4.3.В Special key strokes
- 1.4.4.В Mouse operations
- 1.4.5.В The pager
- 1.4.6.В The text editor
- 1.4.7.В Setting a default text editor
- 1.4.8.В Using vim
- 1.4.9.В Recording the shell activities
- 1.4.10.В Basic Unix commands
- 1.5.В The simple shell command
Как переключаться между TTY без использования функциональных клавиш в Linux

В этом кратком руководстве описывается, как переключаться между TTY без функциональных клавиш в Unix-подобных операционных системах.
Прежде чем идти дальше, мы посмотрим, что такое TTY.
Как упоминалось в ответе на форуме AskUbuntu, слово TTY появилось из TeleTYpewriter.
Еще в ранние дни Unix пользовательские терминалы, подключенные к компьютерам, были электромеханическими телепринтерами или телетайпами (tty вкратце).
С тех пор имя TTY продолжает использоваться для консолей с текстом. В настоящее время все текстовые консоли представляют собой виртуальные консоли, а не физические консоли. Команда TTY печатает имя файла терминала, подключенного к стандартному входу.
Переключение между TTY в Linux
По умолчанию в Linux есть 7 tty.
Они известны как tty1, tty2 … .. tty7.
От 1 до 6 tty – только командная строка.
7th tty – графический интерфейс (ваш рабочий стол X).
Вы можете переключаться между различными TTY, используя клавиши CTRL + ALT + Fn.
Например, чтобы переключиться на tty1, мы набираем CTRL + ALT + F1.
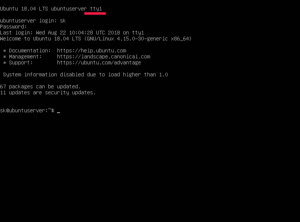
Вот как выглядит tty1 на сервере Ubuntu 18.04 LTS.
Если ваша система не имеет сеанса X, просто введите Alt + Fn. Вам не нужно использовать CTRL.
В некоторых версиях Linux (например, с Ubuntu 17.10 и далее) на экране входа в систему теперь используется виртуальная консоль 1.
Таким образом, вам нужно нажать CTRL + ALT + F3 до CTRL + ALT + F6 для доступа к виртуальным консолям.
Чтобы вернуться в среду рабочего стола, нажмите CTRL + ALT + F2 или CTRL + ALT + F7 на Ubuntu 17.10 и более поздних версиях.
До сих пор мы видели, что мы можем легко переключаться между TTY, используя CTRL + ALT + Function_Key (F1-F7).
Однако, если вы не хотите использовать клавиши функций по какой-либо причине, в Linux есть простая команда с именем chvt.
chvt описание
Команда «chvt N» позволяет вам переключиться на терминал N переднего плана, так же, как нажать CTRL + ALT + Fn.
Соответствующий экран создается, если он еще не существует.
Посмотрим, напечатаем ли система текущий tty:
Пример вывода с моего сервера Ubuntu 18.04 LTS.
Теперь перейдем к tty2. Для этого введите:
Помните, что вам нужно использовать «sudo» с командой chvt.
Теперь проверьте текущий tty с помощью команды:
Вы увидите, что tty теперь изменился.
Аналогичным образом, вы можете переключиться на tty3, используя «sudo chvt 3», tty4, используя «sudo chvt 4» и так далее.
Команда Chvt может быть полезна, когда какая-либо из ваших функциональных клавиш не работает.
Чтобы просмотреть общее количество активных виртуальных консолей, запустите:
Как вы можете видеть, в моей системе есть два активных VT.
Вы можете увидеть следующий нераспределенный виртуальный терминал, используя команду:
Виртуальная консоль не используется, если она не является консолью переднего плана, и никакой процесс не открывается для чтения или записи, и на ее экране не было выделено текста.
Чтобы избавиться от неиспользуемых VT, просто введите:
Вышеупомянутая команда освобождает память ядра и структуры данных для всех неиспользуемых виртуальных консолей.
Чтобы сказать проще, эта команда освободит все ресурсы, связанные с неиспользуемыми виртуальными консолями.
Для получения дополнительной информации см. Справочные страницы соответствующей команды.
Источник
unixforum.org
Форум для пользователей UNIX-подобных систем
- Темы без ответов
- Активные темы
- Поиск
- Статус форума
[Решено]Как избавится от tty1 при запуске системы? (Ubuntu 9.10)

[Решено]Как избавится от tty1 при запуске системы?
Сообщение ridost » 05.02.2010 15:33

Re: [Решено]Как избавится от tty1 при запуске системы?
Сообщение GreatPAVEL » 05.02.2010 18:11
Re: [Решено]Как избавится от tty1 при запуске системы?
Сообщение ridost » 05.02.2010 20:37
Re: [Решено]Как избавится от tty1 при запуске системы?
Сообщение blackdevil » 05.02.2010 21:21

x86 Контактная информация:
Re: [Решено]Как избавится от tty1 при запуске системы?
Сообщение megabaks » 06.02.2010 07:07
Re: [Решено]Как избавится от tty1 при запуске системы?
Сообщение ridost » 08.02.2010 16:04
Стоит этот пакет. Его переустановил и usplash, помогло, консоль пропала и грузится стал намного быстрее. Читал, что можно xsplash удалить, тогда загрузка будет моментальной. Как это сделать, в synaptic при попытке удалить, тащит за собой ubuntu-desktop и мне кажется, если удалю это, то всему крах. Подскажите как удалить правильно?

Re: [Решено]Как избавится от tty1 при запуске системы?
Сообщение Bizdelnick » 08.02.2010 16:11
| в консол и вку́пе (с чем-либо) в общем в ообще | в течени е (часа) нович ок нюанс п о умолчанию | приемл емо пробле ма проб овать тра фик |
Re: [Решено]Как избавится от tty1 при запуске системы?
Сообщение blackdevil » 08.02.2010 16:11
Re: [Решено]Как избавится от tty1 при запуске системы?
Сообщение ridost » 08.02.2010 16:46
Первое — можно ли это сделать какой нибудь графической программой ( в консоли не силен)?
Второе — у меня usplash и xsplash, вроде как отвечают за похожие действия, может кто лишний?
Источник
установка debian
Здравствуйте. Подскажите, установил Debian Linux. Инсталяция прошла успешно, далее идет загрузка и
Debian GNU/Linux 5.0 debian tty1
Установка Debian. VDS
Здравствуйте форумчане. Столкнулся с проблемой, которую, к сожалению, не могу решить, даже прибегая.
Установка Debian 9 из консоли
Здравствуйте. Нет возможности установить Debian через графический режим. Только через консоль. А.
 Установка VirtualBox в Debian
Не получается установить VirtualBox в Debian’е: root@debian:/home/user# aptitude install.
Установка Debian 6.0.6 i386
всем доброго времени суток. Столкнулся с такой проблемой : При установке с DVD Debian 6.0.6.
учтите, в линуксе регистр букв имеет значение, тоесть иван и Иван — это разные вещи.
с другой стороны, если пароли позабывали, загрузитесь в однопользовательском режиме. Вы должны автоматом войти в систему рутом (администратором — root). графики не будет, вы будете в консоли. Чтобы «вспомнить» какой логин у вашего пользователя введите в консоли две команды:
cd /home
ls
в ответ на вторую система выдаст имена папок пользователей в папке home. Одна (или же вообще единственная) из них — ваша. Ее имя и есть ваш логин. Если вы не помните пароль, то продолжая находится в этой же консоли введите следующее
passwd ваш_логин
(где вместо » ваш логин » подставляете тот самый логин (имя папки) который определили ранее). В ответ на запрос дважды вводите один и тот же пароль. Не забываете его в этот раз. Перезагружаетесь в обычный режим.
Источник
Виртуальные консоли GNU/Linux и с чем их едят
В опереционных системах GNU/Linux, текстовый терминал с приглашением входа в UNIX-оболочку обычно обеспечивают первые шесть виртуальных консолей, переключится из X сессии (GUI) на которые можно комбинацией Ctrl + Alt + F1-6.
Использование виртуальных консолей в данной статье описано на примере ОС Debian Linux, но также может быть аналогичным и в иных сборках GNU/Linux (к примеру убунту, торбунту, ёбунту, ябунту, йобунту етс.).
Первые шесть виртуальных консолей работают как терминал с приглашением ввода логина и пароля. Проверить количество виртуальных консолей можно командой:
Выход из текстового терминала (консоли) осуществляется комбинацией Ctrl + Alt + F7 . tty7 по сути также является виртуальным терминалом, который по умолчанию всегда выделен под графическую среду (Xorg, etc.).
Переключение между виртуальными консолями выполняется комбинацией Alt + LeftArrow или Alt + RightArrow .
Виртуальные консоли выше 7-го также существуют, но для них по умолчанию не предусмотрено ни текстового терминала, ни графического (Xorg, etc.), поэтому нажав Ctrl + Alt + F8-12 мы получим просто пустой чёрный экран.
Но если мы выполним:
После нажмём Ctrl + Alt + 12 , то это приведет вас к tty12 , который будет иметь экран входа и теперь может использоваться как терминал.
Контролировать число виртуальных терминалов (консолей) можно в файле /etc/inittab , где можно как добавить, так и удалить терминал. Если нужно удалить терминал, тогда просто поставьте символ комментария перед строкой запуска терминала, который нужно отключить, но только не перед первым (1). Сохраняйте как минимум один активный терминал.
Под занавес стоит упомянуть файл /etc/securetty , в котором перечислены терминальные устройства (TTY) с которых суперпользователю root разрешено входить в систему. Содержимое /etc/securetty по-умолчанию:
Если мы хотим напрочь запретить пользователю root локальный вход, тогда просто нужно очистить (не удалить!) файл /etc/securetty :
Если /etc/securetty отсутствует, тогда вход пользователю root разрешён со всех локальных терминалов, если он пуст, то запрещено соответствено включая single-user mode. По-этому, дабы иметь возможность конектиться в «single-user mode» нужно оставить tty1 (vc/1) как минимум (Linux Annoyances for Geeks: Getting the Most Flexible System in the World).
Как упоминалось ранее, работа X-ов припадает на слот tty7 , и это не изменится, даже если Вы уменьшите количество рабочих терминалов.
Раз уж зашла речь о правах входа в систему супер пользователя root, то заодно отредактируем и файл /etc/ssh/sshd_config , где строку » PermitRootLogin yes » изменим на » PermitRootLogin no «, чем запретим пользователю root удалённое подключение с помощью ssh.
/etc/login.defs — ещё один файл, на который возможно стоит обратить внимание.
Для того чтобы повысить выживаемость в консоли Debian Linux рекомендуется ознакомится с материалами по ссылкам ниже.
Рекомендуемый контент
А тут же ж мог быть рекомендуемый контент от гугла 🙂 Для отображения рекомендуемого контента необходимо в браузере разрешить выполнение JavaScript скриптов, включая скрипты с доменов googlesyndication.com и doubleclick.net
Вы не любите рекламу!? Напрасно!:) На нашем сайте она вовсе ненавязчивая, а потому для нашего сайта можете полностью отключить AdBlock (uBlock/uBlock Origin/NoScript) и прочие блокировщики рекламы! AdBlock/uBlock может препятствовать нормальной работе системы поиска по сайту, отображению рекомендуемого контента и прочих сервисов Google. Рекомендуем полностью отключить блокировщик рекламы и скриптов, а также разрешить фреймы (aka iframe).
Источник
ChapterВ 1.В GNU/Linux tutorials
Table of Contents
I think learning a computer system is like learning a new foreign language. Although tutorial books and documentation are helpful, you have to practice it yourself. In order to help you get started smoothly, I elaborate a few basic points.
The powerful design of Debian GNU/Linux comes from the Unix operating system, i.e., a multiuser, multitasking operating system. You must learn to take advantage of the power of these features and similarities between Unix and GNU/Linux.
Don’t shy away from Unix oriented texts and don’t rely solely on GNU/Linux texts, as this robs you of much useful information.
If you have been using any Unix-like system for a while with command line tools, you probably know everything I explain here. Please use this as a reality check and refresher.
1.1.В Console basics
1.1.1.В The shell prompt
Upon starting the system, you are presented with the character based login screen if you did not install any GUI environment such as GNOME or KDE desktop system. Suppose your hostname is foo , the login prompt looks as follows.
If you installed a GUI environment, then you can still get to the character based login prompt by Ctrl-Alt-F3, and you can return to the GUI environment via Ctrl-Alt-F2 (see Section 1.1.6, “Virtual consoles” below for more).
At the login prompt, you type your username, e.g. penguin , and press the Enter-key, then type your password and press the Enter-key again.
Following the Unix tradition, the username and password of the Debian system are case sensitive. The username is usually chosen only from the lowercase. The first user account is usually created during the installation. Additional user accounts can be created with adduser (8) by root.
The system starts with the greeting message stored in » /etc/motd » (Message Of The Day) and presents a command prompt.
Now you are in the shell. The shell interprets your commands.
1.1.2.В The shell prompt under GUI
If you installed a GUI environment during the installation, you are presented with the graphical login screen upon starting your system. You type your username and your password to login to the non-privileged user account. Use tab to navigate between username and password, or use the primary click of the mouse.
You can gain the shell prompt under GUI environment by starting a x-terminal-emulator program such as gnome-terminal (1), rxvt (1) or xterm (1). Under the GNOME Desktop environment, press SUPER-key (Windows-key) and typing in «terminal» to the search prompt does the trick.
Under some other Desktop systems (like fluxbox ), there may be no obvious starting point for the menu. If this happens, just try (right) clicking the background of the desktop screen and hope for a menu to pop-up.
1.1.3.В The root account
The root account is also called superuser or privileged user. From this account, you can perform the following system administration tasks.
Read, write, and remove any files on the system irrespective of their file permissions
Set file ownership and permissions of any files on the system
Set the password of any non-privileged users on the system
Login to any accounts without their passwords
This unlimited power of root account requires you to be considerate and responsible when using it.
 | Warning | ||||||||||||||||||||||||||||||||||||||||||||||||||||||||||||||||||||||||||||||||||||||||||||||||||||||||||||||||||||||||||||||||||||||||||||||||||||||||||||||||||||||||||||||||||||||||||||||||||||||||||||||||||||||||||||||||||||||||||||||||||||||||||||||||||||||||||||||||||||||||||||||||||||||||||||||||||||||||||||||||||||||||||||||||||||||||||||||||||||||||||||||||||||||||||||||||||||||||||||||||||||||||||||||||||||||||||||||||||||||||||||||||||||||||||||||||||||||||||||||||||||||||||||||||
|---|---|---|---|---|---|---|---|---|---|---|---|---|---|---|---|---|---|---|---|---|---|---|---|---|---|---|---|---|---|---|---|---|---|---|---|---|---|---|---|---|---|---|---|---|---|---|---|---|---|---|---|---|---|---|---|---|---|---|---|---|---|---|---|---|---|---|---|---|---|---|---|---|---|---|---|---|---|---|---|---|---|---|---|---|---|---|---|---|---|---|---|---|---|---|---|---|---|---|---|---|---|---|---|---|---|---|---|---|---|---|---|---|---|---|---|---|---|---|---|---|---|---|---|---|---|---|---|---|---|---|---|---|---|---|---|---|---|---|---|---|---|---|---|---|---|---|---|---|---|---|---|---|---|---|---|---|---|---|---|---|---|---|---|---|---|---|---|---|---|---|---|---|---|---|---|---|---|---|---|---|---|---|---|---|---|---|---|---|---|---|---|---|---|---|---|---|---|---|---|---|---|---|---|---|---|---|---|---|---|---|---|---|---|---|---|---|---|---|---|---|---|---|---|---|---|---|---|---|---|---|---|---|---|---|---|---|---|---|---|---|---|---|---|---|---|---|---|---|---|---|---|---|---|---|---|---|---|---|---|---|---|---|---|---|---|---|---|---|---|---|---|---|---|---|---|---|---|---|---|---|---|---|---|---|---|---|---|---|---|---|---|---|---|---|---|---|---|---|---|---|---|---|---|---|---|---|---|---|---|---|---|---|---|---|---|---|---|---|---|---|---|---|---|---|---|---|---|---|---|---|---|---|---|---|---|---|---|---|---|---|---|---|---|---|---|---|---|---|---|---|---|---|---|---|---|---|---|---|---|---|---|---|---|---|---|---|---|---|---|---|---|---|---|---|---|---|---|---|---|---|---|---|---|---|---|---|---|---|---|---|---|---|---|---|---|---|---|---|---|---|---|---|---|---|---|---|---|---|---|---|---|---|---|---|---|---|---|---|---|---|---|---|---|---|---|---|---|---|---|---|---|---|---|---|---|---|---|---|---|---|---|---|---|---|---|---|---|---|---|---|---|---|---|---|---|---|---|---|---|---|---|---|---|---|---|---|---|---|---|---|---|---|---|---|---|---|---|---|---|---|---|---|---|---|---|---|---|---|---|---|---|---|---|---|---|---|---|
| | Warning | ||||||||||||||||||||||||||||||||||||||||||||||||||||||||||||||||||||||||||||||||||||||||||||||||||||||||||||||||||||||||||||||||||||||||||||||||||||||||||||||||||||||||||||||||||||||||||||||||||||||||||||||||||||||||||||||||||||||||||||||||||||||||||||||||||||||||||||||||||||||||||||||||||||||||||||||||||||||||||||||||||||||||||||||||||||||||||||||||||||||||||||||||||||||||||||||||||||||||||||||||||||||||||||||||||||||||||||||||||||||||||||||||||||||||||||||||||||||||||||||||||||||||||||||
|---|---|---|---|---|---|---|---|---|---|---|---|---|---|---|---|---|---|---|---|---|---|---|---|---|---|---|---|---|---|---|---|---|---|---|---|---|---|---|---|---|---|---|---|---|---|---|---|---|---|---|---|---|---|---|---|---|---|---|---|---|---|---|---|---|---|---|---|---|---|---|---|---|---|---|---|---|---|---|---|---|---|---|---|---|---|---|---|---|---|---|---|---|---|---|---|---|---|---|---|---|---|---|---|---|---|---|---|---|---|---|---|---|---|---|---|---|---|---|---|---|---|---|---|---|---|---|---|---|---|---|---|---|---|---|---|---|---|---|---|---|---|---|---|---|---|---|---|---|---|---|---|---|---|---|---|---|---|---|---|---|---|---|---|---|---|---|---|---|---|---|---|---|---|---|---|---|---|---|---|---|---|---|---|---|---|---|---|---|---|---|---|---|---|---|---|---|---|---|---|---|---|---|---|---|---|---|---|---|---|---|---|---|---|---|---|---|---|---|---|---|---|---|---|---|---|---|---|---|---|---|---|---|---|---|---|---|---|---|---|---|---|---|---|---|---|---|---|---|---|---|---|---|---|---|---|---|---|---|---|---|---|---|---|---|---|---|---|---|---|---|---|---|---|---|---|---|---|---|---|---|---|---|---|---|---|---|---|---|---|---|---|---|---|---|---|---|---|---|---|---|---|---|---|---|---|---|---|---|---|---|---|---|---|---|---|---|---|---|---|---|---|---|---|---|---|---|---|---|---|---|---|---|---|---|---|---|---|---|---|---|---|---|---|---|---|---|---|---|---|---|---|---|---|---|---|---|---|---|---|---|---|---|---|---|---|---|---|---|---|---|---|---|---|---|---|---|---|---|---|---|---|---|---|---|---|---|---|---|---|---|---|---|---|---|---|---|---|---|---|---|---|---|---|---|---|---|---|---|---|---|---|---|---|---|---|---|---|---|---|---|---|---|---|---|---|---|---|---|---|---|---|---|---|---|---|---|---|---|---|---|---|---|---|---|---|---|---|---|---|---|---|---|---|---|---|---|---|---|---|---|---|---|---|---|---|---|---|---|---|---|---|---|---|---|---|---|---|---|---|---|---|---|---|---|---|---|---|---|---|---|---|---|---|---|---|
| package | popcon | size | description |
|---|---|---|---|
| mc | V:55, I:234 | 1492 | A text-mode full-screen file manager |
| sudo | V:597, I:809 | 4589 | A program to allow limited root privileges to users |
| vim | V:102, I:404 | 3286 | Unix text editor Vi IMproved, a programmers text editor (standard version) |
| vim-tiny | V:57, I:969 | 1574 | Unix text editor Vi IMproved, a programmers text editor (compact version) |
| emacs-nox | V:4, I:19 | 18364 | GNU project Emacs, the Lisp based extensible text editor |
| w3m | V:25, I:252 | 2367 | Text-mode WWW browsers |
| gpm | V:11, I:16 | 540 | The Unix style cut-and-paste on the text console (daemon) |
It may be a good idea to read some informative documentations.
TableВ 1.2.В List of informative documentation packages
| package | popcon | size | description |
|---|---|---|---|
| doc-debian | I:850 | 166 | Debian Project documentation, (Debian FAQ) and other documents |
| debian-policy | I:29 | 4306 | Debian Policy Manual and related documents |
| developers-reference | I:6 | 1916 | Guidelines and information for Debian developers |
| debmake-doc | I:0 | 10989 | Guide for Debian Maintainers |
| debian-history | I:1 | 4285 | History of the Debian Project |
| debian-faq | I:846 | 817 | Debian FAQ |
You can install some of these packages by the following.
1.1.11.В An extra user account
If you do not want to use your main user account for the following training activities, you can create a training user account, e.g. fish by the following.
Answer all questions.
This creates a new account named as fish . After your practice, you can remove this user account and its home directory by the following.
1.1.12.В sudo configuration
For the typical single user workstation such as the desktop Debian system on the laptop PC, it is common to deploy simple configuration of sudo (8) as follows to let the non-privileged user, e.g. penguin , to gain administrative privilege just with his user password but without the root password.
Alternatively, it is also common to do as follows to let the non-privileged user, e.g. penguin , to gain administrative privilege without any password.
This trick should only be used for the single user workstation which you administer and where you are the only user.
| | Warning | ||||||||||||||||||||||||||||||||||||||||||||||||||||||||||||||||||||||||||||||||||||||||||||||||||||||||||||||||||||||||||||||||||||||||||||||||||||||||||||||||||||||||||||||||||||||||||||||||||||||||||||||||||||||||||||||||||||||||||||||||||||||||||||||||||||||||||||||||||||||||||||||||||||||||||||||||||||||||||||||||||||||||||||||||||||||||||||||||||||||||||||||||||||||||||||||||||||||||||||||||||||||||||||||||||||||||||||||||
|---|---|---|---|---|---|---|---|---|---|---|---|---|---|---|---|---|---|---|---|---|---|---|---|---|---|---|---|---|---|---|---|---|---|---|---|---|---|---|---|---|---|---|---|---|---|---|---|---|---|---|---|---|---|---|---|---|---|---|---|---|---|---|---|---|---|---|---|---|---|---|---|---|---|---|---|---|---|---|---|---|---|---|---|---|---|---|---|---|---|---|---|---|---|---|---|---|---|---|---|---|---|---|---|---|---|---|---|---|---|---|---|---|---|---|---|---|---|---|---|---|---|---|---|---|---|---|---|---|---|---|---|---|---|---|---|---|---|---|---|---|---|---|---|---|---|---|---|---|---|---|---|---|---|---|---|---|---|---|---|---|---|---|---|---|---|---|---|---|---|---|---|---|---|---|---|---|---|---|---|---|---|---|---|---|---|---|---|---|---|---|---|---|---|---|---|---|---|---|---|---|---|---|---|---|---|---|---|---|---|---|---|---|---|---|---|---|---|---|---|---|---|---|---|---|---|---|---|---|---|---|---|---|---|---|---|---|---|---|---|---|---|---|---|---|---|---|---|---|---|---|---|---|---|---|---|---|---|---|---|---|---|---|---|---|---|---|---|---|---|---|---|---|---|---|---|---|---|---|---|---|---|---|---|---|---|---|---|---|---|---|---|---|---|---|---|---|---|---|---|---|---|---|---|---|---|---|---|---|---|---|---|---|---|---|---|---|---|---|---|---|---|---|---|---|---|---|---|---|---|---|---|---|---|---|---|---|---|---|---|---|---|---|---|---|---|---|---|---|---|---|---|---|---|---|---|---|---|---|---|---|---|---|---|---|---|---|---|---|---|---|---|---|---|---|---|---|---|---|---|---|---|---|---|---|---|---|---|---|---|---|---|---|---|---|---|---|---|---|---|---|---|---|---|---|---|---|---|---|---|---|---|---|---|---|---|---|---|---|---|---|---|---|---|---|---|---|---|---|---|---|---|---|---|
 | Caution | ||||||||||||||||||||||||||||||||||||||||||||||||||||||||||||||||||||||||||||||||||||||||||||||||||||||||||||||||||||||||||||||||||||||||||||||||||||||||||||||||||||||||||||||||||||||||||||||||||||||||||||||||||||||||||||||||||||||||||||||||||||||||||||||||||||||||||||||||||||||||||||||||||||||||||||||||||||||||||||||||||||||||||||||||||||||||||||||||||||||||||||||||||||||||||||||||||||||||||||||||||||||||||||||||||||||||||||||
|---|---|---|---|---|---|---|---|---|---|---|---|---|---|---|---|---|---|---|---|---|---|---|---|---|---|---|---|---|---|---|---|---|---|---|---|---|---|---|---|---|---|---|---|---|---|---|---|---|---|---|---|---|---|---|---|---|---|---|---|---|---|---|---|---|---|---|---|---|---|---|---|---|---|---|---|---|---|---|---|---|---|---|---|---|---|---|---|---|---|---|---|---|---|---|---|---|---|---|---|---|---|---|---|---|---|---|---|---|---|---|---|---|---|---|---|---|---|---|---|---|---|---|---|---|---|---|---|---|---|---|---|---|---|---|---|---|---|---|---|---|---|---|---|---|---|---|---|---|---|---|---|---|---|---|---|---|---|---|---|---|---|---|---|---|---|---|---|---|---|---|---|---|---|---|---|---|---|---|---|---|---|---|---|---|---|---|---|---|---|---|---|---|---|---|---|---|---|---|---|---|---|---|---|---|---|---|---|---|---|---|---|---|---|---|---|---|---|---|---|---|---|---|---|---|---|---|---|---|---|---|---|---|---|---|---|---|---|---|---|---|---|---|---|---|---|---|---|---|---|---|---|---|---|---|---|---|---|---|---|---|---|---|---|---|---|---|---|---|---|---|---|---|---|---|---|---|---|---|---|---|---|---|---|---|---|---|---|---|---|---|---|---|---|---|---|---|---|---|---|---|---|---|---|---|---|---|---|---|---|---|---|---|---|---|---|---|---|---|---|---|---|---|---|---|---|---|---|---|---|---|---|---|---|---|---|---|---|---|---|---|---|---|---|---|---|---|---|---|---|---|---|---|---|---|---|---|---|---|---|---|---|---|---|---|---|---|---|---|---|---|---|---|---|---|---|---|---|---|---|---|---|---|---|---|---|---|---|---|---|---|---|---|---|---|---|---|---|---|---|---|---|---|---|---|---|---|---|---|---|---|---|---|---|---|---|---|---|---|---|---|---|---|---|---|---|---|---|---|---|---|---|
| directory | usage of the directory |
|---|---|
| / | the root directory |
| /etc/ | system wide configuration files |
| /var/log/ | system log files |
| /home/ | all the home directories for all non-privileged users |
1.2.2.В Filesystem internals
Following the Unix tradition , the Debian GNU/Linux system provides the filesystem under which physical data on hard disks and other storage devices reside, and the interaction with the hardware devices such as console screens and remote serial consoles are represented in an unified manner under » /dev/ «.
Each file, directory, named pipe (a way two programs can share data), or physical device on a Debian GNU/Linux system has a data structure called an inode which describes its associated attributes such as the user who owns it (owner), the group that it belongs to, the time last accessed, etc. The idea of representing just about everything in the filesystem was a Unix innovation, and modern Linux kernels have developed this idea ever further. Now, even information about processes running in the computer can be found in the filesystem.
This abstract and unified representation of physical entities and internal processes is very powerful since this allows us to use the same command for the same kind of operation on many totally different devices. It is even possible to change the way the kernel works by writing data to special files that are linked to running processes.
If you need to identify the correspondence between the file tree and the physical entity, execute mount (8) with no arguments.
1.2.3.В Filesystem permissions
Filesystem permissions of Unix-like system are defined for three categories of affected users.
The user who owns the file ( u )
Other users in the group which the file belongs to ( g )
All other users ( o ) also referred to as «world» and «everyone»
For the file, each corresponding permission allows following actions.
The read ( r ) permission allows owner to examine contents of the file.
The write ( w ) permission allows owner to modify the file.
The execute ( x ) permission allows owner to run the file as a command.
For the directory, each corresponding permission allows following actions.
The read ( r ) permission allows owner to list contents of the directory.
The write ( w ) permission allows owner to add or remove files in the directory.
The execute ( x ) permission allows owner to access files in the directory.
Here, the execute permission on a directory means not only to allow reading of files in that directory but also to allow viewing their attributes, such as the size and the modification time.
ls (1) is used to display permission information (and more) for files and directories. When it is invoked with the » -l » option, it displays the following information in the order given.
Type of file (first character)
Access permission of the file (nine characters, consisting of three characters each for user, group, and other in this order)
Number of hard links to the file
Name of the user who owns the file
Name of the group which the file belongs to
Size of the file in characters (bytes)
Date and time of the file (mtime)
Name of the file
TableВ 1.4.В List of the first character of » ls -l » output
| character | meaning |
|---|---|
| — | normal file |
| d | directory |
| l | symlink |
| c | character device node |
| b | block device node |
| p | named pipe |
| s | socket |
chown (1) is used from the root account to change the owner of the file. chgrp (1) is used from the file’s owner or root account to change the group of the file. chmod (1) is used from the file’s owner or root account to change file and directory access permissions. Basic syntax to manipulate a foo file is the following.
For example, you can make a directory tree to be owned by a user foo and shared by a group bar by the following.
There are three more special permission bits.
The set user ID bit ( s or S instead of user’s x )
The set group ID bit ( s or S instead of group’s x )
The sticky bit ( t or T instead of other’s x )
Here the output of » ls -l » for these bits is capitalized if execution bits hidden by these outputs are unset .
Setting set user ID on an executable file allows a user to execute the executable file with the owner ID of the file (for example root ). Similarly, setting set group ID on an executable file allows a user to execute the executable file with the group ID of the file (for example root ). Because these settings can cause security risks, enabling them requires extra caution.
Setting set group ID on a directory enables the BSD-like file creation scheme where all files created in the directory belong to the group of the directory.
Setting the sticky bit on a directory prevents a file in the directory from being removed by a user who is not the owner of the file. In order to secure contents of a file in world-writable directories such as » /tmp » or in group-writable directories, one must not only reset the write permission for the file but also set the sticky bit on the directory. Otherwise, the file can be removed and a new file can be created with the same name by any user who has write access to the directory.
Here are a few interesting examples of file permissions.
There is an alternative numeric mode to describe file permissions with chmod (1). This numeric mode uses 3 to 4 digit wide octal (radix=8) numbers.
TableВ 1.5.В The numeric mode for file permissions in chmod (1) commands
| digit | meaning |
|---|---|
| 1st optional digit | sum of set user ID (=4), set group ID (=2), and sticky bit (=1) |
| 2nd digit | sum of read (=4), write (=2), and execute (=1) permissions for user |
| 3rd digit | ditto for group |
| 4th digit | ditto for other |
This sounds complicated but it is actually quite simple. If you look at the first few (2-10) columns from » ls -l » command output and read it as a binary (radix=2) representation of file permissions («-» being «0» and «rwx» being «1»), the last 3 digit of the numeric mode value should make sense as an octal (radix=8) representation of file permissions to you.
For example, try the following
If you need to access information displayed by » ls -l » in shell script, you should use pertinent commands such as test (1), stat (1) and readlink (1). The shell builtin such as » [ » or » test » may be used too.
1.2.4.В Control of permissions for newly created files: umask
What permissions are applied to a newly created file or directory is restricted by the umask shell builtin command. See dash (1), bash (1), and builtins (7).
TableВ 1.6.В The umask value examples
| umask | file permissions created | directory permissions created | usage |
|---|---|---|---|
| 0022 | -rw-r—r— | -rwxr-xr-x | writable only by the user |
| 0002 | -rw-rw-r— | -rwxrwxr-x | writable by the group |
The Debian system uses a user private group (UPG) scheme as its default. A UPG is created whenever a new user is added to the system. A UPG has the same name as the user for which it was created and that user is the only member of the UPG. UPG scheme makes it safe to set umask to 0002 since every user has their own private group. (In some Unix variants, it is quite common to setup all normal users belonging to a single users group and is a good idea to set umask to 0022 for security in such cases.)
Enable UPG by putting » umask 002 » in the
1.2.5.В Permissions for groups of users (group)
In order to make group permissions to be applied to a particular user, that user needs to be made a member of the group using » sudo vigr » for /etc/group and » sudo vigr -s » for /etc/gshadow . You need to login after logout (or run » exec newgrp «) to enable the new group configuration.
Alternatively, you may dynamically add users to groups during the authentication process by adding » auth optional pam_group.so » line to » /etc/pam.d/common-auth » and setting » /etc/security/group.conf «. (See ChapterВ 4, Authentication and access controls.)
The hardware devices are just another kind of file on the Debian system. If you have problems accessing devices such as CD-ROM and USB memory stick from a user account, you should make that user a member of the relevant group.
Some notable system-provided groups allow their members to access particular files and devices without root privilege.
TableВ 1.7.В List of notable system-provided groups for file access
| group | description for accessible files and devices |
|---|---|
| dialout | full and direct access to serial ports (» /dev/ttyS3 «) |
| dip | limited access to serial ports for Dialup IP connection to trusted peers |
| cdrom | CD-ROM, DVD+/-RW drives |
| audio | audio device |
| video | video device |
| scanner | scanner(s) |
| adm | system monitoring logs |
| staff | some directories for junior administrative work: » /usr/local «, » /home « |
You need to belong to the dialout group to reconfigure modem, dial anywhere, etc. But if root creates pre-defined configuration files for trusted peers in » /etc/ppp/peers/ «, you only need to belong to the dip group to create Dialup IP connection to those trusted peers using pppd (8), pon (1), and poff (1) commands.
Some notable system-provided groups allow their members to execute particular commands without root privilege.
TableВ 1.8.В List of notable system provided groups for particular command executions
| group | accessible commands |
|---|---|
| sudo | execute sudo without their password |
| lpadmin | execute commands to add, modify, and remove printers from printer databases |
For the full listing of the system provided users and groups, see the recent version of the «Users and Groups» document in » /usr/share/doc/base-passwd/users-and-groups.html » provided by the base-passwd package.
See passwd (5), group (5), shadow (5), newgrp (1), vipw (8), vigr (8), and pam_group (8) for management commands of the user and group system.
1.2.6.В Timestamps
There are three types of timestamps for a GNU/Linux file.
TableВ 1.9.В List of types of timestamps
| type | meaning (historic Unix definition) |
|---|---|
| mtime | the file modification time ( ls -l ) |
| ctime | the file status change time ( ls -lc ) |
| atime | the last file access time ( ls -lu ) |
ctime is not file creation time.
The actual value of atime on GNU/Linux system may be different from that of the historic Unix definition.
Overwriting a file changes all of the mtime , ctime , and atime attributes of the file.
Changing ownership or permission of a file changes the ctime and atime attributes of the file.
Reading a file changes the atime attribute of the file on the historic Unix system.
Reading a file changes the atime attribute of the file on the GNU/Linux system if its filesystem is mounted with » strictatime «.
Reading a file for the first time or after one day changes the atime attribute of the file on the GNU/Linux system if its filesystem is mounted with » relatime «. (default behavior since Linux 2.6.30)
Reading a file doesn’t change the atime attribute of the file on the GNU/Linux system if its filesystem is mounted with » noatime «.
The » noatime » and » relatime » mount options are introduced to improve the filesystem read performance under the normal use cases. Simple file read operation under the » strictatime » option accompanies the time-consuming write operation to update the atime attribute. But the atime attribute is rarely used except for the mbox (5) file. See mount (8).
Use touch (1) command to change timestamps of existing files.
For timestamps, the ls command outputs localized strings under non-English locale (» fr_FR.UTF-8 «).
1.2.7.В Links
There are two methods of associating a file » foo » with a different filename » bar «.
Duplicate name for an existing file
Special file that points to another file by name
See the following example for changes in link counts and the subtle differences in the result of the rm command.
The hardlink can be made within the same filesystem and shares the same inode number which the » -i » option with ls (1) reveals.
The symlink always has nominal file access permissions of » rwxrwxrwx «, as shown in the above example, with the effective access permissions dictated by permissions of the file that it points to.
| | Caution | |||||||||||||||||||||||||||||||||||||||||||||||||||||||||||||||||||||||||||||||||||||||||||||||||||||||||||||||||||||||||||||||||||||||||||||||||||||||||||||||||||||||||||||||||||||||||||||||||||||||||||||||||||||||||||||||||||||||||||||||||||||||||||||||||||||||||||||||||||
|---|---|---|---|---|---|---|---|---|---|---|---|---|---|---|---|---|---|---|---|---|---|---|---|---|---|---|---|---|---|---|---|---|---|---|---|---|---|---|---|---|---|---|---|---|---|---|---|---|---|---|---|---|---|---|---|---|---|---|---|---|---|---|---|---|---|---|---|---|---|---|---|---|---|---|---|---|---|---|---|---|---|---|---|---|---|---|---|---|---|---|---|---|---|---|---|---|---|---|---|---|---|---|---|---|---|---|---|---|---|---|---|---|---|---|---|---|---|---|---|---|---|---|---|---|---|---|---|---|---|---|---|---|---|---|---|---|---|---|---|---|---|---|---|---|---|---|---|---|---|---|---|---|---|---|---|---|---|---|---|---|---|---|---|---|---|---|---|---|---|---|---|---|---|---|---|---|---|---|---|---|---|---|---|---|---|---|---|---|---|---|---|---|---|---|---|---|---|---|---|---|---|---|---|---|---|---|---|---|---|---|---|---|---|---|---|---|---|---|---|---|---|---|---|---|---|---|---|---|---|---|---|---|---|---|---|---|---|---|---|---|---|---|---|---|---|---|---|---|---|---|---|---|---|---|---|---|---|---|---|---|---|---|---|---|---|---|---|---|---|---|---|---|---|---|---|---|
| device file | action | description of response |
|---|---|---|
| /dev/null | read | return «end-of-file (EOF) character» |
| /dev/null | write | return nothing (a bottomless data dump pit) |
| /dev/zero | read | return «the \0 (NUL) character» (not the same as the number zero ASCII) |
| /dev/random | read | return random characters from a true random number generator, delivering real entropy (slow) |
| /dev/urandom | read | return random characters from a cryptographically secure pseudorandom number generator |
| /dev/full | write | return the disk-full (ENOSPC) error |
These are frequently used in conjunction with the shell redirection (see Section 1.5.8, “Typical command sequences and shell redirection”).
1.2.12.В procfs and sysfs
The procfs and sysfs mounted on » /proc » and » /sys » are the pseudo-filesystem and expose internal data structures of the kernel to the userspace. In other word, these entries are virtual, meaning that they act as a convenient window into the operation of the operating system.
The directory » /proc » contains (among other things) one subdirectory for each process running on the system, which is named after the process ID (PID). System utilities that access process information, such as ps (1), get their information from this directory structure.
The directories under » /proc/sys/ » contain interfaces to change certain kernel parameters at run time. (You may do the same through the specialized sysctl (8) command or its preload/configuration file » /etc/sysctl.conf «.)
People frequently panic when they notice one file in particular — » /proc/kcore » — which is generally huge. This is (more or less) a copy of the content of your computer’s memory. It’s used to debug the kernel. It is a virtual file that points to computer memory, so don’t worry about its size.
The directory under » /sys » contains exported kernel data structures, their attributes, and their linkages between them. It also contains interfaces to change certain kernel parameters at run time.
See » proc.txt(.gz) «, » sysfs.txt(.gz) » and other related documents in the Linux kernel documentation (» /usr/share/doc/linux-doc-*/Documentation/filesystems/* «) provided by the linux-doc-* package.
1.2.13.В tmpfs
The tmpfs is a temporary filesystem which keeps all files in the virtual memory. The data of the tmpfs in the page cache on memory may be swapped out to the swap space on disk as needed.
The directory » /run » is mounted as the tmpfs in the early boot process. This enables writing to it even when the directory » / » is mounted as read-only. This is the new location for the storage of transient state files and replaces several locations described in the Filesystem Hierarchy Standard version 2.3:
» /var/lock » в†’ » /run/lock «
» /dev/shm » в†’ » /run/shm «
See » tmpfs.txt(.gz) » in the Linux kernel documentation (» /usr/share/doc/linux-doc-*/Documentation/filesystems/* «) provided by the linux-doc-* package.
1.3.В Midnight Commander (MC)
Midnight Commander (MC) is a GNU «Swiss army knife» for the Linux console and other terminal environments. This gives newbie a menu driven console experience which is much easier to learn than standard Unix commands.
You may need to install the Midnight Commander package which is titled » mc » by the following.
Use the mc (1) command to explore the Debian system. This is the best way to learn. Please explore few interesting locations just using the cursor keys and Enter key.
» /etc » and its subdirectories
» /var/log » and its subdirectories
» /usr/share/doc » and its subdirectories
1.3.1.В Customization of MC
In order to make MC to change working directory upon exit and cd to the directory, I suggest to modify «
/.bashrc » to include a script provided by the mc package.
See mc (1) (under the » -P » option) for the reason. (If you do not understand what exactly I am talking here, you can do this later.)
1.3.2.В Starting MC
MC can be started by the following.
MC takes care of all file operations through its menu, requiring minimal user effort. Just press F1 to get the help screen. You can play with MC just by pressing cursor-keys and function-keys.
In some consoles such as gnome-terminal (1), key strokes of function-keys may be stolen by the console program. You can disable these features in «Preferences» в†’ «General» and «Shortcuts» menu for gnome-terminal .
If you encounter character encoding problem which displays garbage characters, adding » -a » to MC’s command line may help prevent problems.
If this doesn’t clear up your display problems with MC, see SectionВ 9.5.6, “The terminal configuration”.
1.3.3.В File manager in MC
The default is two directory panels containing file lists. Another useful mode is to set the right window to «information» to see file access privilege information, etc. Following are some essential keystrokes. With the gpm (8) daemon running, one can use a mouse on Linux character consoles, too. (Make sure to press the shift-key to obtain the normal behavior of cut and paste in MC.)
TableВ 1.11.В The key bindings of MC
| key | key binding |
|---|---|
| F1 | help menu |
| F3 | internal file viewer |
| F4 | internal editor |
| F9 | activate pull down menu |
| F10 | exit Midnight Commander |
| Tab | move between two windows |
| Insert or Ctrl-T | mark file for a multiple-file operation such as copy |
| Del | delete file (be careful—set MC to safe delete mode) |
| Cursor keys | self-explanatory |
1.3.4.В Command-line tricks in MC
cd command changes the directory shown on the selected screen.
Ctrl-Enter or Alt-Enter copies a filename to the command line. Use this with cp (1) and mv (1) commands together with command-line editing.
Alt-Tab shows shell filename expansion choices.
One can specify the starting directory for both windows as arguments to MC; for example, » mc /etc /root «.
Esc + n-key в†’ Fn (i.e., Esc + 1 в†’ F1 , etc.; Esc + 0 в†’ F10 )
Pressing Esc before the key has the same effect as pressing the Alt and the key together.; i.e., type Esc + c for Alt-C . Esc is called meta-key and sometimes noted as » M- «.
1.3.5.В The internal editor in MC
The internal editor has an interesting cut-and-paste scheme. Pressing F3 marks the start of a selection, a second F3 marks the end of selection and highlights the selection. Then you can move your cursor. If you press F6, the selected area is moved to the cursor location. If you press F5, the selected area is copied and inserted at the cursor location. F2 saves the file. F10 gets you out. Most cursor keys work intuitively.
This editor can be directly started on a file using one of the following commands.
This is not a multi-window editor, but one can use multiple Linux consoles to achieve the same effect. To copy between windows, use Alt-F n keys to switch virtual consoles and use «Fileв†’Insert file» or «Fileв†’Copy to file» to move a portion of a file to another file.
This internal editor can be replaced with any external editor of choice.
Also, many programs use the environment variables » $EDITOR » or » $VISUAL » to decide which editor to use. If you are uncomfortable with vim (1) or nano (1) initially, you may set these to » mcedit » by adding the following lines to «
I do recommend setting these to » vim » if possible.
If you are uncomfortable with vim (1), you can keep using mcedit (1) for most system maintenance tasks.
1.3.6.В The internal viewer in MC
MC is a very smart viewer. This is a great tool for searching words in documents. I always use this for files in the » /usr/share/doc » directory. This is the fastest way to browse through masses of Linux information. This viewer can be directly started using one of the following commands.
1.3.7.В Auto-start features of MC
Press Enter on a file, and the appropriate program handles the content of the file (see Section 9.4.11, “Customizing program to be started”). This is a very convenient MC feature.
TableВ 1.12.В The reaction to the enter key in MC
| file type | reaction to enter key |
|---|---|
| executable file | execute command |
| man file | pipe content to viewer software |
| html file | pipe content to web browser |
| » *.tar.gz » and » *.deb » file | browse its contents as if subdirectory |
In order to allow these viewer and virtual file features to function, viewable files should not be set as executable. Change their status using chmod (1) or via the MC file menu.
1.3.8.В FTP virtual filesystem of MC
MC can be used to access files over the Internet using FTP. Go to the menu by pressing F9 , then type » p » to activate the FTP virtual filesystem. Enter a URL in the form » username:passwd@hostname.domainname «, which retrieves a remote directory that appears like a local one.
Try «[deb.debian.org/debian]» as the URL and browse the Debian archive.
1.4.В The basic Unix-like work environment
Although MC enables you to do almost everything, it is very important for you to learn how to use the command line tools invoked from the shell prompt and become familiar with the Unix-like work environment.
1.4.1.В The login shell
You can select your login shell with chsh (1).
TableВ 1.13.В List of shell programs
| package | popcon | size | POSIX shell | description |
|---|---|---|---|---|
| bash | V:796, I:999 | 6470 | Yes | Bash: the GNU Bourne Again SHell (de facto standard) |
| bash-completion | V:31, I:922 | 1523 | N/A | programmable completion for the bash shell |
| dash | V:913, I:993 | 221 | Yes | Debian Almquist Shell, good for shell script |
| zsh | V:36, I:74 | 2467 | Yes | Z shell: the standard shell with many enhancements |
| tcsh | V:8, I:28 | 1316 | No | TENEX C Shell: an enhanced version of Berkeley csh |
| mksh | V:7, I:12 | 1478 | Yes | A version of the Korn shell |
| csh | V:2, I:8 | 343 | No | OpenBSD C Shell, a version of Berkeley csh |
| sash | V:0, I:6 | 1090 | Yes | Stand-alone shell with builtin commands (Not meant for standard » /bin/sh «) |
| ksh | V:2, I:15 | 3284 | Yes | the real, AT&T version of the Korn shell |
| rc | V:0, I:1 | 169 | No | implementation of the AT&T Plan 9 rc shell |
| posh | V:0, I:0 | 190 | Yes | Policy-compliant Ordinary SHell ( pdksh derivative) |
Although POSIX-like shells share the basic syntax, they can differ in behavior for things as basic as shell variables and glob expansions. Please check their documentation for details.
In this tutorial chapter, the interactive shell always means bash .
1.4.2.В Customizing bash
You can customize bash (1) behavior by «
For example, try the following.
The bash-completion package enables programmable completion for bash .
1.4.3.В Special key strokes
In the Unix-like environment, there are few key strokes which have special meanings. Please note that on a normal Linux character console, only the left-hand Ctrl and Alt keys work as expected. Here are few notable key strokes to remember.
TableВ 1.14.В List of key bindings for bash
| key | description of key binding |
|---|---|
| Ctrl-U | erase line before cursor |
| Ctrl-H | erase a character before cursor |
| Ctrl-D | terminate input (exit shell if you are using shell) |
| Ctrl-C | terminate a running program |
| Ctrl-Z | temporarily stop program by moving it to the background job |
| Ctrl-S | halt output to screen |
| Ctrl-Q | reactivate output to screen |
| Ctrl-Alt-Del | reboot/halt the system, see inittab (5) |
| Left-Alt-key (optionally, Windows-key ) | meta-key for Emacs and the similar UI |
| Up-arrow | start command history search under bash |
| Ctrl-R | start incremental command history search under bash |
| Tab | complete input of the filename to the command line under bash |
| Ctrl-V Tab | input Tab without expansion to the command line under bash |
The terminal feature of Ctrl-S can be disabled using stty (1).
1.4.4.В Mouse operations
Traditional Unix style mouse operations:
use 3 buttons (click)
used by X applications such as xterm and text applications in Linux console
Modern GUI style mouse operations:
use 2 buttons (drag + click)
use PRIMARY and CLIPBOARD
used in Modern GUI applications such as gnome-terminal
TableВ 1.15.В List of mouse operations and related key actions on Debian
| action | response |
|---|---|
| Left-click-and-drag mouse | select range as PRIMARY selection |
| Left-click | select the start of range for PRIMARY selection |
| Right-click (traditional) | select the end of range for PRIMARY selection |
| Right-click (modern) | context dependent menu (cut/copy/paste) |
| Middle-click or Shift- Ins | insert PRIMARY selection at the cursor |
| Ctrl-X | cut PRIMARY selection to CLIPBOARD |
| Ctrl-C ( Shift-Ctrl-C in terminal) | copy PRIMARY selection to CLIPBOARD |
| Ctrl-V | paste CLIPBOARD at the cursor |
Here, the PRIMARY selection is the highlighted text range. Within the terminal program, Shift-Ctrl-C is used instead to avoid terminating a running program.
The center wheel on the modern wheel mouse is considered middle mouse button and can be used for middle-click. Clicking left and right mouse buttons together serves as the middle-click under the 2 button mouse system situation.
In order to use a mouse in Linux character consoles, you need to have gpm (8) running as daemon.
1.4.5.В The pager
The less (1) command is the enhanced pager (file content browser). It reads the file specified by its command argument or its standard input. Hit » h » if you need help while browsing with the less command. It can do much more than more (1) and can be supercharged by executing » eval $(lesspipe) » or » eval $(lessfile) » in the shell startup script. See more in » /usr/share/doc/less/LESSOPEN «. The » -R » option allows raw character output and enables ANSI color escape sequences. See less (1).
1.4.6.В The text editor
You should become proficient in one of variants of Vim or Emacs programs which are popular in the Unix-like system.
I think getting used to Vim commands is the right thing to do, since Vi-editor is always there in the Linux/Unix world. (Actually, original vi or new nvi are programs you find everywhere. I chose Vim instead for newbie since it offers you help through F1 key while it is similar enough and more powerful.)
If you chose either Emacs or XEmacs instead as your choice of the editor, that is another good choice indeed, particularly for programming. Emacs has a plethora of other features as well, including functioning as a newsreader, directory editor, mail program, etc. When used for programming or editing shell scripts, it intelligently recognizes the format of what you are working on, and tries to provide assistance. Some people maintain that the only program they need on Linux is Emacs. Ten minutes learning Emacs now can save hours later. Having the GNU Emacs manual for reference when learning Emacs is highly recommended.
All these programs usually come with tutoring program for you to learn them by practice. Start Vim by typing » vim » and press F1-key. You should at least read the first 35 lines. Then do the online training course by moving cursor to » |tutor| » and pressing Ctrl-] .
Good editors, such as Vim and Emacs, can handle UTF-8 and other exotic encoding texts correctly. It is a good idea to use the GUI environment in the UTF-8 locale and to install required programs and fonts to it. Editors have options to set the file encoding independent of the GUI environment. Please refer to their documentation on multibyte text.
1.4.7.В Setting a default text editor
Debian comes with a number of different editors. We recommend to install the vim package, as mentioned above.
Debian provides unified access to the system default editor via command » /usr/bin/editor » so other programs (e.g., reportbug (1)) can invoke it. You can change it by the following.
The choice » /usr/bin/vim.basic » over » /usr/bin/vim.tiny » is my recommendation for newbies since it supports syntax highlighting.
Many programs use the environment variables » $EDITOR » or » $VISUAL » to decide which editor to use (see SectionВ 1.3.5, “The internal editor in MC” and SectionВ 9.4.11, “Customizing program to be started”). For the consistency on the Debian system, set these to » /usr/bin/editor «. (Historically, » $EDITOR » was » ed » and » $VISUAL » was » vi «.)
1.4.8.В Using vim
The recent vim (1) starts itself in the sane » nocompatible » option and enters into the NORMAL mode. [1]
TableВ 1.16.В List of basic Vim key strokes
| mode | key strokes | action |
|---|---|---|
| NORMAL | :help|only | display the help file |
| NORMAL | :e filename.ext | open new buffer to edit filename.ext |
| NORMAL | :w | overwrite current buffer to the original file |
| NORMAL | :w filename.ext | write current buffer to filename.ext |
| NORMAL | :q | quit vim |
| NORMAL | :q! | force to quit vim |
| NORMAL | :only | close all other split open windows |
| NORMAL | :set nocompatible? | check if vim is in the sane nocompatible mode |
| NORMAL | :set nocompatible | set vim to the sane nocompatible mode |
| NORMAL | i | enter the INSERT mode |
| NORMAL | R | enter the REPLACE mode |
| NORMAL | v | enter the VISUAL mode |
| NORMAL | V | enter the linewise VISUAL mode |
| NORMAL | Ctrl- V | enter the blockwise VISUAL mode |
| except TERMINAL-JOB | ESC -key | enter the NORMAL mode |
| NORMAL | :term | enter the TERMINAL-JOB mode |
| TERMINAL-NORMAL | i | enter the TERMINAL-JOB mode |
| TERMINAL-JOB | Ctrl- W N (or Ctrl- \ Ctrl- N ) | enter the TERMINAL-NORMAL mode |
| TERMINAL-JOB | Ctrl- W : | enter the Ex -mode in TERMINAL-NORMAL mode |
Please use the » vimtutor » program to learn vim through an interactive tutorial course.
The vim program changes its behavior to typed key strokes based on mode . Typing in key strokes to the buffer is mostly done in INSERT -mode and REPLACE -mode. Moving cursor is mostly done in NORMAL -mode. Interactive selection is done in VISUAL -mode. Typing » : » in NORMAL -mode changes its mode to Ex -mode. Ex -mode accepts commands.
The Vim comes with the Netrw package. Netrw supports reading files, writing files, browsing directories over a network, and local browsing! Try Netrw with » vim . » (a period as the argument) and read its manual at » :help netrw «.
For the advanced configuration of vim , see Section 9.2, “Customizing vim”.
1.4.9.В Recording the shell activities
The output of the shell command may roll off your screen and may be lost forever. It is a good practice to log shell activities into the file for you to review them later. This kind of record is essential when you perform any system administration tasks.
The new Vim (version>=8.2) can be used to record the shell activities cleanly using TERMINAL-JOB -mode. See Section 1.4.8, “Using vim”.
The basic method of recording the shell activity is to run it under script (1).
For example, try the following
Do whatever shell commands under script .
Press Ctrl-D to exit script .
1.4.10.В Basic Unix commands
Let’s learn basic Unix commands. Here I use «Unix» in its generic sense. Any Unix clone OSs usually offer equivalent commands. The Debian system is no exception. Do not worry if some commands do not work as you wish now. If alias is used in the shell, its corresponding command outputs are different. These examples are not meant to be executed in this order.
Try all following commands from the non-privileged user account.
TableВ 1.17.В List of basic Unix commands
| command | description |
|---|---|
| pwd | display name of current/working directory |
| whoami | display current user name |
| id | display current user identity (name, uid, gid, and associated groups) |
| file foo | display a type of file for the file » foo « |
| type -p commandname | display a file location of command » commandname « |
| which commandname | , , |
| type commandname | display information on command » commandname « |
| apropos key-word | find commands related to » key-word « |
| man -k key-word | , , |
| whatis commandname | display one line explanation on command » commandname « |
| man -a commandname | display explanation on command » commandname » (Unix style) |
| info commandname | display rather long explanation on command » commandname » (GNU style) |
| ls | list contents of directory (non-dot files and directories) |
| ls -a | list contents of directory (all files and directories) |
| ls -A | list contents of directory (almost all files and directories, i.e., skip » .. » and » . «) |
| ls -la | list all contents of directory with detail information |
| ls -lai | list all contents of directory with inode number and detail information |
| ls -d | list all directories under the current directory |
| tree | display file tree contents |
| lsof foo | list open status of file » foo « |
| lsof -p pid | list files opened by the process ID: » pid « |
| mkdir foo | make a new directory » foo » in the current directory |
| rmdir foo | remove a directory » foo » in the current directory |
| cd foo | change directory to the directory » foo » in the current directory or in the directory listed in the variable » $CDPATH « |
| cd / | change directory to the root directory |
| cd | change directory to the current user’s home directory |
| cd / foo | change directory to the absolute path directory » / foo « |
| cd .. | change directory to the parent directory |
| cd |
foo
Unix has a tradition to hide filenames which start with » . «. They are traditionally files that contain configuration information and user preferences.
For cd command, see builtins (7).
The default pager of the bare bone Debian system is more (1) which cannot scroll back. By installing the less package using command line » apt-get install less «, less (1) becomes default pager and you can scroll back with cursor keys.
The » [ » and » ] » in the regular expression of the » ps aux | grep -e «[e]xim4*» » command above enable grep to avoid matching itself. The » 4* » in the regular expression means 0 or more repeats of character » 4 » thus enables grep to match both » exim » and » exim4 «. Although » * » is used in the shell filename glob and the regular expression, their meanings are different. Learn the regular expression from grep (1).
Please traverse directories and peek into the system using the above commands as training. If you have questions on any of console commands, please make sure to read the manual page.
For example, try the following
The style of man pages may be a little hard to get used to, because they are rather terse, particularly the older, very traditional ones. But once you get used to it, you come to appreciate their succinctness.
Please note that many Unix-like commands including ones from GNU and BSD display brief help information if you invoke them in one of the following ways (or without any arguments in some cases).
1.5.В The simple shell command
Now you have some feel on how to use the Debian system. Let’s look deep into the mechanism of the command execution in the Debian system. Here, I have simplified reality for the newbie. See bash (1) for the exact explanation.
A simple command is a sequence of components.
Источник


