- Use profiles to change the look of Terminal windows on Mac
- Create a new profile or modify an existing profile
- Rename a profile
- Copy a profile
- Remove a profile
- Restore the predefined Terminal window profiles
- How to customize your Mac OS terminal
- Feel great to your terminal like never before.
- Create a cool terminal using zsh and Oh My Zsh
- 1. Open your terminal
- 2. Copy and paste the following command
- 3. Install Oh My Zsh
- 4. Setup your zsh as default shell by running
- 5. Select the theme
- Set up the zsh as default shell (If step 4 is not working)
- Как настроить Терминал в Mac (macOS) и сделать его более полезным
- Терминал – Основы
- Как изменить размеры окна Терминала по умолчанию
- Как изменить фон в окне Терминала
- Как изменить текст в Терминале
- Атрибуты окна Терминала
- Атрибуты оболочки (Shell)
- Работа с группами окон в Терминале
- Настройка оболочки по умолчанию
- Simple Tricks to Improve the Terminal Appearance in Mac OS X
- Modify Bash Prompt, Enable Colors, Improve ‘ls’
- Enable Bold Fonts, ANSI Colors, & Bright Colors
- Consider Customizing ANSI Colors
- Adjust Background Opacity, Blur, & Background Image
- Install a Theme
- New Terminal vs Old Terminal
Use profiles to change the look of Terminal windows on Mac
Use profiles to customize the colors, font, cursor style, background, and other elements of Terminal windows. A profile is a collection of style and behavior settings for a Terminal window.
Terminal comes with a set of predefined profiles, and you can also create your own custom profiles.
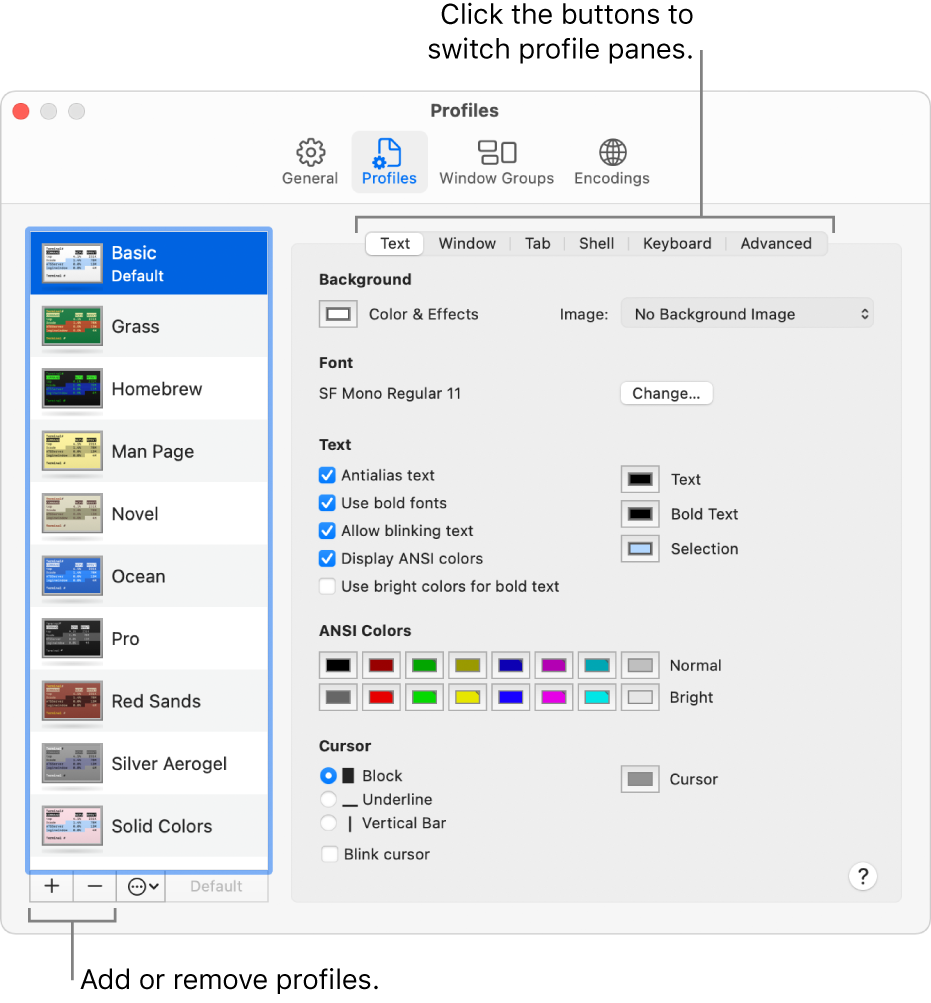
Create a new profile or modify an existing profile
In the Terminal app  on your Mac, choose Terminal > Preferences, then click Profiles.
Do one of the following:
Create a new profile: Click the Add button  under the profiles list, then enter a name for the new profile.
Modify an existing profile: Select the profile you want to modify.
Choose settings for the profile:
Text: Change colors, fonts, text, backgrounds, and cursor style.
Window: Change window display settings including title, size, and scrollback.
Tab: Change tab display settings including title and process name.
Shell: Change settings for startup and exit behavior.
Keyboard: Change settings for function keys, the option key, and the alternate screen.
Advanced: Change settings for terminal type (terminfo), input, bell behavior, and international encodings.
Rename a profile
In the Terminal app on your Mac, choose Terminal > Preferences, then click Profiles.
Double-click the name of the profile you want to rename.
Enter a new name, then press Return.
Copy a profile
In the Terminal app on your Mac, choose Terminal > Preferences, then click Profiles.
Select the profile you want to copy.
Click the Action pop-up menu  , then choose Duplicate Profile.
Enter a name for the copied profile, then press Return.
Remove a profile
In the Terminal app on your Mac, choose Terminal > Preferences, then click Profiles.
Select the profile you want to remove.
Click the Remove button  under the profiles list.
Restore the predefined Terminal window profiles
If you removed or changed any of the predefined profiles that came with Terminal, you can add them back to the profiles list with their original settings. You can restore only the entire set of predefined profiles (that is, you can’t restore them individually).
If you customized one of the predefined profiles and want to save your customizations, you need to rename the profile before restoring the predefined profiles. The restore operation overwrites the settings for each of the predefined profiles.
In the Terminal app on your Mac, choose Terminal > Preferences, then click Profiles.
Click the Action pop-up menu , then choose Restore Default Profiles.
Источник
How to customize your Mac OS terminal
Feel great to your terminal like never before.

Aug 10, 2018 · 4 min read
For all Mac users or developers who spend time using terminal, like commit the code to git using a command line. Before that, it will take you several steps before you commit any change. So, it’s a great idea to customize your terminal as it will help you have a very nice and save you more time.
In this content will tell you some step to c ustom your terminal using zsh and Oh My Zsh. Also, custom your terminal, for instance, setting transparent background, change the qfont and color of the text. Moreover, I will show you some tips and tricks on how to create your own alias.
Create a cool terminal using zsh and Oh My Zsh
1. Open your terminal
Check if you have Homebrew installed.
This will display the current version of your Homebrew
For example Homebrew 1.7.1
P.S. If you don’t have Homebrew please install before going to the next step.
2. Copy and paste the following command
To install zsh and zsh-completions using Homebrew.
3. Install Oh My Zsh
Customize your shell using the framework name Oh My Zsh.
4. Setup your zsh as default shell by running
P.S. This command will asking for your password
The default theme will be robbyrussell.
5. Select the theme
Now that you can set up yours by selecting from Oh My Zsh theme.
Open your terminal and using your favorite text editor.
select the theme you like. For example, I want to change the theme to avit.
press esc and type :wq to save and quit
Don’t forget to check if zsh has been set as default, by open new terminal if the default is not displaying zsh theme then you need a few more step to set up the default shell manually.
Set up the zsh as default shell (If step 4 is not working)
Start with clicking terminal > preferences and select tab Shell then click Run command and type zsh -l. Before closing the setting don’t forget to deselect the run in a shell, so the command won’t be run in your shell.
Источник
Как настроить Терминал в Mac (macOS) и сделать его более полезным
Приложение Терминал – ваш верный друг в мире командной строки macOS. Он предлагает интерфейс с оболочкой, которая интерпретирует ваши команды и затем воплощает их в жизнь.

Терминал – Основы
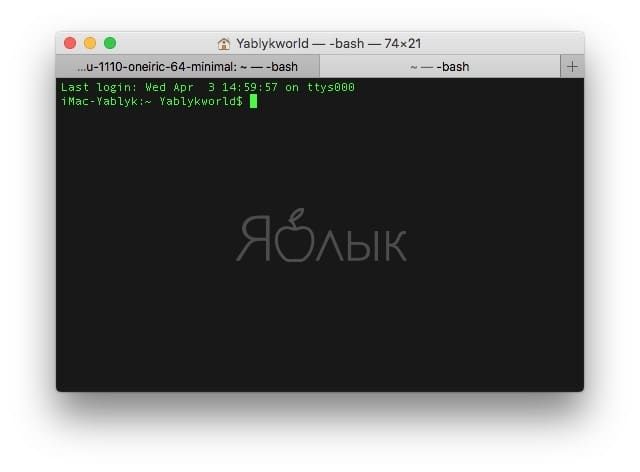
Когда вы открываете на Mac приложение Терминал, то видите практически пустое окно с двумя строчками текста. Первая содержит в себе дату и время вашего последнего логина.
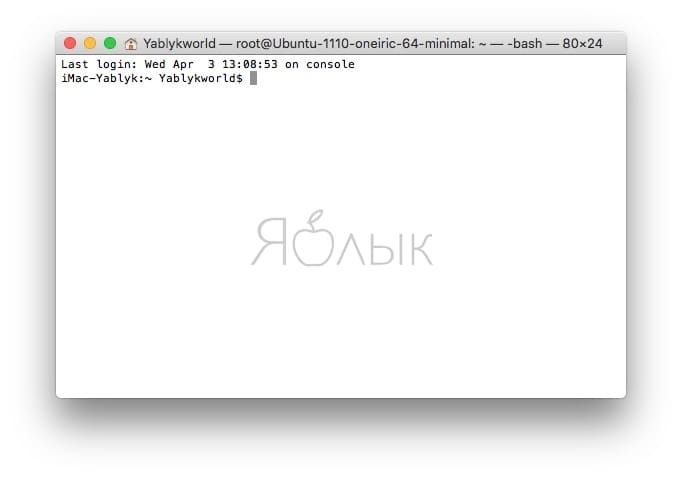
Last login: Wed Apr 3 13:08:53 on console
Вторая строчка – это, собственно, и есть командная строка для работы. Прямоугольный бокс в конце – ваш курсор.
Вводить в Терминал команды нужно сразу после второй строчки, которая имеет вид:
Вот что означают эти элементы:
Первая часть (до двоеточия) – это имя вашего Mac. Двоеточие – просто визуальный разделитель.
Вторая часть начинается с тильды (
). Она указывает на то, что вы находитесь в домашней директории, и использует краткое имя пользователя.
Наконец, знак доллара уведомляет о том, что вы вошли в систему как пользователь без рут-прав.
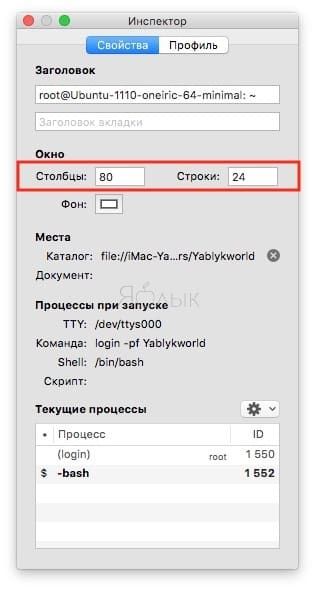
Как изменить размеры окна Терминала по умолчанию
Терминал не идеален. Текст команд набирается мелким шрифтом, его трудно анализировать, а курсор порой нелегко найти. Да, размер окна можно увеличить – но macOS «забудет» ваши настройки сразу после того, как вы закроете приложение.
Для того, чтобы сделать окно Терминала более удобным, нажмите ⌘Cmd + I – откроется Инспектор (или в строке меню вверху при открытом терминале выберите Shell → Показать Инспектор). В секции Свойства укажите более удобные для вас значения в пунктах Столбцы и Строки, а затем подтвердите выбор клавишей Return (Enter).
Как изменить фон в окне Терминала
В том же Инспекторе, во вкладке Профиль будут указаны доступные темы оформления – ими можно изменить внешний вид Терминала до неузнаваемости.
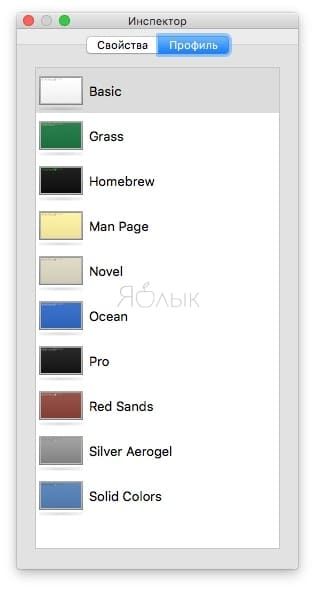
Например, попробуйте вариант Homebrew – и почувствуйте себя Windows-хакером! :).
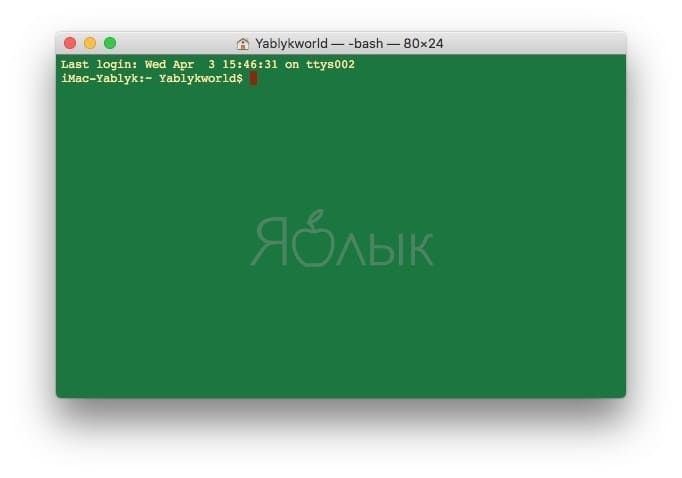
Предпросмотр всех тем оформления есть в настройках. Для перехода к ним выберите в строке меню Терминал → Настройки → Профили.
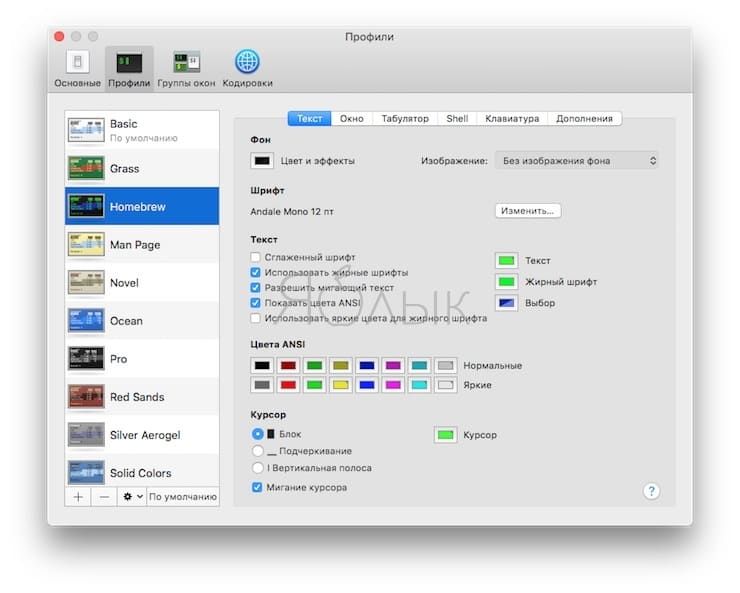
Как изменить текст в Терминале
Создатели Терминала встроили в приложение необходимые инструменты для настройки системного текста «под себя».
Например, для смены шрифта и – что самое главное! – его размера достаточно нажать кнопку Изменить в разделе настроек Текст.
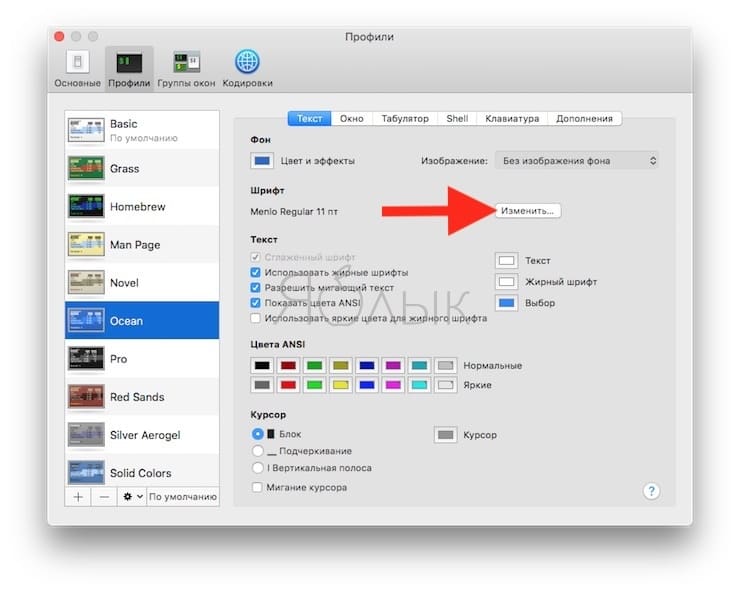
Есть и опции для того, чтобы включить или выключить жирный шрифт, использовать сглаженные шрифты, сменить цвет (!) текста.
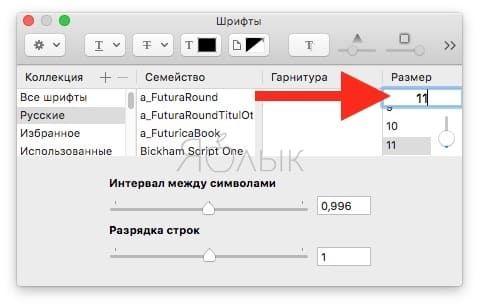
Да что там – можно изменить даже курсор! Доступные варианты – блок, подчеркивание или вертикальная полоса. Также в вашей власти – решить, должен ли мигать курсор, и какого цвета ему быть.
Наконец, при желании меняется и прозрачность окна Терминала. В результате очень легко «повесить» прозрачное окно прямо над веб-страницей и вводить команды по мере того, как вы читаете какую-нибудь инструкцию.
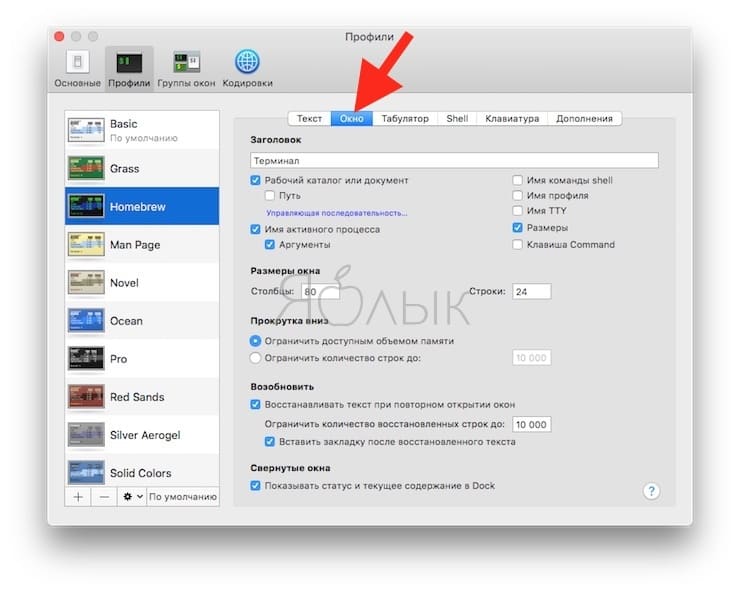
Атрибуты окна Терминала
Они включают в себя название, размер, лимит на скроллинг и тому подобные параметры. Помните о том, что выбранные вами настройки применяются только к профилю, а не ко всему Терминалу в целом. Для того, чтобы изменить название окна, просто введите нужный текст в соответствующей строке (Настройки → Окно → Заголовок).
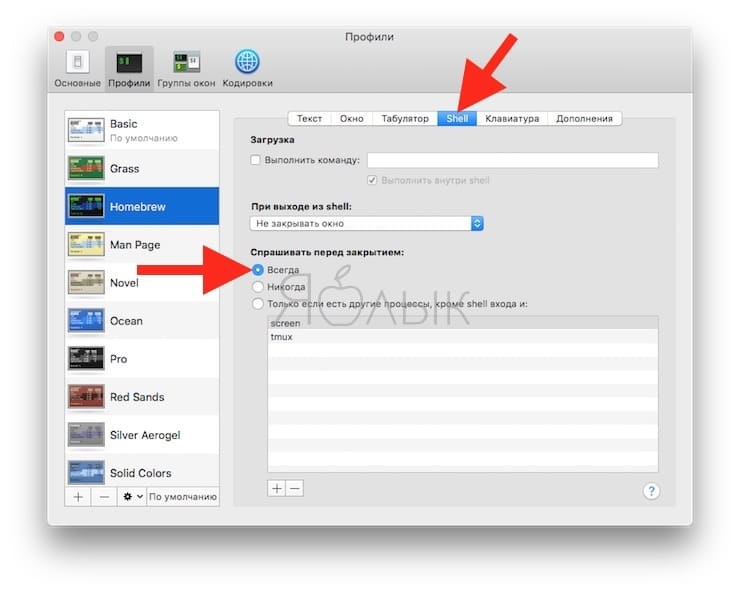
Атрибуты оболочки (Shell)
Здесь происходит тонкая настройка Терминала. Вы можете выбрать команду для запуска сразу после старта (например, запускать «автоматом» стороннюю оболочку).
Полезная опция – попросить Терминал выдавать предупреждения перед закрытием. Для этого откройте Профили → Shell, и в пункте Спрашивать перед закрытием выберите вариант Всегда.
Работа с группами окон в Терминале
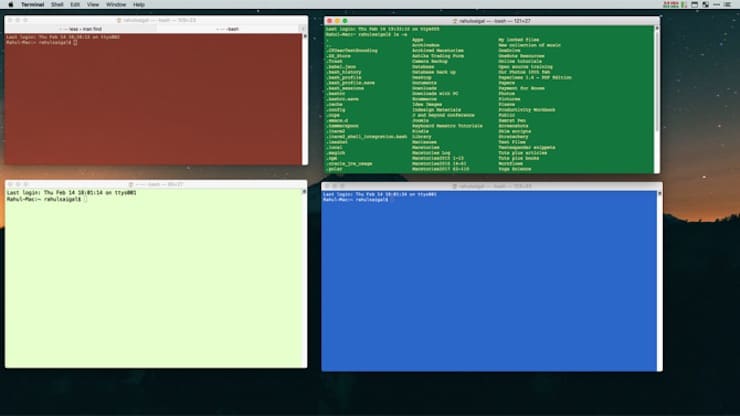
А вы знали, что в Терминале можно открывать сразу несколько рабочих окон, размещать их на десктопе так, как вам удобно, а затем никогда не терять эту сессию? За это отвечает специальная функция Группы окон. С её помощью каждое «окошко» получает свой собственный процесс, атрибуты и позицию на рабочем столе.
Перед тем, как создать группу окон, потребуется:
- Расставить нужные окна на рабочем столе так, как вам хочется.
- Настроить «под себя» атрибуты, размер и форму каждого окна.
- Запустить все нужные команды.
Всё готово? Теперь открывайте Окно → Сохранить окна как группу. Далее введите название новой группы, поставьте галочку напротив надписи Использ. группу окон при запуске Терминала и нажмите Сохранить.
Для восстановления вашей группы выберите всё тот же раздел Окно → Открывать группу окон. Чтобы импортировать или экспортировать такие группы, выберите Настройки → Группы окон и нажмите на иконку-шестеренку в нижней части экрана.
Настройка оболочки по умолчанию
Изначально в macOS работает bash. Но есть и другие – bin/bash, /bin/csh, /bin/zsh, /bin/ksh и т.п.
Unix-энтузиасты любят работать с zsh (или Z), т.к. в ней есть много функций и поддержка десятков самых разных плагинов.
Если вы новичок, установленной по умолчанию оболочку bash будет более чем достаточно.
Источник
Simple Tricks to Improve the Terminal Appearance in Mac OS X
The standard terminal appearance is just boring old black text on a white background. Apple included a few nice preset themes too, but to really make your terminals appearance stand out you’ll want to take the time to customize it yourself. While some of these tweaks are admittedly pure eye candy, others genuinely improve the command line experience and make using the terminal not only more attractive but easier to scan.

Follow along and try them all, or just pick and choose which makes the most sense for you.
Modify Bash Prompt, Enable Colors, Improve ‘ls’
At a bare minimum, let’s get a better bash prompt, improve the output of the frequently used ls command, and enable colors. This is all done by editing the .bash_profile or .bashrc located in the home directory, for the purpose of this walkthrough we’ll use .bash_profile:
- Open Terminal and type nano .bash_profile
- Paste in the following lines:
export PS1=»\[\033[36m\]\u\[\033[m\]@\[\033[32m\]\h:\[\033[33;1m\]\w\[\033[m\]\$ »
export CLICOLOR=1
export LSCOLORS=ExFxBxDxCxegedabagacad
alias ls=’ls -GFh’
The first line changes the bash prompt to be colorized, and rearranges the prompt to be “username@hostname:cwd $”
The next two lines enable command line colors, and define colors for the ‘ls’ command
Finally, we alias ls to include a few flags by default. -G colorizes output, -h makes sizes human readable, and -F throws a / after a directory, * after an executable, and a @ after a symlink, making it easier to quickly identify things in directory listings.
Pasted in properly, it should look like this:
Open a new terminal window, run ls, and see the difference. Still not satisfied with the appearance, or have you already done that? There’s more to do.
Enable Bold Fonts, ANSI Colors, & Bright Colors
This will be theme and profile dependent, meaning you will have to adjust this for each theme. Most themes have ANSI color on by default, but enable it if it’s not.
- Pull down the Terminal menu and choose “Preferences”, then click the “Settings” tab
- Choose your profile/theme from the left side list, then under the “Text” tab check the boxes for “Use bold fonts” and “Use bright colors for bold text”
This makes things like directories and executables be bold and brighter, making them easier to spot in listings.
Consider Customizing ANSI Colors
Going further with ANSI colors, if you discover that certain text contrast or text colors are hard to read with a specific profile or against a specific background color in Terminal, you may want to manually adjust the ANSI colors used by Terminal app, this is done through the Preferences > Profiles > Text section:
Generally it’s best to adjust ANSI colors to be near their intended color mark but in the realm of being easier to read, a shade of grey to replace black for example.
Adjust Background Opacity, Blur, & Background Image
After you have colorization squared away, adjusting the terminals background appearance is a nice touch:
- Back in Terminal Preferences, choose the theme from the left side, then go to the “Window” tab
- Click on “Color & Effects” to adjust the background color, opacity, and blur – opacity at 80% or so and blur at 100% is pleasant on the eyes
- Click on “Image” to select a background picture. Dark background pictures are better for dark themes, light for light, etc
Opacity and blur alone tend to be enough, but going the extra step to set a background picture can look either really nice or completely garish. You make the call.
Install a Theme
Another approach is to use Terminal themes like IR Black, which are simple to install, add custom colors, and make the command line much more attractive. Here are three popular themes:
You can also easily create your own by spending some time with Terminal Preferences and setting colors and fonts to what you like.
New Terminal vs Old Terminal
Put it all together, and you should have something like this:
Which is a bit more interesting to look at than this, right?
Have a useful bash prompt or some other customization tip? Let us know in the comments.
Источник


