- Ethical hacking and penetration testing
- InfoSec, IT, Kali Linux, BlackArch
- How to install NVIDIA drivers, CUDA and Bumblebee on Arch Linux / BlackArch
- How to check active GPU in Linux
- How to check whether an NVIDIA graphics card is active
- How to install NVIDIA video driver on Arch Linux or BlackArch
- How to install and use Bumblebee (how to enable NVIDIA Optimus on Arch Linux)
- System freezes after installing Bumblebee
- How to use Bumblebee / NVIDIA Optimus on Linux
- How to test Bumblebee / NVIDIA Optimus on Linux
- GPGPU
- Contents
- OpenCL
- OpenCL Runtime
- AMD/ATI
- NVIDIA
- Intel
- Others
- OpenCL ICD loader (libOpenCL.so)
- OpenCL Development
- Implementations
- Language bindings
- Implementations
- Checking For SPIR Support
- SYCL Development
- Development
- Language bindings
- ROCm 3.7 with OpenCL Image Support
- List of GPGPU accelerated software
- NVidia CUDA. Настройка среды разработки на базе Arch Linux
Ethical hacking and penetration testing
InfoSec, IT, Kali Linux, BlackArch
How to install NVIDIA drivers, CUDA and Bumblebee on Arch Linux / BlackArch
In this note we will consider the following topics:
- How to check active GPU in Linux
- How to switch from integrated graphics to a discrete NVidia graphics card
- How to install and use Bumblebee to automatically switch between integrated and discrete graphics cards (how to enable NVIDIA Optimus on Linux)
How to check active GPU in Linux
There are several commands that will show which video card is used:
This is the same command, but launched via optirun from the Bumblebee package:
Sample output that shows that an NVIDIA graphics card is active:
More about optirun and Bumblebee will come later a bit.
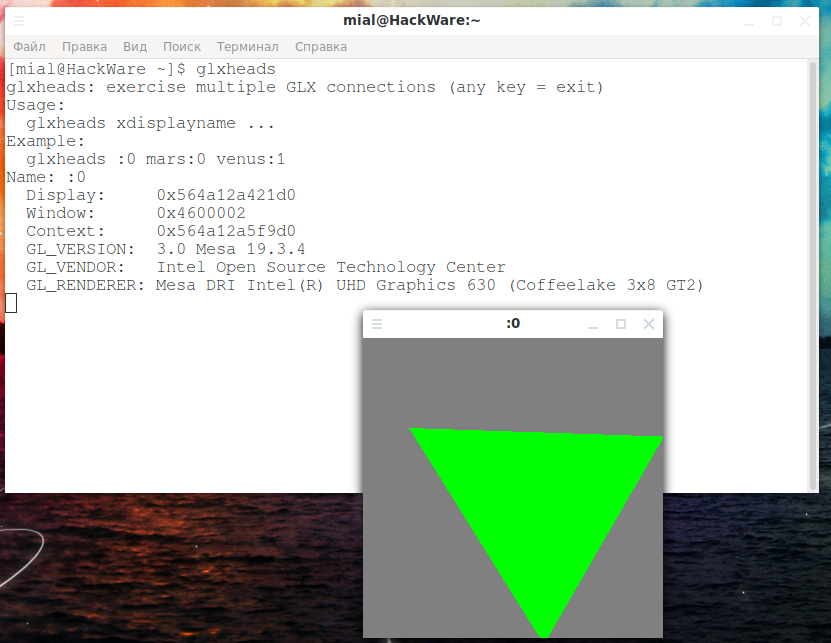
Another command that displays information about the active GPU (and a cool triangle as a bonus):
Using the lspci command with certain options, you can display information about the GPU. Any controller with [VGA controller] at the end is your currently active GPU. The others are switched off. Command to filter data:
How to check whether an NVIDIA graphics card is active
The following command will show the processes that the NVIDIA graphics card uses (if there are no processes, then the video adapter is not used):
Another command that shows the processes that consume the resources of an NVIDIA graphics card, as well as its load level, temperature and other metrics:
How to install NVIDIA video driver on Arch Linux or BlackArch
To install the NVidia driver in Arch Linux, BlackArch and their derivatives, run the command:
How to install and use Bumblebee (how to enable NVIDIA Optimus on Arch Linux)
The Bumblebee package is needed to automatically switch between integrated and discrete graphics cards. Your card must support NVidia Optimus technology, a list of supporting cards can be found on this page: https://www.geforce.com/hardware/technology/optimus/supported-gpus
If your card is there, then proceed to the following commands. You must already have the NVIDIA proprietary driver installed, as shown above.
On Arch Linux, BlackArch, and their derivatives, run:
System freezes after installing Bumblebee
I ran into a problem that Bumblebee works, but when using some commands that use CUDA or access kernel modules, the system freezes. To check if you have this problem, run the lspci command, for example:
If the system freezes completely, reboot and remove the bbswitch package.
How to use Bumblebee / NVIDIA Optimus on Linux
Now any program that should use the NVIDIA graphics card can be launched with a command of the form:
When optirun is not used, the NVIDIA card must be in the off state, which should save electricity.
How to test Bumblebee / NVIDIA Optimus on Linux
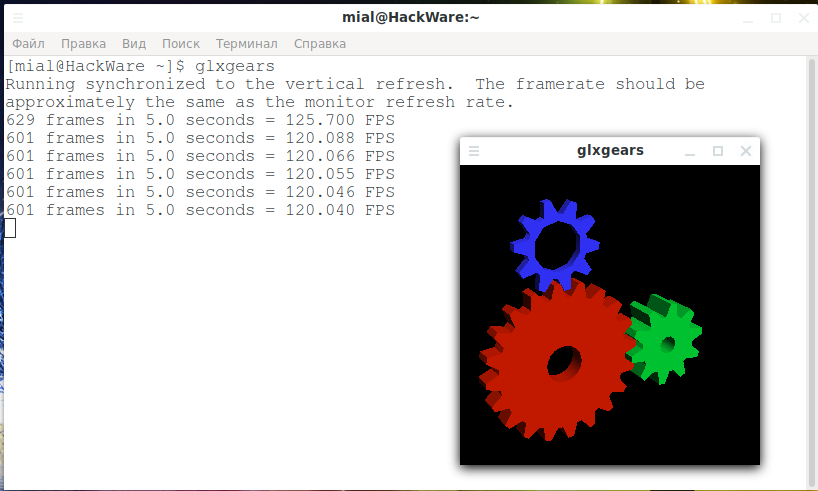
Run the GPU performance test with the usual command:
And also with optirun:

Note that FPS has grown approximately 20 times.
Another option for a video card test:
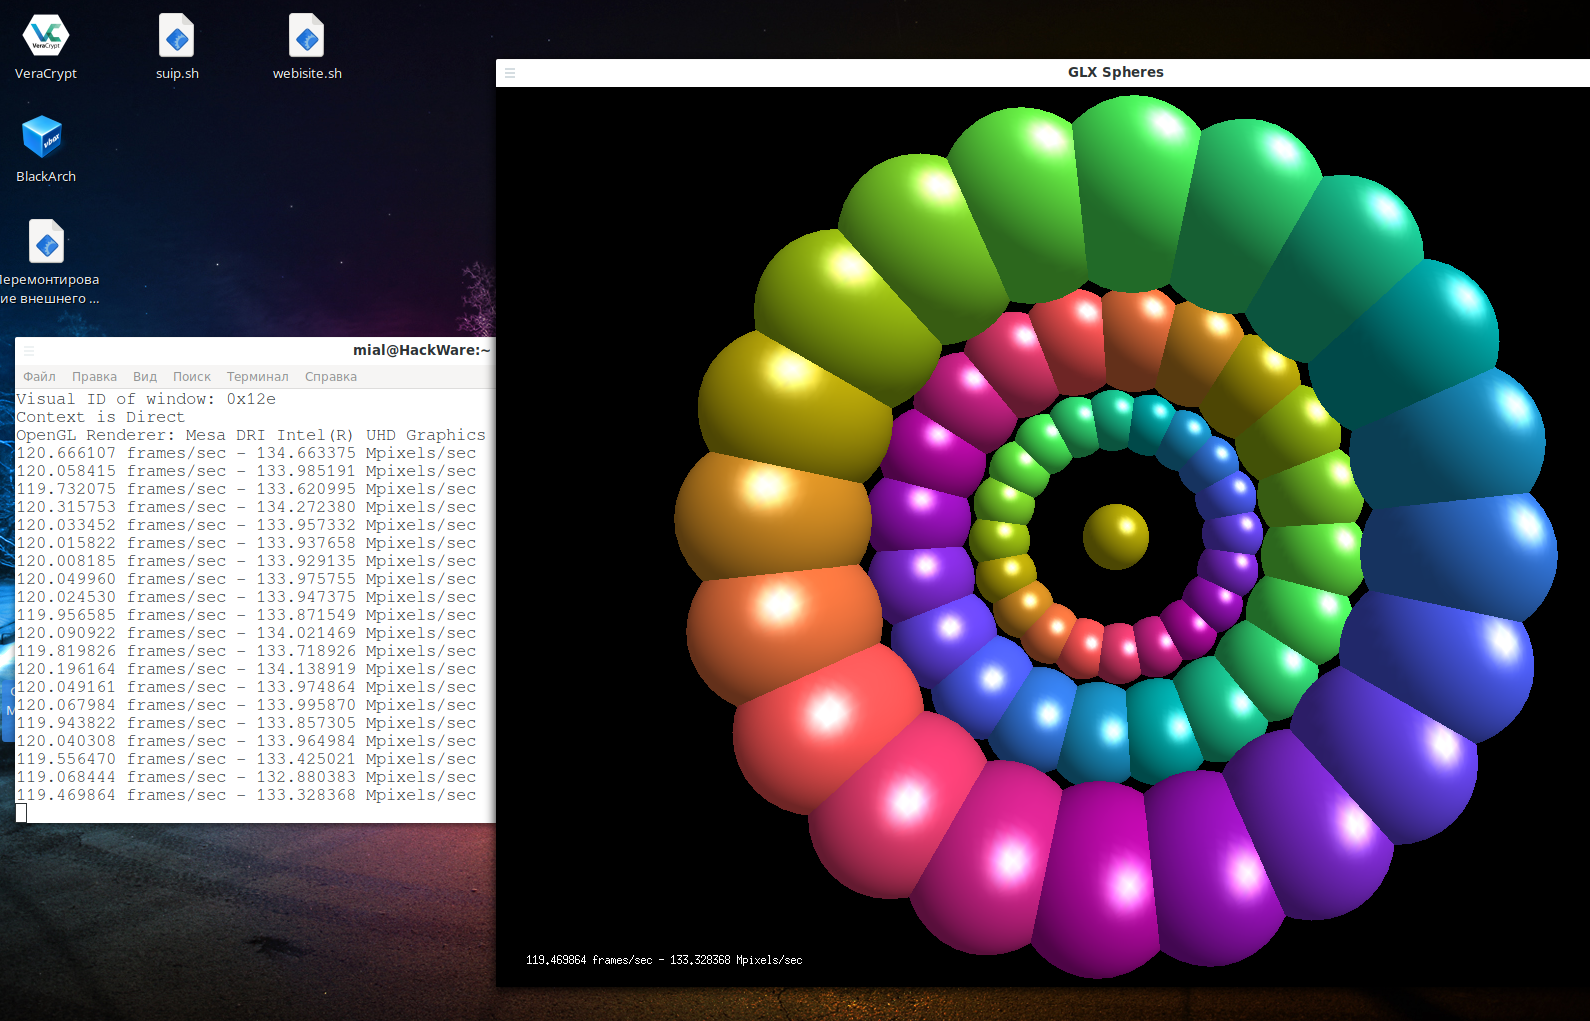
And also with optirun:

You should see a performance boost when using optirun.
While these tests are running, run the command:
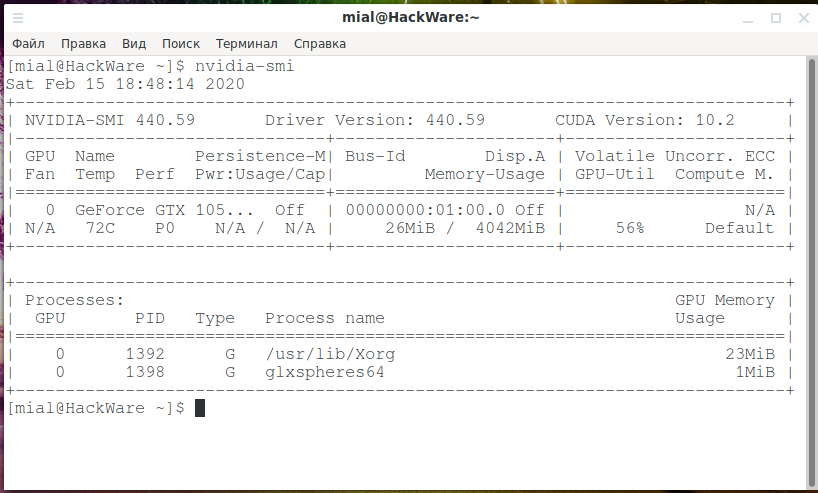
You should see processes that use a discrete graphics card.
If you have the Chromium web browser installed, then launch it in two ways:
In both cases, open the tab:
There you will see information about the active graphics chip:
Источник
GPGPU
Contents
OpenCL
OpenCL (Open Computing Language) is an open, royalty-free parallel programming specification developed by the Khronos Group, a non-profit consortium.
The OpenCL specification describes a programming language, a general environment that is required to be present, and a C API to enable programmers to call into this environment.
OpenCL Runtime
To execute programs that use OpenCL, a compatible hardware runtime needs to be installed.
AMD/ATI
- opencl-mesa : free runtime for AMDGPU and Radeon
- opencl-amdAUR : proprietary standalone runtime for AMDGPU and AMDGPU PRO
- rocm-opencl-runtimeAUR : Part of AMD’s ROCm GPU compute stack, officially supporting GFX8 and later cards (Fiji, Polaris, Vega), with unofficial and partial support for Navi10 based cards.
- amdapp-sdkAUR : AMD CPU runtime
NVIDIA
Intel
- intel-compute-runtime : a.k.a. the Neo OpenCL runtime, the open-source implementation for Intel HD Graphics GPU on Gen8 (Broadwell) and beyond.
- beignetAUR : the open-source implementation for Intel HD Graphics GPU on Gen7 (Ivy Bridge) and beyond, deprecated by Intel in favour of NEO OpenCL driver, remains recommended solution for legacy HW platforms (e.g. Ivy Bridge, Haswell).
- intel-openclAUR : the proprietary implementation for Intel HD Graphics GPU on Gen7 (Ivy Bridge) and beyond, deprecated by Intel in favour of NEO OpenCL driver, remains recommended solution for legacy HW platforms (e.g. Ivy Bridge, Haswell).
- intel-opencl-runtimeAUR : the implementation for Intel Core and Xeon processors. It also supports non-Intel CPUs.
Others
- pocl : LLVM-based OpenCL implementation (hardware independent)
OpenCL ICD loader (libOpenCL.so)
The OpenCL ICD loader is supposed to be a platform-agnostic library that provides the means to load device-specific drivers through the OpenCL API. Most OpenCL vendors provide their own implementation of an OpenCL ICD loader, and these should all work with the other vendors’ OpenCL implementations. Unfortunately, most vendors do not provide completely up-to-date ICD loaders, and therefore Arch Linux has decided to provide this library from a separate project ( ocl-icd ) which currently provides a functioning implementation of the current OpenCL API.
The other ICD loader libraries are installed as part of each vendor’s SDK. If you want to ensure the ICD loader from the ocl-icd package is used, you can create a file in /etc/ld.so.conf.d which adds /usr/lib to the dynamic program loader’s search directories:
This is necessary because all the SDKs add their runtime’s lib directories to the search path through ld.so.conf.d files.
The available packages containing various OpenCL ICDs are:
OpenCL Development
For OpenCL development, the bare minimum additional packages required, are:
- ocl-icd : OpenCL ICD loader implementation, up to date with the latest OpenCL specification.
- opencl-headers : OpenCL C/C++ API headers.
The vendors’ SDKs provide a multitude of tools and support libraries:
- intel-opencl-sdkAUR : Intel OpenCL SDK (old version, new OpenCL SDKs are included in the INDE and Intel Media Server Studio)
- amdapp-sdkAUR : This package is installed as /opt/AMDAPP and apart from SDK files it also contains a number of code samples ( /opt/AMDAPP/SDK/samples/ ). It also provides the clinfo utility which lists OpenCL platforms and devices present in the system and displays detailed information about them. As the SDK itself contains a CPU OpenCL driver, no extra driver is needed to execute OpenCL on CPU devices (regardless of its vendor).
- cuda : Nvidia’s GPU SDK which includes support for OpenCL 1.1.
Implementations
To see which OpenCL implementations are currently active on your system, use the following command:
To find out all possible (known) properties of the OpenCL platform and devices available on the system, install clinfo .
Language bindings
- JavaScript/HTML5: WebCL
- Python: python-pyopencl
- D: cl4d or DCompute
- Java: Aparapi or JOCL (a part of JogAmp)
- Mono/.NET: Open Toolkit
- Go: OpenCL bindings for Go
- Racket: Racket has a native interface on PLaneT that can be installed via raco.
- Rust: ocl
- Julia: OpenCL.jl
SYCL is another open and royalty-free standard by the Khronos Group that defines a single-source heterogeneous programming model for C++ on top of OpenCL 1.2.
SYCL consists of a runtime part and a C++ device compiler. The device compiler may target any number and kind of accelerators. The runtime is required to fall back to a pure CPU code path in case no OpenCL implementation can be found.
Implementations
- computecppAUR Codeplay’s proprietary implementation of SYCL 1.2.1. Can target SPIR, SPIR-V and experimentally PTX (NVIDIA) as device targets.
- trisycl-gitAUR : Open source implementation mainly driven by Xilinx.
- hipsycl-cuda-gitAUR and hipsycl-rocm-gitAUR : Free implementation built over AMD’s HIP instead of OpenCL. Is able to run on AMD and NVIDIA GPUs.
Checking For SPIR Support
Most SYCL implementations are able to compile the accelerator code to SPIR or SPIR-V. Both are intermediate languages designed by Khronos that can be consumed by an OpenCL driver. To check whether SPIR or SPIR-V are supported clinfo can be used:
ComputeCpp additionally ships with a tool that summarizes the relevant system information:
Drivers known to at least partially support SPIR or SPIR-V include intel-compute-runtime , intel-opencl-runtime AUR , pocl and amdgpu-pro-opencl AUR [broken link: package not found] .
SYCL Development
SYCL requires a working C++11 environment to be set up. There are a few open source libraries available:
- ComputeCpp SDK: Collection of code examples, cmake integration for ComputeCpp
- SYCL-DNN: Neural network performance primitives
- SYCL-BLAS: Linear algebra performance primitives
- VisionCpp: Computer Vision library
- SYCL Parallel STL: GPU implementation of the C++17 parallel algorithms
CUDA (Compute Unified Device Architecture) is NVIDIA’s proprietary, closed-source parallel computing architecture and framework. It requires an NVIDIA GPU, and consists of several components:
- Required:
- Proprietary NVIDIA kernel module
- CUDA «driver» and «runtime» libraries
- Optional:
- Additional libraries: CUBLAS, CUFFT, CUSPARSE, etc.
- CUDA toolkit, including the nvcc compiler
- CUDA SDK, which contains many code samples and examples of CUDA and OpenCL programs
The kernel module and CUDA «driver» library are shipped in nvidia and opencl-nvidia . The «runtime» library and the rest of the CUDA toolkit are available in cuda . cuda-gdb needs ncurses5-compat-libs AUR to be installed, see FS#46598.
Development
The cuda package installs all components in the directory /opt/cuda . For compiling CUDA code, add /opt/cuda/include to your include path in the compiler instructions. For example, this can be accomplished by adding -I/opt/cuda/include to the compiler flags/options. To use nvcc , a gcc wrapper provided by NVIDIA, add /opt/cuda/bin to your path.
To find whether the installation was successful and whether CUDA is up and running, you can compile the samples installed on /opt/cuda/samples (you can simply run make inside the directory, altough it is a good practice to copy the /opt/cuda/samples directory to your home directory before compiling) and run the compiled samples. One way to check the installation is to run the deviceQuery sample.
Language bindings
- Fortran: PGI CUDA Fortran Compiler
- Haskell: The accelerate package lists available CUDA backends
- Java: JCuda
- Mathematica: CUDAlink
- Mono/.NET: CUDAfy.NET, managedCuda
- Perl: KappaCUDA, CUDA-Minimal
- Python: python-pycuda
- Ruby: rbcuda
- Rust: cuda-sys (bindings) or RustaCUDA (high-level wrapper)
 This article or section is a candidate for merging with #OpenCL.
ROCm (Radeon Open Compute) is AMD’s open-source parallel computing architecture and framework. Although it requires an AMD GPU some ROCm tools are hardware agnostic.
ROCm 3.7 with OpenCL Image Support
ROCm 3.7 now includes OpenCL Image Support used by GPGPU accelerated software such as Darktable. ROCm with the AMDGPU open source graphics driver are all that is required. AMDGPU PRO is not required.
List of GPGPU accelerated software
 This article or section needs expansion.
Источник
NVidia CUDA. Настройка среды разработки на базе Arch Linux


Compute Unified Device Architecture, дословно – унифицированная вычислительная архитектура устройств – архитектура (совокупность программных и аппаратных средств), позволяющая производить на GPU вычисления общего назначения, при этом GPU фактически выступает в роли мощного сопроцессора.
Эта технология заинтересовала меня для применения при разработке вычислительного комплекса моделирования движения тяжелых грузовых поездов. Изначально проект развивался на базе OC Windows 7 Ultimate и MS Visual Studio 2010 в качестве средства разработки.
Однако желание избавить проект от использования проприетарного ПО (мало доступного в академической среде, и доставаемого сами знаете как…) подвигла меня на поиск путей создания бесплатной платформы разработки, благо NVidia предоставляет Toolkit и SDK безвозмездно. Кстати вышел резил-кандидат CUDA 5.0 со специализированной средой разработки, но доступный для Windows, Mac OS и популярных дистрибутивов Linux, к коим арч не совсем относится.
Тем не менее засучив рукава я приступил к настройке своего арча для работы с CUDA. И, о чудо, драйвера и тулкиты оказались доступны в официальных репозиториях арча! Радостно мяукнув приступил к…
1. Установка CUDA SDK и Toolkit
Если у Вас не установлены средства разработки на C/C++, то их надо установить
# pacman -S gcc glibc make
Ставим драйвера на видеокарту, если они у Вас ещё не установлены
# pacman -S nvidia
# pacman -S cuda-sdk cuda-toolkit
Собственно и всё, необходимый набор инструментария у вас уже имеется. Лежит все это богатство по адресу /opt/cuda-sdk/ и /opt/cuda-toolkit/. Мне лично было интересно проверить работоспособность CUDA под линуксом на моей видеокарте (GForce 580 GTX) поэтому я сначала собрал все примеры из SDK. Делаем это так
переходим в каталог с исходниками примеров. Собираем их командой
Теперь переходим в /opt/cuda-sdk/C/bin/linux/release/ и любуемся примерами

Сразу предупреждаю, большинство примеров там чисто вычислительные без визуализации, так что не удивляйтесь если сразу не найдете именно этот — smokeParticles. Что ж, полюбовались, идем дальше
2. Выбор среды разработки. Настройка Netbeans 7.2 для работы с CUDA
Честно говоря сначала мой выбор пал на Eclipse IDE, поскольку именно в этой среде я занимался разработкой icq-клиента на Java, привык к ней основательно, да и официальная IDE, релиз коей не за горами основывается именно на эклипсе.
Однако тут меня ждало разочарование — найти толкового описания настройки Eclipse Juno для работы с CUDA я не нашел, предыдущие версии ставить не захотел, а разница в окнах настройки у разных версий эклипса очень ощутимая. Попрыгав с бубном я решил обратить свой взор к Netbeans от “кровавого” Oralce
# pacman -S netbeans
Запускаем Netbeans (Все приложения -> Разработка -> Netbeans — это в “кедах”).
Теперь необходимо настроить среду на сборку CUDA-проектов. Для их сборки модулей содержащих код работающий на GPU (файлы с расширением *.cu) используется компилятор nvcc, входящие в состав CUDA Toolkit. По сути он является оберткой над gcc — код GPU собирает сам, код CPU передает на съедение gcc.
Изначально Netbeans не настроен на работу с конкретным языком программирования, поэтому идем в пункт меню “Сервис -> Подключаемые модули -> Установленные”, в котором выбираем модуль C/C++ и жмем “Активировать”

Перезапускаем среду, идем в “Сервис -> Параметры”. В появившемся окне выбираем C/C++ и на нескольких вкладках последовательно задаем параметры.
В писке “Набор средств” жмем “Добавить”. Задаем базовый каталог — тот в котором будут хранится ваши проекты, семейство набора средств (я поставил GNU) имя набора средств CUDA (на скрине CUDA1, ибо у меня CUDA уже есть, а для иллюстрации удалять не хотелось)

Задаем пути к компилятору C/C++

Задаем дополнительные каталоги заголовочных файлов для компиляторов C и C++

Добавить расширение *.cu в список поддерживаемых расширений


В принципе всё готово для создания проектов с использованием CUDA. Однако опционально можно настроить подсветку синтаксиса в Netbeans, вернее отключить некоторые настройки “Сервис -> Параметры -> Редактор -> Выделение”. Выбираем язык “Исходные файлы на C/C++” и снимаем галочки “Выделить ошибки синтаксиса”, “Выделить неразрешенные файлы include” и “Выделить неразрешенные идентификаторы”.

Для чего это делаеть? Дело в том, что разработка для CUDA ведется не на С/С++ а на его расширении CUDA C, содержащем ключевые слова и идентификаторы не входящие в стандарт. Редактор безбожно покрывается красными волнистыми линиями подчеркивания “неправильных слов” и пестрит иконками восклицательных знаков ошибок, хотя проект отлично собирается и выполняется. Такая настройка избавит Вас от такого раздражителя, а ошибки компиляции всё равно будут подсвечиваться в исходном коде при щелчке по сообщению об ошибке в логе компиляции.
Теперь все готово для создания первого проекта. Идем в меню “Файл -> Создать проект”. В категориях выбираем C/C++, в проектах “Приложение С/С++”. Жмем “Далее”.

Мы будем создавать пустой проект, поэтому в настройках снимаем галку “Создать главный файл проекта”, задаем имя проекта hello_CUDA, выбираем набор средств “CUDA (Набор компиляторв GNU)”

Жмем готово, и видим появившееся слева дерево проекта, которое пока ничего не содержит.

Щелкаем правой клавишей по папке “Исходные файлы” и в меню выбираем “Новый -> Исходный файл на языке C++”. В появившемся окне задаем имя и расширение файла *.cu. Жмем “Готово” и переходим в редактор кода, в котором набираем такой текст
Далее щелкаем правой кнопкой по имени проекта в дереве и в меню выбираем “Свойства”. В открывшемся окне выбираем вкладку “Собрать” и снимаем галочку “Включить проверку зависимостей”

После этого жмем F11 — собираем проект. Сообщение
означает что проект успешно собран. Жмем F6 для запуска.
Данный код выполнялся конечно на CPU, о чем говорит директива __host__ в описании функции main(). Так что данный пример иллюстрирует лишь пригодность Netbeans в качестве IDE для разработки для NVidia CUDA. Дальнейшее впереди… 🙂

Приятно удивило наличие всего необходимого ПО в репозиториях арча. В той же винде с установкой куды и настройкой среды надо повозится
© 2006-2021, Русскоязычное сообщество Arch Linux.
Название и логотип Arch Linux ™ являются признанными торговыми марками.
Linux ® — зарегистрированная торговая марка Linus Torvalds и LMI.
Источник


