- Создание загрузочной флешки Windows 10 в Linux
- Загрузочная флешка Windows 10 с помощью WoeUSB
- Создание загрузочной флешки Windows 10 в Linux без программ
- Create A Bootable Windows 7 USB Drive From Linux (Tested On Ubuntu)
- How to create a bootable Windows 7 USB Drive while using Ubuntu
- How to Create a Bootable Windows 10 USB on Ubuntu
- How to Create Bootable Windows 10 USB on Ubuntu
- 1. Install WoeUSB on Ubuntu
- 2. Run WoeUSB
- 3. Create Windows 10 Bootable USB
- How To Make A Bootable Windows 10 USB On Linux Using The New WoeUSB
- How to install WoeUSB (command line tool)
- How to use WoeUSB command line tool to create a bootable Windows USB drive
Создание загрузочной флешки Windows 10 в Linux
 Если вам по той или иной причине потребовалась загрузочная флешка Windows 10 (или другой версии ОС), при этом на имеющемся компьютере в наличии только Linux (Ubuntu, Mint, другие дистрибутивы), вы сравнительно легко можете записать её.
В этой инструкции пошагово о двух способах создать загрузочную флешку Windows 10 из Linux, которые подойдут как для установки на UEFI-системе, так и для того, чтобы установить ОС в Legacy режиме. Также могут пригодиться материалы: Лучшие программы для создания загрузочной флешки, Загрузочная флешка Windows 10.
Загрузочная флешка Windows 10 с помощью WoeUSB
Первый способ создания загрузочной флешки Windows 10 в Linux — использование бесплатной программы WoeUSB. Созданный с её помощью накопитель работает и в UEFI и в Legacy режиме.
Для установки программы используйте следующие команды в терминале
После установки порядок действий будет следующим:
- Запустите программу.
- Выберите ISO образ диска в разделе «From a disk image» (также, при желании, можно сделать загрузочную флешку с оптического диска или смонтированного образа).
- В разделе «Target device» укажите флешку, на которую будет записан образ (данные с неё будут удалены).

- Нажмите кнопку Install и дождитесь завершения записи загрузочной флешки.
- При появлении ошибки с кодом 256 «Source media is currently mounted», размонтируйте образ ISO с Windows 10.
- При ошибке «Target device is currently busy», размонтируйте и отключите флешку, затем снова подключите её, обычно помогает. Если не сработало, попробуйте предварительно отформатировать её.


На этом процесс записи завершен, можно использовать созданный USB накопитель для установки системы.
Создание загрузочной флешки Windows 10 в Linux без программ
Этот способ, пожалуй, ещё проще, но подойдет только в том случае, если вы планируете загружаться с созданного накопителя на UEFI-системе и устанавливать Windows 10 на GPT диск.
- Отформатируйте флешку в FAT32, например, в приложении «Диски» в Ubuntu.
- Смонтируйте образ ISO с Windows 10 и просто скопируйте всё его содержимое на отформатированную флешку.


Загрузочная флешка Windows 10 для UEFI готова и с неё можно без проблем загрузиться в EFI-режиме.
А вдруг и это будет интересно:
Почему бы не подписаться?
Рассылка новых, иногда интересных и полезных, материалов сайта remontka.pro. Никакой рекламы и бесплатная компьютерная помощь подписчикам от автора. Другие способы подписки (ВК, Одноклассники, Телеграм, Facebook, Twitter, Youtube, Яндекс.Дзен)
29.03.2019 в 19:31
Ошибка и в программе и при обычном копировании — файл install.wim больше 4 гб
29.03.2019 в 19:48
Видимо, какая-то сборка у вас, где не позаботились о записи на FAT32 под UEFI. Решение — найти где-то Windows-машину или использовать виртуалку и там записать (Rufus умеет делать под UEFI с NTFS).
04.12.2019 в 17:14
Боже как же мне нравиться этот в линуксе с созданием загрузочных флешек windows. Нет ни одной нормальной проги которая могла бы нормально записать, эти вечные пляски с костылями. Ради записи теперь придется ставить виртуалку, мда, и это ради записи windows на флешку.
06.03.2020 в 12:32
ну да, если мозгов набрать в консоли dd не хватает, то можно и виртуалку поставить и комп с предустановленной виндой купить…
27.06.2020 в 18:10
При ошибке «Target device is currently busy», размонтируйте и отключите флешку, затем снова подключите её, обычно помогает. Если не сработало, попробуйте предварительно отформатировать её.
ээээ…. а ничего, что нужно просто отмонтировать её и продолжить?
05.08.2020 в 21:22
Почитал и прозрел от деградации пользователей пк… лень встроенные софтинки использовать. Только потому что общаюсь с людями — у которых: — «вы все хорошо сделали, но у меня в опере одноклассники стояли… а теперь их нет.» Поэтому не плюнул в монитор!
пысы — не зная DOS, не суй свой нос.
25.08.2020 в 16:21
У меня ошибка:
Installation failed!
Exit code: 256
Log:
WoeUSB v3.3.1
11.09.2020 в 13:12
Я линакс переустановил, нормалек пошлоу
01.02.2021 в 10:52
Попытка установить на минд не увенчалась успехом, выдает в итоге такую бяку:
sudo apt install woeusb
Чтение списков пакетов… Готово
Построение дерева зависимостей
Чтение информации о состоянии… Готово
Некоторые пакеты не могут быть установлены. Возможно, то, что вы просите,
неосуществимо, или же вы используете нестабильную версию дистрибутива, где
запрошенные вами пакеты ещё не созданы или были удалены из Incoming.
Следующая информация, возможно, вам поможет:
Следующие пакеты имеют неудовлетворённые зависимости:
woeusb : Зависит: libwxgtk3.0-0v5 (>= 3.0.4+dfsg) но он не может быть установлен
E: Невозможно исправить ошибки: у вас зафиксированы сломанные пакеты.
15.02.2021 в 18:00
как вы решили эту проблему? у меня точно такая же, только на убунту
Create A Bootable Windows 7 USB Drive From Linux (Tested On Ubuntu)
Author : Andrew | Posted: October 07, 2010
How to create a bootable Windows 7 USB Drive while using Ubuntu
Firstly, make sure you have a Windows 7 .ISO file (you can create it from the DVD) and a 4GB USB flash drive (or larger).
1. Install Gparted and format the USB drive to NTFS. In Ubuntu, use the following command to install Gparted:
To be able to format a drive to NTFS, you’ll also need ntfs-3g — install it using the following command:

I’m not sure if UNetbootin will mark the drive as bootable as my USB drive already had the «boot» flag enabled from Gparted, so you may want to enable it too: right click the USB drive and select «Manage flags», then check the «boot» flag.
Then you’ll have to mount the USB drive back. You can do it from the command line or Disk Utility (System > Administration > Disk Utility) but to keep things simple, you can just unplug the USB flash drive and plug it back in to the computer.
2. Some users have reported that some recent Unetbootin versions no longer let you select an USB drive formatted to NTFS and by formatting it to FAT, the Windows 7 installation fails. So here’s what to do: download Unetbootin version 494 from HERE (version tested and it should work).
Then, right click the downloaded Unetbootin file, select Properties and on the «Permissions» tab, check the «Allow executing file as program» box. Then simply double click it and it should open.
Using this (494) Unetbootin version, you have an option to «Show all Drives» which lets you select the NTFS formatted drive and write the Windows 7 ISO onto it. With newer version, this option is no longer available.
3. Open UNetbootin, select «Diskimage» and then browse for your Windows 7 ISO file.
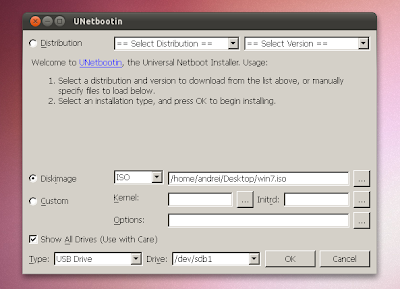
Now simply click the «OK» button and wait for the files to be copied to the USB drive.
After Unetbootin is done, you can use the USB stick to install Windows 7 on any computer that supports booting from an USB drive.
Update: you may want to check out WinUSB (fork) instead, a tool that can create bootable Windows 10 as well as 8 and 7 sticks from Linux. See here: Make A Bootable Windows 10 USB Install Stick On Linux With WinUSB Fork
How to Create a Bootable Windows 10 USB on Ubuntu
Learn how to create a bootable Windows 10 USB on Ubuntu and Linux Mint using a free application called ‘WoeUSB’.
While I don’t use Windows 10 often I do know that, every now and then, I might have need to. And should I need to create a bootable Windows 10 USB I’d like do it from my Ubuntu desktop.
Now, the method I show you in this post is just one of several ways to perform this particular task. So while I think it’s the easy way to create a bootable Windows 10 USB (one that actually boots) it’s not the only way.
How to Create Bootable Windows 10 USB on Ubuntu

WoeUSB is the (oddly named) app we are going use to make a bootable Windows 10 USB stick on the Ubuntu desktop. It’s a fork of an earlier tool called WinUSB.
This tool is free, open-source software. It is available as both a GUI app and CLI client. In this tutorial we only focus on the GUI steps.
WoeUSB lets you make a bootable USB for most modern Windows releases, including Windows Vista, Windows 7, Window 8, and Windows 10. The tool supports all languages and all versions of Windows, including pro, home, N, 32-bit, etc. It will work with both ‘legacy’ and ‘UEFI’ bootmodes, too.
For advanced usage you can dive in to the WoeUSB CLI which has all sorts of flags and switches. Most of you will be fine using the GUI client though.
To create a bootable Windows 10 USB on Ubuntu you will need:
- WoeUSB app
- USB flash drive (4GB minimum)
- Windows 10 .iso file
Microsoft lets you download Windows 10 disc images from their website so if you don’t have one, you can go grab one. Be aware that you will need a valid Windows license to activate and use the OS, but you don’t need one to create an install USB or install it.
1. Install WoeUSB on Ubuntu
WoeUSB is no longer actively maintained so you can no longer download the tool from its Github page.
The easiest way to install WoeUSB on Ubuntu is to use the following PPA. This repo provides pre-built packages of WoeUSB for Ubuntu 18.04 LTS and 20.04 LTS:
Installers for Ubuntu 16.04 LTS (32-bit) are also available.
2. Run WoeUSB
Once WoeUSB is installed you can launch the app from the applications menu on your desktop.
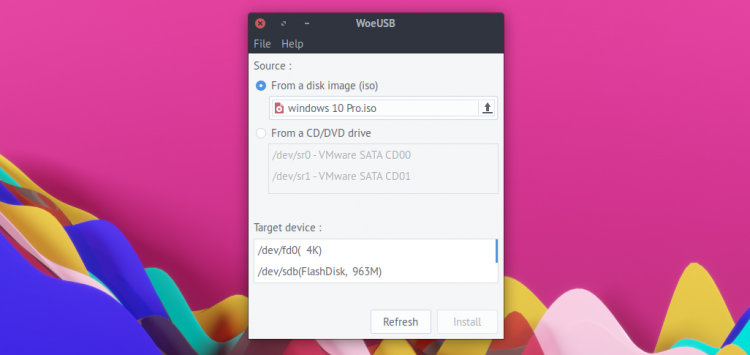
The app is very easy to use.
First, select a valid Windows 10 ISO image using the file selector, and then select the correct USB drive you want to install it to from the ‘Target device’ section.
If you don’t see your USB device listed in the ‘Target device’ section make sure it’s attached and then click the ‘refresh’ button to update the list of attached devices.
3. Create Windows 10 Bootable USB
Once you’re ready to roll you can go ahead and hit install.
But before you do this please, please double-check that you’ve selected the correct drive first. The install process will reformat and wipe the contents of the selected USB drive. You will lose any data stored on it.
Other than that, the tool will do the rest. Just let it run its course. Once done you can close the app, eject the USB and use it to install Windows 10 on a different device.
Everything should work as normal — though I’m told the app may spit an error out but the USB will still boot/install fine — but if it doesn’t you can file bugs on the WoeUSB Github page.
Home » How To » How to Create a Bootable Windows 10 USB on Ubuntu
How To Make A Bootable Windows 10 USB On Linux Using The New WoeUSB
WoeUSB is no more. At least in its original form. The tool that’s used to create bootable Windows USB drives from Linux has been split into a command line program called WoeUSB, which is under active development, and a GUI called WoeUSB-frontend-wxgtk that’s currently unmaintained.
There’s also an independent Python port of WoeUSB, called WoeUSB-ng, that’s actively maintained.
The new WoeUSB, which is now just a command line tool, supports creating a bootable Windows USB drive from Linux with support for both Legacy PC and UEFI booting. The filesystem can be either FAT32 or NTFS, and the source can be a disk image or a physical installation disk. It’s also wroth noting that WoeUSB supports non-ASCII filenames.
As for supported Windows installation images, WoeUSB supports Windows Vista, Windows 7, Windows 8, Windows 8.1 and Windows 10, in any language or edition. Windows PE is also supported.
How to install WoeUSB (command line tool)
The new WoeUSB has the following dependencies: Bash >= 4.3, Coreutils, util-linux, Grep and Gawk, Find Utilities, Parted, and Wget. p7zip is an optional dependency, required for example when the Windows 7 installation media doesn’t ship with the USEFI bootloader in the proper location.
On Debian, Ubuntu, and Linux distributions based on these, like Pop!_OS, Linux Mint, Zorin OS, etc., you can install these dependencies by using (most are already installed, but just in case; I’m skipping some packages that are almost always installed, like Bash or Find):
Arch Linux / Manjaro:
Now you can install the new, command line only WoeUSB somewhere in your PATH (the commands below download it and install it to /usr/local/bin):
How to use WoeUSB command line tool to create a bootable Windows USB drive
1. To get started, plug the USB stick you want to use to create a bootable Windows installation, into your computer. Wait a couple of seconds, then use the command below to list all disks connected to your computer, including the USB drive:
Example with this command showing an USB drive attached to my computer:
In this example output you can find the USB device name by looking under Disk , so in this example’s case it’s /dev/sdd . The partitions are listed below the Disk Flags , so in this example you can see 2 partitions: 1 and 2 (and since the device name is /dev/sdd , the partitions are /dev/sdd1 and /dev/sdd2 ).
2. Unmount any mounted USB drive partitions
In case the USB drive you’ve just inserted was mounted, unmount it before proceeding using:
Replace /dev/sdXN with the USB device partitions (see step 1).
3. Create a bootable Windows drive from Linux using WoeUSB
There are 2 ways you can do this. The device creation method completely wipes the entire USB storage device, then build a bootable Windows USB device from scratch. The partition creation method copies the Windows ISO files to an existing partition (that you choose) of an USB storage device and make it bootable, only overwriting files that already exist under the same name on the USB.
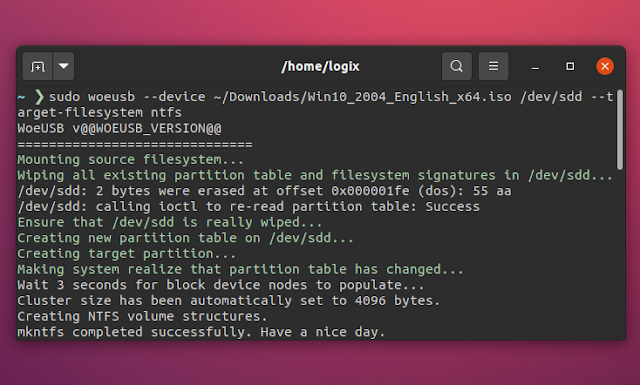
To create a bootable Windows USB drive from Linux using WoeUSB in device mode, use:
- —device specifies the device creation mode, «device» in this case
- /path/to/Windows.iso — replace this with the path to the Windows ISO you want to use for the bootable USB media creation
- /dev/sdX is the USB device you found out under step 1 (for example /dev/sdd ).
- —target-filesystem ntfs specifies to use NTFS as the target filesystem, instead of the default FAT32. Without this, you’ll get into an error in most cases, saying that the source image has exceeded the FAT32 4GiB file size limitation, like this: Error: File «/media/woeusb_source_1602672597_513603/sources/install.wim» in source image has exceed the FAT32 Filesystem 4GiB Single File Size Limitation and cannot be installed. You must specify a different —target-filesystem.
Important: double-check that the USB device is correct before running the command! All the data on that drive will be lost!
To create a bootable Windows USB drive from Linux using WoeUSB in partition mode, use:
- —partition specifies to use the WoeUSB partition mode, which copies the Windows ISO files to an existing partition (that you choose) of an USB storage device and make it bootable, only overwriting files that already exist under the same name on the USB
- /path/to/Windows.iso — replace this with the path to the Windows ISO you want to use for the bootable USB media creation
- /dev/sdXN is the USB device partition to which you want to copy the Windows files to. You can find the device and partition by using sudo parted -l , as explained under step 1 (for example /dev/sdd1 ).
We’re not specifying the partition target filesystem type when using WoeUSB in partition mode, because this only copies the files to a partition on the USB stick, so the partition is already supposed be NTFS.
Reminder: double-check that the USB device and partition are correct before running the command! All the data on that drive will be lost!
For more WoeUSB options, like specifying your own label for the newly created filesystem, apply a workaround for a BIOS bug that won’t include the device in the boot menu if no partition has a boot flag toggled, and more, see the application help ( woeusb —help ).


