- [Top 4 Ways ] to Create Windows 10/8/7 Bootable USB From ISO
- Part One: Why to Create Windows 10/8/7 Bootable USB on Mac is Tough?
- Part Two: How to Create Windows 10/8/7 Bootable USB on Mac
- Method 1: Create Windows 10/8/7 Bootable USB on Mac Using “Boot Camp Assistant”
- Method 2: Create Windows 10/8/7 Bootable USB on Mac Using “PassFab 4winkey”
- Video Tutorial about How to Create Bootable Windows USB on Mac
- Method 3: Create Windows 10/8/7 Bootable USB on Mac Using “UNetbootin”
- Warning:
- Method 4: Create Windows 10/8/7 Bootable USB on Mac Using “using Terminal”
- Part Three: Additional Tips
- Q1: Is it safe to Install Windows on a Macbook?
- Q2: Is it possible to create a bootable USB using Disk Utility?
- Final Notes
- How to Make a Windows 10 USB Using Your Mac — Build a Bootable ISO From Your Mac’s Terminal
- Step 1: Download the Windows 10 ISO file
- Step 2: Insert your USB storage drive into your Mac
- Step 3: Use the diskutil command to identify which drive your USB is mounted on
- Step 4: Format your USB Drive to work with Windows
- Step 5: Use hdiutil to mount the Windows 10 folder and prepare it for transfer.
- Step 6: Copy the Windows 10 ISO over to your USB Drive
- Step 7: Put your USB into your new PC and start loading Windows
[Top 4 Ways ] to Create Windows 10/8/7 Bootable USB From ISO
Creating a Bootable Window 8 ISO from Mac was quite easy back then where Mac OS X was in the trend. Later, Mac OS Mojave came into the picture, and the in-built Boot Camp Assistant is no longer supported.
Therefore the process to create Windows 10 bootable USB on Mac for pc from ISO became much more complex and tricky. However, irrespective of the process complexity, Since you are reading this guide, you don’t have to worry about the complexity of the process to burn ISO to USB windows 10 using Mac.
In this guide, I have listed 4 different ways to create a windows 10 bootable USB from ISO on a Mac device. Besides this, we have briefly explained why you should have a bootable windows 10/8 USB ready with you.
Let’s begin with the explanation first.
Part One: Why to Create Windows 10/8/7 Bootable USB on Mac is Tough?
Part Two: How to Create Windows 10/8/7 Bootable USB on Mac
Part Three: Additional Tip
Part One: Why to Create Windows 10/8/7 Bootable USB on Mac is Tough?
There could be a situation where your Windows system is compromised due to some virus attack or sudden malware attack. Therefore, it’s always handy to have an extra bootable USB lying around so that in the future, if anything goes wrong, you have Windows available with you.
But the thing is, creating a windows bootable USB from ISO on mac is quite tough. If you are doing it for the first time, you might end up getting different unknown errors.
Because Mac Computers have a different architecture than Windows Computers. Mac computers have got some discrepancies that make them vulnerable while operating on different files especially, the files that are created for Windows OS in the first place.
Apart from this, an ISO Image file contains fragmented and archive files compressed from an optical disk. In order to burn them to a USB, i.e., creating a bootable USB from ISO, segregation of the image files is required.
Part Two: How to Create Windows 10/8/7 Bootable USB on Mac
Before you jump on the 4 ways to create a windows USB on Mac, Let me tell you that there are some pre-requisites of these methods.
All of them are listed below:
- Windows 10/8 ISO file.
- USB Flash Drive of at least 16 GB Memory
You can either ask a friend for the ISO file or instead, you can directly download the required ISO file from Microsoft’s portal.
Now, let’s move to the different ways to create windows bootable usb on mac:
Method 1: Create Windows 10/8/7 Bootable USB on Mac Using “Boot Camp Assistant”
Earlier, I have told you the after the release of macOS Mojave and later, Boot Camp Assistant is no longer supported but if you are using an older version of macOS on your Mac device, this method will be ideal for you.
Follow the below-mentioned steps carefully:
- Insert USB Flash Drive.
Now run Bootcamp Assistant, select the box for «Create a Windows 7 or later version install disk» and uncheck «Install Windows 7 or later version.» Click Continue to go for the next step.

Once the ISO file is located, you need to select the USB Flash Drive.
A new process will begin, you have to wait until it terminates successfully.
That’s how you are going to create a bootable USB disk using Mac’s Boot Camp Assistant. Maybe you also want to know how to create windows 10 bootable usb on mac without bootcamp, Please read on, because the following three methods can help you to create bootable windows usb on mac effectively.
Method 2: Create Windows 10/8/7 Bootable USB on Mac Using “PassFab 4winkey”
If you are looking for a precise tool which can create windows 10 bootable usb on mac for pc without bootcamp, and it will reduce maximum hustle, PassFab 4WinKey is an incredible option for you. Though it’s paid, it is worth every penny spent.
Apart from creating Bootable USBs, PassFab 4WinKey has other features like using this tool, you can reset the Windows Admin Password. Overall, it’s a great package.Since we are only talking about Bootable USBs in this guide, we will strictly focus on it only. Before we begin with the steps, it is recommended to download and install the tool.
- Insert USB Drive.
Launch the “PassFab 4WinKey” application. Choose one windows system ISO file and download
Select the “USB Flash Drive” option in the application window.
Click on the “Burn” option and wait for the process to terminate successfully.
That’s how you create a bootable USB from ISO using PassFab 4WinKey. Tthe ISO image has been automatically downloaded from the tool itself. Therefore you don’t have to look around for the Windows ISO file.
Video Tutorial about How to Create Bootable Windows USB on Mac
Method 3: Create Windows 10/8/7 Bootable USB on Mac Using “UNetbootin”
Before jumping on into the process, let me explain to you the UNetBootin tool. It is a free, open-source utility application that enables you to create boot windows USB from Mac in just a few clicks.
Before we begin with steps, you must Download and Install UNetBootin from its official website.
Follow the steps to avoid random/ unwanted errors:
- Insert a USB drive that is empty.
Navigate to “Disk Utility” on your Mac Device.
Launch the “UNetBootin” Application”.
Click on the “DiskImage” option, and select the ISO file.
In Drive: Column, enter the “Drive Name” that you had remembered in Step 4.
Warning:
Make sure you have entered the correct Drive Name, otherwise you’ll end up getting errors or formatting one your local drive.
At last, Click on the “OK” button.
The process of creating a bootable USB will automatically start and it will take a few minutes to terminate successfully.
Though UNetBootin is one of the best utility tools for Mac, but we can’t say it’s the perfect tool. There could be situations where the tool might throw some error without any actual issue.
If you want to create a windows 10 bootable USB on Mac without any errors and don’t want to pay for any tools, you could go with the 4th Method i.e using Terminal. But it also has few disadvantages.
Method 4: Create Windows 10/8/7 Bootable USB on Mac Using “using Terminal”
In this process, you have to write a few lines of code to complete the process successfully.
Don’t worry, you don’t have to go through different internet guides to find the code. I have it all here for you.
- Connect the USB Drive to the Machine.
Launch “Terminal” and Hit the following command:“diskutil list”
Hit the following Query, just change the device_name with your Device’s Name.
diskutil eraseDisk MS-DOS «WIN10» GPT device_name
Here, you are formatting the USB drive and naming it «WIN10». Be very careful with the device name. The wrong entry could format your Mac’s local drive.
In this step, you need to have the address of your ISO file. Once you have it, hit the following command to mount the ISO file.
hdiutil mount
In the above command, replace “filelocation” with the actual location of your file include the name of the extension. For instance, if your file is located in the downloads folder then your file location will be :/Download/Windows-10.iso
- Don’t get confused with the location, otherwise Terminal will throw an error.
Once you have mounted the ISO file, hit the following.
cp — rp /Volumnes/ESD-ISO/* /Volumes/WIN10
With this command, you are telling the terminal to copy the ISO file in the USB drive and it will automatically make it executable.
The above step could take a couple of minutes, once it is completed, you have to unmount the ISO Image. Run the following command:
hdiutil unmount /Volumes/ESD-ISO
That’s all, you have successfully created a bootable USB drive and you can use it for installing windows on any device now.
Teminal is very suitable for making Windows 10 bootable USB on Mac, but if you enter the wrong command, all data on the selected drive will be erased and all data will disappear within a few seconds. Therefore, this is not an ideal solution for beginners who are not familiar with the technical staff.
Part Three: Additional Tips
Apart from these methods, I wanted to discuss a few most asked questions here.
Q1: Is it safe to Install Windows on a Macbook?
The majority of the readers ask me this question and I want to tell all of them that it is completely safe to install Windows on a Macbook. Actually, I have seen people using Windows on a Macbook. Most developers use Windows in Virtual Machine on their Macbook.
Q2: Is it possible to create a bootable USB using Disk Utility?
Yes, it was possible back in the days when MacOS X was used. In the latest macOS versions, this feature of the Disk Utility application is removed due to security reasons. Therefore if you are using an older version of Mac, you can use Disk Utility as well.
Final Notes
So, these were the 4 Best methods to create a bootable USB drive using a Mac device. All these methods are tried and tested, therefore each of them is reliable.
You can pick any of these at your convenience and desire. But if you want to the easiest method to create Windows USB on Mac, PassFab 4WinKey is your ideal choice! Certainly if you came across some error that is bothering you, do let us know in the comments below. We will solve it together.
Источник
How to Make a Windows 10 USB Using Your Mac — Build a Bootable ISO From Your Mac’s Terminal
Most new PCs don’t come with DVD drives anymore. So it can be a pain to install Windows on a new computer.
Luckily, Microsoft makes a tool that you can use to install Windows from a USB storage drive (or «thumbdrive» as they are often called).
But what if you don’t have a second PC for setting up that USB storage drive in the first place?
In this tutorial we’ll show you how you can set this up from a Mac.
Step 1: Download the Windows 10 ISO file
You can download the ISO file straight from Windows. That’s right — everything we’re going to do here is 100% legal and sanctioned by Microsoft.
If you want an English-language version of the latest update of Windows 10, you can download the ISO here.
If you have a relatively new computer, you probably want the 64-bit version. If you’re not sure, go with the 32-bit version to be safe.
If you want a non-English-language version of Windows, or want to get an older update version, download the ISO here instead.
Step 2: Insert your USB storage drive into your Mac
The ISO file is only about 5 gigabytes, but I recommend you use a USB drive with at least 16 gigabytes of space just in case Windows needs more space during the installation process.
I bought a 32 gigabyte USB drive at Walmart for only $3, so this shouldn’t be very expensive.
Stick your USB drive into your Mac. Then open your terminal. You can do this using MacOS Spotlight by pressing both the ⌘ and Space bar at the same time, then typing «terminal» and hitting enter.
Don’t be intimidated by the command line interface. I’m going to tell you exactly which commands to enter.
Step 3: Use the diskutil command to identify which drive your USB is mounted on
Open Mac Spotlight using the ⌘ + space keyboard shortcut. Then type the word «terminal» and select Terminal from the dropdown list.
Paste the following command into your terminal and hit enter:
You will see output like this (note — your Mac’s terminal may be black text on a white background if you haven’t customized it).
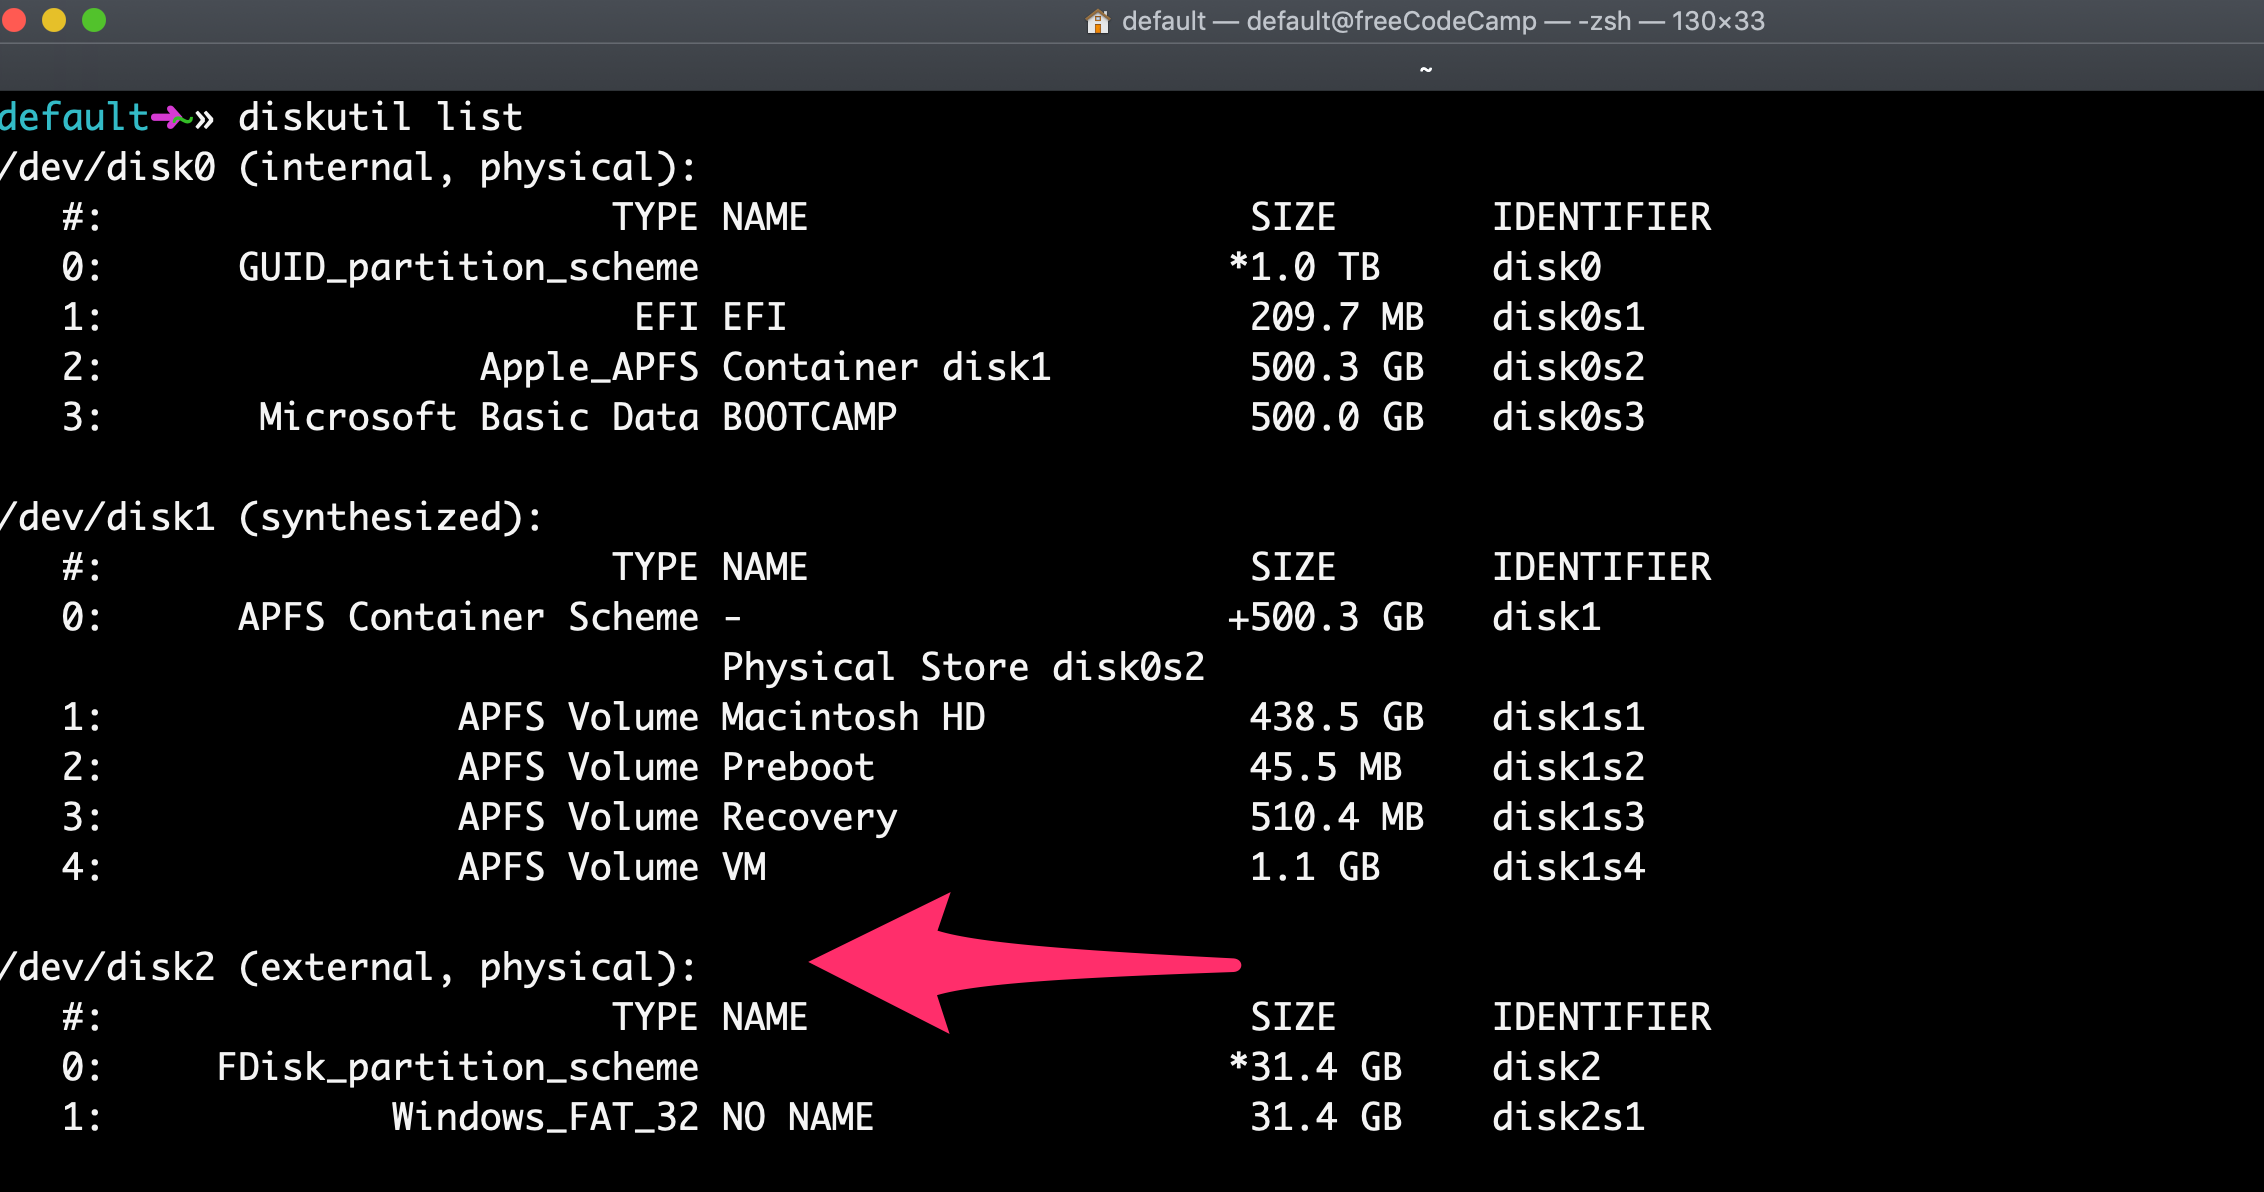
Copy the text I point to here. It will probably be something like
Step 4: Format your USB Drive to work with Windows
Next format your USB drive to Windows FAT32 format. This is a format that Windows 10 will recognize.
Note that you should replace the disk2 with the name of the your drive from step 3 if it wasn’t disk2 . (It may be disk3 or disk4 ).
Run this command using the correct disk number for your USB:
diskutil eraseDisk MS-DOS «WIN10» GPT /dev/disk2
Then you’ll see terminal output like this.
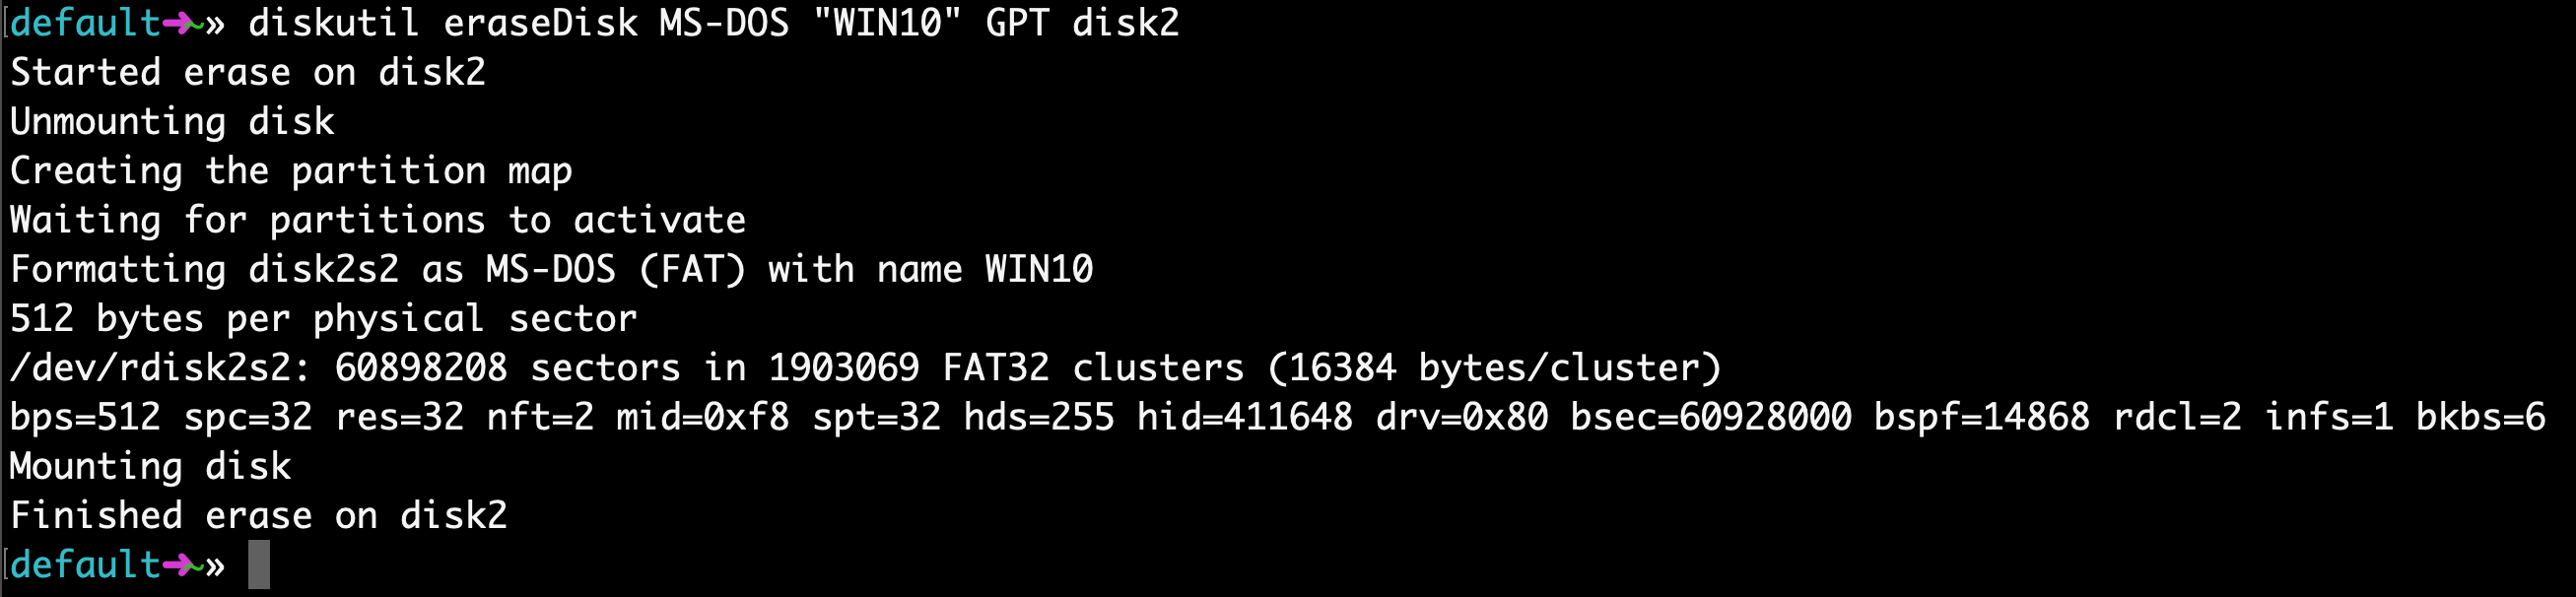
This will probably only take about 20 seconds on a newer computer, but may take longer on an older computer.
Note that for some hardware, you may instead need to run this command, which uses the MBR format for partitioning instead of GPT. Come back and try this command if step 7 fails, then redo steps 5, 6, and 7:
Step 5: Use hdiutil to mount the Windows 10 folder and prepare it for transfer.
Now we’re going to prep our downloaded ISO file so we can copy it over to our USB drive.
You will need to check where your downloaded Windows 10 ISO file is and use that. But your file is probably located in your
/Downloads folder with a name of Win10_1903_V1_English_x64.iso .
Step 6: Copy the Windows 10 ISO over to your USB Drive
Update April 2020: One of the files in the Windows 10 ISO – install.wim – is now too large to copy over to a FAT-32 formatted USB drive. So I’ll show you how to copy it over separately.
Thank you to @alexlubbock for coming up with this workaround.
First run this command to copy over everything but that file:
rsync -vha —exclude=sources/install.wim /Volumes/CCCOMA_X64FRE_EN-US_DV9/* /Volumes/WIN10
Then run this command to install Homebrew (if you don’t have it installed on your Mac yet):
/usr/bin/ruby -e «$(curl -fsSL https://raw.githubusercontent.com/Homebrew/install/master/install)»
Then use Homebrew to install a tool called wimlib with this terminal command:
brew install wimlib
Then go ahead and create the directory that you’re going to write the files into:
Then run this command. Note that this process may take several hours, you may see 0% progress until it finishes. Don’t abort it. It will use wimlib to split the install.wim file into 2 files less than 4 GB each (I use 3.8 GB in the following command), then copy them over to your USB:
wimlib-imagex split /Volumes/CCCOMA_X64FRE_EN-US_DV9/sources/install.wim /Volumes/WIN10/sources/install.swm 3800
Once that’s done, you can eject your USB from your Mac inside Finder. Note that Windows will automatically rejoin these files later when you’re installing.
Step 7: Put your USB into your new PC and start loading Windows
Congratulations — your computer now should boot directly from your USB drive. If it doesn’t, you may need to check your new PC’s BIOS and change the boot order to boot from your USB drive.
Windows will pop up a screen and start the installation process.
Enjoy your new PC, and your newly-installed copy of Windows.
The teacher who founded freeCodeCamp.org.
If you read this far, tweet to the author to show them you care. Tweet a thanks
Learn to code for free. freeCodeCamp’s open source curriculum has helped more than 40,000 people get jobs as developers. Get started
freeCodeCamp is a donor-supported tax-exempt 501(c)(3) nonprofit organization (United States Federal Tax Identification Number: 82-0779546)
Our mission: to help people learn to code for free. We accomplish this by creating thousands of videos, articles, and interactive coding lessons — all freely available to the public. We also have thousands of freeCodeCamp study groups around the world.
Donations to freeCodeCamp go toward our education initiatives and help pay for servers, services, and staff.
Источник


