- How to Create Ubuntu Live USB in Windows
- How to make Ubuntu bootable USB in Windows:
- Step 1: Download Ubuntu ISO
- Step 2: Download Universal USB Installer
- Step 3: Creating the bootable USB
- SDB:Create a Live USB stick using Windows
- Contents
- Using Etcher
- Using Rufus
- Using ImageUSB
- Using SUSE Studio ImageWriter
- Using GRUB4DOS
- Troubleshooting
- Verifying checksum of downloaded files
- Write access problems
- How to Create a Windows Live USB
- Windows Live USB, Windows 10, Windows 7, Windows 2019, Windows 2016
- Create live usb from windows
- 2. Requirements
- 3. USB selection
- 4. Boot selection and Partition scheme
- 5. Select the Ubuntu ISO file
- 6. Write the ISO
- 7. Additional downloads
- 8. Write warnings
- 9. Writing the ISO
- 10. Installation complete
How to Create Ubuntu Live USB in Windows
Last updated January 10, 2020 By Abhishek Prakash 93 Comments
Brief: Tutorial to show you how to create a bootable USB of Ubuntu in Windows. Instructions are valid for all versions of Ubuntu and Windows.
One of the first few steps for installing Ubuntu is to create bootable USB of Ubuntu. If you are using Windows 7 or 10, you can use Universal USB Installer to easily create a live USB. It’s my favorite tool and is extremely easy to use.
Let’s see how to easily make a live USB of Ubuntu in Windows.
How to make Ubuntu bootable USB in Windows:

Step 1: Download Ubuntu ISO
Go to Ubuntu and download the ISO image of your preferred Ubuntu version. At present, there are two LTS version available, Ubuntu 14.04 and Ubuntu 16.04. You can download whichever you prefer.
It is always a good idea to perform a checksum on ISO file you downloaded from the internet.
Step 2: Download Universal USB Installer
Once you have downloaded the ISO of Ubuntu 16.04 or 18.04, go to this page and download the latest version of Universal USB Installer.
Step 3: Creating the bootable USB
Plugin the USB drive in the computer and run Universal USB Installer. You need to do the following things now:
- Select Ubuntu under step 1
- Browse to the location of downloaded Ubuntu ISO in Step 2 section
- In Step 3, select the USB drive and also check the option to format it.

It will present you with obvious warnings, click Yes.

Wait for sometime for the process to complete. You can push it to background, if you like.

That said, your Ubuntu USB should be created in few minutes.

Once the live USB is created, you can proceed with testing Ubuntu in live mode.What you need to do is restart your computer. At boot time, press F2 or F10 or F12 (depending upon your system) to access boot menu.
Once there, choose to boot from USB or removable media. That’s it. You can use Ubuntu without installing here. You can also choose to install Ubuntu if you want.
I have shown the process of making a bootable Ubuntu Linux USB with Rufus tool in this video:
I hope this tutorial helped you to easily create Ubuntu live USB in Windows.
Considering that you are just starting, I advise to follow this beginner’s guide to Ubuntu and learn how to use Ubuntu. Let me know if you need some help.
Like what you read? Please share it with others.
SDB:Create a Live USB stick using Windows
Version: 12.2+ This applies to openSUSE 12.2 and above.
Contents
Using Etcher
- Download the current ISO image of openSUSE Leap or Tumbleweed. The filename ends with «.iso».
- Download, install and start Etcher
- Select the openSUSE .iso file you just downloaded using the «Select Image» button.
- Plug a USB drive into you computer, if it’s the only drive connected to your computer, it will be automatically selected. If not, select it.
Using Rufus
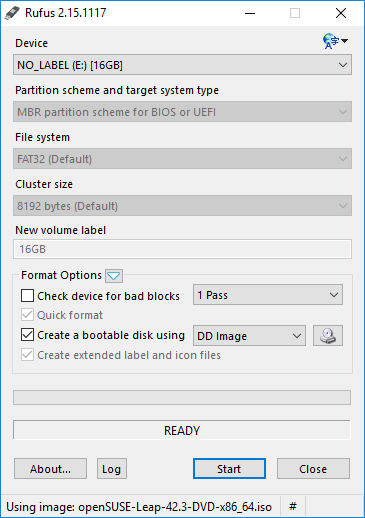
- Download the current ISO image of openSUSE Leap or Tumbleweed. The filename ends with «.iso».
- Download and start Rufus
- Plug a USB drive into you computer and select it in Rufus (see screenshot)
Using ImageUSB
Download ImageUSB and follow the instructions on their page.
Using SUSE Studio ImageWriter
We used to have SUSE Studio ImageWriter compiled for windows, but this is not maintained anymore. Feel free to fork it and build/maintain the windows version yourself.
Using GRUB4DOS
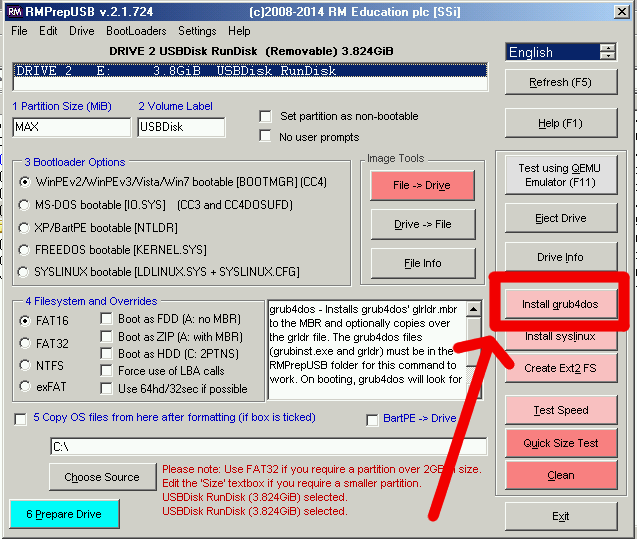
This method will keep all current data in your USB medium. Demonstration is provided in this video. Note: These instruction will not work, if your computer boots via UEFI (like most computers made after
2011-2012 and all computers with preinstalled Windows 8/8.1/10); at first you must go to BIOS, enable Legacy boot (i.e. dissable UEFI/secure boot option)!
- Copy ISO into «boot» folder of USB flash.
- Extract «initrd» and «linux» files into «boot» folder of USB medium. These files located in boot\i386\loader or boot\x86_64\loader directory of ISO image. For ISO mounting you can use, for example, Pismo File Mount Audit Package.
- GRUB4DOS installation into MBR of USB flash:
- download RMPrepUSB and install it;
- start RMPrepUSB;
- select your medium;
- click «Install GRUB4DOS»;
- confirm GRUB installation to MBR;
- confirm GRUB installation to selected medium;
- confirm GRLDR copying into selected medium.
- Create «menu.lst» file in root folder of USB key. Content of «menu.lst» should be (in both places – in line 2 and in line 5 – replace openSUSE.iso with real name of your ISO file):
Reboot your computer from USB stick.
Troubleshooting
Verifying checksum of downloaded files
If you need to verify that the file you’ve just downloaded is correct, you can use the CertUtil program (At least on windows10)
Write access problems
If you get write access problems with the USB drive you can try to reformat the drive in Windows prior to writing the image.
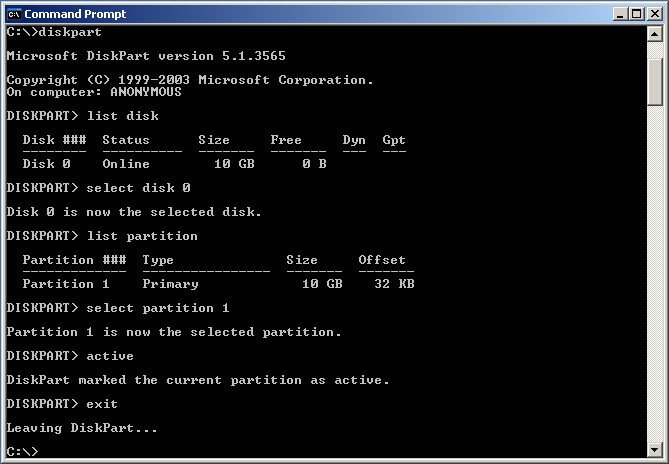
This situation would happen very rarely, but in the even that your computer doesn’t boot from the LiveUSB/DVD from the steps above, you might try the following procedure.
Unlike fdisk, diskpart will perform changes as you enter them, therefore, there is no write instruction.
How to Create a Windows Live USB
There is great functionality in having a fully working version of Windows that you could boot from any computer on something as small as a USB flash drive (Windows Live USB) and today we will show you how to do it. All you need is a 16GB (recommended 32GB+) flash drive and a license to activate Windows on the USB.
Windows Live USB, Windows 10, Windows 7, Windows 2019, Windows 2016
There is great functionality in having a fully working version of Windows that you could boot from any computer on something as small as a USB flash drive (Windows Live USB) and today we will show you how to do it. All you need is a 16GB (recommended 32GB+) flash drive and a license to activate Windows on the USB.
First of all, you will need to get a Windows ISO file with the version that you require. We are going to use WinToUSB, which has a free version of the program. There is a small caveat however; the free version of the program only supports Windows 10 versions 1803 (April 2018 release) and lower (Windows 2016, Windows 7). In order to get a later version of Windows (Windows Sever 2019) to work, you will have to pay $29.95 for the Professional version of WinToUSB.
Now that you have all the prerequisites, let us move on to the first step.
1: Head to their dedicated website and download WinToUSB.
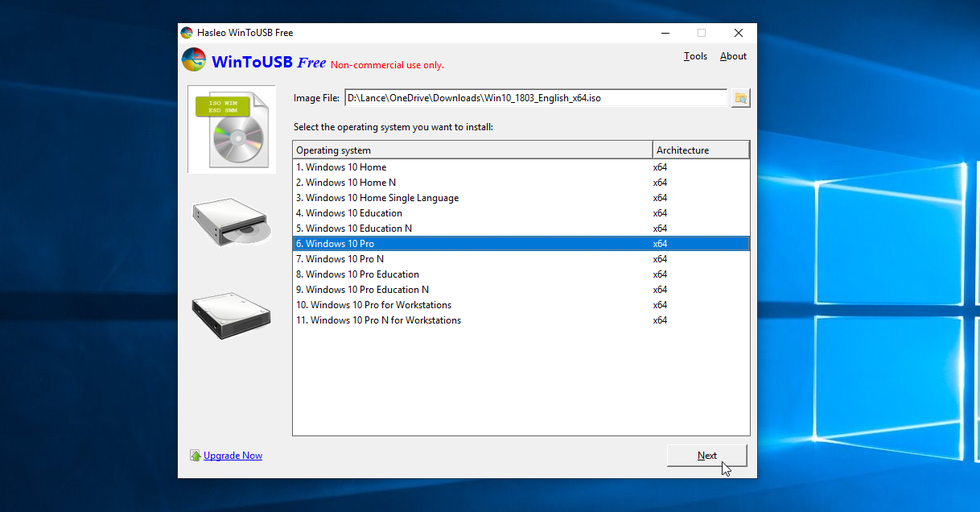
2: Connect a blank USB to your computer and launch WinToUSB. From here, use the browse button (i.e. to the right of “Image File” field) to select your ISO file and the version of Windows you wish to clone onto the USB stick. Once done, click “Next”

3: Now select the USB drive from the drop-down menu. Once selected, a popup will appear, prompting you to select a partition scheme. Click on “MBR for BIOS” and then “Yes”.
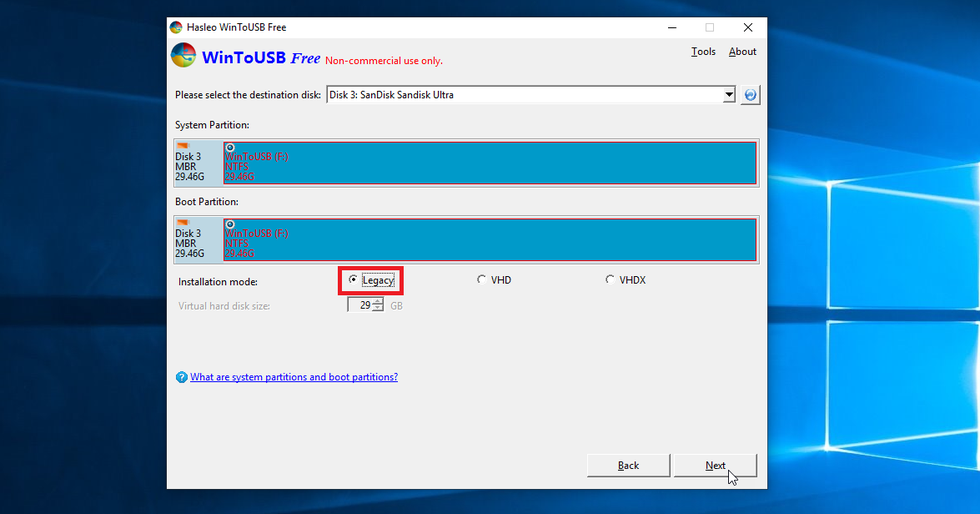
4: On the next screen, select the “Legacy” option under “Installation mode:” and click Next. The creation of the Windows USB shall begin, and once it reaches 100%, you can unplug your USB.
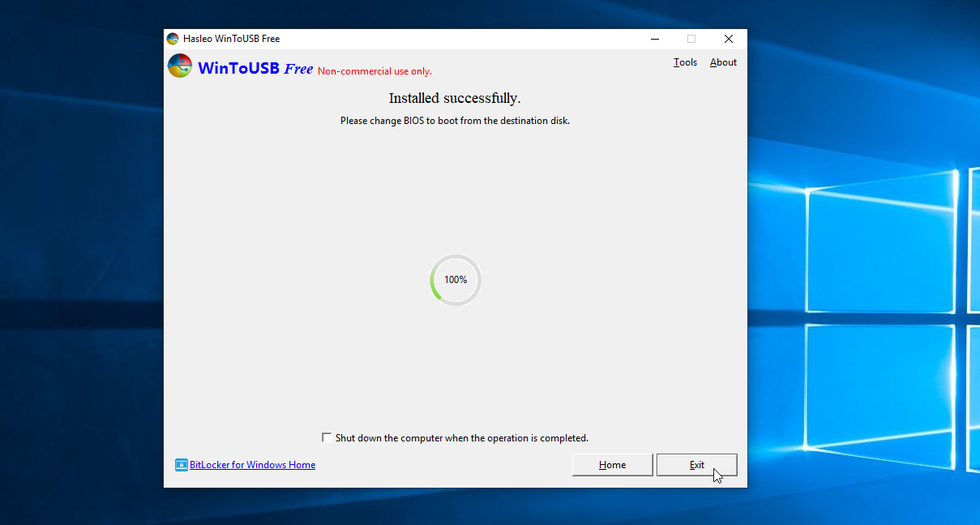
IMPORTANT NOTE: In order to use the windows USB on a computer, you will have to enter BIOS and change the boot preferences in order to boot the Windows USB.
Create live usb from windows
With a bootable Ubuntu USB stick, you can:
- Install or upgrade Ubuntu
- Test out the Ubuntu desktop experience without touching your PC configuration
- Boot into Ubuntu on a borrowed machine or from an internet cafe
- Use tools installed by default on the USB stick to repair or fix a broken configuration
Creating a bootable Ubuntu USB stick from Microsoft Windows is very simple and we’re going to cover the process in the next few steps.
Alternatively, we also have tutorials to help you create a bootable USB stick from both Ubuntu and Apple macOS.

2. Requirements
- A 4GB or larger USB stick/flash drive
- Microsoft Windows XP or later
- Rufus, a free and open source USB stick writing tool
- An Ubuntu ISO file. See Get Ubuntu for download links

Take note of where your browser saves downloads: this is normally a directory called ‘Downloads’ on your Windows PC. Don’t download the ISO image directly to the USB stick! If using Windows XP or Vista, download version 2.18 of Rufus.
3. USB selection
Perform the following to configure your USB device in Rufus:
- Launch Rufus
- Insert your USB stick
- Rufus will update to set the device within the Device field
- If the Device selected is incorrect (perhaps you have multiple USB storage devices), select the correct one from the device field’s drop-down menu

You can avoid the hassle of selecting from a list of USB devices by ensuring no other devices are connected.
4. Boot selection and Partition scheme
Now choose the Boot selection. Choices will be Non bootable and FreeDOS. Since you are creating a bootable Ubuntu device select FreeDOS.
The default selections for Partition scheme (MBR) and Target system (BIOS (or UEFI-CSM)) are appropriate (and are the only options available).

5. Select the Ubuntu ISO file
To select the Ubuntu ISO file you downloaded previously, click the SELECT to the right of “Boot selection”. If this is the only ISO file present in the Downloads folder you will only see one file listed.
Select the appropriate ISO file and click on Open.

6. Write the ISO
The Volume label will be updated to reflect the ISO selected.
Leave all other parameters with their default values and click START to initiate the write process.

7. Additional downloads
You may be alerted that Rufus requires additional files to complete writing the ISO. If this dialog box appears, select Yes to continue.

8. Write warnings
You will then be alerted that Rufus has detected that the Ubuntu ISO is an ISOHybrid image. This means the same image file can be used as the source for both a DVD and a USB stick without requiring conversion.
Keep Write in ISO Image mode selected and click on OK to continue.

Rufus will also warn you that all data on your selected USB device is about to be destroyed. This is a good moment to double check you’ve selected the correct device before clicking OK when you’re confident you have.

If your USB stick contains multiple partitions Rufus will warn you in a separate pane that these will also be destroyed.
9. Writing the ISO
The ISO will now be written to your USB stick, and the progress bar in Rufus will give you some indication of where you are in the process. With a reasonably modern machine, this should take around 10 minutes. Total elapsed time is shown in the lower right corner of the Rufus window.

10. Installation complete
When Rufus has finished writing the USB device, the Status bar will be green filled and the word READY will appear in the center. Select CLOSE to complete the write process.

Congratulations! You now have Ubuntu on a USB stick, bootable and ready to go.
If you want to install Ubuntu, take a look at our install Ubuntu desktop tutorial.


