- How to Copy Windows 7 to USB Drive and Make It Bootable?
- 2 Situations where you need to copy Windows 7 to USB
- Tutorial: copy Windows 7 to USB in different cases
- Case 1. Copy Windows 7 to USB using CMD for installing OS
- Case 2. Copy Windows 7 to USB for portable Windows 7 device
- Sum Up
- Windows USB/DVD Download Tool
- Overview
- Installation
- Using the Windows USB/DVD Download Tool
- Frequently Asked Questions
- Troubleshooting
How to Copy Windows 7 to USB Drive and Make It Bootable?
Sometimes, you might want to copy Windows 7 to USB, here we introduce how to copy Windows OS to USB drive using Command Prompt and a versatile partition manager. So you can easily clone Windows to USB and make the USB drive bootable.

By Emily  / Last Updated March 19, 2021
2 Situations where you need to copy Windows 7 to USB
Copying Windows 7 operating system onto USB flash drive can be useful in many cases, and below are two most common situations.
1. Install Windows conveniently
With each new release of Windows, the installation time gets shorter and shorter. However, Windows is still released in DVD or ISO form, and installing Windows OS from optical media is also still too slow. So, many users choose to install OS from USB drive, which is much faster and more convenient. To make a bootable USB as a Windows installer, you have to know how to copy Windows 7 to USB from ISO or DVD.
2. Create a portable Windows drive
Secondly, lots of computer users want to clone or copy Windows 7/8/10 to USB drive to make a portable Windows USB so that they can keep their customized OS environment in their pocket, carry around and boot familiar OS on other computers, even the brand-new one. Besides, when the computer crashes suddenly, they can also rescue it with the portable Windows USB drive.
Tutorial: copy Windows 7 to USB in different cases
Since we have listed the two most common situations where you might want to clone Windows operating system onto a USB flash drive, now we will introduce how to do it in detail respectively.
Case 1. Copy Windows 7 to USB using CMD for installing OS
First of all, we would like to tell how to clone Windows 7 onto a USB flash drive using CMD (Command Line) with the purpose of installing OS conveniently.
Notes:
в‘ Prepare a flash drive with at least 8 GB of space for Windows 10 and 8.1, or at least 4 GB of space for Windows 7.
в‘ЎThe process described below will delete everything currently on your flash drive. Make sure to back up your flash drive to another storage location before proceeding.
1. Connect your USB drive to the computer and make sure it is recognized.
2. Open a command prompt as Administrator: press “Win+R” combination to open Run dialogue, input “cmd” in the box and press on “Enter”.
3. Run the following commands to partition and format the USB drive.
в—Џ diskpart
в—Џ list disk
в—Џ select disk 1: modify disk number as needed
в—Џ clean
в—Џ create partition primary
в—Џ select partition 1
в—Џ active
в—Џ format fs=ntfs
в—Џ assign
в—Џ exit: exit DISKPART, but leave the command prompt window open
4. Mount the Windows installation media: put the Windows installation disc in the optical drive, mount the ISO, or extract its contents to a folder.

The ISO file will now be extracted to a sub-folder with the same name as the ISO file. This can take a few minutes to complete.
5. Use BOOTSECT command to make the USB drive bootable
After the media mounted to extracted, run the commands below to update the filesystem on the flash drive to make it bootable.
в—Џ E:
в—Џ cd boot
● bootsect.exe /nt60 F:”
Be aware: Replace E with your install media drive letter, and F with your USB flash drive letter.
6. Use ROBOCOPY command “robocopy E:F: /s /v /mt: 16”to copy the contents of the Windows installation media to the USB drive
When it completes, type “Exit” to leave the command prompt. Then you can boot your computer from the bootable USB drive and install Windows. Besides copying Windows 7 onto USB drive from DVD/CD using Command Prompt, you can also use Windows 7 USB/DVD Download Tool, a free utility that will automatically make a bootable USB flash drive using a Windows 7/8/10 ISO image file.
Simply download the tool, choose the ISO file and USB drive, then the Wizard will do everything for you.
Case 2. Copy Windows 7 to USB for portable Windows 7 device
This section is about how to copy Windows 7 to USB flash drive to make a portable Windows operating system. For this task, Windows released a new feature named “Windows To Go” for Windows 8/8.1 Enterprise and Windows 10 Education/Enterprise/Pro. With that, users can burn Windows ISO files to USB, boot and run Windows from USB devices.
But it cannot work on Windows 7 and Windows 8/8.1 Home/ Pro/Education as well as Windows 10 Home. Thus, you can use AOMEI Partition Assistant Professional instead. It developed a more powerful and versatile “Windows To Go Creator”. Compared with Microsoft “Windows To Go”, it is a better choice for the below advantages:
вќ¤ It is more compatible and allows you to copy all versions of Windows 10, 8.1/8 or 7 onto a removable USB flash drive to boot it from any computer as you need.
вќ¤ It only requires a 13GB USB and a non-certified USB drive is also OK, while the «Windows To Go” needs a USB drive of 32GB at least and the USB must be certified by Microsoft at the same time, otherwise you cannot convert ISO to USB successfully.
вќ¤ It permits you to create Windows to go USB with either Windows disc/ISO or current system.
вќ¤ It allows you to make a bootable USB for mac and run Windows from USB on Mac.
Now, you can download the demo version and learn how to clone Windows 7 to USB drive step by step.
1. Install and run AOMEI Partition Assistant Pro on your Windows 7 computer. Connect the USB drive to the computer and make sure it is detected successfully.
2. Click “All Tools” > “Windows To Go Creator” on the left side.

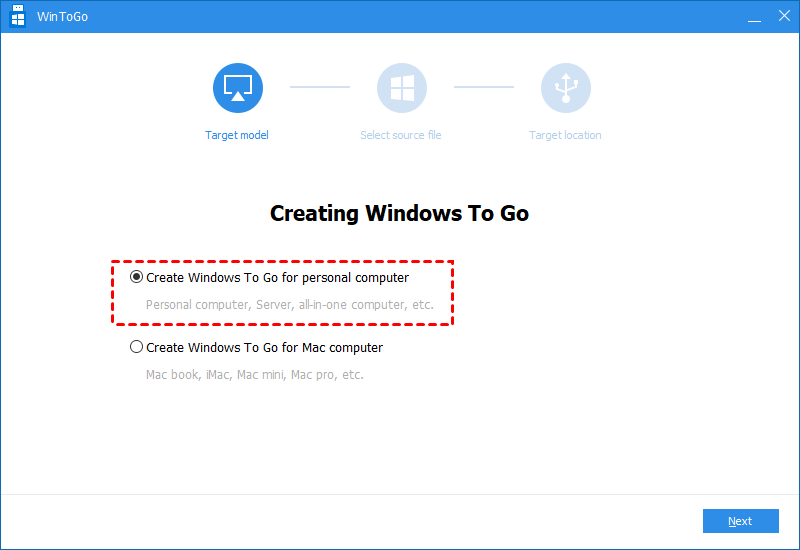
3. Choose «Create Windows ToGo for personal computer» and click «Next».
4. Select the first method «Create Windows To Go with system disc/ISO» and choose the prepared ISO file. Click «Next».

PS.: If the Windows 7 ISO files are not available or you don’t want to download or extract the ISO file, you can choose «Create Windows To Go with current system».
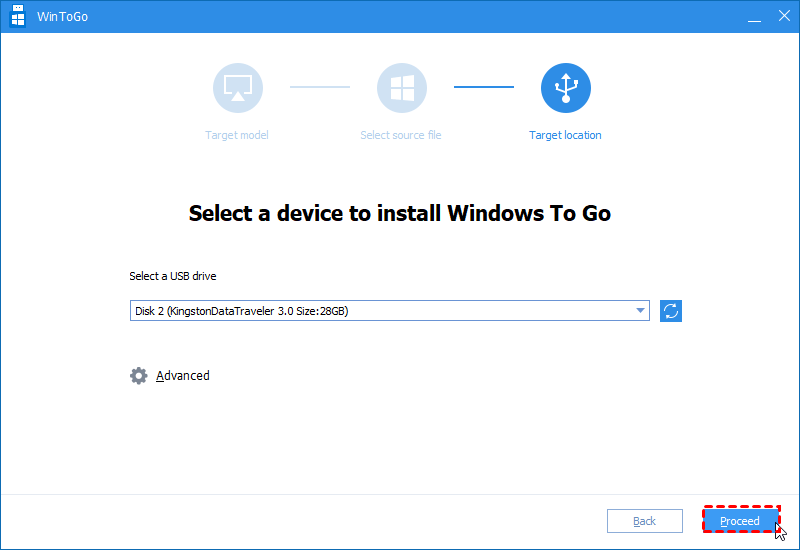
5. Then choose the USB drive and click «Proceed» to start cloning Windows 7 to USB drive.
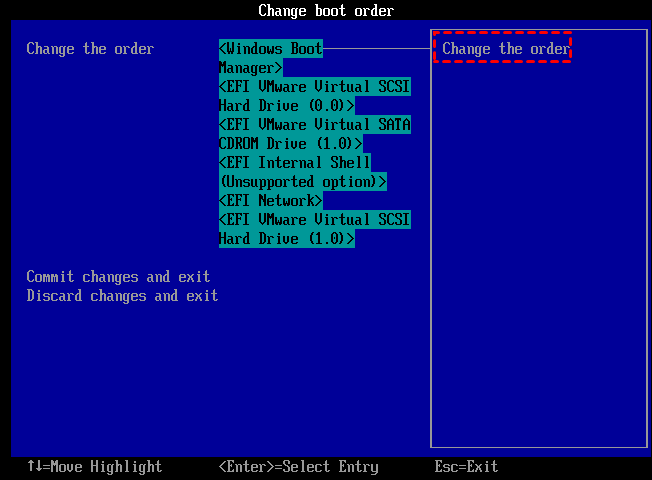
After cloning Windows OS to USB via the above methods, you can plug the USB drive into any computer at any place, enter BIOS, and change the boot order to USB first and save. Then you can successfully boot computer into your familiar Windows 10/8/7 environment.
Sum Up
Now, I am sure you have a clear idea of how to copy Windows 7 to a USB drive from DVD using CMD or clone Windows operating system to USB drive for a portable Windows. By the way, AOMEI Partition Assistant Pro also has many other fantastic features, such as migrating only OS drive to SSD/HDD, quick partitioning a large hard disk within two clicks, recovering lost partition, and more. To move Windows Server to USB drive, you can try AOMEI Partition Assistant Server.
Windows USB/DVD Download Tool
Overview
When you download Windows from Microsoft Store, you have two options: You can download a collection of compressed files, or you can download an ISO file. An ISO file combines all the Windows installation files into a single uncompressed file.
If you choose to download an ISO file so you can create a bootable file from a DVD or USB drive, copy the Windows ISO file onto your drive and then run the Windows USB/DVD Download Tool. Then simply install Windows onto your computer directly from your USB or DVD drive.
When you download the ISO file, you must copy it onto a USB or DVD. When you’re ready to install Windows, insert the USB drive or DVD with the ISO file on it and then run Setup.exe from the root folder on the drive.
This allows you to install Windows onto your machine without having to first run an existing operating system. If you change the boot order of drives in your computer’s BIOS, you can run the Windows installation directly from your USB drive or DVD when you first turn on your computer. Please see the documentation for your computer for information about how to change the BIOS boot order of drives.
Making copies
To install the software, you can make one copy of the ISO file on a disc, USB flash drive, or other media.
After you’ve installed the software and accepted the license terms that accompany the software, those license terms apply to your use of the software. The license terms for Windows permit you to make one copy of the software as a back-up copy for re-installation on the licensed computer. If you do not delete your copy of the ISO file after installing the Windows software, the copy of the ISO file counts as your one back-up copy.
If you need to download the software again, you can go to your Download Purchase History in your Microsoft Store account and access the download there.
Installation
To install the Windows USB/DVD Download Tool:
2. Click Download then Run.
3. Follow the steps in the setup dialogs. You’ll have the option to specify where to install the Windows USB/DVD Download Tool.
You must be an administrator on the computer on which you are installing the Windows USB/DVD Download tool. It requires the Microsoft .NET Framework version 2.0 or higher.
System requirements
Windows XP SP2, Windows Vista, or Windows 7 (32-bit or 64-bit)
Pentium 233-megahertz (MHz) processor or faster (300MHz is recommended)
50MB of free space on your hard drive
DVD-R drive or 4GB removable USB drive
For Windows XP users
The following applications must be installed prior to installing the tool:
Microsoft .NET Framework 2.0 must be installed. It can be downloaded here.
Microsoft Image Mastering API v2 must be installed. It can be downloaded here.
Using the Windows USB/DVD Download Tool
Before you run the Download Tool, make sure you have purchased the Windows ISO download from Microsoft Store and downloaded the Windows ISO file to your drive. If you have purchased Windows but have not yet downloaded the ISO file, you can download the ISO file from your Microsoft Store Account.
To make a copy of your Windows ISO file:
1. Click the Windows START button, and click WINDOWS USB/DVD DOWNLOAD TOOL in the ALL PROGRAMS list to open the Windows USB/DVD Download Tool.
2. In the SOURCE FILE box, type the name and path of your Windows ISO file, or click BROWSE and select the file from the OPEN dialog box. Click NEXT.
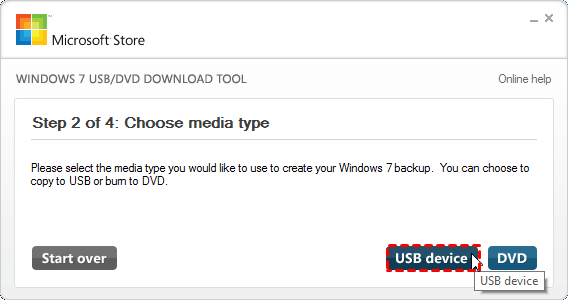
3. Select USB DEVICE to create a copy on a USB flash drive or select DVD disk to create a copy on a DVD disk.
4. If you are copying the file to a USB flash drive, select your USB device in the drop-down list and click BEGIN COPYING. If you are copying the file up to a DVD, click BEGIN BURNING.
When your Windows ISO file is copied to your drive, install Windows by moving to the root folder of your DVD or USB drive, and then double-click Setup.exe.
Frequently Asked Questions
Where can I download .NET framework 2.0?
The .NET framework can be downloaded here.
Where can I download Image Mastering API 2.0?
The Image Mastering API can be downloaded here.
What size USB drive is required?
You need a USB drive with a minimum of 4GB of free space.
Can I use my newly created USB drive to install Windows on someone else’s computer?
No. The Windows ISO file on the USB drive is only intended to be used to install Windows on the licensed user’s own computer.
Can I back up to a CD-ROM?
No. The Windows ISO file is too large to fit on a CD.
Can I back up to a Blu-ray Disc?
Yes, as long as your DVD drive can write to a Blu-ray Disc.
IfI have other files on the USB drive will the Windows USB/DVD download tool delete them?
This tool requires the USB drive to be completely blank before the Windows files are copied. This helps ensure that the device is bootable after the copying has completed.
Can I backup to an external hard drive or other device with enough free disk space?
Yes, but this is not recommended. The device must be formatted in order for the device to be bootable. A dedicated USB flash drive would be a better option.
Can I use the Windows USB/DVD Download Tool to back up other files?
No. This tool is only for use with the Windows ISO file purchased from Microsoft Store.
Does the tool support dual-layer DVD discs for burning?
No. Currently, the tool does not support dual-layer DVD discs.
Troubleshooting
The tool is asking me to install the .NET framework and Image Mastering API before I install the tool
If you’re running Windows XP, you must install the .NET Framework 2.0 and the Image Mastering API 2.0 before installing the tool. You can download .NET framework here and you can download the Image Mastering API here.
A restart may be required after installing the .NET framework and the Image Mastering API.
When creating a bootable USB device, I am getting an error about bootsect
To make the USB drive bootable, you need to run a tool named bootsect.exe. In some cases, this tool needs to be downloaded from your Microsoft Store account. This may happen if you’re trying to create a 64-bit bootable USB device from a 32-bit version of Windows. To download bootsect:
1. Login to your Microsoft Store account to view your purchase history.
2. Look for your Windows purchase.
3. Next to Windows, there is an Additional download options drop-down menu.
4. In the drop-down menu, select 32-bit ISO.
5. Right-click the link, and then save the bootsect.exe file to the location where you installed the Windows USB/DVD Download Tool (e.g. C:\Users\username\AppData\Local\Apps\Windows USB DVD Download Tool).
6. Once the file has been saved, go back to the Windows USB/DVD Download Tool to create your bootable USB device.
My USB drive is not in the list of available devices
If you don’t see your USB drive in the list of available devices, please make sure the drive is inserted in the USB port, and then click the Refresh button beside the list of available drives.
I inserted a blank DVD in my DVD-ROM drive, but the Windows USB/DVD Download Tool doesn’t recognize it
If there are multiple drives on the system, the tool will select the first one that is capable of burning DVDs. If you have multiple DVD-R drives, try inserting the blank DVD into another DVD-R drive. If that doesn’t help, please make sure that your disc isn’t damaged and that your DVD-R drive is operational. Contact Product Support if issues continue to arise.
I inserted a blank DVD in my DVD-ROM drive, but the tool won’t let me burn it
Make sure the disc isn’t a dual-layer DVD disc. Currently, dual-layer discs are not supported within the tool.


