- How to Copy Windows 7 to USB Drive and Make It Bootable?
- 2 Situations where you need to copy Windows 7 to USB
- Tutorial: copy Windows 7 to USB in different cases
- Case 1. Copy Windows 7 to USB using CMD for installing OS
- Case 2. Copy Windows 7 to USB for portable Windows 7 device
- Sum Up
- How to Copy a DVD to A Flash Drive/USB?
- Part 1. Why Need to Copy DVD to USB?
- Part 2. Copy DVD to Flash Drive Directly
- Part 3. Copy DVD to USB Flash Drive With the 3rd-party DVD Copy Software
- Wondershare DVD Creator
- Video Tutorial on How to Copy DVD to Flash Drive or USB with Wondershare DVD Creator
- Steps of How to Copy DVD to USB Flash Drive with Wondershare DVD Creator:
- Step 1 Launch the DVD to USB Software
- Step 2 Select DVD to USB Flash Drive Settings
- Step 3 Start Copying DVD to Another DVD
How to Copy Windows 7 to USB Drive and Make It Bootable?
Sometimes, you might want to copy Windows 7 to USB, here we introduce how to copy Windows OS to USB drive using Command Prompt and a versatile partition manager. So you can easily clone Windows to USB and make the USB drive bootable.

By Emily  / Last Updated March 19, 2021
2 Situations where you need to copy Windows 7 to USB
Copying Windows 7 operating system onto USB flash drive can be useful in many cases, and below are two most common situations.
1. Install Windows conveniently
With each new release of Windows, the installation time gets shorter and shorter. However, Windows is still released in DVD or ISO form, and installing Windows OS from optical media is also still too slow. So, many users choose to install OS from USB drive, which is much faster and more convenient. To make a bootable USB as a Windows installer, you have to know how to copy Windows 7 to USB from ISO or DVD.
2. Create a portable Windows drive
Secondly, lots of computer users want to clone or copy Windows 7/8/10 to USB drive to make a portable Windows USB so that they can keep their customized OS environment in their pocket, carry around and boot familiar OS on other computers, even the brand-new one. Besides, when the computer crashes suddenly, they can also rescue it with the portable Windows USB drive.
Tutorial: copy Windows 7 to USB in different cases
Since we have listed the two most common situations where you might want to clone Windows operating system onto a USB flash drive, now we will introduce how to do it in detail respectively.
Case 1. Copy Windows 7 to USB using CMD for installing OS
First of all, we would like to tell how to clone Windows 7 onto a USB flash drive using CMD (Command Line) with the purpose of installing OS conveniently.
Notes:
в‘ Prepare a flash drive with at least 8 GB of space for Windows 10 and 8.1, or at least 4 GB of space for Windows 7.
в‘ЎThe process described below will delete everything currently on your flash drive. Make sure to back up your flash drive to another storage location before proceeding.
1. Connect your USB drive to the computer and make sure it is recognized.
2. Open a command prompt as Administrator: press “Win+R” combination to open Run dialogue, input “cmd” in the box and press on “Enter”.
3. Run the following commands to partition and format the USB drive.
в—Џ diskpart
в—Џ list disk
в—Џ select disk 1: modify disk number as needed
в—Џ clean
в—Џ create partition primary
в—Џ select partition 1
в—Џ active
в—Џ format fs=ntfs
в—Џ assign
в—Џ exit: exit DISKPART, but leave the command prompt window open
4. Mount the Windows installation media: put the Windows installation disc in the optical drive, mount the ISO, or extract its contents to a folder.

The ISO file will now be extracted to a sub-folder with the same name as the ISO file. This can take a few minutes to complete.
5. Use BOOTSECT command to make the USB drive bootable
After the media mounted to extracted, run the commands below to update the filesystem on the flash drive to make it bootable.
в—Џ E:
в—Џ cd boot
● bootsect.exe /nt60 F:”
Be aware: Replace E with your install media drive letter, and F with your USB flash drive letter.
6. Use ROBOCOPY command “robocopy E:F: /s /v /mt: 16”to copy the contents of the Windows installation media to the USB drive
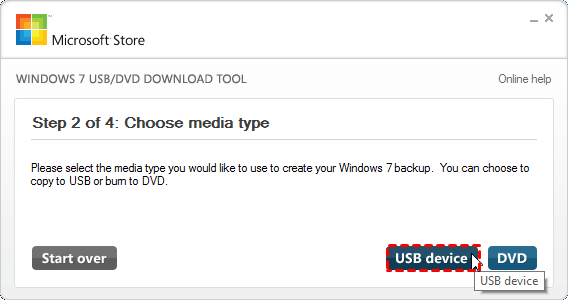
When it completes, type “Exit” to leave the command prompt. Then you can boot your computer from the bootable USB drive and install Windows. Besides copying Windows 7 onto USB drive from DVD/CD using Command Prompt, you can also use Windows 7 USB/DVD Download Tool, a free utility that will automatically make a bootable USB flash drive using a Windows 7/8/10 ISO image file.
Simply download the tool, choose the ISO file and USB drive, then the Wizard will do everything for you.
Case 2. Copy Windows 7 to USB for portable Windows 7 device
This section is about how to copy Windows 7 to USB flash drive to make a portable Windows operating system. For this task, Windows released a new feature named “Windows To Go” for Windows 8/8.1 Enterprise and Windows 10 Education/Enterprise/Pro. With that, users can burn Windows ISO files to USB, boot and run Windows from USB devices.
But it cannot work on Windows 7 and Windows 8/8.1 Home/ Pro/Education as well as Windows 10 Home. Thus, you can use AOMEI Partition Assistant Professional instead. It developed a more powerful and versatile “Windows To Go Creator”. Compared with Microsoft “Windows To Go”, it is a better choice for the below advantages:
вќ¤ It is more compatible and allows you to copy all versions of Windows 10, 8.1/8 or 7 onto a removable USB flash drive to boot it from any computer as you need.
вќ¤ It only requires a 13GB USB and a non-certified USB drive is also OK, while the «Windows To Go” needs a USB drive of 32GB at least and the USB must be certified by Microsoft at the same time, otherwise you cannot convert ISO to USB successfully.
вќ¤ It permits you to create Windows to go USB with either Windows disc/ISO or current system.
вќ¤ It allows you to make a bootable USB for mac and run Windows from USB on Mac.
Now, you can download the demo version and learn how to clone Windows 7 to USB drive step by step.
1. Install and run AOMEI Partition Assistant Pro on your Windows 7 computer. Connect the USB drive to the computer and make sure it is detected successfully.
2. Click “All Tools” > “Windows To Go Creator” on the left side.

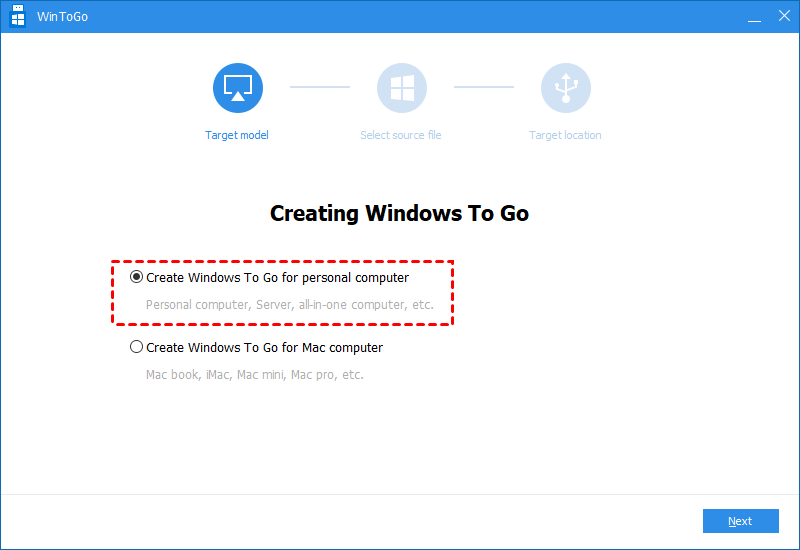
3. Choose «Create Windows ToGo for personal computer» and click «Next».
4. Select the first method «Create Windows To Go with system disc/ISO» and choose the prepared ISO file. Click «Next».

PS.: If the Windows 7 ISO files are not available or you don’t want to download or extract the ISO file, you can choose «Create Windows To Go with current system».
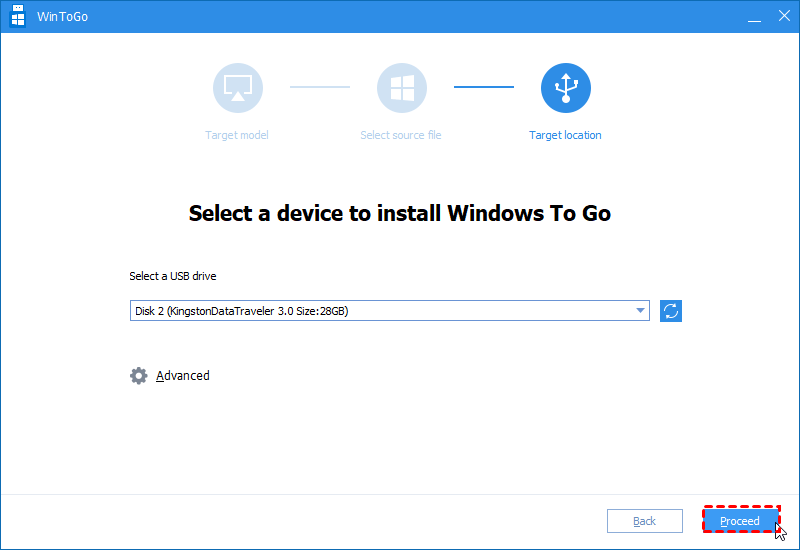
5. Then choose the USB drive and click «Proceed» to start cloning Windows 7 to USB drive.
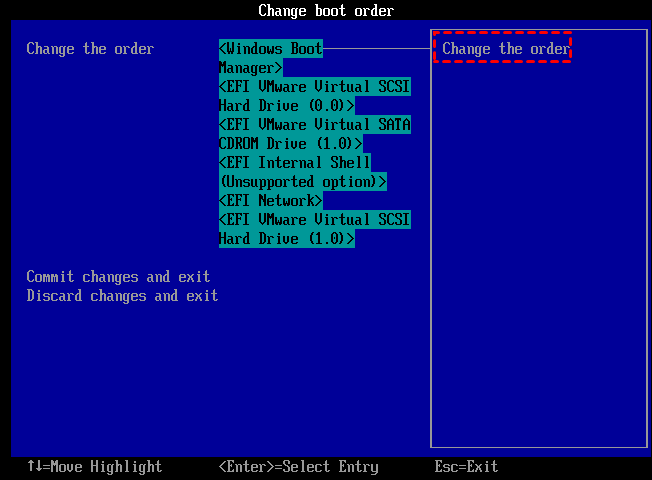
After cloning Windows OS to USB via the above methods, you can plug the USB drive into any computer at any place, enter BIOS, and change the boot order to USB first and save. Then you can successfully boot computer into your familiar Windows 10/8/7 environment.
Sum Up
Now, I am sure you have a clear idea of how to copy Windows 7 to a USB drive from DVD using CMD or clone Windows operating system to USB drive for a portable Windows. By the way, AOMEI Partition Assistant Pro also has many other fantastic features, such as migrating only OS drive to SSD/HDD, quick partitioning a large hard disk within two clicks, recovering lost partition, and more. To move Windows Server to USB drive, you can try AOMEI Partition Assistant Server.
How to Copy a DVD to A Flash Drive/USB?
Watching DVD movies with family and friends at home in systems like a DVD player or computer is fun. It is very difficult to carry a DVD player if you are planning a vacation. While traveling if you carry your DVD discs it might be a chance that your DVD get lost or break. So the best way to carry your favorite movies in DVD is that copy DVD to USB drive. If you carry a USB flash drive with you then you can easily watch your favorite movie with your family on vacation. This article will introduce you a professional way on how to copy a DVD to a flash drive step by step.
Part 1. Why Need to Copy DVD to USB?
Transferring your data from DVD to USB is the best option for backup your favorite movies. This is one of the best ways to collect all your movies and videos in one device as compared to the large collection of disc. USB is the best device where you can store all your favorite data and you can easily bring with you while you traveling or going for vacations. If you have a huge collection of DVD disc then you can transfer all your data to the USB device. It is one of the convenient ways to back up your important data and movies.
You can easily bring the USB device with you while you are away from home. Most of the times people are away from their house and they don’t have their data or favorite movies. And most of the videos are stored in DVD disc which they cannot carry with them while they are away from their home. So the best and ideal choice is to copy whole data from DVD to USB device.
Part 2. Copy DVD to Flash Drive Directly
The USB flash drive is a very convenient way to store all the important information. This driver comes in very compact size so the user can easily transfer their important files from one computer to another. The users can easily carry these drives in key chains, bags and every year their storage capacity is getting grown day by day. These USB flash drives are the best way to transport data from place to place, and keep data ready in hand.
You can copy DVD to USB directly via your computer with several simple steps.
Step 1. First insert the DVD you want to copy from into your PC, prepare your DVD as ISO files or DVD Folder so that they can be copy-and-paste easily.
Step 2. Plug your USB in the same computer and make sure it can be recognized by your PC, if not, connect the USB by a USB drive. Your USB should have enough space to copy all your DVD content.
Step 3. Open your DVD and select all files in your disc, or choose the ISO file or DVD Folder directly, then simply right click and choose Copy from the options. Next, move to your USB disk and Paste what you have copied.
However, there are still many problems of copying DVD to USB directly. Firstly, it’s easy to lose data during your copy-and-paste process. While copying a data from DVD to USB Flash drive, there are many cases that you don’t get full data, because of the corrupted files. Sometimes, during the process of the copy, there is a chance that your PC gets shut off or you accidentally click on the cancel icon, it can lead to the data loss situation. Secondly, you cannot copy the protected DVDs successfully, those DVDs are password protected and can’t be accessed by the third party. Other unknown problems may also cause your DVD to USB direct copy failed.
Part 3. Copy DVD to USB Flash Drive With the 3rd-party DVD Copy Software
Due to the problems of losing data and copyright protection, copying DVD to USB via your PC may be the easiest way but not the best way to make a DVD to USB copy. The most recommended way of how to copy a DVD to a flash drive and USB is copy it via the professional 3-rd party. Wondershare DVD Creator is such an all-in-one tool we’ll discuss in the following part to help you copy DVD to USB in an easy and safe way.

Wondershare DVD Creator
- В· Copy DVD to USB Flash drive easy and safe within several steps.
- В· Supported different formats including DVD/DVD Folder/ISO files and DVD-5/DVD-9 output type.
- В· Copy DVD by removing unlike parts, adding subtitle, choosing audio, and others with real-time preview.
- В· DVD copy modes including Full Movie, Main Movie with menu, Main Movie without menu, and Custom Mode.
- В· Additional functions like Burn Data Disc, ISO to DVD, One-click to Burn DVD/Blu-ray disc, Video Editor, Convert DVD to video, etc.
- В· Supported OS: Windows 10/8/7/XP/Vista/2003, Mac OS 10.14 (Mojave), 10.13(High Sierra), 10.12, 10.11, 10.10, 10.9, 10.8, 10.7, 10.6.
With Wondershare DVD creator, you can burn images and videos at very fast speed compared to other software. This software burns the video in 150 different formats and supports the all popular disc types. It’s also the best and ideal choice for DVD copying and provides you the best experience of copy the DVD to USB bootable devices.
Video Tutorial on How to Copy DVD to Flash Drive or USB with Wondershare DVD Creator
Steps of How to Copy DVD to USB Flash Drive with Wondershare DVD Creator:
Step 1 Launch the DVD to USB Software
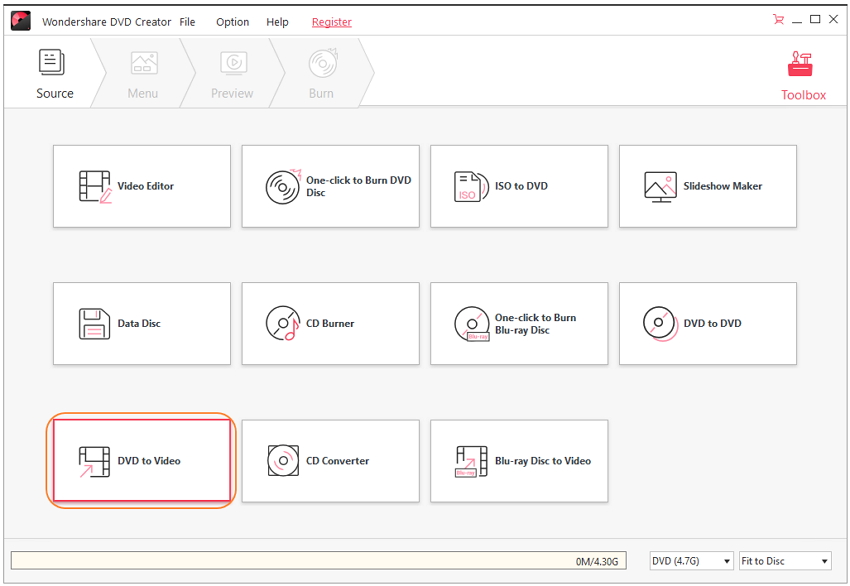
After download and install Wondershare DVD Creator on your PC, launch it and click the More DVD Tools button right-bottom of the interface to open a new interface.
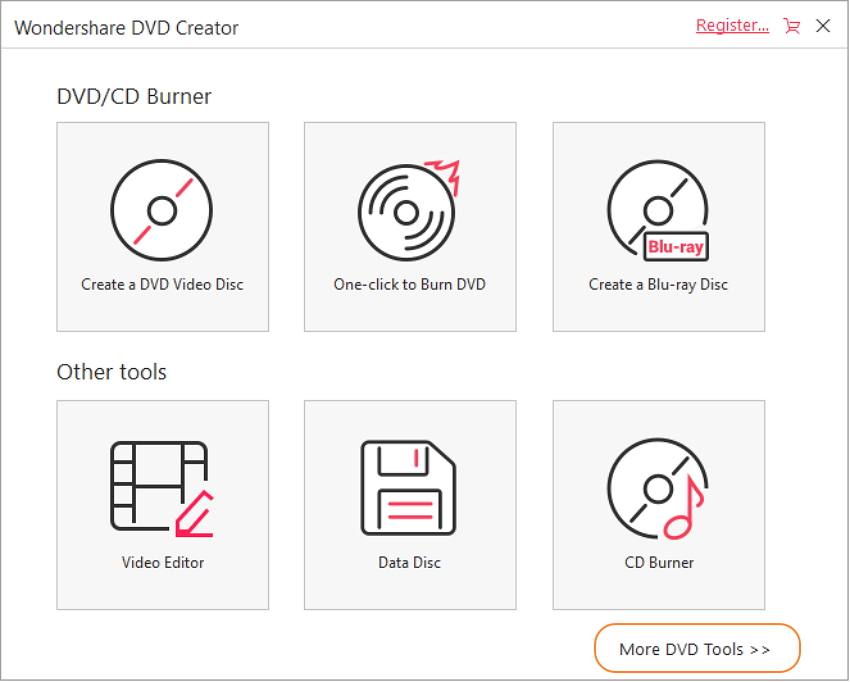
Choose DVD to DVD option from all the listed functions of Wondershare DVD Creator on the interface.
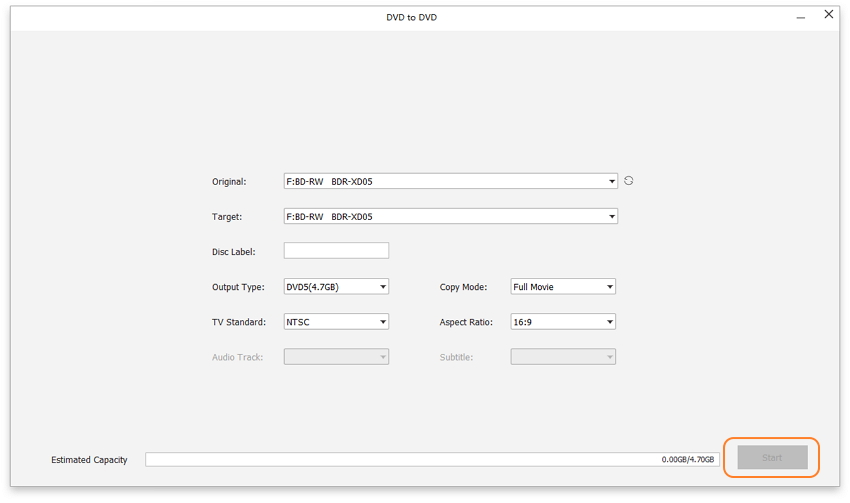
Step 2 Select DVD to USB Flash Drive Settings
Insert the DVD you want to copy from into your computer and choose it as Source DVD. Then plug in your USB to the computer and choose it as the Target device, the copied DVD will save as ISO files and DVD Folder as your needs.
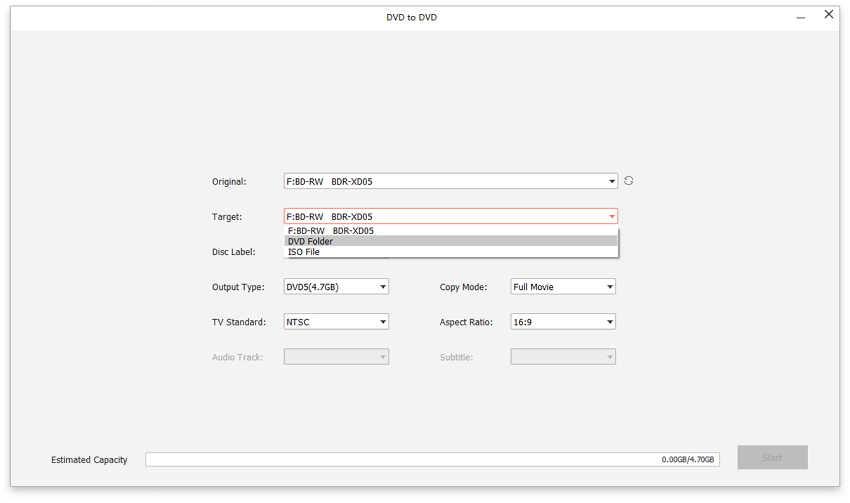
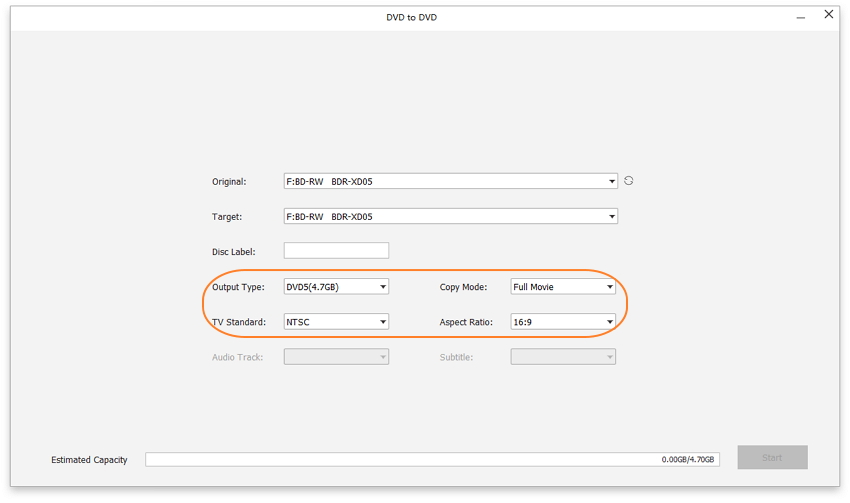
Next, choose the Output type , Copy mode , and Disc label for your DVD to USB flash drive. You can choose different copy modes from Full Movie, Main Movie (with menu), Main Movie (without menu), and Custom Mode to make customization. You’re allowed to choose audio, edit subtitle, remove unlike part, and preview the content real-time by clicking the More Information button under the custom copy mode.
Step 3 Start Copying DVD to Another DVD
After you have prepared all your contents and settings OK, just click the Start button to start copying your DVD to USB Flash drive within a few minutes.
After the copying process has been finished, your movies or videos in your DVD will be saved in the USB flash. So you can bring your USB everywhere you like and play it in any playable device. Compared to copy DVD to USB Flash drive directly, Wondershare give a safer and quick way without losing data. We also advise you that do not copy copyright protected DVDs for commercial purpose, which is usually illegal in many countries, or you should read the Copyright Law in your country first.


