- Install OpenSSH
- Install OpenSSH using Windows Settings
- Install OpenSSH using PowerShell
- Start and configure SSH Server
- Connect to SSH Server
- Uninstall OpenSSH using Windows Settings
- Uninstall OpenSSH using PowerShell
- Использование встроенного SSH клиента в Windows 10
- Установка клиента OpenSSH в Windows 10
- Как использовать SSH клиенте в Windows 10?
- SCP: копирование файлов из/в Windows через SSH
- OpenSSH Server Configuration for Windows 10 1809 and Server 2019
- Configuring the default shell for OpenSSH in Windows
- Windows Configurations in sshd_config
- AllowGroups, AllowUsers, DenyGroups, DenyUsers
- AuthenticationMethods
- AuthorizedKeysFile
- ChrootDirectory (Support added in v7.7.0.0)
- HostKey
- Match
- PermitRootLogin
- SyslogFacility
- Not supported
Install OpenSSH
Applies to Windows Server 2019, Windows 10
OpenSSH is a connectivity tool for remote login that uses the SSH protocol. It encrypts all traffic between client and server to eliminate eavesdropping, connection hijacking, and other attacks.
OpenSSH can be used to connect Window 10 clients to Windows Server 2019. OpenSSH Client is available to install on Windows 10 build 1809 and later, while OpenSSH Server is available to install on Windows Server 2019 and later.
If you downloaded OpenSSH from the GitHub repo at PowerShell/openssh-portable, follow the instructions listed there, not the ones in this article.
Install OpenSSH using Windows Settings
Both OpenSSH components can be installed using Windows Settings. OpenSSH Server is installed on Windows Server and OpenSSH Client is installed on Windows 10 devices.
To install the OpenSSH components:
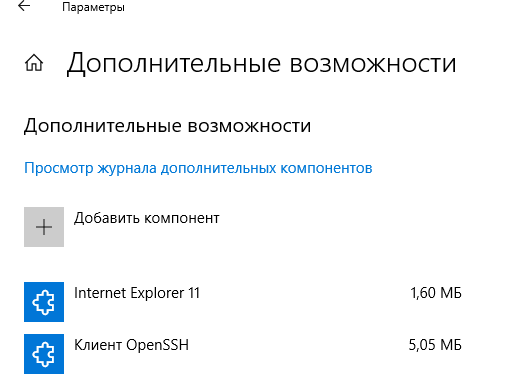
Open Settings, select Apps > Apps & Features, then select Optional Features.
Scan the list to see if the OpenSSH is already installed. If not, at the top of the page, select Add a feature, then:
- On Windows 10, find OpenSSH Client, then click Install
- On Windows Server 2019, find OpenSSH Server, then click Install
Once setup completes, return to Apps > Apps & Features and Optional Features and you should see OpenSSH listed.
Installing OpenSSH Server will create and enable a firewall rule named OpenSSH-Server-In-TCP . This allows inbound SSH traffic on port 22. If this rule is not enabled and this port is not open, connections will be refused or reset.
Install OpenSSH using PowerShell
To install OpenSSH using PowerShell, run PowerShell as an Administrator. To make sure that OpenSSH is available, run the following cmdlet:
This should return the following output:
Then, install the server or client components as needed:
Both of these should return the following output:
Start and configure SSH Server
To start and configure OpenSSH server for initial use, open PowerShell as an administrator, then run the following commands to start the SSHD service :
Connect to SSH Server
Once installed, you can connect to OpenSSH Server from a Windows 10 device with the SSH client installed using PowerShell as follows. Be sure to run PowerShell as an administrator:
Once connected, you get a message similar to the following:
Selecting yes adds that server to the list of known ssh hosts on your Windows client.
You are prompted for the password at this point. As a security precaution, your password will not be displayed as you type.
Once connected, you will see the Windows command shell prompt:
Uninstall OpenSSH using Windows Settings
To uninstall OpenSSH using Windows Settings:
- Open Settings, then go to Apps > Apps & Features.
- Go to Optional Features.
- In the list, select OpenSSH Client or OpenSSH Server.
- Select Uninstall.
Uninstall OpenSSH using PowerShell
To uninstall the OpenSSH components using PowerShell, use the following commands:
You may need to restart Windows afterwards if the service was in use at the time it was uninstalled.
Использование встроенного SSH клиента в Windows 10
В Windows 10 и Windows Server 2019 появился встроенный SSH клиент, который вы можете использовать для подключения к *Nix серверам, ESXi хостам и другим устройствам по защищенному протоколу, вместо Putty, MTPuTTY или других сторонних SSH клиентов. Встроенный SSH клиент Windows основан на порте OpenSSH и предустановлен в ОС, начиная с Windows 10 1809.
Установка клиента OpenSSH в Windows 10
Клиент OpenSSH входит в состав Features on Demand Windows 10 (как и RSAT). Клиент SSH установлен по умолчанию в Windows Server 2019 и Windows 10 1809 и более новых билдах.
Проверьте, что SSH клиент установлен:
Get-WindowsCapability -Online | ? Name -like ‘OpenSSH.Client*’

В нашем примере клиент OpenSSH установлен (статус: State: Installed).
Если SSH клиент отсутствует (State: Not Present), его можно установить:
- С помощью команды PowerShell: Add-WindowsCapability -Online -Name OpenSSH.Client*
- С помощью DISM: dism /Online /Add-Capability /CapabilityName:OpenSSH.Client
0.0.1.0
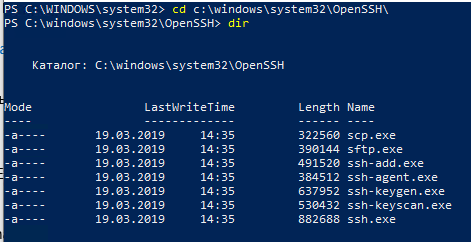
]Бинарные файлы OpenSSH находятся в каталоге c:\windows\system32\OpenSSH\.
- ssh.exe – это исполняемый файл клиента SSH;
- scp.exe – утилита для копирования файлов в SSH сессии;
- ssh-keygen.exe – утилита для генерации ключей аутентификации;
- ssh-agent.exe – используется для управления ключами;
- ssh-add.exe – добавление ключа в базу ssh-агента.
Как использовать SSH клиенте в Windows 10?
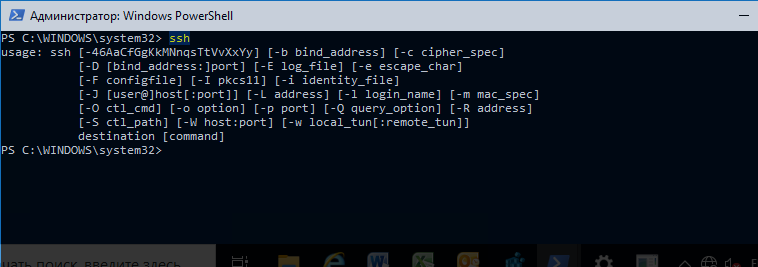
Чтобы запустить SSH клиент, запустите командную строку PowerShell или cmd.exe . Выведите доступные параметры и синтаксис утилиты ssh.exe, набрав команду:
ssh
usage: ssh [-46AaCfGgKkMNnqsTtVvXxYy] [-b bind_address] [-c cipher_spec]
[-D [bind_address:]port] [-E log_file] [-e escape_char]
[-F configfile] [-I pkcs11] [-i identity_file]
[-J [user@]host[:port]] [-L address] [-l login_name] [-m mac_spec]
[-O ctl_cmd] [-o option] [-p port] [-Q query_option] [-R address]
[-S ctl_path] [-W host:port] [-w local_tun[:remote_tun]]
destination [command]
Для подключения к удаленному серверу по SSH используется команда:
Если SSH сервер запущен на нестандартном порту, отличном от TCP/22, можно указать номер порта:
ssh username@host -p port
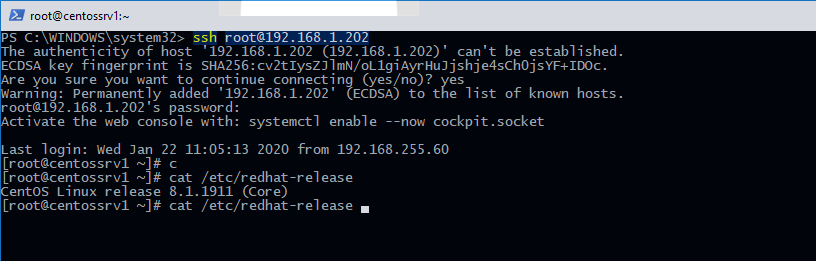
Например, чтобы подключиться к Linux хосту с IP адресом 192.168.1.202 под root, выполните:
При первом подключении появится запрос на добавление ключа хоста в доверенные, наберите yes -> Enter (при этом отпечаток ключа хоста добавляется в файл C:\Users\username\.ssh\known_hosts).
Затем появится запрос пароля указанной учетной записи, укажите пароль root, после чего должна открытся консоль удаленного Linux сервера (в моем примере на удаленном сервере установлен CentOS 8).
Если вы используете SSH аутентификацию по RSA ключам (см. пример с настройкой SSH аутентификации по ключам в Windows), вы можете указать путь к файлу с закрытым ключом в клиенте SSH так:
ssh root@192.168.1.92 -i «C:\Users\username\.ssh\id_rsa»
Также вы можете добавить ваш закрытый ключ в SSH-Agent. Сначала нужно включить службу ssh-agent и настроить ее автозапуск:
set-service ssh-agent StartupType ‘Automatic’
Start-Service ssh-agent
Добавим ваш закрытый ключ в базу ssh-agent:
Теперь вы можете подключиться к серверу по SSH без указания пути к RSA ключу, он будет использоваться автоматически. Пароль для подключения не запрашивается (если только вы не защитили ваш RSA ключ отдельным паролем):
Еще несколько полезных аргументов SSH:
- -C – сжимать трафик между клиентом и сервером (полезно на медленных и нестабильных подключениях);
- -v – вывод подробной информации обо всех действия клиента ssh;
- -R / -L – можно использовать для проброса портов через SSH туннель.
SCP: копирование файлов из/в Windows через SSH
С помощью утилиты scp.exe, которая входит в состав пакета клиента SSH, вы можете скопировать файл с вашего компьютера на SSH сервер:
scp.exe «E:\ISO\CentOS-8.1.1911-x86_64.iso» root@192.168.1.202:/home 
Можно рекурсивно скопировать все содержимое каталога:
scp -r E:\ISO\ root@192.168.1.202:/home
И наоборот, вы можете скопировать файл с удаленного сервера на ваш компьютер:
scp.exe root@192.168.1.202:/home/CentOS-8.1.1911-x86_64.iso e:\tmp
Итак, теперь вы можете прямо из Windows 10 подключаться к SSH серверам, копировать файлы с помощью scp без установки сторонних приложений и утилит.
OpenSSH Server Configuration for Windows 10 1809 and Server 2019
This topic covers the Windows-specific configuration for OpenSSH Server (sshd).
OpenSSH maintains detailed documentation for configuration options online at OpenSSH.com, which is not duplicated in this documentation set.
Configuring the default shell for OpenSSH in Windows
The default command shell provides the experience a user sees when connecting to the server using SSH. The initial default Windows is the Windows Command shell (cmd.exe). Windows also includes PowerShell and Bash, and third party command shells are also available for Windows and may be configured as the default shell for a server.
To set the default command shell, first confirm that the OpenSSH installation folder is on the system path. For Windows, the default installation folder is SystemDrive:WindowsDirectory\System32\openssh. The following commands shows the current path setting, and add the default OpenSSH installation folder to it.
| Command shell | Command to use |
|---|---|
| Command | path |
| PowerShell | $env:path |
Configuring the default ssh shell is done in the Windows registry by adding the full path to the shell executable to Computer\HKEY_LOCAL_MACHINE\SOFTWARE\OpenSSH in the string value DefaultShell.
As an example, the following Powershell command sets the default shell to be PowerShell.exe:
Windows Configurations in sshd_config
In Windows, sshd reads configuration data from %programdata%\ssh\sshd_config by default, or a different configuration file may be specified by launching sshd.exe with the -f parameter. If the file is absent, sshd generates one with the default configuration when the service is started.
The elements listed below provide Windows-specific configuration possible through entries in sshd_config. There are other configuration settings possible in that are not listed here, as they are covered in detail in the online Win32 OpenSSH documentation.
AllowGroups, AllowUsers, DenyGroups, DenyUsers
Controlling which users and groups can connect to the server is done using the AllowGroups, AllowUsers, DenyGroups and DenyUsers directives. The allow/deny directives are processed in the following order: DenyUsers, AllowUsers, DenyGroups, and finally AllowGroups. All account names must be specified in lower case. See PATTERNS in ssh_config for more information on patterns for wildcards.
When configuring user/group based rules with a domain user or group, use the following format: user?domain* . Windows allows multiple of formats for specifying domain principals, but many conflict with standard Linux patterns. For that reason, * is added to cover FQDNs. Also, this approach uses «?», instead of @, to avoid conflicts with the username@host format.
Work group users/groups and internet-connected accounts are always resolved to their local account name (no domain part, similar to standard Unix names). Domain users and groups are strictly resolved to NameSamCompatible format — domain_short_name\user_name. All user/group based configuration rules need to adhere to this format.
Examples for domain users and groups
Examples for local users and groups
AuthenticationMethods
For Windows OpenSSH, the only available authentication methods are «password» and «publickey».
AuthorizedKeysFile
The default is «.ssh/authorized_keys .ssh/authorized_keys2». If the path is not absolute, it is taken relative to user’s home directory (or profile image path). Ex. c:\users\user. Note that if the user belongs to the administrator group, %programdata%/ssh/administrators_authorized_keys is used instead.
ChrootDirectory (Support added in v7.7.0.0)
This directive is only supported with sftp sessions. A remote session into cmd.exe wouldn’t honor this. To setup a sftp-only chroot server, set ForceCommand to internal-sftp. You may also set up scp with chroot, by implementing a custom shell that would only allow scp and sftp.
HostKey
The defaults are %programdata%/ssh/ssh_host_ecdsa_key, %programdata%/ssh/ssh_host_ed25519_key, %programdata%/ssh/ssh_host_dsa_key, and %programdata%/ssh/ssh_host_rsa_key. If the defaults are not present, sshd automatically generates these on a service start.
Match
Note that pattern rules in this section. User and group names should be in lower case.
PermitRootLogin
Not applicable in Windows. To prevent administrator login, use Administrators with DenyGroups directive.
SyslogFacility
If you need file based logging, use LOCAL0. Logs are generated under %programdata%\ssh\logs. For any other value, including the default value, AUTH directs logging to ETW. For more info, see Logging Facilities in Windows.
Not supported
The following configuration options are not available in the OpenSSH version that ships in Windows Server 2019 and Windows 10 1809:
- AcceptEnv
- AllowStreamLocalForwarding
- AuthorizedKeysCommand
- AuthorizedKeysCommandUser
- AuthorizedPrincipalsCommand
- AuthorizedPrincipalsCommandUser
- Compression
- ExposeAuthInfo
- GSSAPIAuthentication
- GSSAPICleanupCredentials
- GSSAPIStrictAcceptorCheck
- HostbasedAcceptedKeyTypes
- HostbasedAuthentication
- HostbasedUsesNameFromPacketOnly
- IgnoreRhosts
- IgnoreUserKnownHosts
- KbdInteractiveAuthentication
- KerberosAuthentication
- KerberosGetAFSToken
- KerberosOrLocalPasswd
- KerberosTicketCleanup
- PermitTunnel
- PermitUserEnvironment
- PermitUserRC
- PidFile
- PrintLastLog
- RDomain
- StreamLocalBindMask
- StreamLocalBindUnlink
- StrictModes
- X11DisplayOffset
- X11Forwarding
- X11UseLocalhost
- XAuthLocation
—>


