- Kernel/Traditional compilation
- Contents
- Preparation
- Install the core packages
- Create a kernel compilation directory
- Download the kernel source
- Unpack the kernel source
- Kernel configuration
- Default Arch configuration
- Advanced configuration
- Compilation
- Installation
- Install the modules
- Copy the kernel to /boot directory
- Make initial RAM disk
- Automated preset method
- Manual method
- Copy System.map
- Bootloader configuration
- Shipping a Linux Kernel with Windows
- Tuned for WSL
- Code goes upstream
- Security
- Open Source
- Thanks!
- Compiling Your Own Linux Kernel for Windows? WSL 2
- Published by Matheus Castello on 21/09/2019
Kernel/Traditional compilation
This article is an introduction to building custom kernels from kernel.org sources. This method of compiling kernels is the traditional method common to all distributions. It can be, depending on your background, more complicated than using the Kernels/Arch Build System. Consider the Arch Build System tools are developed and maintained to make repeatable compilation tasks efficient and safe.
Contents
Preparation
It is not necessary (or recommended) to use the root account or root privileges (i.e. via Sudo) for kernel preparation.
Install the core packages
Install the base-devel package group, which contains necessary packages such as make and gcc . It is also recommended to install the following packages, as listed in the default Arch kernel PKGBUILD: xmlto , kmod , inetutils , bc , libelf , git , cpio , perl , tar , xz .
Create a kernel compilation directory
It is recommended to create a separate build directory for your kernel(s). In this example, the directory kernelbuild will be created in the home directory:
Download the kernel source
Download the kernel source from https://www.kernel.org. This should be the tarball ( tar.xz ) file for your chosen kernel.
It can be downloaded by simply right-clicking the tar.xz link in your browser and selecting Save Link As. , or any other number of ways via alternative graphical or command-line tools that utilise HTTP, TFTP, Rsync, or Git.
In the following command-line example, wget has been installed and is used inside the
/kernelbuild directory to obtain kernel 4.8.6:
You should also verify the correctness of the download before trusting it. First grab the signature, then use that to grab the fingerprint of the signing key, then use the fingerprint to obtain the actual signing key:
Note the signature was generated for the tar archive (i.e. extension .tar ), not the compressed .tar.xz file that you have downloaded. You need to decompress the latter without untarring it. Verify that you have xz installed, then you can proceed like so:
Do not proceed if this does not result in output that includes the string «Good signature».
If wget was not used inside the build directory, it will be necessary to move the tarball into it, e.g.
Unpack the kernel source
Within the build directory, unpack the kernel tarball:
To finalise the preparation, ensure that the kernel tree is absolutely clean; do not rely on the source tree being clean after unpacking. To do so, first change into the new kernel source directory created, and then run the make mrproper command:
Kernel configuration
This is the most crucial step in customizing the default kernel to reflect your computer’s precise specifications. Kernel configuration is set in its .config file, which includes the use of Kernel modules. By setting the options in .config properly, your kernel and computer will function most efficiently.
You can do a mixture of two things:
- Use the default Arch settings from an official kernel (recommended)
- Manually configure the kernel options (optional, advanced and not recommended)
Default Arch configuration
This method will create a .config file for the custom kernel using the default Arch kernel settings. If a stock Arch kernel is running, you can use the following command inside the custom kernel source directory:
Otherwise, the default configuration can be found online in the official Arch Linux kernel package.
Advanced configuration
There are several tools available to fine-tune the kernel configuration, which provide an alternative to otherwise spending hours manually configuring each and every one of the options available during compilation.
Those tools are:
- make menuconfig : Command-line ncurses interface superseded by nconfig
- make nconfig : Newer ncurses interface for the command-line
- make xconfig : User-friendly graphical interface that requires packagekit-qt5 to be installed as a dependency. This is the recommended method — especially for less experienced users — as it is easier to navigate, and information about each option is also displayed.
- make gconfig : Graphical configuration similar to xconfig but using gtk. This requires gtk2 , glib2 and libgladeAUR .
The chosen method should be run inside the kernel source directory, and all will either create a new .config file, or overwrite an existing one where present. All optional configurations will be automatically enabled, although any newer configuration options (i.e. with an older kernel .config ) may not be automatically selected.
Once the changes have been made save the .config file. It is a good idea to make a backup copy outside the source directory. You may need to do this multiple times before you get all the options right.
If unsure, only change a few options between compilations. If you cannot boot your newly built kernel, see the list of necessary config items here.
Running lspci -k # from liveCD lists names of kernel modules in use. Most importantly, you must maintain cgroups support. This is necessary for systemd. For more detailed information, see Gentoo:Kernel/Gentoo Kernel Configuration Guide and Gentoo:Intel#Kernel or Gentoo:Ryzen#Kernel for Intel or AMD Ryzen processors.
Compilation
Compilation time will vary from as little as fifteen minutes to over an hour, depending on your kernel configuration and processor capability. Once the .config file has been set for the custom kernel, within the source directory run the following command to compile:
Installation
Install the modules
Once the kernel has been compiled, the modules for it must follow. First build the modules:
Then install the modules. As root or with root privileges, run the following command to do so:
This will copy the compiled modules into /lib/modules/ — . For example, for kernel version 4.8 installed above, they would be copied to /lib/modules/4.8.6-ARCH . This keeps the modules for individual kernels used separated.
Copy the kernel to /boot directory
The kernel compilation process will generate a compressed bzImage (big zImage) of that kernel, which must be copied to the /boot directory and renamed in the process. Provided the name is prefixed with vmlinuz- , you may name the kernel as you wish. In the examples below, the installed and compiled 4.8 kernel has been copied over and renamed to vmlinuz-linux48 :
Make initial RAM disk
If you do not know what making an initial RAM disk is, see Initramfs on Wikipedia and mkinitcpio.
Automated preset method
An existing mkinitcpio preset can be copied and modified so that the custom kernel initramfs images can be generated in the same way as for an official kernel. This is useful where intending to recompile the kernel (e.g. where updated). In the example below, the preset file for the stock Arch kernel will be copied and modified for kernel 4.8, installed above.
First, copy the existing preset file, renaming it to match the name of the custom kernel specified as a suffix to /boot/vmlinuz- when copying the bzImage (in this case, linux48 ):
Second, edit the file and amend for the custom kernel. Note (again) that the ALL_kver= parameter also matches the name of the custom kernel specified when copying the bzImage :
Finally, generate the initramfs images for the custom kernel in the same way as for an official kernel:
Manual method
Rather than use a preset file, mkinitcpio can also be used to generate an initramfs file manually. The syntax of the command is:
- -k ( —kernel ): Specifies the modules to use when generating the initramfs image. The name will be the same as the name of the custom kernel source directory (and the modules directory for it, located in /usr/lib/modules/ ).
- -g ( —generate ): Specifies the name of the initramfs file to generate in the /boot directory. Again, using the naming convention mentioned above is recommended.
For example, the command for the 4.8 custom kernel installed above would be:
Copy System.map
The System.map file is not required for booting Linux. It is a type of «phone directory» list of functions in a particular build of a kernel. The System.map contains a list of kernel symbols (i.e function names, variable names etc) and their corresponding addresses. This «symbol-name to address mapping» is used by:
- Some processes like klogd, ksymoops, etc.
- By OOPS handler when information has to be dumped to the screen during a kernel crash (i.e info like in which function it has crashed).
If your /boot is on a filesystem which supports symlinks (i.e., not FAT32), copy System.map to /boot , appending your kernel’s name to the destination file. Then create a symlink from /boot/System.map to point to /boot/System.map- :
After completing all steps above, you should have the following 3 files and 1 soft symlink in your /boot directory along with any other previously existing files:
- Kernel: vmlinuz-
- Initramfs: Initramfs- .img
- System Map: System.map-
- System Map kernel symlink
Bootloader configuration
Add an entry for your new kernel in your bootloader’s configuration file. See Arch boot process#Feature comparison for possible boot loaders, their wiki articles and other information.
Источник
Shipping a Linux Kernel with Windows

Beginning with Windows Insiders builds this Summer, we will include an in-house custom-built Linux kernel to underpin the newest version of the Windows Subsystem for Linux (WSL). This marks the first time that the Linux kernel will be included as a component in Windows. This is an exciting day for all of us on the Linux team at Microsoft and we are thrilled to be able to tell you a little bit about it.
Tuned for WSL
The term “Linux” is often used to refer both to the Linux kernel as well as the GNU userspace. As with WSL1, WSL2 will not provide any userspace binaries. Instead, the Microsoft kernel will interface with a userspace selected by the user. This will generally come through installation via the Windows store but can also be “sideloaded” through the creation of a custom distribution package. The only exception to this rule is a small init script that is injected to bootstrap the startup process, forming the connections between Windows and Linux that make WSL so magical.
The kernel itself will initially be based on version 4.19, the latest long-term stable release of Linux. The kernel will be rebased at the designation of new long-term stable releases to ensure that the WSL kernel always has the latest Linux goodness.
In addition to the LTS source from Kernel.org, a number of local patches are being applied. These patches tune the resulting binary for use in WSL2 by improving launch times, reducing the memory footprint and curating a minimal set of supported devices. The result is a small, lightweight kernel that is purpose built for WSL2 to be a drop-in replacement for the emulation architecture featured in the design of WSL1.
Code goes upstream
Microsoft employs a growing number of Linux contributors who have brought industry leading Linux knowhow into the company. For years now, these Linux developers have enabled Microsoft to support new platform features in the wide number of distributions provided in the Azure Marketplace.
An important philosophy of Linux at Microsoft is that all changes go upstream. Maintaining downstream patches adds complexity and is not standard practice in the open source community. In leveraging Linux, we are making a commitment to be good citizens and contribute back the changes that we make.
However, during development it is necessary to work with local patches that enable new features or address issues in upstream. In these cases, we either create, or find patches that fulfill our product requirements and then work with the community to get that code integrated as soon as possible. To protect the stability of the LTS branches, some patches – such as for new features – might only be included in future versions of the kernel, and not be back-ported to the current LTS version.
When the WSL kernel source becomes available it will consist of links to a set of patches in addition to the long-term stable source. Over time, we hope this list will shrink as patches make it upstream and grow as we add new local patches to support new WSL features.
Security
The WSL kernel will be built using Microsoft’s world-class CI/CD systems and serviced through Windows Update in an operation transparent to the user. The kernel will stay up to date with the newest features and fixes in the latest stable branch of Linux. To ensure the provenance of our sources we mirror repositories locally. We continually monitor Linux security mailing lists and partner with several CVE database companies to help ensure that our kernel has the most recent fixes and mitigations.
One of the great things about Linux is its stable and backwards compatible system call interface. This will enable us to ship the latest stable branch of the Linux kernel to all versions of WSL2. We will rebase the kernel when a new LTS is established and when we have sufficiently validated it.
Open Source
The kernel provided for WSL2 will be fully open source! When WSL2 is released in Windows Insider builds, instructions for creating your own WSL kernel will be made available on Github. We will work with developers interested in contributing to help get changes upstream. Check back in a few weeks for more information.
Thanks!
This is the culmination of years of effort from the Linux Systems Group as well as multiple other teams across Microsoft. We are excited to be able to share the result and look forward to the new and interesting ways in which you will use WSL. If you are interested in positions at Microsoft working with Linux check out this job listing.
Источник
Compiling Your Own Linux Kernel for Windows? WSL 2
Published by Matheus Castello on 21/09/2019
But huh? What do you mean by compiling your own Linux Kernel for Windows!? Well little friends, if you haven’t been in a cave in the last few months you’ve certainly heard that Microsoft will now distribute a Linux Kernel along with Windows.
Windows Subsystem for Linux 2 (WSL2), the WSL 1 updated, Microsoft’s “Wine” (for those who don’t know Wine is the project that tries to run windows applications on Linux 😝), now runs on top of a real Linux Kernel and gives you the possibility to load a customized Kernel inside Windows.
WSL and WSL 2 – Differences
WSL (Windows Subsystem for Linux) is a Microsoft project to natively run Linux applications, Linux distros on Windows without a virtual machine. The idea is, roughly speaking, to “translate” Linux syscalls into Windows syscalls. In other words, the application will use the native Windows NT kernel to run.
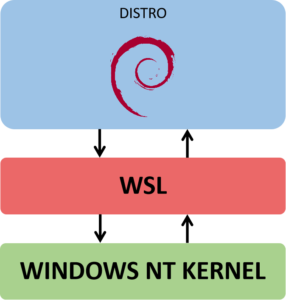
WSL works very well, we can run distros and Linux user space applications like Ubuntu and Debian with this technology. The problem here is the big work that the WSL team has to do this “translation” and support all the functionality between the systems, still making sure that it will behave as expected, not to mention that the Linux Kernel is almost like a living organism that is in active development and it is difficult for the WSL team to keep up with the latest updates.
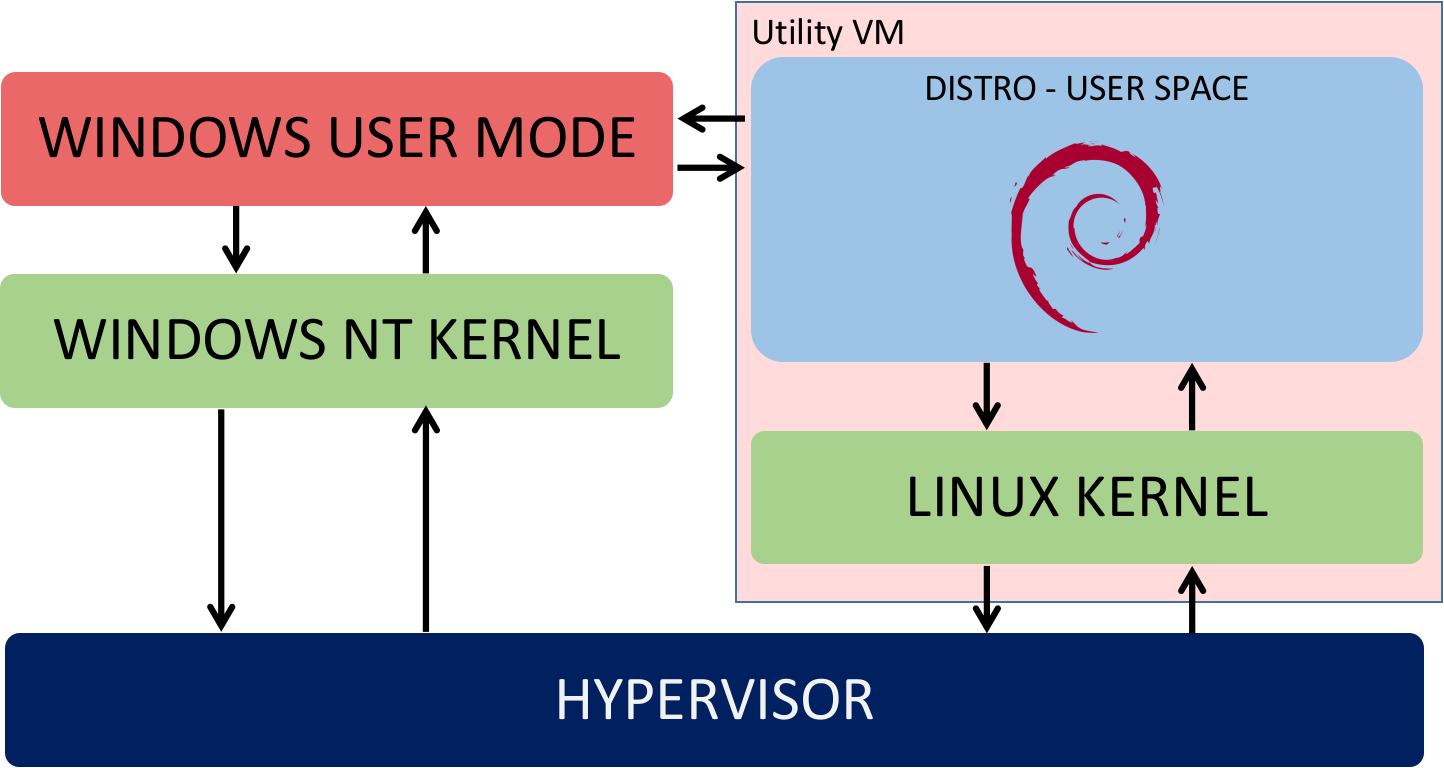
To solve this, and other problems, WSL 2 was proposed. The main idea is the same, running Linux applications, Linux distros on Windows. But now running natively on top of a virtualized Linux Kernel on a very lightweight utility Hyper-V VM. The Linux Kernel is open source, why spend time “translating” syscall if I can use it directly to run my applications?
So Microsoft compiles a tuned Linux kernel, customized and optimized to run on top of its Hyper-V with a very good performance, better than that delivered by the normal WSL.
Too bad the Wine folks don’t have the windows NT Kernel code to do the same … 🤔
Compiling your own Linux kernel for WSL 2
*The following steps were performed on Windows 189 build 18980.1, which you can download by participating in Windows Insiders.
WSL 2 not only loads a native Linux Kernel, the image of the Linux Kernel is in the directory C:\WINDOWS\System32\lxss\tools\kernel, but it also gives us the option of loading a customized Linux kernel. That’s right, we can compile and customize our own kernel to be loaded into WSL 2.
Standard Version – Longterm
The standard version that is delivered with build 18980.1 is the 4.19.67:
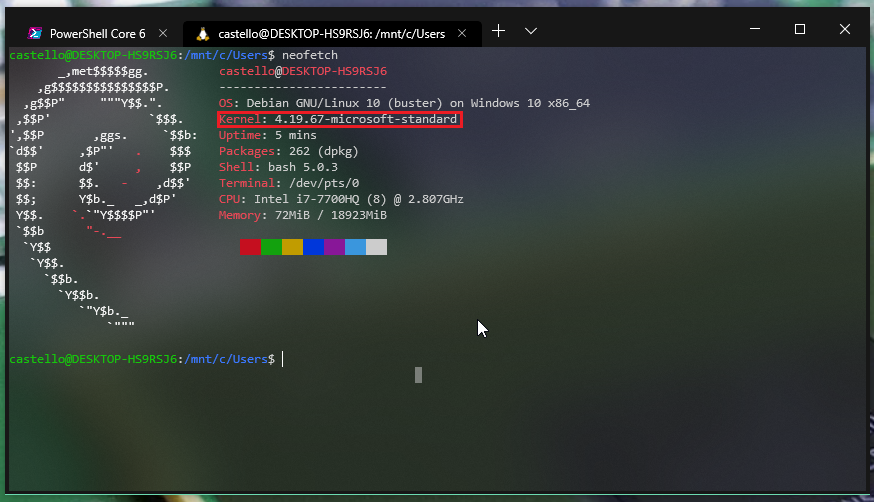
Microsoft, which is not silly, is using the latest longterm version of the Linux Kernel, v4.19. The source code for the Kernel used with WSL 2 is on Microsoft’s GitHub in the following repository: https://github.com/microsoft/WSL2-Linux-Kernel.
The code in this repository has some modifications, and tricks, to make the Kernel work optimally for Hyper-V. Checking the Makefile of this repository we can see that the team is already working with version 4.19.72, but longterm has already received updates and is at version 4.19.74.
So let’s not wait for Microsoft to send a Kernel update, we will compile it ourselves! (for fun, of course 😎)
Compiling your Kernel
Not only will we compile our custom kernel for WSL 2, but we will do it using WSL 2 itself 🤯. For this I merge directly from the Linux git tree stable with the WSL2-Linux-Kernel git tree that resulted in this branch: https://github.com/microhobby/linus-tree/tree/wsl_4.19.74
For compilation I am using the Debian distro and we will need the following packages:
With the dependencies installed we will clone the merge:
Before starting the game, let’s make a small change. In the standard Microsoft config, on line 22 we have the “LOCALVERSION” config:
This config adds a name to the release version of the compiled Kernel:

I will modify this config to the following:
All set, let’s compile our kernel with the following command:
This compilation should take about 10 minutes or more. Don’t forget to pass the “-j” argument at the end of the command, with the number of CPU cores that your machine has, so that the compilation takes place in parallel and speeds up the process a lot.
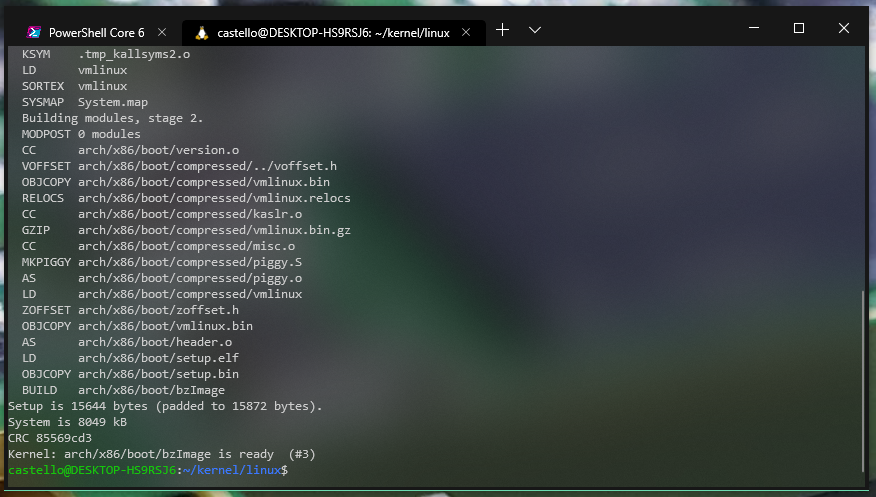
If all goes well at the end of the build we will have something like this:
Loading your own Kernel on WSL 2
With the Kernel compiled we will have the following file in the source root:

This file is the “image”, raw binary of the Linux kernel and has the entire kernel and drivers built in. Let’s copy it to your user’s default windows folder:
Remember to change the to the name of your Windows user.
Now on Windows create a file called .wslconfig, also inside your user’s folder with the following content:
This file is the tricks of the trade . The WSL checks in it the kernel property which is the absolute path to the custom Kernel image that we want to load in Hyper-V, to use in conjunction with WSL 2. Again, remember to change the to the name of your Windows user. And it is important that this file is in the root of your user’s folder!
Now we’re almost there. To load the new Kernel we have to first turn off the distro that is running, and just close the window, or tab of the new terminal, does not solve. We have to open powershell and do the following:
Here I am sending “Debian” as an argument because it is the distro I am using, if you are using another distro modify this argument.
Now is the moment of truth. Open the Linux distro, if everything goes as expected, WSL 2 will see that we have a .wslconfig file in our user folder with a new Kernel, it will load the image we passed in Hyper-V and it will run our customized Kernel:
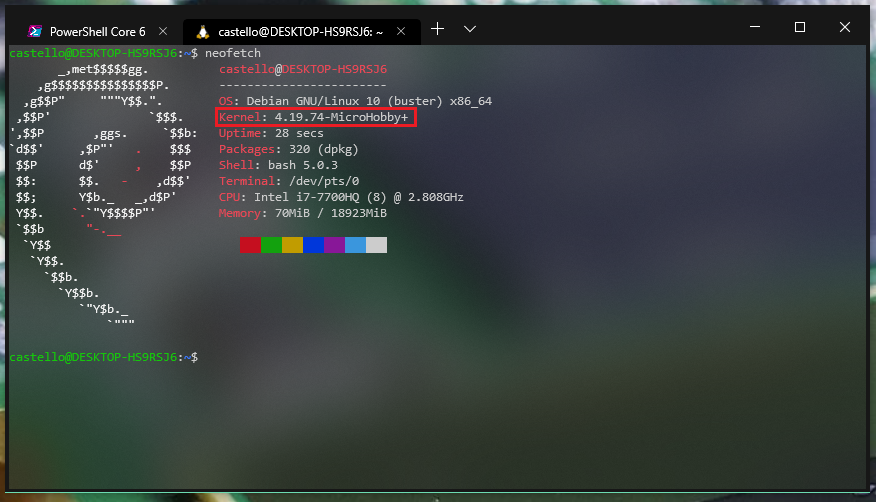
Done, now we are running the latest version, “MicroHobby”, stable longterm of the Linux Kernel on Windows through WSL 2.
Conclussions
This is a really cool extension feature in WSL 2 that adds a lot of possibilities to the developer. Being able to configure our own Kernel we are no longer stuck only with the modules and configs that are in the image of Microsoft’s standard Linux Kernel.
Youtube
Even if you prefer, I showed in practice the subject covered in this article in the video (sorry, portuguese content):
Источник


