- Command line dns commands windows
- Change IP Address and DNS Servers using the Command Prompt
- How To Change IP Address Using Command Prompt
- How To Change DNS Servers Using Command Prompt
- How To Change DNS Servers With Command Prompt
- Conclusion
- Adding Windows DNS Records Via Command-Line
- 5 thoughts on “ Adding Windows DNS Records Via Command-Line ”
- Configure IP Address and DNS from Command Line
Command line dns commands windows
- Open up the command prompt (In Windows, you can use WINDOWS KEY+R to open Run dialogue box and type cmd)
(note: Use your up and down arrow keys to access recent commands you have entered in the command line.)
To see your current DNS settings, type ipconfig /displaydns and press Enter.
To delete the entries, type ipconfig /flushdns and press Enter.
To see your DNS settings again, type ipconfig /displaydns and press Enter.
You should see blank records or you might get the message «Could not display the DNS Resolver Cache.»
To perform a DNS lookup, type ping scisweb.ulster.ac.uk and press Enter.
To see your DNS settings again, type ipconfig /displaydns and press Enter.
You should see a DNS record for scisweb.ulster.ac.uk that includes the IP address and other information. Another field in the DNS cache is a TTL value, which is different from the TTL in an IP packet. This DNS TTL value is sent by the DNS server maintaining the scisweb.ulster.ac.uk record. It is measured in seconds and tells your DNS client how long to cache the DNS record as a safeguard against clients holding on to DNS records whose IP addresses might have changed.
To open your computer’s Hosts file, run Notepad as administrator. Easiest way is to press and then type notepad in windows 8 splashscreen, select notepad and right click and then select «Run as administrator» in bottom taskbar area of windows 8. In the Open dialog box, navigate to C:\Windows\System32\Drivers\Etc. In the File type drop-down list, click All Files. Double-click the hosts file to open it.
You should now have a hosts file open with various settings.
After the last line in the file, type 193.61.191.104 university, and then save the file and exit Notepad.
At the command prompt, type ipconfig /displaydns and press Enter to see that the entry is in your DNS cache.
Type ping university and press Enter.
Delete the DNS cache again by typing ipconfig /flushdns and press Enter.
Display your DNS cache by typing ipconfig /displaydns and press Enter.
Notice that the university entry remains in the cache because the Hosts file data always stays in the cache.
Type nslookup scisweb.ulster.ac.uk and press Enter.
Your DNS server’s name and IP address are displayed, along with the name and IP address of www.ulster.ac.uk. You use Nslookup to look up a host’s IP address without actually communicating with it.
Type nslookup and press Enter.
You should now have entered Nslookup’s interactive mode. You should see an arrow prompt.
Type www.google.com and press Enter.
Notice that more than one address is returned along with one or more aliases (other names that www.google.com goes by).
Type www.google.com again (or press the up arrow to repeat the last line you typed) and press Enter.
You should see the IP addresses returned in a different order. (If you don’t, keep trying, and the order will change.)
The www.google.com page can be reached by a number of different IP addresses, and the addresses are returned in a different order so that a different server is used each time, which is called load balancing.
Nslookup is also used to do reverse lookups, in which the IP address is given and the hostname is returned.
If you are ever concerned that your DNS server is not working correctly, you can test it with Nslookup and compare the results of your DNS server with the results from another server, such as Google’s.
Change IP Address and DNS Servers using the Command Prompt
Just because it’s more fun
The Command Prompt application, sometimes referred to as command shell, is found in most Windows NT-based operating systems. Its purpose is to execute specific commands for troubleshooting or solving specific Windows issues, performing advanced administrative functions, and automating tasks via batch files and scripts.
That said, you can also use it to change your IP address when you want to spoof it to bypass geoblocks or online bans on sites that impose such restrictions on their content, or change your Domain Name System (DNS) servers for troubleshooting reasons or to make surfing more secure and faster.

In this guide, we’re going to show you how to change your IP address and DNS servers using the Command Prompt in Windows 10.
How To Change IP Address Using Command Prompt
An IP address holds information about your device, location, your internet service provider (ISP), and browser information.
Changing it is useful when you have a malfunctioning router that’s providing addresses used by a different computer on the network or an invalid address is accidentally configured. It’s also helpful when you want to install a new router and reconfigure your home network to use the default IP address range.
The first step to changing your IP address is to find the network name for the interface you want to change.
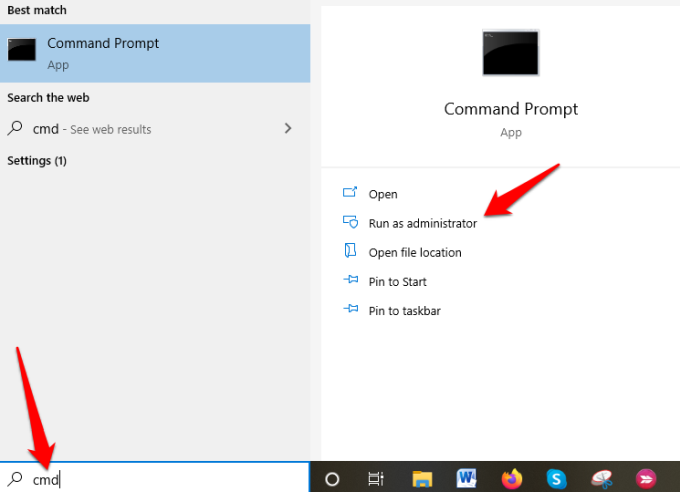
- Open an elevated Command Prompt by typing CMD in the search bar and clicking on Run as Administrator.
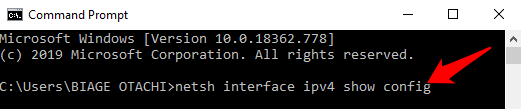
- Next, type netsh interface ipv4 show config in the command prompt window, press Enter, and scroll down to the interface you want.
In our case, we’ll be modifying the WiFi interface, but you can pick the correct interface for your case. Make note of the interface name.
- To change the IP address, type this command: netsh interface ipv4 set address name=”YOUR INTERFACE NAME” static IP_ADDRESS SUBNET_MASK GATEWAY
In our example, this command would look like this: netsh interface ipv4 set address name=”Wi-Fi” static 192.168.0.173 255.255.255.0 192.168.0.0
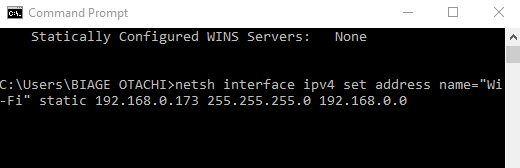
This command will use the Wi-Fi interface, set the IP address to 192.168.0.173, set the subnet mask to 255.255.255.0 and set the default gateway to 192.168.0.0.
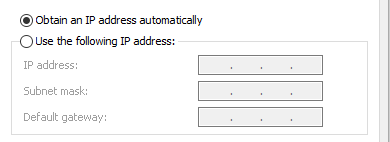
If you want to switch to using an IP address automatically assigned by a DHCP server instead of a static IP address, use the netsh interface ipv4 set address name=”YOUR INTERFACE NAME” source=dhcp command.
How To Change DNS Servers Using Command Prompt
A DNS server holds public IP addresses and related hostnames in a database, and is used to resolve or translate the hostnames to IP addresses. The server does this by running special software to communicate with other servers through special protocols based on certain requests from the computer.
The conversion process is thoroughly vetted and verified, and it happens quickly behind the scenes so as to obtain information corresponding to the server that the computer is looking for, and then tells the original connecting computer where to go so that it can connect to that server.
There are several reasons why you’d want to change your default DNS server, but the main ones are:
- Boost your privacy when getting around a firewall, bypassing geoblocks or ISP blocks on a website
- Increase security
- Parental controls like blocking websites from your router
- Speed your surfing, which your own ISP’s DNS servers may not offer because they’re not always reliable or up-to-date
Note: You can change DNS servers individually for your home network on your router or on computers, smartphone, and Chromebook, among other devices
How To Change DNS Servers With Command Prompt
Follow the steps below to learn how to change DNS servers using Command Prompt.
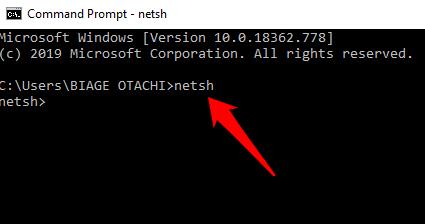
- Open an elevated Command Prompt by typing CMD in the search bar, and clicking Run as Administrator.

- Type netsh and press Enter.
- Next, type interface ip show config and press Enter.
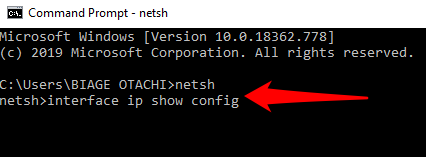
- Find the network interface whose DNS server you want to change, and enter the netsh interface ipv4 set dns name=”YOUR INTERFACE NAME” static DNS_SERVER. This will set your primary DNS server.
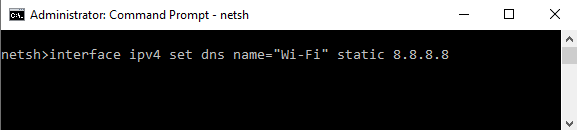
From our example above, we changed the IP address for the “Wi-Fi” interface, so we’ll use the same example to change DNS servers.
For purposes of this guide, we’ll use Google’s primary public DNS server, 8.8.8.8. The command will look something like this: netsh interface ipv4 set dns name=”Wi-Fi” static 8.8.8.8
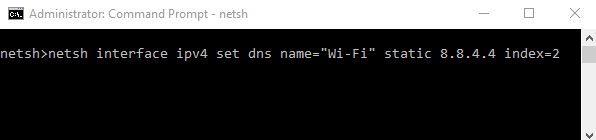
- Next, type the netsh interface ipv4 set dns name=”YOUR INTERFACE NAME” static DNS_SERVER index=2 command to set the secondary DNS server. Again, we’ll use Google’s public DNS secondary server, 8.8.8.8 as an example, which will look like this: netsh interface ipv4 set dns name=”Wi-Fi” static 8.8.4.4 index=2.
Note: You can use the netsh interface ipv4 set dnsservers name”YOUR INTERFACE NAME” source=dhcp command if you want the network interface to automatically pick DNS settings from a DHCP server. Continuing with our example, this command would look like this: netsh interface ipv4 set dnsservers name”Wi-Fi” source=dhcp
Conclusion
Command Prompt is a great tool to use when you want to change IP addresses and DNS servers. It’s faster and saves you the hassle of having to click through several windows and dialog boxes from the Control Panel interface just to get to the IPv4 Properties dialog box to do the same thing.
Was this guide helpful? Let us know by dropping your comment in the section below.
Elsie is a technology writer and editor with a special focus on Windows, Android and iOS. She writes about software, electronics and other tech subjects, her ultimate goal being to help people out with useful solutions to their daily tech issues in a simple, straightforward and unbiased style. She has a BCom degree in Marketing and currently pursuing her Masters in Communications and New Media. Read Elsie’s Full Bio
Adding Windows DNS Records Via Command-Line
This is something that is almost completely off-topic, but something I’ve found myself doing quite a bit at Enkitec. You see, we keep adding new hardware (Big Data Appliance in August, new Exadata X3-2 earlier this year), and that means that we need to add a bunch of DNS entries at once. Even an eighth rack of Exadata needs 54 DNS entries, when you add up the forward and reverse records.
If you’re like us, you have a Windows-based DNS server (whether you like it or not). The DNS configuration interface in Windows Server 2008 is pretty nice, but it can be a pain to repeatedly click to add all of the entries needed. What is really convenient is to be able to write out the commands and paste them into a command line window. Since I use this blog as a place to keep things that I’ll use again, I wanted to document this here. Someday, you may find this useful, too. I know that real men use Linux for DNS, but unfortunately, we were unable to resist the pull of Active Directory (ugh).
First, you’ll need to add your A records – these are the normal DNS entries (forward lookups).
Next, you’ll need to add the PTR records – these are reverse lookups (translate an IP into a hostname)
Here’s what this looks like when we put it into action:
I know that real men use Linux (and manlier men use BSD) for DNS, but unfortunately, we were unable to resist the pull of Active Directory (ugh).
5 thoughts on “ Adding Windows DNS Records Via Command-Line ”
and lazy so and sos like me use dnsmasq for quick and dirty dns management in vm labs etc,
I definitely need to look at dnsmasq – Oracle uses it on the BDA, and I’ve been told numerous times that I need to check it out. Unfortunately, we have to use active directory in our office – we managed to hold out on a windows server until about 2 years ago – and I don’t want to have to maintain 2 different DNS infrastructures. Thankfully, the windows DNS server will still replicate to our servers running BIND without issue.
oops – url is http://www.thekelleys.org.uk/dnsmasq/doc.html there’s a pretty nice discussion list as well.
I can actually provide some confirmation that manlier men use BSD for DNS. I used to work for the tld provider for .uk, and yes there were BSD nameservers.
Boy was I dancing for joy the day the BSD nameservers were retired!
Configure IP Address and DNS from Command Line
Would you like to configure the IP address and DNS settings of your Windows PC just using the command prompt? Rather than click through the user interface, these items can quickly be set with just a few commands.
The first thing you need to identify is the name of the network interface you want to modify. You can find the names of all network interfaces by running the following command:
This will list all the interfaces available. In most cases, your wired network adapter will be called «Local Area Connection» but it may include a number at the end of the name. It is important to use the full name in the commands below and surround it with quotes if the name contains spaces.
How to set a static IP address
A static IP address can be set from the command prompt by running the netsh command at an administrative level prompt. Make sure to substitute the parameters in the command below for your environment.
«Local Area Connection» is the name of the adapter you want to modify.
«123.123.123.123» is the IP address you want to set.
«255.255.255.0» is the subnet mask.
«123.123.123.1» is the gateway.
The «1» on the end of the command is the gateway metric. You will want to leave this as 1 for almost all cases.
How to enable DHCP instead of a static IP
If you want to enable DHCP you can run:
As mentioned in the previous section, replace «Local Area Connection» with the name of the network adapter you want to modify.
How to Set Specific DNS Servers
There are two commands for DNS since administrators typically configure a primary and secondary DNS server.
For the primary DNS server run:
For the secondary DNS server run:
How to configure the network adapter to use the DNS servers provided by DHCP:
If you PC is already configured to use DHCP want to configure the adapter to use DNS from DHCP as well run the following command.
When you are finished with all of your IP and DNS changes run ipconfig -all to review the new settings.


