- Changing File Ownership and Permissions in Linux
- Finding Current File Ownership and Permissions
- Changing File Ownership and Permissions
- Changing Ownership
- Changing Permissions
- How to change the file owner and group in Linux?
- Syntax
- Checking the ownership
- Changing the ownership of a file
- Chown Command in Linux (Change File Ownership)
- Chown syntax
- Change Ownership of a file
- Changing the owner and group of a file
- Change ownership for directories recursively
- Verbose output
- Change ownership for symbolic links
- Change ownership same as reference file
- Silent operation
- How to preserve the root
- Conclusion
- Chown Command: Change Owner of File in Linux
- Linux Chown Command Syntax
- How to Check Ownership of a File in Linux
- How to Change the Owner of a File
- Change the Owner of a File With UID
- Change Ownership of Multiple Linux Files
- How to Change the Group of a File
- Change the Group of a File Using GID
- Change Owner and the Group
- Change Group to a Users Login Group
- Transfer Ownership and Group Settings from One File to Another
- Check Owner and Group Before Making Changes
- Check Owner Only
- Check Group Only
- How to Recursively Change File Ownership
- Chown Command and Symbolic Links
- Display Chown Command Process Details
- Suppress Chown Command Errors
Changing File Ownership and Permissions in Linux
As Linux was designed to support many users on a system, permissions and ownership are in place to ensure authorized access to certain files. This prevents general users from modifying system and administration level files, accessing other users’ private files, or allowing some users to read a file. Still, only one or few have access to write to it. Two of these systems are Linux’s file ownership and permissions policies.
Every file in Linux (including directories) has an owning user and group and read/write/execute flags to allow or deny such types of file access to the owner, owning group, and all other users, respectively.
Finding Current File Ownership and Permissions
To list a file’s current ownership and permissions policies, the commandВ ls -lВ can be used.
Supplying a file to the command withВ ls -l filenameВ will output details about the file. These details include an indicator of the type of file it is, the read (r)/write (w)/execute (x) flags for the user, group, and other users, the number of links to the file, the size of the file, and the date the file was last modified.
In this example, the file is owned by the user fooВ and the group bar. The user fooВ has read, write, and execute permissions, the group barВ has read and write permissions, andВ any other users only have read access.
Simply runningВ ls -lВ without supplying a filename will list the same output for all current directory contents.
If the file provided is actually a directory, the command will list the same output for all contents of that directory.
More information on the ls command can be found here, or with the commands ls –help or man ls.
Changing File Ownership and Permissions
Because onlyВ the root user can change the ownership and permissions of a file in Linux, all of the following commands must be run as root or withВ sudoВ if logged in as any other user withВ sudo command permissions.
Changing Ownership
In Linux, when a file is created, ownership over the file defaults to the user who created it and that user’s primary group. Sometimes though. There are instances where the ownership of a file or directory must be changed. To do so,В there are two useful commands in changing user or group ownership of a file:В chownВ andВ chgrp.
The command chown is used to modify the ownership of a file. The command chgrp is used to modify the group ownership of a file. However, because chown also has the functionality to modify group ownership, we will only use chown in this guide. For more details and instructions for using chgrp, you can look here or use the commands chgrp –help or man chgrp.
To useВ chownВ to change file ownership, supply the user’s name you want to transfer ownership to, followed by which file you wish to transfer:
Instead of a username, to change the group ownership, enter a:В followed by the group name:
To change both the user and group ownership simultaneously, enter both the username and group name, with a:В separating them:
You may also need to supply the command with one of its available argument options, depending on what is being changed.
For example, if changing the ownership of an entire directory, theВ -RВ option should also be supplied to run the command recursively, changing the ownership of the directory itself and all of its contents:
It is highly suggested to utilize the full path of the file or folder when using this flag and have a solid understanding of absolute and relative paths. This could harm your file system’s ownership.
Without this option, only the owner of the directory itself would be updated, while the ownership of its contents would not.
More details, and a full list of the available options, forВ chownВ can be found here, or with the commands
Changing Permissions
In Linux, the access permissions for a file are split between theВ user, group, and others. The user is the file owner, while the group is the owning group of the file, and others are simply all other users.В It is then further split into what’s basically a simple yes/no for each type of access is available: read, write, and execute. Read (r) means they can read data from the file, write (w) means they can write data to the file, and execute (x) means they can run the file as a program.
To change these permissions, the commandВ chmodВ is available, with which there are two primary ways to adjust the permissions.
The first way is to enable or disable specific permissions for specific roles. To do this, you would run chmod and follow it with either u for adjusting user permissions, g for group permissions, or o for other users, then either a + or – to indicate either adding or remove permissions, and finally either a r for reading, w for write, or x for execution permissions. You can also combine the options for who to change permissions for and which permissions.
In the example above, the first command gives execution permissions to the user that owns the file. The second command gives read and writes permissions for both the user and group that own the file. And finally, the last example takes away read permissions for the file from all other users.
The second way to useВ chmodВ to change file permissions is to set all permissions at once using a number to represent all permissions. This number is a 3-digit number where the first digit represents the permissions for the user, the second digit represents the group permissions, and the last digit represents the permissions for other users.
The value for each digit is the sum of the numbers representing which permissions to enable for that role. The numbers representing each type of permission is as follows:
Read = 4
Write = 2
Execute = 1
This means that the number representing no permissions would be zero. Four would be just read. Six would be read and write. Seven would be all permissions, etc.
We then concatenate these numbers into our 3-digit number to represent all roles at once. For example, to give the user read and write access, the group only read access, and other users no access, the number to represent that would beВ 740.
In the example above, the first command sets all roles to have no permissions. The second command gives all roles all permissions. The third gives read and write access to only the user, and the last command gives read and executes permissions to both the user and other users.
More details and options available forВ chmodВ can be found here or with the commands
Written byВ Hostwinds TeamВ / В August 29, 2018
Источник
How to change the file owner and group in Linux?
To change the file owner and group, we use the chown command in the Linux operating system.
We know that Linux is a multiuser operating system so every file or directory belongs to an owner and group.
To change ownership of files or directories we use chown command in the Linux system. This command is also available in the IBM i operating system. The chgrp command is also used to change only the group ownership of the file in the Linux system.
Syntax
The general syntax of the chown command is as follows
A brief description of options available in the chown command —
| Sr.No. | option & Description |
|---|---|
| 1 | -c, —changes Gives a diagnosis for all the files that actually changed. |
| 2. | -f, —silent, —quite It suppresses most of the error messages. |
| 3 | -v, —verbose Give a diagnosis for all the processed files. |
| 4 | -R, —recursive It changes files and directories recursively. |
| 5 | —help Displays a help message and then exits. |
| 6 | —version It gives info about the version and then exits. |
Checking the ownership
To check the ownership of a file in the Linux system, we use the ls -l command as shown below.
Changing the ownership of a file
To change ownership of a file in the Linux system we need to administrative permission or sudo privilege.
The general syntax for changing ownership of a file is as follows:
Here, we will change the ownership of a file ‘file.txt’ Vikash to Gautam using the chown command.
First, we will check the ownership of ‘file.txt’ using the below command.
We can see that the owner of ‘file.txt’ is vikash and the group ownership of the ‘file.txt’ is vikash. To change the ownership, we will execute command as shown below.
After changing the ownership of the file, we will again check again the ownership of files to ensure that ownership is changed or not.
To check more information and available options in the chown command, we use the —help option with the chown command as follows:
Conclusion: In this article, we learned to change the ownership of files using the chown command in the Linux operating system with available options and suitable examples. To change only the group ownership of the file, we use the chgrp command in the Linux system.
Источник
Chown Command in Linux (Change File Ownership)

In Linux and Unix-like operating systems, all files, directories and processes (which are again files) are owned by users. The group is a set of users that share the same access permissions (i.e read, write and execute) for that objects (files/directories).
The chown command is used in Linux to change the user and group ownership of files, directories and symbolic links.
In this tutorial, I will show you how to use the chown command with some practical examples.
Chown syntax
Let check the basic syntax of chown command as follows:
You can run ls -l command to print file ownership details.
In the following output, you can see the file ‘myfile.txt’ is owned by user ‘tom’ and the group is owned by ‘developers’:
Change Ownership of a file
To change the ownership of a file, use chown with new owner name and the file name for which the owner has to be changed.
The following command change ownership of the file named ‘myfile.txt’ to a new user ‘tom’:
If the command successfully executed it won’t display any output on the terminal. Let verify using ls -l command as follows:
Changing the owner and group of a file
If the owner is followed by a colon ( : ) and a group name (without spaces), the group name is changed as well.
The following example shows how to change owner and group for the file named ‘myfile.txt’:
Now the new owner of the file is ‘tom’ and the new group owner is ‘developers’ group.
If you remove the group name after the colon the group of the file is changed to the specified user’s login group:
If the colon (:) and group are mentioned, only the group of the file is changed. In this case, the command works like chgrp command.
Change ownership for directories recursively
To apply ownership recursively on all files and directories under a given directory use -R option
In the following example, the ownership of all the files and directories under ‘/var/www/html’ will be recursively changed to ‘linoxide’ and group ownership to ‘www-data’:
Verbose output
The —verbose option shows all the ownership changing on the terminal. It outputs the diagnostics for each file processed.
The verbose option outputs the processing of each file even when the changes are not made. But with -c or —changes option, the output is reported only when changes are made.
Change ownership for symbolic links
By default chown command won’t change ownership of symbolic links rather it changes ownership on the target file. Chmod has an option -h that can be used to change ownership for symbolic links.
Check the following example:
Change ownership same as reference file
You can reference a file from which chown copy the same user and group ownership to a new file.
In following command —reference=myfile1.txt option to provide reference file and ownership assigned to file named ‘myfile2.txt’:
Silent operation
A normal user cannot change the ownership of files owned by others. So an error is displayed when a normal user tries to change the ownership.
But if we use -f or —silent or —quiet option, the error is not displayed.
How to preserve the root
Chmod command has an option —preserve-root to prevent chmod from acting recursively on / . This option should be used with -R option to take effect.
Only the permissions of the / will be changed and ownership of files and directories inside / will remain the same.
Conclusion
In this tutorial, we learned how to change ownership of files and directories in Linux. Thanks for reading and let us know your comments.
Источник
Chown Command: Change Owner of File in Linux
Home » SysAdmin » Chown Command: Change Owner of File in Linux
The chown command changes user ownership of a file, directory, or link in Linux. Every file is associated with an owning user or group. It is critical to configure file and folder permissions properly.
In this tutorial, learn how to use the Linux chown command with examples provided.

- Linux or UNIX-like system
- Access to a terminal/command line
- A user with sudo privileges to change the ownership. Remember to run the commands with sudo to execute them properly.
Linux Chown Command Syntax
The basic chown command syntax consists of a few segments. The help file shows the following format:
- [OPTIONS] – the command can be used with or without additional options.
- [USER] – the username or the numeric user ID of the new owner of a file.
- [:] – use the colon when changing a group of a file.
- [GROUP] – changing the group ownership of a file is optional.
- FILE – the target file.
Superuser permissions are necessary to execute the chown command.
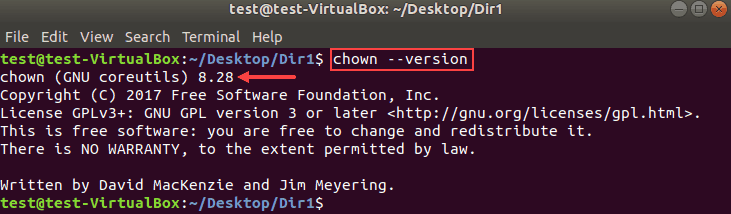
In this guide, we tested the command examples with the chown version 8.28 in Ubuntu 18.04.2 LTS.
To check the chown version on your machine, enter:
The output will look similar to this:
How to Check Ownership of a File in Linux
First, you need to know the original file owner or group before making ownership changes using the chown command.
To check the group or ownership of Linux files and directories in the current location, run the following command:
An example output of the ls command looks like this:

How to Change the Owner of a File
Changing the owner of a file with chown requires you to specify the new owner and the file. The format of the command is:
The following command changes the ownership of a file sample from root to the user test:
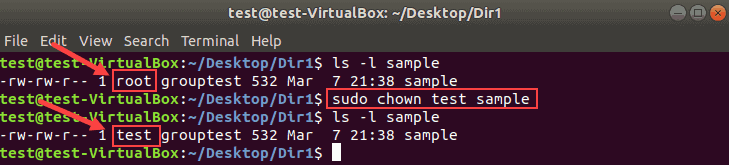
Use the same format to change the ownership for both files and directories.
Change the Owner of a File With UID
Instead of a username, you can specify a user ID to change the ownership of a file.
Make sure there is no user with the same name as the numeric UID. If there is, the chown command gives priority to the username, not the UID.
Note: To check a user’s ID, run id -u USERNAME from the terminal.
Change Ownership of Multiple Linux Files
List the target file names after the new user to change the ownership for multiple files. Use single spaces between the file names.
In the following example, root will be the new owner of files sample2 and sample3.
Combine file names and directory names to change their ownership with one command. For example:
Do not forget that the commands are case sensitive.
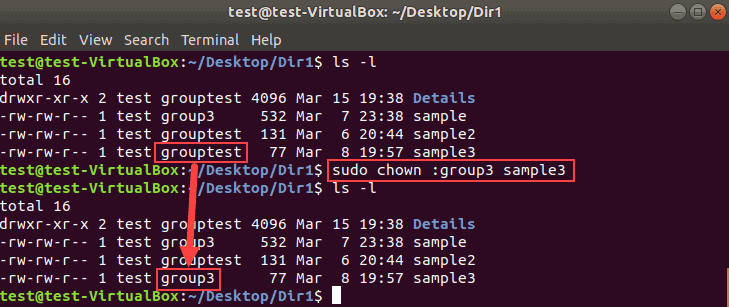
How to Change the Group of a File
With chown, you can change a group for a file or directory without changing the owning user. The result is the same as using the chgrp command.
Run the chown command using the colon and a group name:
The following example changes the group of the file sample3 from grouptest to group3.
List multiple names of files or directories to make bulk changes.
Change the Group of a File Using GID
Similar to UID, use a group ID (GID) instead of a group name to change the group of a file.
Change Owner and the Group
To assign a new owner of a file and change its group at the same time, run the chown command in this format:
Therefore, to set linuxuser as the new owner and group2 as the new group of the file sample2:
Remember that there are no spaces before or after the colon.
Change Group to a Users Login Group
The chown command assigns the owner’s login group to the file when no group is specified.
To do so, define a new user followed by a colon, space, and the target file:
The following example changes the group ownership to the login group of linuxuser:
Transfer Ownership and Group Settings from One File to Another
Rather than changing the ownership to a specific user, you can use the owner and a group of a reference file.
Add the —reference option to the chown command to copy the settings from one file to another:
Remember to type in the names of the files correctly to avoid the error message:
![]()
Check Owner and Group Before Making Changes
The chown command —from option lets you verify the current owner and group and then apply changes.
The chown syntax for checking both the user and group looks like this:
The example below shows we first verified the ownership and the group of the file sample3:
Then chown changed the owner to linuxuser and the group to group3.
Check Owner Only
The option —from can be used to validate only the current user of a file.
Check Group Only
Similar to the previous section, you can validate only the group of a file using the option —from .
Here is an example where we verified the current group before changing it:
Remember to use the colon for both group names to avoid error messages.
How to Recursively Change File Ownership
The chown command allows changing the ownership of all files and subdirectories within a specified directory. Add the -R option to the command to do so:
In the following example, we will recursively change the owner and the group for all files and directories in Dir1.
Chown Command and Symbolic Links
To change the owner of a symbolic link, use the -h option. Otherwise, the ownership of the linked file will be changed.
The following image shows how symbolic links behave when -h is omitted.
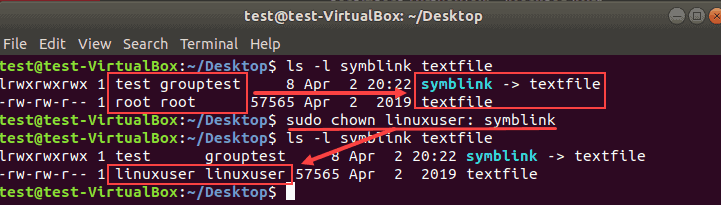
The owner and group of the symbolic link remain intact. Instead, the owner and the group of the file textfile changed.
To push the changes to the link, run the chown command with the -h flag:
In the following example, we changed the owner and group of a symbolic link.

Display Chown Command Process Details
By default, the terminal does not display the chown process information. To see what happens under the hood, use one of the two command line flags:
- The option –v produces the process details even when the ownership stays the same.
- The option –c displays the output information only when an owner or group of the target file changes.
For example, if we specify the current owner as a new owner of the file:
The terminal produces the following output:

Switch from -v to -c and there will be no messages in this case. This happens because there are no owner or group changes.
The information is particularly useful with the recursive chown command:

In this example, the output lists all objects affected after running the command.
Suppress Chown Command Errors
To avoid seeing potential error messages when running the chown command, use the -f option:
The example below shows the error message for a non-existent file or directory:

Adding the -f flag suppresses most error messages. However, if you specify an invalid username, the error message appears:

Now you know how to use chown command in Linux to change a file’s user and/or group ownership.
Take extra caution when changing the group or ownership of a file or directories.
Источник


