- How to Change Linux Partition Label Names on EXT4 / EXT3 / EXT2 and Swap
- Linux Filesystem and Partitions – Types and Terminologies
- Some Terminologies Relating to Linux Partitioning:
- Primary Partition:
- Extended Partition:
- Logical Partition:
- Linux LVM Partition:
- Volume:
- Linux Utilities/Commands for Changing or Modifying Partition Names/Labels
- 1. e2label or tune2fs
- 2. ntfslabel
- 3. reiserfstune
- 4. mkswap
- 5. exfatlabel
- 6. Changing Label of a partition in GUI – DISKS
- Special Linux Utilities to Mount Partition with Label Names
- 1. gdisk
- 2. mount
- Conclusion
- If You Appreciate What We Do Here On TecMint, You Should Consider:
- Linux Disk Partitioning (fdisk, parted)
- Disk Druid
- fdisk
- Create a Partition
- Delete a Partition
- Boot Partitions
- Swap Partitions
- LVM Partitions
- parted
- Create a Partition
- Delete a Partition
- Boot Partitions
- Swap Partitions
- LVM Partitions
- Disk Utility
How to Change Linux Partition Label Names on EXT4 / EXT3 / EXT2 and Swap
A Partition is a space carved out from a physical disk which can be used to either install an Operating System or just act as a storage space for Users files and other data. Each partition is created directly on Hard Disk or External Disk attached to the system with starting and ending block address identifying the amount of space it takes on the drive.
![]() Change Linux Partition Disk Label Names
Change Linux Partition Disk Label Names
Although you can create n number of partitions you desire but a Linux system identifies maximum of 16 partitions which can be associated to any of SCSI, SATA, PATA or virtual hard disk. For identifying above partitions, A Linux system has its own general convention. That convention is in the form ‘ /dev/sdxn ‘ or ‘ /dev/vdxn ‘ where ‘ x ‘ is alphabet and ‘ n ‘ a number.
Here, ‘/dev’ is the directory in ‘/’ file system which holds files associated to each of the devices attached to a Linux system. After that ‘s’ identifies a SATA, SCSI or PATA drive and ‘v’ is for virtual disks on KVM based Machines. The next alphabet i.e. ‘d’ is acronym for device and finally the next alphabet identifies the drive attached.
If your system has 4 hard disks, you may find listing for: /dev/sda , /dev/sdb , /dev/sdc , /dev/sdd in the output of fdisk command when ‘l’ option is invoked.
After the alphabet comes the number. A typical hard disk identifies 4 primary partitions of which there can be an extended partition too, which again holds multiple logical partitions. In that case, the first primary partition, which generally is the boot partition, holds the default label: ‘/dev/sda1’ which signifies its position as first primary partition on first hard disk, likewise ‘/dev/sdb1’ will be first primary partition on second hard disk.
The next primary partition will have sda2, then sda3 and so on, with logical partition starting from sda5. This is a just of how a Linux Partitioning is laid down, although currently one more type of partition exists, which is Linux LVM partition on which Logical Volume is created out of Physical Volume and Volume Groups on the fly without directly affecting the underlying hardware.
Linux Filesystem and Partitions – Types and Terminologies
A bare Linux system configures 2 partitions during normal installation i.e. root ( ‘/’ ) (Where the filesystem is laid down) and swap (a temporary storage space which is assumed to be twice of RAM by default which is although not necessary).
Bootloader is generally installed in root partition or the first primary partition. Partition lays down the base for filesystems which are then created on the partition, but before that it requires the partition to be formatted for the type of filesystem to be supported on that partition.
Some of the filesystems supported by Linux Systems include:
- ext2
- ext3
- ext4
- ReiserFS
- xfs
- FAT
- HPFS/NTFS/exFAT
Some Terminologies Relating to Linux Partitioning:
Primary Partition:
Directly holds area on hard disk specified in terms of first and last sector address and holding a label indicating the hard disk where it is and its number. It can hold the boot files for OS or the data as configured by user.
Extended Partition:
Partition which holds other partitions. Extended partition is created to hold multiple logical partitions. Unlike primary partition, it can’t hold the boot files of installed OS, as it holds and manages the logical partitions.
Logical Partition:
After first 4 primary partitions, come the logical partitions which are laid down on extended partition. These are generally used to hold the filesystem as laid down by user. Swap space is also configured as a logical partition.
Linux LVM Partition:
LVM partition is used for laying down filesystems created on Logical Volumes. LVM is acronym for Logical Volume Management, a feature of Linux to create on the fly Logical Volumes on partitions. It takes a partition, which then holds a Physical Volume and multiple Physical volumes are combined to create a volume group on which Logical Volume is laid down. Logical Volume is then formatted to hold the filesystem.
Volume:
A formatted segment of space, which can hold filesystem. Volume is created on the partition for mounting filesystem on it and allowing it to hold user data.
Since all the operations on partitions require modification of size of filesystem hosted by it, any modification, deletion or creation of partition require filesystems to be carefully unmounted and backed up to avoid risking loss of data.
Some Linux Utilities/Commands that come in handy for filesystem related operations include:
- fdisk – for creating, modifying, deleting partition, including creating and printing partition table and so on.
- parted – performs same operations as fdisk and even many more also considered.
- df – displays all the filesystems mounted on Linux Filesystem and their mount points.
- mount – for mounting filesystems, directories, changing mount point for a directory/device and all sorts of such operations.
- mkfs – creating and formatting a filesystem. Usually command is used in concatenation with the type of formatting desired. Like: mkfs.ext4 for formatting filesystem with type ext4.
- umount – for unmounting filesystem from a partition.
- GParted/QParted – GUI Parted for Gnome and KDE systems.
- Disks – Software Utility pre-installed on Linux systems for managing partitions through GUI.
Linux Utilities/Commands for Changing or Modifying Partition Names/Labels
Commands for changing or modifying Partition Name/ Label are dependent on type of filesystem on that partition with exception of some general commands.
Below you can find listing of all such commands.
1. e2label or tune2fs
The commands e2label or tune2fs used for changing label of ext2, ext3 and ext4 type partitions.
Here, ROOT and ROOT_PART are the labels to be added to /dev/sda1 which is ext4 formatted partition.
2. ntfslabel
The ntfslabel command used for changing label of NTFS partitions.
3. reiserfstune
The reiserfstune command used for labeling reiserFS formatted partitions.
Note: It is advisable to first unmount the filesystem before this command.
Where, /dev/sdb1 is the partition formatted with reiserFS filesystem.
4. mkswap
The mkswap command used for changing label of SWAP partition.
After unmounting the filesystem, following command needs to be executed to change the label of swap partition.
Where, /dev/sda5 is the SWAP formatted partition.
5. exfatlabel
The exfatlabel command used for changing the label of exFAT formatted partition.
6. Changing Label of a partition in GUI – DISKS
Disks is a pre-installed utility found in most Linux systems which presents GUI for doing all the partitions related tasks which are done by fdisk and parted and even more than that. Disks can be used to change label of a partition by following procedure:
![]() Show Linux Partition Table
Show Linux Partition Table
GUI of Disks shows, all the external drives and details of selected external drive including partitions, their labels, their size and type of formatting. First step is to select the partition whose label is to be changed, which is Partition 1 here, next step is to select gear icon and edit filesystem.
![]() Change Linux Partition Label
Change Linux Partition Label
After this you will be prompted to change the label of selected partition.
![]() Set Linux Partition Label Name
Set Linux Partition Label Name
And finally, the label of the partition will be changed.
![]() Linux Partition Name Modified
Linux Partition Name Modified
Special Linux Utilities to Mount Partition with Label Names
1. Using Label for loading partition at boot time – /etc/fstab file
/etc/fstab is the file which is consulted at the boot time to mount the partitions that exist on the system. Partitions are by default identified by using UUID as per the entry in this /etc/fstab file.
But, there is another way to load the partition, instead of that long UUID, you can just pass the label of that partition in the file instead of UUID and from then on, your system would mount the partitions on the system using LABEL instead of UUID.
For loading any partition using Label rather than UUID just open the /etc/fstab file for editing:
File looks like below:
![]() Linux Fstab Mounted Partitions
Linux Fstab Mounted Partitions
Here, partition is recognized using UUID as seen above. Now if you want the partition to be recognized using label just edit the corresponding entry in the file replacing UUID= by LABEL= . Then, save and close the file. On next boot, the partition will be loaded using label instead of UUID.
2. Changing entries of partitions in partition table:
Some commands can be used to play with entries of partitions in partition table and shuffle the entries in the partition table.
These commands include:
1. gdisk
Utility which can be used to perform many useful operations on partitions, but highlighted here is one of its operation to change the partition names.
Procedure to follow:
This opens the gdisk and you will be prompted to enter the disk to be selected. Just enter the disk you want to select. ‘/dev/sda’ for operating on first hard disk.
Next, you will get following prompt would appear asking you to enter any command. Enter ‘c’ here. You will be prompted to select the partition number whose name you want to edit. Enter the partition name and then you will be prompted to enter the new name. Enter the new name and hit ENTER.
Next, use the following option to verify that the change you did, is done.
Now Close and exit gdisk, saving your changes.
2. mount
Mount can also be used to change the name of partition. Following procedure can be used here:
Unmount the partition.
Change the name of directory after it is un-mounted.
Edit /etc/fstab and change the mount point of partition from /partition to /new_name_partition and then remount the partition.
Conclusion
Above are the techniques presented for Changing/Modifying the Name/Label of Linux Partitions. If you have other interesting techniques which can achieve the same thing do share with us in your precious comments.
If You Appreciate What We Do Here On TecMint, You Should Consider:
TecMint is the fastest growing and most trusted community site for any kind of Linux Articles, Guides and Books on the web. Millions of people visit TecMint! to search or browse the thousands of published articles available FREELY to all.
If you like what you are reading, please consider buying us a coffee ( or 2 ) as a token of appreciation.

We are thankful for your never ending support.
Источник
Linux Disk Partitioning (fdisk, parted)
This article discusses the disc partitioning utilities available Linux, with specific reference to the information needed for the RHCSA EX200 and RHCE EX300 certification exams.
Remember, the exams are hands-on, so it doesn’t matter which method you use to achieve the result, so long as the end product is correct.
This article does not cover the Logical Volume Manager (LVM). That will be covered in a separate article.
My test VM originally had a single virtual SCSI disk that was partitioned during the installation of OL6.2 (a RHEL6 clone). Checking the SCSI devices gave the following.
After adding a new virtual SCSI disk, the unpartitioned «/dev/sdb» device was visible.
This is the starting point for the examples in this article.
Disk Druid
For many servers, the only time you will need to consider partitioning is during the installation process. When doing an interactive installation the partitioning will be done using Disk Druid. It’s a very simple GUI, so it doesn’t need much by way of explanation.

In many cases, the default partitioning scheme is fine, but it’s always worth checking.
Once an interactive installation is complete, the installation choices, including the disk partitioning choices, are saved to a kickstart configuration file called «/root/anaconda-ks.cfg». This can be used to perform silent installations using kickstart.
fdisk
The fdisk utility could be considered the classic disk partitioning tool as it is available on several operating systems.
The utility is called from the «root» user, passing the disk device as a parameter. In RHEL6/OL6 you are immediately presented with a warning message.
From the above output you can see I have followed the advice of the warning and issued the «c» and «u» options, although this is not mandatory. To simplify the output, in the following examples I will not include the warning message and the setting of the «c» and «u» options, but they are present.
Issuing the «m» command produces a list of the available options.
If at any point you make a mistake and don’t want to write the partition table to disk, simply use the «q» option to exit without saving.
Create a Partition
To create a new partition use the «n» command. The following output shows the creation of a primary partition using the whole disk. The choices are highlighted in bold.
The above output shows we made the following choices:
- n : Create a new partition.
- p : We chose to create a primary partition. You can only have 4 primary partitions. If the disks needs more than 4 partitions, the 4th primary partition should be converted to a logical partition, so it can hold multiple extended partitions.
- 1 : We are creating the first primary partition.
- We accepted the defaults for the first and last sectors meaning the partition will use the full disk. If we wanted a specific size we could accept the default first sector, then specify a size, like «+500M».
- p : Display the current partition table. This is optional, but it’s work doing to check your settings are correct.
- w : Write the partition table to disk and exit.
The new partition is now visible from the OS.
Delete a Partition
To delete a partition use the «d» command. The following output shows the deletion of the partition we just created.
The call to «p» is not necessary, but it is worth checking what partitions are present before attempting to delete them. In this case, as we only have a single partition, it was chosen by default when we selected the «d» command. If there were more than one we would have been prompted to select a partition number. After writing the changes to disk, the partition is no longer visible from the OS.
Boot Partitions
Boot partitions are created in a similar way to regular partitions. Typically you would only expect to create a boot partition during installation, so you will probably do this using Disk Druid or Kickstart.
If you do use fdisk to create a boot partition, the typical size for Linux boot partitions is 500M and remember to flip the bootable flag using the «a» command before writing the partition table to disk. The output below shows the creation of a boot partition. The options are highlighted in bold. Notice the boot flag in the output from the «p» command.
Swap Partitions
Swap partitions are created in a similar way to regular partitions, but before writing the partition table to disk, you must use the «t» command to change the partition’s system id to «82» (Linux Swap). The default system id is «83» (Linux). The following output shows the creation of a 2G swap partition as the second partition on the disk.
LVM Partitions
Creating partitions for use with the Logical Volume Manager (LVM) is similar to creating swap partitions, except you set the system id of the partition to «8e» (Linux LVM). The Logical Volume Manager will be covered in a separate article.
parted
The parted utility is an alternative to fdisk . It can perform all the operations of fdisk , but it has additional functionality, such as resizing and copying partitions and creating file systems. The utility is called from the «root» user, passing the disk device as a parameter. Typing help at the prompt lists the commands available.
For additional information on a specific command, type help followed by the command.
When working with a new disk, the first thing we need to do is label the disk using the mklabel command displayed above. Oddly enough, we have to use the label type of «msdos» for Linux partitions.
To check the free space on the drive using the print free command.
Create a Partition
To create a new partition use the mkpart command. If the FS-TYPE parameter is specified, the system ID of the partition is set accordingly, but no file system is created. The following example uses mkpart to create a 2G partition with no file system on it.
Notice the partition starts at «1MB». This is to leave space for the master boot record.
The mkpartfs command allows you to create a new partition with a file system, but when you try to use it you get a warning that the file system creation is not robust. For this reason, it should probably be avoided.
Delete a Partition
The rm command is used to delete a partition. It accepts the partition number as a parameter. The following example deletes the partition we just created.
Boot Partitions
Boot partitions are created in a similar manner to regular partitions, but the boot flag is set using the toggle or set command after the partition is created, as shown below.
Swap Partitions
Swap partitions are created in a similar manner to regular partitions, but the file system type is set to linux-swap . The example below creates a 2G swap partition after the boot partition created previously.
LVM Partitions
LVM partitions are created in a similar manner to regular partitions, but lvm flag is set using the toggle or set command after the partition is created, as shown below.
Disk Utility
The «Disk Utility» application is a GUI disk management tool in the «gnome-disk-utility» package, available from the console menu (Applications > System Tools > Disk Utility). Alternatively it can be started by running the «palimpsest» command as the «root» user. Clicking on a disk on interest in the «Storage Devices» pane causes the information about that disk to be loaded in the right-hand pane.
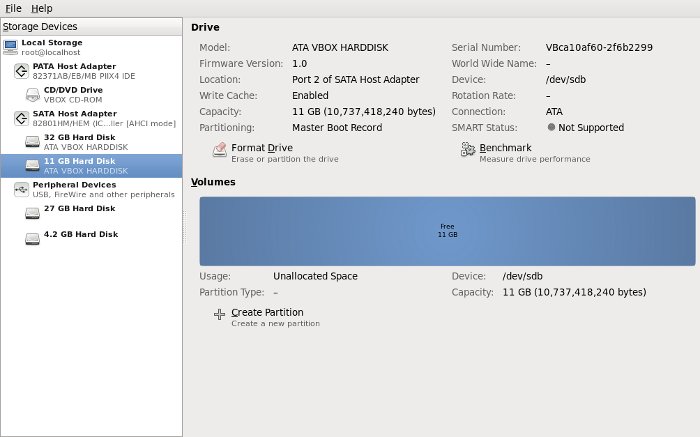
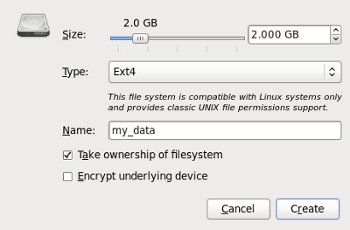
In addition to information, it also displays possible administrative tasks. Clicking on the «+ Create Partition» button allows you to specify the size, file system type and volume name for a new partition.
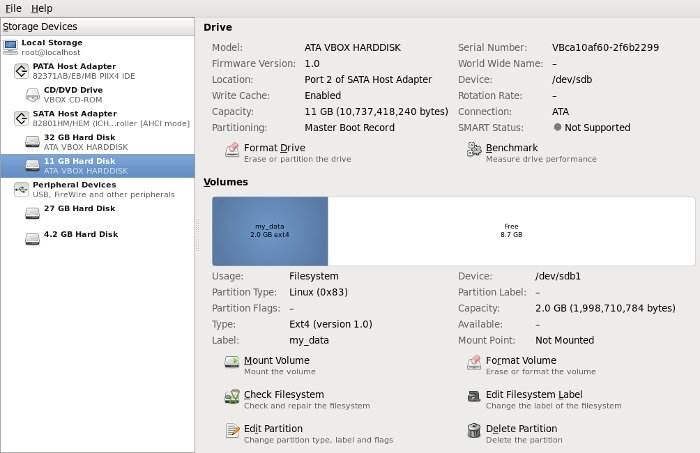
Once the partition is created and formatted, it is visible in the previous screen. Clicking on the partition highlights it and displays the possible administrative tasks available for the partition.
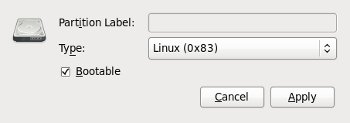
To make a partition bootable, highlight it and click the «Edit Partition» button. On the resulting dialog, check the «Bootable» checkbox and click the «Apply» button.
Clicking on the free space allows you to add more partitions.
Источник


