- How to change Boot order in Windows 10
- Change Boot Order in Windows 10
- Windows 10 updates change my boot order all the time
- Replies (16)
- How To Change Boot Order Safely On Windows Device [MiniTool News]
- Summary :
- How to Change Boot Order on A Windows Computer
- How to Change Boot Drive in BIOS
- ABOUT THE AUTHOR
- 4 Ways To Change The Boot Order In Windows 10
- Change the boot order in Windows 10 via System Configuration
- Change the boot order in Windows 10 via advanced options
- Another way to change the boot order in Windows 10
- Change the boot order in Windows 10 using EasyBCD
How to change Boot order in Windows 10
When your PC boots up, the first thing that loads up is the UEFI Firmware or the BIOS. It does a lot of things which also includes the option to which hardware to use to boot the Windows. If you want to boot from a USB drive or an external drive, you need to change the boot order on Windows 10. The usual default is set to the first hard drive connected to the PC.
Prior to Windows 10, it was possible only by rebooting your PC and then press a unique key like F2 or DEL on your keyboard to get into BIOS. In Windows 10, Microsoft has inbuilt a recovery system that allows you to do many things. One of the options is to boot into BIOS making it a lot easier in case you always miss pressing the key.
In this guide, we will show how you can boot into Windows 10 firmware settings (UEFI/BIOS), and change the boot order easily.
Change Boot Order in Windows 10
Windows 10 Recovery System allows you to get into your UEFI/BIOS settings from the OS and change your boot order. You can choose to boot from a USB drive or DVD Drive. This comes in handy during fresh installation or upgrading using an ISO.
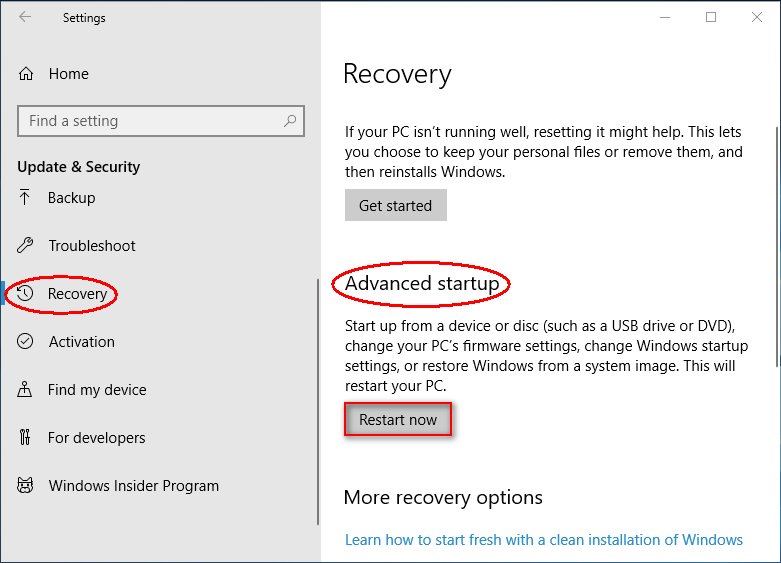
Open Windows Settings > Update & Security > Recovery Advanced Startup and click on Restart now.
This feature lets you:
- Boot Windows from a device or disk (such as a USB drive or DVD).
- Change your PC’s Firmware Settings.
- Configure Windows Startup Settings.
- Restore Windows from a System Image.
When you click on Restart Now, it will reboot your PC, and offer you all these Advanced Options. Click, and wait till you get these options. Select Troubleshoot > Advanced Options. This screen offers further options which include System Restore, Startup repair, Go back to the previous version, Command Prompt, System Image Recovery, and UEFI Firmware Settings.
Select UEFI Firmware Settings, and it will let you restart your PC. Once the computer boots up, it will take you to the Firmware settings.
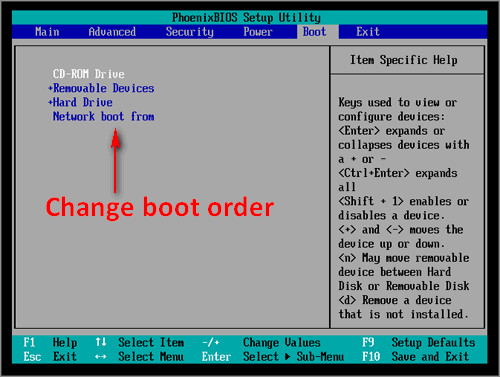
- Switch to Boot Tab.
- Here you will see Boot Priority which will list connected hard drive, CD/DVD ROM and USB drive if any.
- You can use the arrow keys or + & – on your keyboard to change the order.
- Save and Exit.
Now when you boot it will follow the sequence which you have set in your BIOS or UEFI Firmware Settings.
This comes in very handy when you want to boot from a DVD drive that has Windows 10 Installation files or if you have another Windows installed on a secondary hard disk.
Note: It seems if you have a Bluetooth keyboard, it will not work here. You will need a hard-wired keyboard to navigate and change the options. Also, the touch doesn’t work either.
Windows 10 updates change my boot order all the time
I am having a very persistent problem. After each windows 10 update, the computer won’t start up because somehow the boot order is changed.
After going in bios I often find the boot order messed up there. After manually restoring the boot order and saving it in bios, the computer starts up fine, sometimes however requiring a time-consuming reversion to the older windows 10 version. That is very annoying because the same update comes back automaticaly, everytime recreating the same problem.
— How on earth is this possible?
— How is this preventable?
Replies (16)
* Please try a lower page number.
* Please enter only numbers.
* Please try a lower page number.
* Please enter only numbers.
Boot order sequence depends on the location where you first installed the operating system. It will be the default every time the Windows will have an update. That’s why every time the Windows install a new update, the boot sequence goes back to default. Do you have a SSD? If yes, you can try this workaround and see if it helps:
- Make sure your SSD is connected to the lowest numbered SATA port.
- Boot into BIOS.
- Set all the settings to default.
- Save it and exit the BIOS settings.
- Boot back into BIOS and see if the changes you made stuck.
If anything comes up, don’t hesitate to get back to us anytime.
1 person found this reply helpful
Was this reply helpful?
Sorry this didn’t help.
Great! Thanks for your feedback.
How satisfied are you with this reply?
Thanks for your feedback, it helps us improve the site.
How satisfied are you with this reply?
Thanks for your feedback.
Boot order sequence depends on the location where you first installed the operating system. It will be the default every time the Windows will have an update. That’s why every time the Windows install a new update, the boot sequence goes back to default. Do you have a SSD? If yes, you can try this workaround and see if it helps:
- Make sure your SSD is connected to the lowest numbered SATA port.
- Boot into BIOS.
- Set all the settings to default.
- Save it and exit the BIOS settings.
- Boot back into BIOS and see if the changes you made stuck.
If anything comes up, don’t hesitate to get back to us anytime.
Indeed I have an SSD later added. I migrated the OS to this SSD with a boot manager.
But many people have done this; there must be millions around the world. It cannot be that they all have this problem or that Windows update is not feasible for all of these people!
Thanks for the suggested workaround, but that is not a solution. My SSD was already connected to the lowest numbered SATA port. I still did what you suggested, but to no avail. This time the update returned me to the BIOS with AGAIN the whole boot sequence mixed up — how can I prevent this? Then after me specifying the SSD boot manager, the update got further than ever but again ending into a totally stuck system. Then after several fruitless restarts, the systeem restores wiondiows to the pre-update stage.
Is there a real solution that really works? Windows 10 update should be able to cope with this!
How To Change Boot Order Safely On Windows Device [MiniTool News]
By Sarah | Follow | Last Updated November 30, 2020
Summary :

A boot device is absolutely indispensable to a computer since it contains all the necessary files for booting an operating system (OS). Except for the device itself, the boor order is also very significant for users to boot into OS successfully. This post will show you how to change boot drive/boot order in detail.
In brief, the boot order refers to the order of the storage devices connected to a computer. It decides which device the computer will search first for program code to load the operating system. If the boot order is not set properly, users will definitely run into problems while booting. This happens frequently when users decide to change their boot device. (MiniTool Solution provides many useful methods for solving startup problemes.)
So, what should you do to avoid such situation? Certainly, the answer is change boot order .
How to Change Boot Order on A Windows Computer
When do you need to change boot sequence? The common cases include:
- Troubleshoot virus issues with bootable antivirus programs.
- Install a new operating system or reinstall your current system.
- Use bootable data destruction tools and other useful utilities.
- …
Every time when you start a computer, the BIOS (Basic Input/Output System) or UEFI Firmware will load up first; it tells the computer which drive it should use to boot the Windows. If you want to boot from a new drive, you should go to change the boot order in BIOS (please set the target drive as the first boot device). In the following part, I’ll take BIOS as an example to show you the steps to change boot sequence safely.
How to Change Boot Drive in BIOS
Step 1: shut down your computer to which the target boot drive is connected. Then, restart it and look carefully for the message that tells you which button to press to enter SETUP/BIOS (the message will appear on your computer screen in the first few seconds).
- In common cases, you only need to press a single key (F1, F2, F10, Delete or Esc) during startup.
- However, there are still some cases in which you should press key combinations like Ctrl + Alt + Esc and Ctrl + Alt + Delete to access BIOS.

The message disappears very quickly so that many people complained they miss the key information during computer restart. In this case, my advice is to reboot again.
- Setup: Change boot order from windows
- Press Change boot order from windows to enter setup
- Press Change boot order from windows to access BIOS
- Enter BIOS by pressing Change boot order from windows
- Press Change boot order from windows to enter BIOS setup
- Press Change boot order from windows to access system configuration
Luckily, users of Windows 10 have no such trouble; they can go to restart their PC to change boot order directly by following steps.
- Press Win + I key combination to open Windows Settings.>
- Click Update & Security at the bottom.
- Navigate to Recovery option from the left pane.
- Look for Advanced startup section from the right pane.
- Click on the Restart now button and wait.
Step 2: get familiar with the BIOS Setup Utility main window and then navigate to the boot order options.
Not all the BIOS utilities are the same; there are some differences between them. So please don’t be surprised to find that your BIOS interface is completely different from what I show you below. Please look through the options in BIOS Setup Utility so as to locate the option for changing boot order quickly.
Now, you should select the option called Boot (or another name) that is responsible for changing the boot sequence. After that, all the devices (hard drives, USB drives, and optical drives) connected to the computer will be listed in order.
Actually, the list order is the order that tells your computer which drive to look first for operating system information. That is what well called the boot order.
Step 3: change boot order to meet your needs by following the instructions.
In this step, you should move the drive that you want to boot from to the top of the list (using the + and — keys). After that, please make sure the boot order is correct and the first boot drive contains valid & complete start-up files.
Step 4: exit BIOS and save changes.
When you’re sure everything’s right, you should navigate to Exit or Save and Exit option. Click Yes to exit and save changes.

Step 5: now, you can restart the computer with the new boot order. When you click to restart PC, your BIOS will start to boot from the first drive in the boot order you have modified. Then, you will enter Windows successfully. (If the first boot device is not bootable, the PC will try to boot from the second device.)
That’s how to change boot drive in BIOS.
ABOUT THE AUTHOR

Position: Columnist
Sarah is working as editor at MiniTool since she was graduated from university, having rich writing experiences. Love to help other people out from computer problems, disk issues, and data loss dilemma and specialize in these things. She said it’s a wonderful thing to see people solving their problems on PC, mobile photos, and other devices; it’s a sense of accomplishment. Sarah likes to make friends in life and she’s a huge music fan.
4 Ways To Change The Boot Order In Windows 10
Last Updated on May 29, 2020 by admin 2 Comments
The boot menu shows up every time you turn on a PC where two or more Windows operating systems are installed. For instance, if you have installed Windows 10 and Windows 7 in dual boot setup, you will get the boot menu where you can either select the non-default operating system or let the boot menu to automatically boot into the default operating system.
By default settings, the most recently installed or most recently upgraded operating system is the default operating system in the boot menu.

However, at times, after installing or upgrading an operating system, you might want to change the boot order to set or change the default operating system.
In Windows 10, if you need to change the default boot order, you can do so without the help of third-party tools.
The following are the four ways out there to change the boot order in Windows 10.
Method 1 of 4
Change the boot order in Windows 10 via System Configuration
Step 1: Type msconfig in the Start/taskbar search field and then press the Enter key to open the System Configuration dialog.
Step 2: Switch to the Boot tab. Select the operating system that you want to set as the default and then click Set as default button. Click the Apply button.

Here, you can also change the default 30 seconds waiting period to the time of your choice.
Method 2 of 4
Change the boot order in Windows 10 via advanced options
Step 1: Close all running programs. Restart your PC.
Step 2: When you see the boot menu (Choose an operating system) screen, click the Change defaults or choose others.

Step 3: Next, you will get the Options screen. Here, click Choose a default operating system tile.

Step 4: On the Choose a default operating system screen, you can see the default operating system. The entry at the top of the list is usually the default operating system.

To change the default operating system, simply click on the tile that you want to set as the default operating system in the boot menu. For instance, I am clicking on Windows 10 entry to make it the default operating system.
That’s all! You will not see any confirmation message.
Instead, you will be taken back to the Options screen where you can click Change the timer tile if you wish to change the default 30 seconds of the boot menu to 5, 10, or 15 seconds.

To exit, click the Back icon. You will now get Choose an operating system screen. Here, the default operating system will appear at the top of the list. Click on an entry to boot into it.
Method 3 of 4
Another way to change the boot order in Windows 10
Step 1: Open the Settings app. Navigate to Update & security > Recovery.
Step 2: Click the Restart now button in the Advanced startup section.

Step 3: Your PC will restart, and you will get Choose an option screen after the restart. Click Use another operating system tile.

Step 4: On the Choose an operating system screen, click Change defaults.

Step 5: Next, you will see the Options screen. Here, click Choose a default operating system tile.

Step 6: Finally, click on the OS entry that you want to set as default to make it the default.

You will now see the Options screen. Click the Back icon to go back to Choose an operating system screen. Here, you can see the default operating system. The default one appears at the top of the list.
Click on an entry to boot into it.
Method 4 of 4
Change the boot order in Windows 10 using EasyBCD
EasyBCD is one of the must-have tools for dual-boot PC users. With EasyBCD, you can easily change not just the default boot order but also add a new operating system to the boot menu.
Here is how to use the EasyBCD to change the boot order in Windows 10.
Step 1: Download EasyBCD and install the same. The free version is for personal and non-commercial use only.
Step 2: Run, EasyBCD. Click the Edit Boot Menu button on the left pane.
Step 3: In the Modify Menu Entries section, select an entry and then click the Up or Down icons to move it up or down.

To change the default operating system, simply click the checkbox next to it.
Here you can also change the countdown time from the default 30 seconds to something else, or you can make the boot menu wait until the user selects an entry.
Finally, click the Save settings button.


