- How to Change Your Account Name on Windows 10
- Change Account Name and Rename User Account Folder in Windows 10
- Method 1: Classic Control Panel
- Method 2: User Accounts Advanced Control Panel
- What about Your User Folder Name?
- how to change username on pc located in c:/users in windows 10 pro?
- Replies (1)
- How to change the Microsoft user account login ID?
- 3 Ways to Change User Account Name in Windows 10
- 3 ways to change user account name in Windows 10:
- How to change sign-in account name on Windows 10
- How to change account name with Settings on Windows 10
- How to change account name using Control Panel on Windows 10
- Change account name with User Accounts
- Change account name with netplwiz
- Change account name with Computer Management
- More Windows 10 resources
- The Dell XPS 15 is our choice for best 15-inch laptop
- Halo: MCC’s live service elements make it better, not worse
- Microsoft’s Surface Duo is not ‘failing up’
- These are the best PC sticks when you’re on the move
How to Change Your Account Name on Windows 10


When you set up a new Windows 10 PC, the part where you choose your username may catch you off guard. If that’s the case, you may choose the first thing that pops into your head or something random and temporary that you intend to change later. But surprisingly enough, changing your account name in Windows 10 isn’t exactly a straightforward process. It can be done, but there are a few important things to consider as you go about it. Read on for the details.
Change Account Name and Rename User Account Folder in Windows 10
Your username is part of your identity used to sign in to Windows 10. Mistakes can sometimes happen when creating a username. There are several ways you can fix that.
Currently, the Settings app doesn’t offer an option to edit usernames. There are two ways to work around this limitation.
Method 1: Classic Control Panel
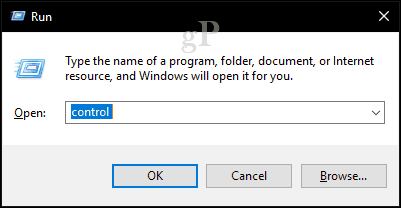
Find and open the classic Control Panel. One way to do this is to press Windows + R and then type Control then hit Enter.
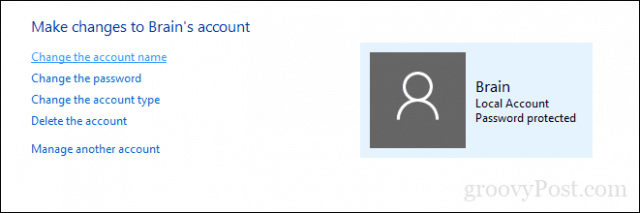
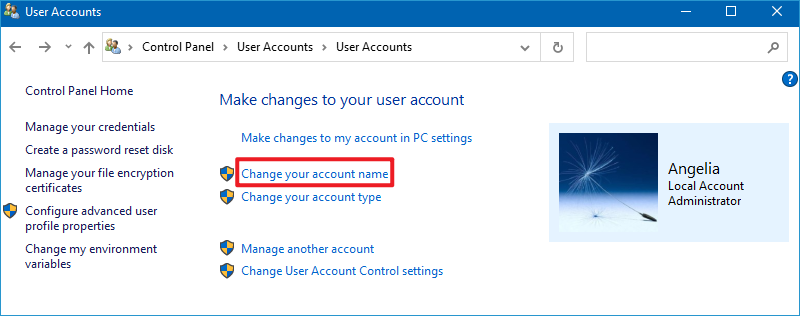
Open the User Accounts control panel, then click Manage another account.
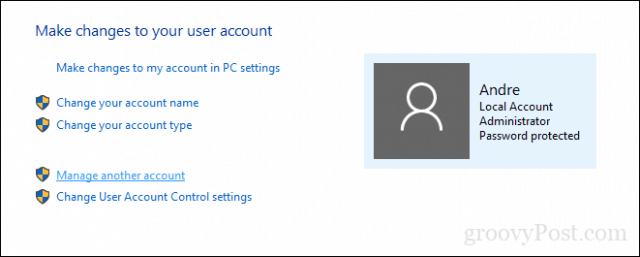
Click the account you want to edit.
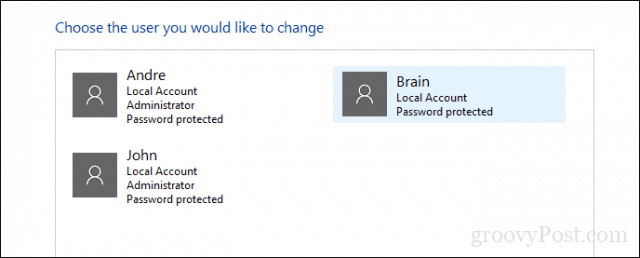
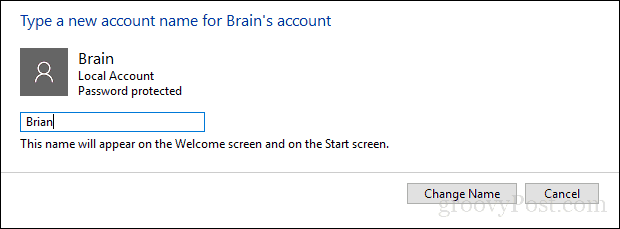
Click Change the account name.
Enter the correct username for the account then click Change Name.
Method 2: User Accounts Advanced Control Panel
There is another way you can do it.
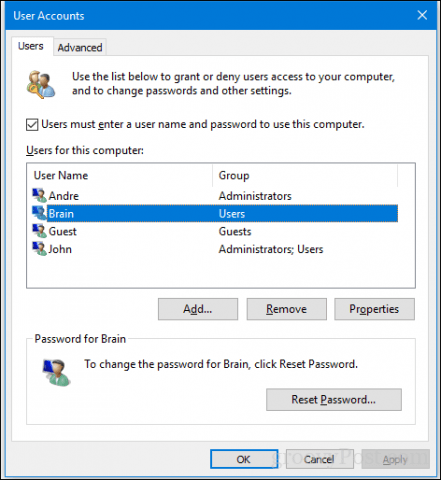
Press Windows key + R, type: netplwiz or control userpasswords2 then hit Enter.
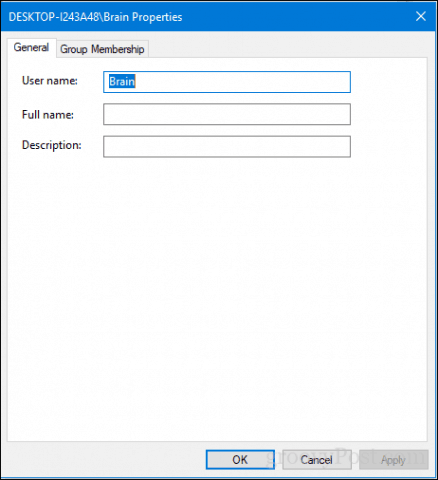
Select the account, then click Properties.
Select the General tab then enter the user name you want to use. Click Apply then OK, then click Apply then OK again to confirm the change.
What about Your User Folder Name?
Changing the username is pretty basic, but this change is not reflected in the User folder located within the C: drive. Renaming it can be risky—sometimes sticking with it or just creating a new user account then copying your files to the new account is a better option. Yes, it’s annoying, but it’s better than ending up with a corrupt user profile.
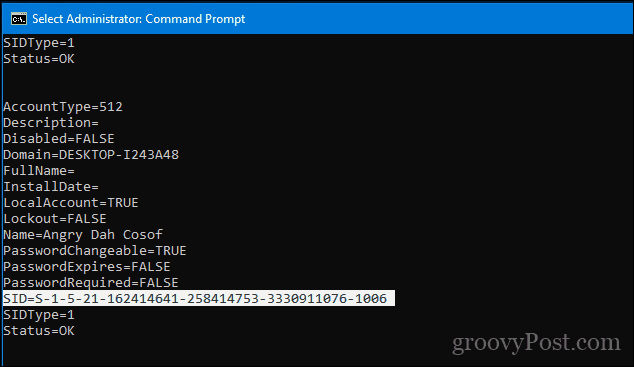
If you must change it to hush your OCD, there is an advanced option available. This involves using the command line to access the security identifier (SID) then making the necessary change in the Registry. Before you go any further, enable then log into the built-in Administrator account. As a precaution, create a system restore point in advance.
To access all the information within the SID requires using the Windows Management Instrumentation Command-line to reveal the value needed to find and change it in the Registry. Open the command prompt with Administrator privileges, type: wmic useraccount list full then hit Enter. Scroll down then take note of the SID values for the account you want to change.
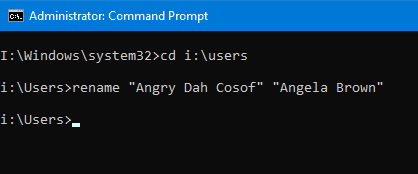
The next step is to rename the account. Doing this from the command line is just as easy.
For example, rename “Angry Dah Cosof” “Angela Brown”
Open Start, type: regedit
Right-click Regedit.
Click Run as administrator.
Remember that SID value we accessed earlier? Now is the time to reference it.
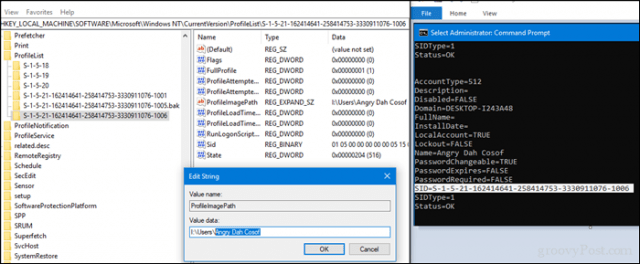
Once you find it, select it, then double-click the value ProfileImagePath. You will see the old name we had earlier is still there. Change it to the new name you want to use.
There you have it, the name you actually intended. Mistakes like this can happen, but there is always a way to fix them.
how to change username on pc located in c:/users in windows 10 pro?
I have a problem that my name is «Srijan» but in users folder located in local disk c: is showing first five words .
Help me! I want my full name on that folder.
Replies (1)
![]()
I would like to ask if you are using Microsoft account or Local account.
I suggest you to follow the methods below and check if it helps.
Method 1: Please follow the steps to rename the user account.
- In the search box, type user accounts and click on User Accounts.
- Click on “Change your account name”
- If it’s prompting for password please enter and click on Yes. If you do not have password click on Yes.
- Enter the new user name.
- Click on change name.
Method 2:
Note: Before you start, please back up all you data and create a system restore point first.
- Press Windows Key + R combination and then type netplwiz in the Run dialog box. Click OK. If prompted for UAC, click Yes.
- Now in the User Accounts window, check Users must enter a user name and password to enter this computer, if it is unchecked.
- In the User Name section, select the user name to which you want to change the name and click Properties.
- In the Properties window, in the User name field, provide the desired user name. Then click Apply followed by OK.
- Reboot to see the change.
Change User Folder name: Even after you change the username using this method, your personal folder will continue to display the old username. To rename the user folder, do the following.
- Create a system restore point first. Then open Registry Editor and navigate to the following key:
HKEY_LOCAL_MACHINE\SOFTWARE\Microsoft\Windows NT\CurrentVersion\ProfileList
2. You will find several folders here like S-1-5-. Search through them till you find a ProfileImagePath pointing to your old username. Double-click on it and replace your old username with your new username.
3. Restart your computer to see the change.
Disclaimer:
Important: The System Restore restores the computer back to an earlier point in time, called a restore point. System Restore doesn’t change your personal files, but it might remove recently installed apps and drivers and also reset the recently changed settings on the computer.
Registry disclaimer: Important this section, method, or task contains steps that tell you how to modify the registry. However, serious problems might occur if you modify the registry incorrectly. Therefore, make sure that you follow these steps carefully. For added protection, back up the registry before you modify it. Then, you can restore the registry if a problem occurs. For more information about how to back up and restore the registry, click the following article number to view the article in the Microsoft Knowledge Base: 322756 ( http://support.microsoft.com/kb/322756/ )
How to back up and restore the registry in Windows
Write us back with status of the issue in regards with your account. Your reply is important to assist you further.
How to change the Microsoft user account login ID?
Original title: Wrong Microsoft account is ruining everything on my PC.
I accidentally set up the wrong email as my microsoft account when setting up my computer. I cant change it and now i cant download apps i cant figure out how to change anything. Ive looked through control panel and everything i even deleted the genetic credentials related to the account and its still there. Its a good thing that didnt mess up anything. Can anyone solve this?
It seems that, you need an assistance to change the Microsoft user account login ID.
If you are referring to changing the Microsoft user account login ID, refer to the following information.
To change the Microsoft user account’s login ID, you need change the Microsoft account to Local account, then local account back to Microsoft account, these changes allow you to changing the Microsoft user account’s login ID.
Step 1:
Switch to a “Local Account” , refer to these steps.
a. Press “Windows key +W”.
b. Type “users” without quotes in the search box.
c. Then select “Users” from the left panel.
d. You will get an option “Switch to a Local account” right below your user account name.
e. Select “Switch to a local account” option.
f. Enter the required details.
g. Then login to the local account,
Step 2:
To change a Local Account to Microsoft Account, I would suggest you to try these steps.
a. From the Settings charm, tap or click Change PC settings.
b. In the left pane, tap or click Users.
c. Tap or click Switch to a Microsoft account and follow the instructions.
Refer to the links for additional information.
Hope this information is helpful. Please do let us know if you need assistance with Windows, we’ll be glad to assist you.
156 people found this reply helpful
Was this reply helpful?
Sorry this didn’t help.
Great! Thanks for your feedback.
How satisfied are you with this reply?
Thanks for your feedback, it helps us improve the site.
3 Ways to Change User Account Name in Windows 10
To change names of the user accounts on your Windows 10 PC, you can put the following three methods into practice.
Tips: Even if you set a strong password to Windows user account, it still can be reset or recovered with software in a short time. To get more detail, please see How to Reset Windows 10 Forgotten Password. So, I strongly recommend that you set a HDD password to your computer to raplace Windows password. For detail, see Detailed Explanation of HDD Password.
Video guide on how to change user account name in Windows 10:
3 ways to change user account name in Windows 10:
Way 1: Change account name in Control Panel.
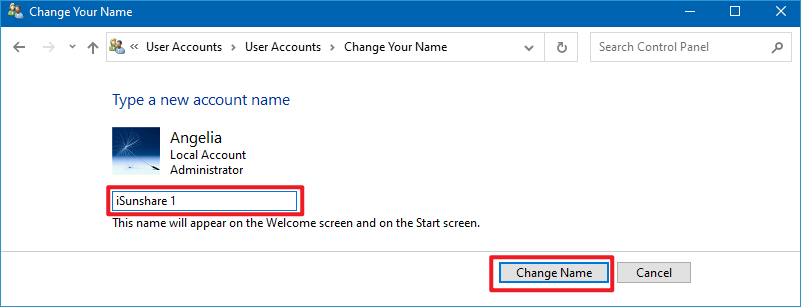
Step 1: Access Control Panel/User Accounts and Family Safety/User Accounts.
Step 2: Choose Change your account name.
Step 3: Type a new name in the box and tap Change Name.
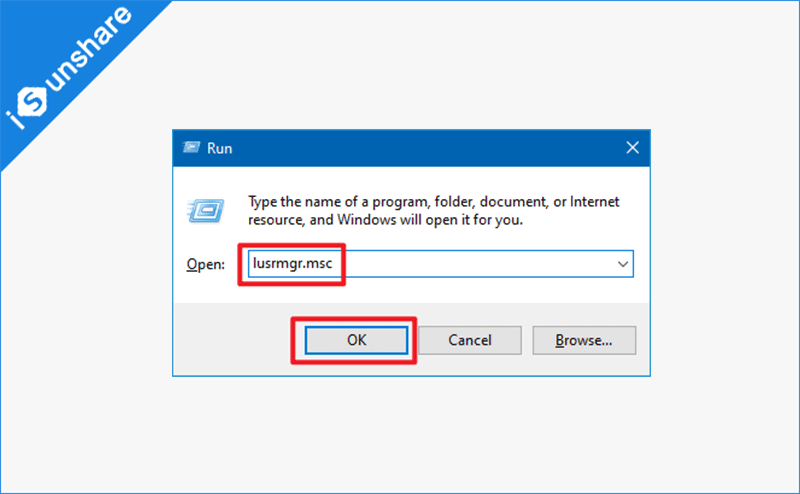
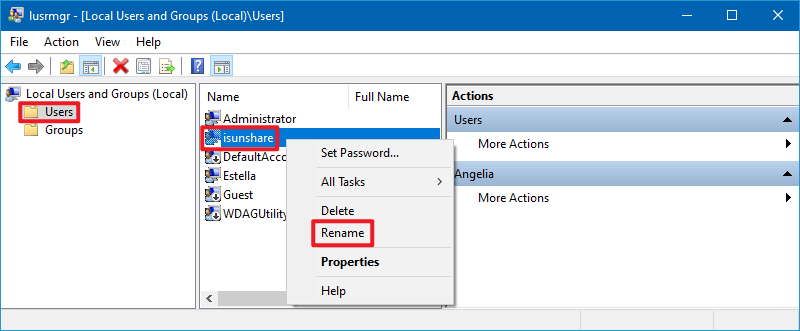
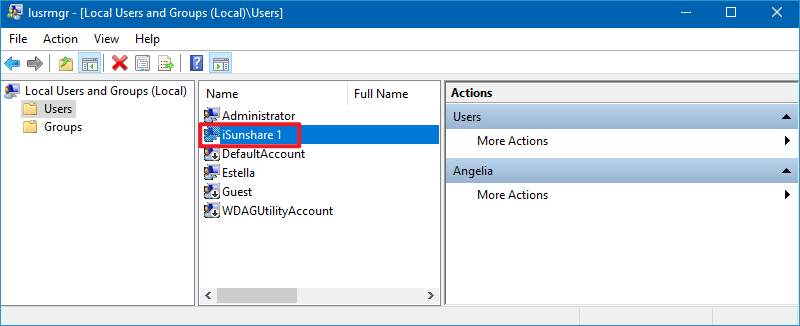
Way 2: Change account name in Local Users and Groups.
Step 1: Open Run by Windows+R, enter lusrmgr.msc and hit OK to open Local Users and Groups.
Step 2: Open the Users folder, right-click a user and select Rename in the menu.
Step 3: Type a new name in the name box.
Way 3: Change administrator or guest name in Local Group Policy Editor.
Step 2: Open Computer Configuration/Windows Settings/Security Settings/Local Policies/Security Options/Accounts: Rename administrator account (or Accounts: Rename guest account).

Step 3: Type a new name and hit OK.
How to change sign-in account name on Windows 10
 Source: Windows Central
On Windows 10, you may have many reasons to change an account name. For instance, you recently changed your name, and you want to reflect the correct information. The device has a local account, and you want to display your actual name instead of the nickname. Or you want to modify the name of the account to make it a little more private.
Regardless of the reason, Windows 10 includes different settings to change the name that appears in the Sign-in screen and across the experience, but it is not a straightforward process. Depending on the account type you are using, the instructions will be entirely different.
In this Windows 10 guide, we will walk you through the various methods to change the account name that appears on the Sign-in screen for a local or Microsoft account.
How to change account name with Settings on Windows 10
If the device uses a Microsoft account, Windows 10 pulls the account name from the cloud. As a result, you have to change the settings online if you want to change your device’s account name.
To change the name of the Windows 10 account, use these steps:
- Open Settings.
- Click on Accounts.
- Click on Your info.
Click the Manage my Microsoft account option.
 Source: Windows Central
Quick tip: You can always access your account settings online on this Microsoft page.
Click the Your Info tab.
 Source: Windows Central
Under your current name, click the Edit name option.
Source: Windows Central
Change the new account name as needed.
 Source: Windows Central
Quick tip: If you want to make your information a little more private, you can use the first six letters of your name and the first two letters of your last name (often known as «six-by-two» by network administrators).
Once you complete the steps, the Sign-in screen should reflect the new name change, but allow sometime before the changes sync and apply to all your computers.
Although changing the account name is a straightforward process, the caveat is that renaming the account online also changes the first and last name of any services connected to your Microsoft account, including Xbox Live, Outlook, OneDrive, Microsoft 365, and others.
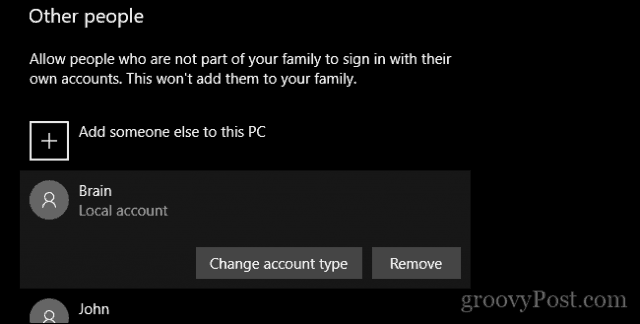
How to change account name using Control Panel on Windows 10
When using a local account, you have several different ways to modify the account’s name using Control Panel.
Change account name with User Accounts
To change the account name using the User Accounts settings, use these steps:
- Open Control Panel.
Under the «User Accounts» section, click the Change account type option.
Source: Windows Central
Select the local account to change its name.
Source: Windows Central
Click the Change the account name option.
 Source: Windows Central
Confirm the new account name to in the Sign-in screen.
Source: Windows Central
After you complete the steps, sign-out of the current session and the Sign-in screen should display the new name.
Change account name with netplwiz
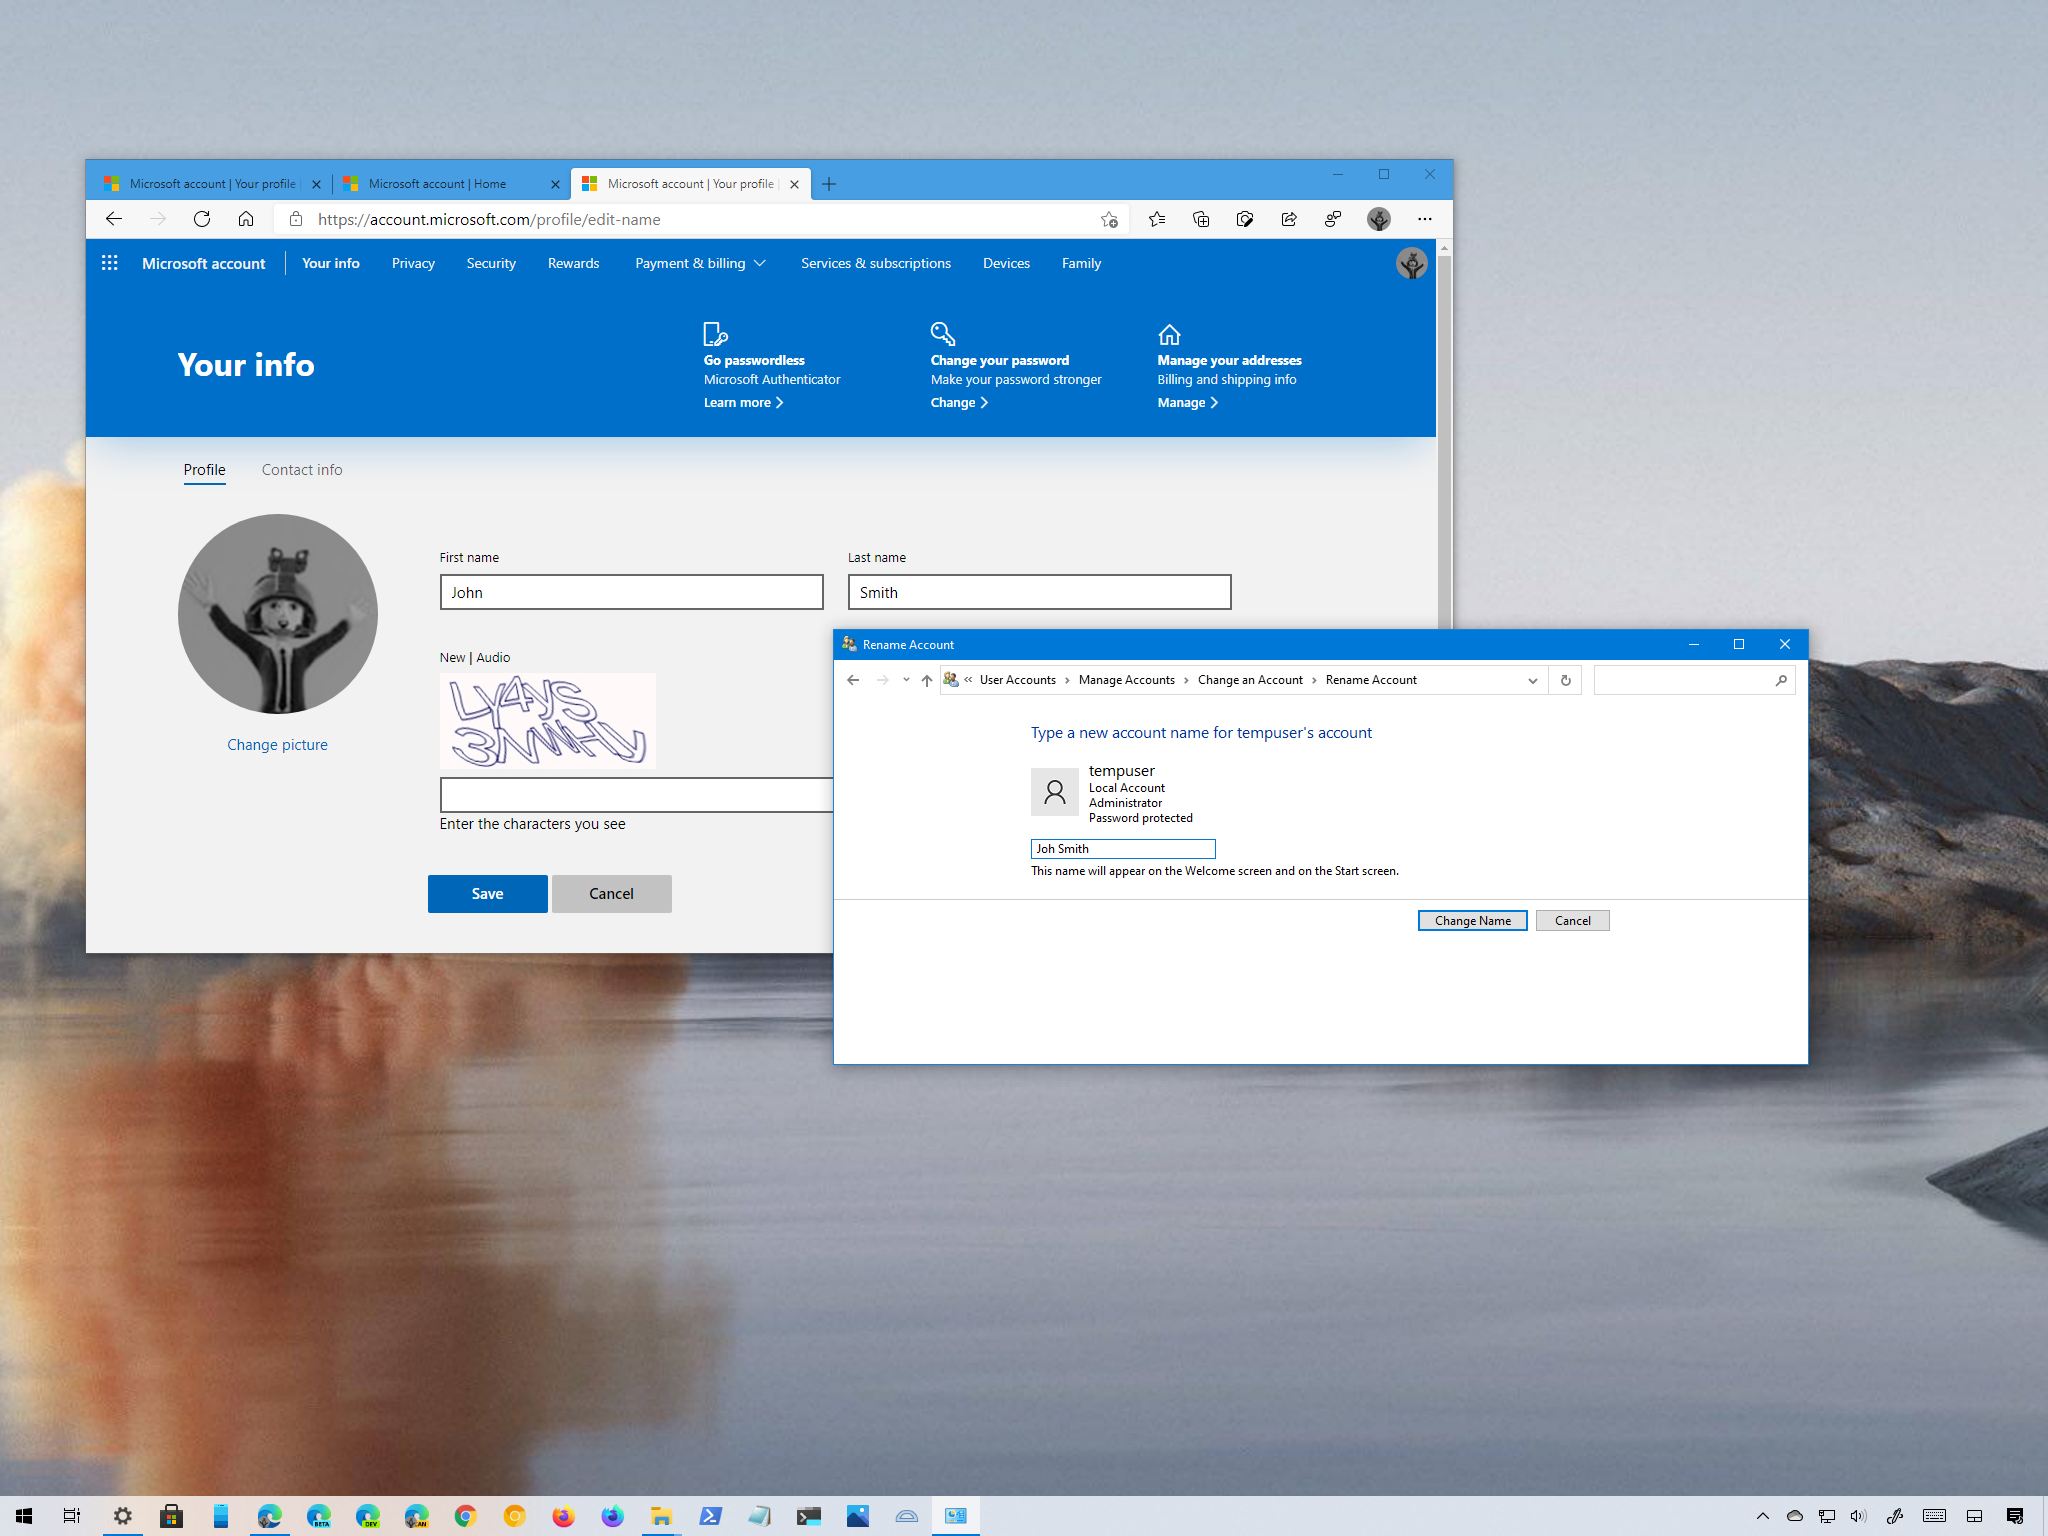
You can also use the legacy account management tool (netplwiz) to complete the same task on Windows 10.
To update the account name with netplwiz, use these steps:
- Open Start.
- Search for netplwiz and click the top result to open the legacy account management tool.
- Click the Users tab.
- Select the account to change its name.
Click the Properties button.
![]() Source: Windows Central
Source: Windows Central
Confirm the new name in the «Full Name» field – for example, «John Smith.»
![]() Source: Windows Central
Source: Windows Central
Quick tip: If you want to display a nickname instead of your real name, you can leave the «Full Name» field empty.
Once you complete the steps, sign-out, and the Sign-in screen will show the name you specified in the «Full Name» field.
You can also edit the accounts linked to a Microsoft account with the legacy tool. However, the information will again be overwritten by the cloud settings, thus making this option only available for local profiles.
Change account name with Computer Management
To use a different name for an account on Windows 10, use these steps:
- Open Start.
- Search for Computer Management and click the top result to open the console.
- Double-click to expand the System Tools branch.
- Double-click the Local Users and Groups branch.
- Click on Users.
Right-click the account you want to edit and select the Properties option.
Source: Windows Central
Quick tip: You can use the Rename option to change the profile nickname from the context menu.
In the «Full name» field, confirm a new name for the Windows 10 account.
![]() Source: Windows Central
Source: Windows Central
After you complete the steps, the next time you sign in to the account, the Sign-in screen will show the local account’s new name.
On Windows 10, you have several methods to change the name of an account, but any of the available options will not change the name of the profile folder in the «Users» folder. You might find online some workarounds, but it is not recommended to use those instructions, as you may end up creating other issues.
If you want to change the account name everywhere on Windows 10, you should create a new account with the name you wish to use, and then transfer all your settings and files to the newly created account.
More Windows 10 resources
For more helpful articles, coverage, and answers to common questions about Windows 10, visit the following resources:
We may earn a commission for purchases using our links. Learn more.
![]()
The Dell XPS 15 is our choice for best 15-inch laptop
For a lot of people, a 15-inch laptop is a perfect size that offers enough screen for multitasking, and in a lot of cases, some extra performance from powerful hardware. We’ve rounded up the best of the best at this size.
![]()
Halo: MCC’s live service elements make it better, not worse
Halo: The Master Chief Collection is more popular than ever, but some fans don’t agree with the live service approach 343 Industries has taken with it. Here’s why those elements are, at the end of the day, great for the game and for Halo overall.
![]()
Microsoft’s Surface Duo is not ‘failing up’
Microsoft announced this week that it was expanding Surface Duo availability to nine new commercial markets. While Surface Duo is undoubtedly a work in progress, this is not a sign of a disaster. It’s also doesn’t mean that Surface Duo is selling a ton either. Instead, the reason for the expansion is a lot more straightforward.
![]()
These are the best PC sticks when you’re on the move
Instant computer — just add a screen. That’s the general idea behind the ultra-portable PC, but it can be hard to know which one you want. Relax, we have you covered!


