Built in windows utilities

Using Visual Studio or MSBuild to build a driver

This topic describes how you can build a driver using the Visual Studio development environment, or from the command line by using the Microsoft Build Engine (MSBuild).

ImportantВ В Starting in Windows Driver Kit (WDK)В 8, MSBuild replaced the Windows Build Utility (Build.exe). The WDK now uses the same compiler and build tools that you use to build Visual Studio projects. Driver projects that were built with previous versions of the WDK must be converted to work in the Visual Studio environment. You can run a conversion utility from the command line, or you can convert an existing driver by creating new Visual Studio project from existing sources. For more info, see Creating a Driver From Existing Source Files and WDK and the Visual Studio build environment.

Building a Driver Using Visual Studio

You build a driver the same way you build any project or solution in Visual Studio. When you create a new driver project using a Windows driver template, the template defines a default (active) project configuration and a default (active) solution build configuration.

NoteВ В You can convert projects and solutions that you created with WDKВ 8 or Windows Driver Kit (WDK)В 8.1 to work with Windows Driver Kit (WDK)В 10 and Visual StudioВ 2019. Before you open the projects or solutions, run the ProjectUpgradeTool. The ProjectUpgradeTool converts the projects and solutions so that they can be built using WDKВ 10.

For information about managing and editing build configurations, see Building in Visual Studio.

The default Solution build configuration is Debug and Win32.

To select a configuration and build a driver

  1. Ensure that you have the same version of SDK and WDK installed on your computer.
  2. Open the driver project or solution in Visual Studio.
  3. Select and hold (or right-click) the solution in the Solutions Explorer and select Configuration Manager.
  4. From the Configuration Manager, select the Active solution configuration (for example, Debug or Release) and the Active solution platform (for example, Win32) that correspond to the type of build you are interested in.
  5. Select and hold (or right-click) the Avshws project and select Properties. Navigate to Driver Settings > General, and set Target OS Version and Target Platform.
  6. Configure the project properties for your driver or driver package. You can set properties for deployment, driver signing, or other tasks. For more information, see Configuring project properties for your driver and driver package.
  7. From the Build menu, select Build Solution (Ctrl+Shift+B).

Building a Driver Using the Command Line (MSBuild)

You can build a driver from the command line using the Visual Studio Command Prompt window and the Microsoft Build Engine (MSBuild)

To build a driver using the Visual Studio Command Prompt window

Open a Developer Command Prompt for VS2019 window.

From this window you can use MSBuild.exe to build any Visual Studio project by specifying the project (.VcxProj) or solutions (.Sln) file.

Navigate to the project directory and enter the MSbuild command for your target.

Читайте также:  Parted ��� ������������ linux

For example, to perform a clean build of a Visual Studio driver project called MyDriver.vcxproj using the default Platform and Configuration, navigate to the project directory and enter the following MSBuild command:

Syntax — To specify a specific configuration and platform, use the following command syntax:

For example, the following command builds a driver for the «Debug» configuration, «Win32» platform, and for WindowsВ 10.

The TargetPlatformVersion setting is optional and allows you to specify the kit version to build with. The default is to use the latest kit.

Configuring project properties for your driver and driver package

You use property pages to configure and set options for your driver and driver package. You can choose to configure your driver so that it is automatically signed when you build your solution, or automatically deployed to a remote test computer.

The WDK provides a number of command-line tools, such as Stampinf and WPP Preprocessor (WPP Tracing), that are commonly included in the build process. These tools are not distributed with Visual Studio. To combine these tools with the Visual Studio build environment they are wrapped as WDK tasks for MSBuild. If you use one of the driver templates or have an existing driver that you have converted, these property pages might already exist for your project. If not, the property pages are automatically added to your project as you add the related file types to the project or solution (for example, .mc or .man files for the message compiler). For more information, see WDK and the Visual Studio build environment

You can set properties for an individual driver or for an entire driver package. The following table shows some of the available properties that you can configure specifically for drivers and driver packages.

Signing properties for individual driver files (see Signing a Driver)

Signing properties for driver packages (see Signing a Driver)

Troubleshooting tip for building a driver

The following tip can help you troubleshoot problems when you use the WDK and Visual Studio to build drivers.

To increase the verbosity of the build output using the options in Visual Studio

  1. Select Tools>Options.
  2. Select the Project and Solutions folder and select Build and Run.
  3. Change the options for the MSBuild project build output verbosity and MSBuild project build log file verbosity. By default, these are set to Minimal.

2021 Best Two Useful Disk Utilities in Windows (10/8/7/Vista/XP)

This page offers two best free disk utility for Windows 10/8/7/Vista, etc. With the program, you can put your partitions in proper order, speed up the system with better performance:

  1. #1. Windows Disk Utility — Disk Management
  2. 1. Extend, Shrink, Delete, Create Volume
  3. 2. Defrag Partition
  4. 3. Convert Disk to Dynamic
  5. #2. EaseUS Disk Utility — Partition Master
  6. 1. Extend, Shrink, Delete, Create Volume
  7. 2. Convert Disk to Dynamic or Basic, GPT or MBR
  8. 3. Clone Partition, Clone Hard Drive
  9. More.

Have you received this warning— «Sorry, you are running out of space»? When you want to install (run) your long-awaited games or other system programs, this little blue frame may make you confused. This article will introduce two useful and simple disk utilities— Windows built-in tool and EaseUS Partition Master in Windows to you.
Disk Utility is a system utility for performing disk and disk volume-related tasks on the operating system. EaseUS Partition Master is a free Windows partition software which can help you create, resize, clone, move, merge, and format partitions, and much more. If you prefer any function we have, please get ready with me!

Contents

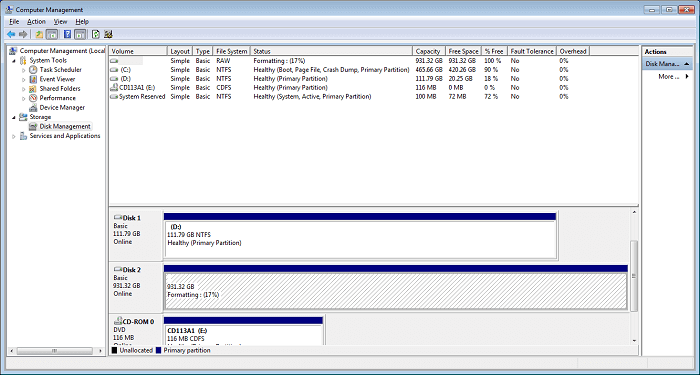
1. Disk Utility in Windows — Disk Management

Your computer already has a Windows disk utility — Disk Management. It enables you to perform advanced storage tasks, including initializing a new disk, shrink essential volume, extend a primary size, format a volume, delete a basic volume, and change drive letter and paths.

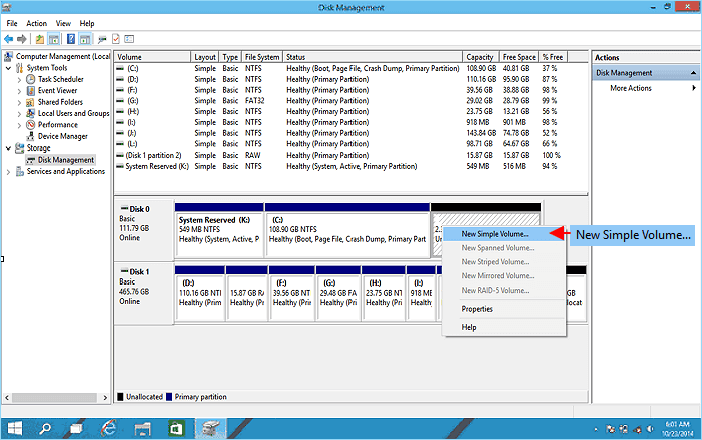
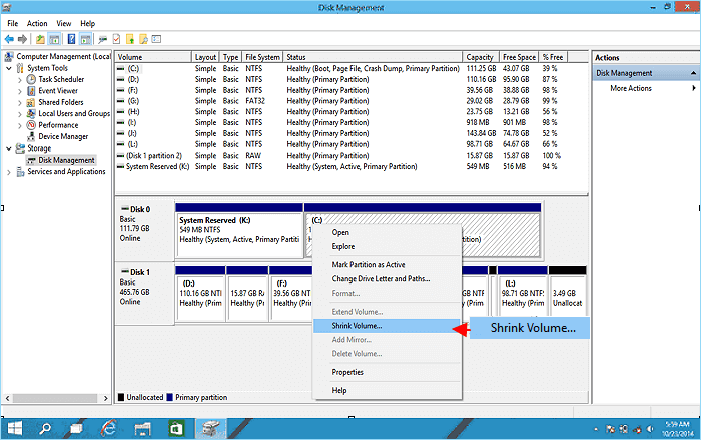
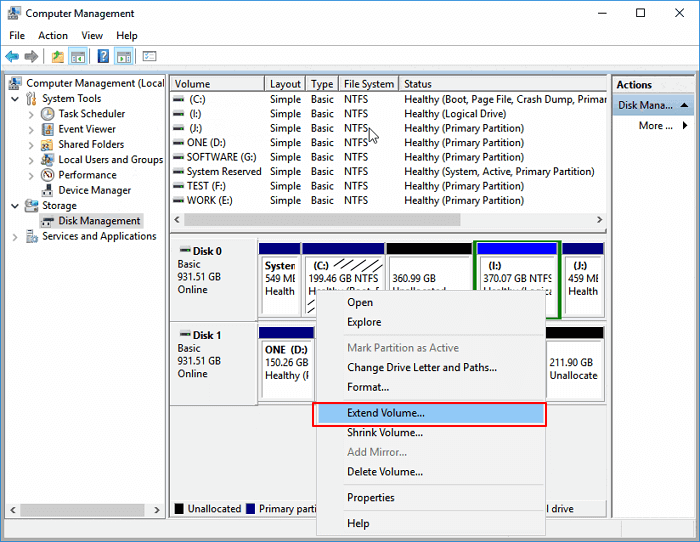
How to Use Disk Management

Step 1. Open Disk Management

  • On Windows 8/10: Right-click on the Windows start button and choose «Disk Management».
  • You also try the shortcut Win+X combination on your keyboard, then click «Disk Management» to open it.

On Windows Vista/7: Just right-click on Computer and choose «Manage», then click «Disk Management».

Step 2. Manage Hard Drive Disk in Disk Management

  • Create New Partition:В Right-click unallocated space and select «New Simple Volume». And complete the process.

  • Shrink Volume:В Right-click target volume and select «Shrink Volume». Adjust the size you want to shrink.

  • Extend Volume:В With unallocated space next to the target partition, right-click target volume and select «Extend Volume».

  • Format Volume:В Right-click target partition and select «Format». Set a new file system and drive letter, click «OK» to confirm.
  • Initialize New Disk: Right-click on disk, select «Initialize Disk». Set the partition style as «MBR» or «GPT» and click «OK».
  • Convert Disk to MBR/GPT: Right-click to delete all volumes. Right-click disk and select «Initalize Disk». Select «MBR» or «GPT».

Disk Management has limited functions and cannot be optimized and upgraded. Here is a better partition tool for you.

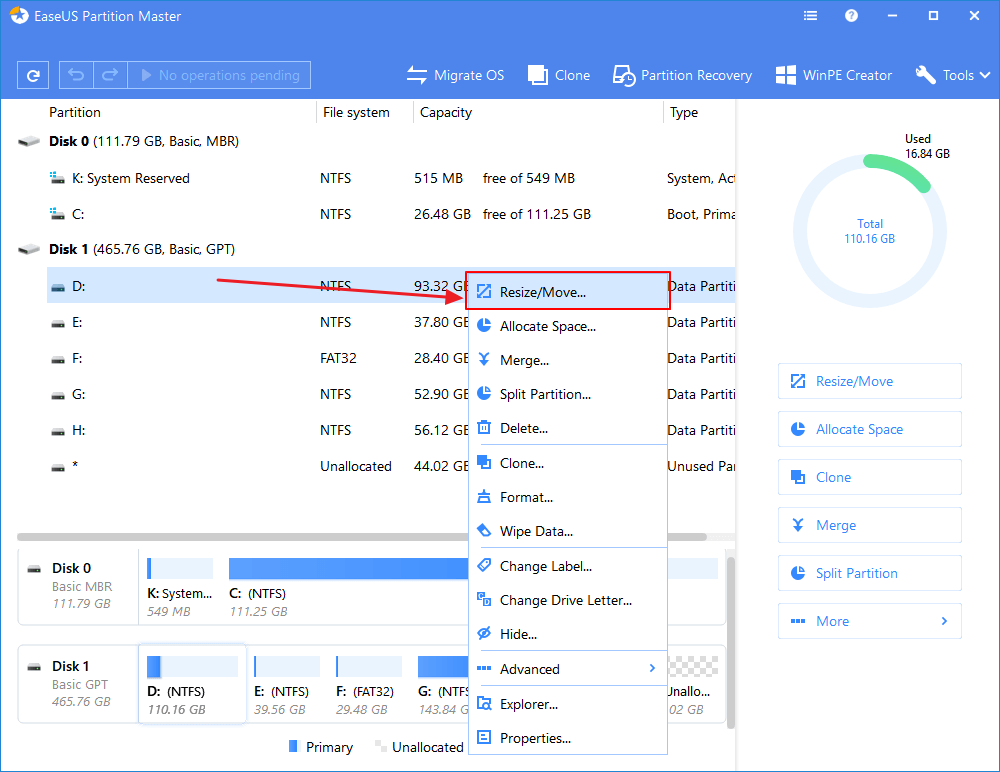
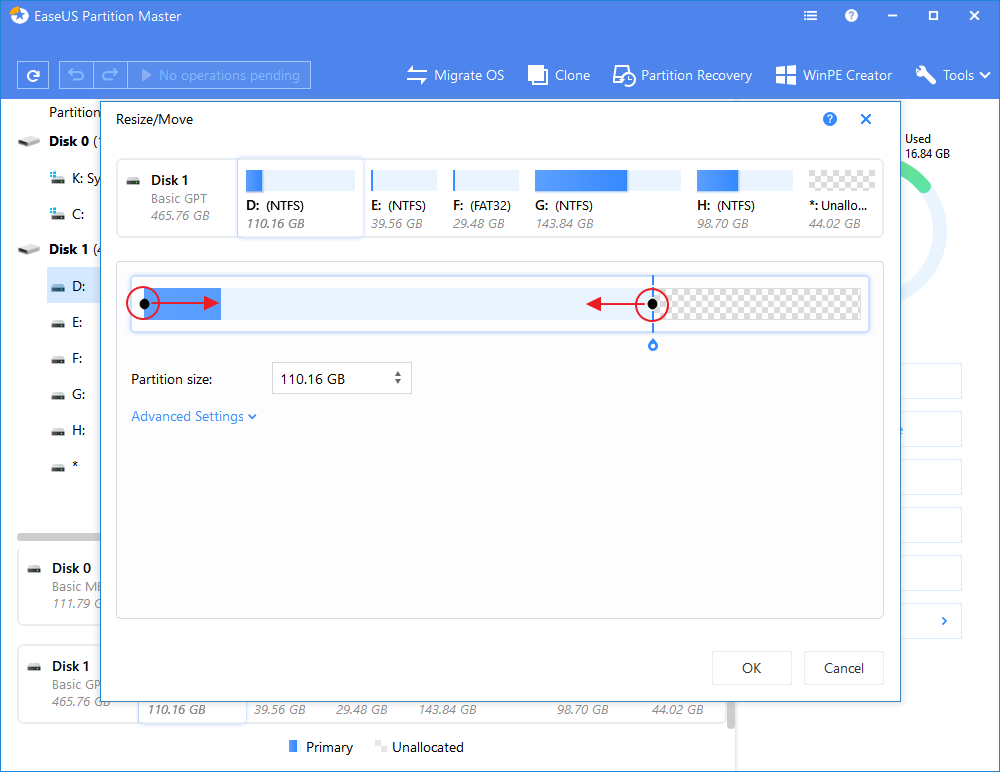
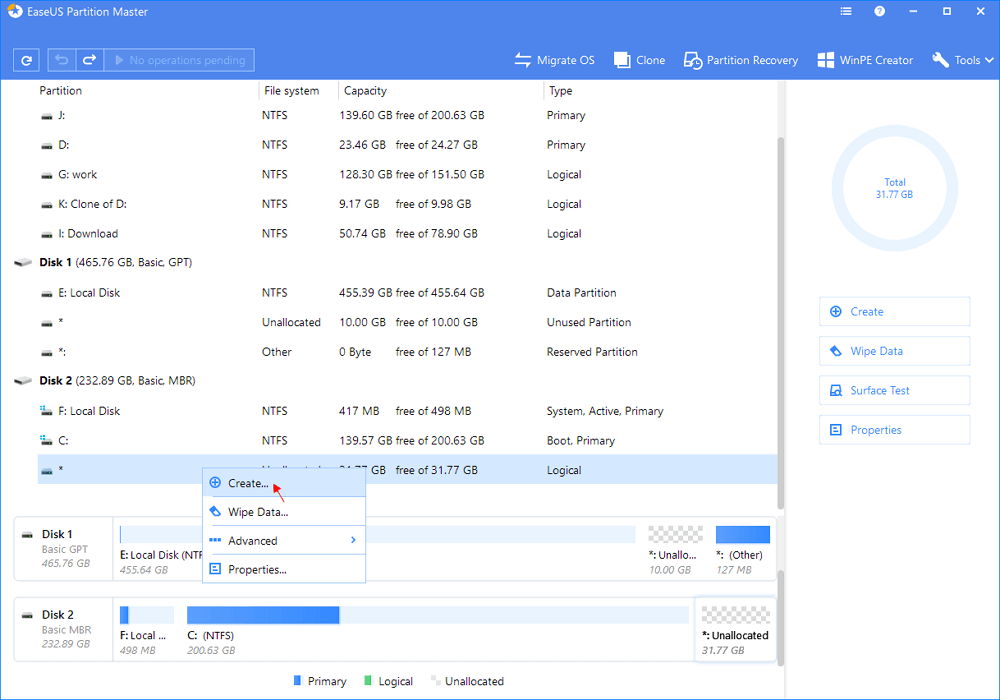
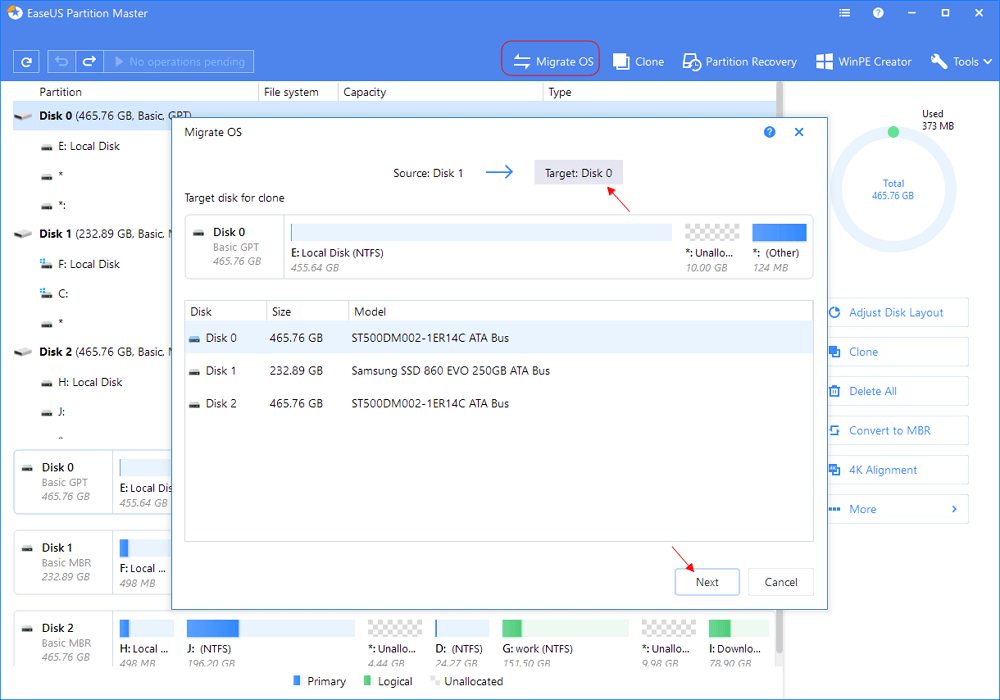
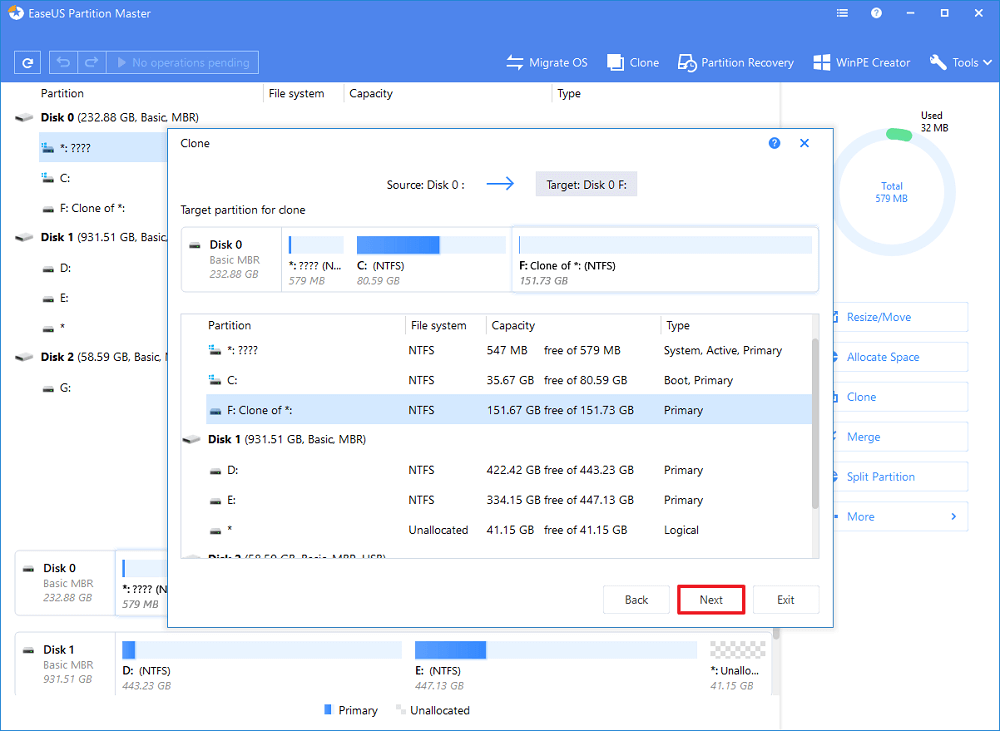
2. EaseUS Disk Utility in Windows — EaseUS Partition Master

EaseUS is easy for beginners without data loss, increasing your computer speed. It has more features that Disk Management doesn’t have. Its function is more effective than the former. Cleanup and optimization may give you a surprise.

Besides basic disk management features, EaseUS Partition Master even offers some advanced features to help you manage disk, such as migrate OS, clone disk, etc.

How to Use EaseUS Disk Utility — Partition Master:

Step 1. Check for free space

To devide a disk partition into multiple ones, you must ensure that there is adequate free space to be allotted.

Step 2. Shrink a disk partition to create unallocated space

By doing so, start with the «Resize/Move» feature. Right-click on a partition with a lot free space and select «Resize/Move»

Drag either end of the partition rightwards or leftwards so you can shrink its size as the red arrow does, in order to get ample unallocated space. You can visually know how much space you’ve decreased in the «Partition size» area. Click «OK».

At last, you need to click the «Execute xx Operation» on the top menu and then «Apply» to save all the changes. Go back on the main window, there should be unallocated space appearing under the same disk of the shrinked one.

Step 3. Create a new partition on unallocated space

The last step is to turn the unallocated space into a usable partition drive with a recognized file system. Right-click on the unallocated space and choose «Create. «.

Customize the partition information by choosing a drive letter, partition label, file system (NTFS, FAT32, EXT2. )В and many more settings in the Advanced Settings. Click «OK».

Finally, cick «Apply» to confirm that you want to create a partition on the unallocated space. Repeat the whole steps to partition a hard drive in many more partitions.

Many users find it particularly annoying to re-install the operating system and hard drive. This software is a right hand to migrate OS and copy disk/partition.

No data loss and Windows reinstallation is needed. Follow to learnВ how to transfer Windows 10 to a new hard drive(HDD/SSD) and how to migrate Windows 7/10 to SSD.

  • Clone HDD to SSD — Upgrade Hard Drive

When your hard drive is too small, it is easy for you to apply the disk/partition copy feature for upgrading disk.

You may followВ clone 1TB HDD/SSD to 512GB SSDВ as a guide.В You can also apply this feature toВ clone SD card in Windows 10.

  • Partition Recovery

It brings huge convenience to help you immediately restore the partition and data when you accidentally deleted a volume.

Other Disk Utilities in Windows

Free application for Windows, designed to defragment files and folders on a hard drive, consolidate free space, and optimize file placement. Large contrast in interface color. If you intend to get more info, please click links.

Disk Space Fan 4 is a disk space analyzer and duplicate file remover software. It takes 1 minute to scan and show space with a pie chart. You can free up disk space and delete big files.

This software contains disk management, defragmentation at system boot time and game optimization. The last feature optimizes game experience, saving long load time.

WinDirStat is a disk usage statistics viewer and cleanup tool for various versions of Microsoft Windows. The main window is the same as the built-in computer tool. But one difference is each file represented by a colored rectangle, which is proportional to the file size.

UltraDefrag is a disk fragmentation for Windows, which can defrag locked system files at the beginning of the PC boot process.

Extra Subst is a virtual disk management tool that allows users to more easily access commonly used folders in the computer, and can create, edit, and delete virtual drives on the PC, and may also create virtual drives based on the selected folders.

1. How to wipe the disk with EaseUS Partition Master?

You can use the Wipe feature to wipe out a disk with EaseUS Partition Master, which alternatively overwrites the disk. In most cases, the data cleaned with this feature are not able to be retrieved.

2. What does disk utility do?

Disk Utility is used to erase, format, or manage internal disks and external storage devices. Disk Utility can also be used to add and control volumes, or if you want to organize your data into partitions. Disk Utility can be useful if you are working with RAID sets.

3. How do I know if disk utility is working on Mac?

  1. Open Disk Utility.
  2. Select your device that you are having problems with from the sidebar.
  3. Click on First Aid.
  4. Disk Utility will check the partition maps on the disk and check each volume.

4. Is there a disk utility for Windows?

Disk Management is a system utility in Windows that enables you to perform advanced storage tasks. Here are some of the things Disk Management is suitable for: To set up a new drive, see Initializing a new drive. To extend a volume into space that’s not already part of a volume on the same hard drive, see Extend a primary volume.

Читайте также:  Linux размер списка файлов
Оцените статью
Driver Project Properties Driver Package Properties