- How to get old versions of macOS
- Check compatibility
- Download macOS using Safari on your Mac
- How to create a bootable installer for macOS
- What you need to create a bootable installer
- Download macOS
- Use the ‘createinstallmedia’ command in Terminal
- Installing macOS on a separate APFS volume
- What you need
- Back up your Mac
- Add an APFS volume
- Install macOS on the volume
- Switch between macOS versions
- Keep the macOS on each volume up to date
- Learn more
- Установка macOS Mojave на POXMOX 6.1
- Установка macOS Mojave на POXMOX 6.1
- Введение
- Подготовка к установке
- Создание установочного ISO-образа macOS 10.14
- Создание виртуальной машины macOS
- Настройка параметров виртуальной машины
- Настройка OVMF BIOS на виртуальной машине
- Установка macOS 10.14 на виртуальную машину PROXMOX
- Установка загрузчика Clover на жесткий диск PROXMOX
- Загрузка macOS Mojave 10.14 с жесткого диска PROXMOX
- Заключение
- Другие статьи
How to get old versions of macOS
If your Mac isn’t compatible with the latest macOS, you might still be able to upgrade to an earlier macOS, such as macOS Catalina, Mojave, High Sierra, Sierra, or El Capitan.
To get the latest features and maintain the security, stability, compatibility, and performance of your Mac, it’s important to keep your software up to date. Apple recommends that you always use the latest macOS that is compatible with your Mac.
Check compatibility
The version of macOS that came with your Mac is the earliest version it can use. For example, if your Mac came with macOS Big Sur, it will not accept installation of macOS Catalina or earlier.
If a macOS can’t be used on your Mac, the App Store or installer will let you know. For example, it might say that it’s not compatible with this device or is too old to be opened on this version of macOS. To confirm compatibility before downloading, check the minimum hardware requirements:
Download macOS using Safari on your Mac
Safari uses these links to find the old installers in the App Store. After downloading from the App Store, the installer opens automatically.
- macOS Catalina 10.15 can upgrade Mojave, High Sierra, Sierra, El Capitan, Yosemite, Mavericks
- macOS Mojave 10.14 can upgrade High Sierra, Sierra, El Capitan, Yosemite, Mavericks, Mountain Lion
- macOS High Sierra 10.13 can upgrade Sierra, El Capitan, Yosemite, Mavericks, Mountain Lion
Safari downloads the following older installers as a disk image named InstallOS.dmg or InstallMacOSX.dmg. Open the disk image, then open the .pkg installer inside the disk image. It installs an app named Install [ Version Name ]. Open that app from your Applications folder to begin installing the operating system.
- macOS Sierra 10.12 can upgrade El Capitan, Yosemite, Mavericks, Mountain Lion, or Lion
- OS X El Capitan 10.11 can upgrade Yosemite, Mavericks, Mountain Lion, Lion, or Snow Leopard
- OS X Yosemite 10.10can upgrade Mavericks, Mountain Lion, Lion, or Snow Leopard
Источник
How to create a bootable installer for macOS
You can use an external drive or secondary volume as a startup disk from which to install the Mac operating system.
These advanced steps are primarily for system administrators and others who are familiar with the command line. You don’t need a bootable installer to upgrade macOS or reinstall macOS, but it can be useful when you want to install on multiple computers without downloading the installer each time.
What you need to create a bootable installer
- A USB flash drive or other secondary volume formatted as Mac OS Extended, with at least 14GB of available storage
- A downloaded installer for macOS Big Sur, Catalina, Mojave, High Sierra, or El Capitan
Download macOS
- Download: macOS Big Sur, macOS Catalina, macOS Mojave, or macOS High Sierra
These download to your Applications folder as an app named Install macOS [ version name ]. If the installer opens after downloading, quit it without continuing installation. To get the correct installer, download from a Mac that is using macOS Sierra 10.12.5 or later, or El Capitan 10.11.6. Enterprise administrators, please download from Apple, not a locally hosted software-update server. - Download: OS X El Capitan
This downloads as a disk image named InstallMacOSX.dmg. On a Mac that is compatible with El Capitan, open the disk image and run the installer within, named InstallMacOSX.pkg. It installs an app named Install OS X El Capitan into your Applications folder. You will create the bootable installer from this app, not from the disk image or .pkg installer.
Use the ‘createinstallmedia’ command in Terminal
- Connect the USB flash drive or other volume that you’re using for the bootable installer.
- Open Terminal, which is in the Utilities folder of your Applications folder.
- Type or paste one of the following commands in Terminal. These assume that the installer is in your Applications folder, and MyVolume is the name of the USB flash drive or other volume you’re using. If it has a different name, replace MyVolume in these commands with the name of your volume.
Big Sur:*
Catalina:*
Mojave:*
High Sierra:*
El Capitan:
* If your Mac is using macOS Sierra or earlier, include the —applicationpath argument and installer path, similar to the way this is done in the command for El Capitan.
After typing the command:
- Press Return to enter the command.
- When prompted, type your administrator password and press Return again. Terminal doesn’t show any characters as you type your password.
- When prompted, type Y to confirm that you want to erase the volume, then press Return. Terminal shows the progress as the volume is erased.
- After the volume is erased, you may see an alert that Terminal would like to access files on a removable volume. Click OK to allow the copy to proceed.
- When Terminal says that it’s done, the volume will have the same name as the installer you downloaded, such as Install macOS Big Sur. You can now quit Terminal and eject the volume.


Источник
Installing macOS on a separate APFS volume
APFS makes it easier than ever to switch between versions of macOS, including a beta (prerelease) version of macOS.
If you install macOS on an additional volume of your startup disk, you can switch between that macOS and the macOS on your other volume, as if each were on a separate disk. And because storage space is shared across APFS volumes, you don’t need to reserve space for the new volume. Its size automatically adjusts to fit your content.
What you need
Your Mac must already be using macOS High Sierra or later on an APFS-formatted startup disk. Find out which format your startup disk is using.
You don’t need to reserve storage space for the new volume, but macOS needs as much as 20GB of available space to install, depending on the version of macOS. If you don’t have enough space, the installer will let you know.
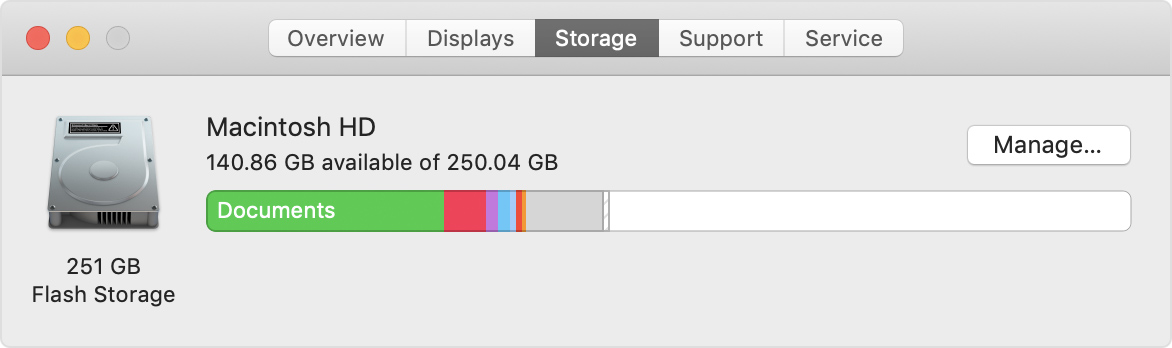
About This Mac includes a storage overview: Choose Apple () menu > About This Mac, then click Storage.

Back up your Mac
It’s a good idea to back up your Mac first, especially if you’re installing a beta version of macOS. Beta software is software that is still in development, so some apps and services might not work as expected.
Add an APFS volume
- Open Disk Utility, which is in the Utilities folder of your Applications folder.
- In the sidebar, select your existing APFS volume.
- Choose Edit > Add APFS Volume from the menu bar, or click in the Disk Utility toolbar. These options are available only when an APFS volume is selected.
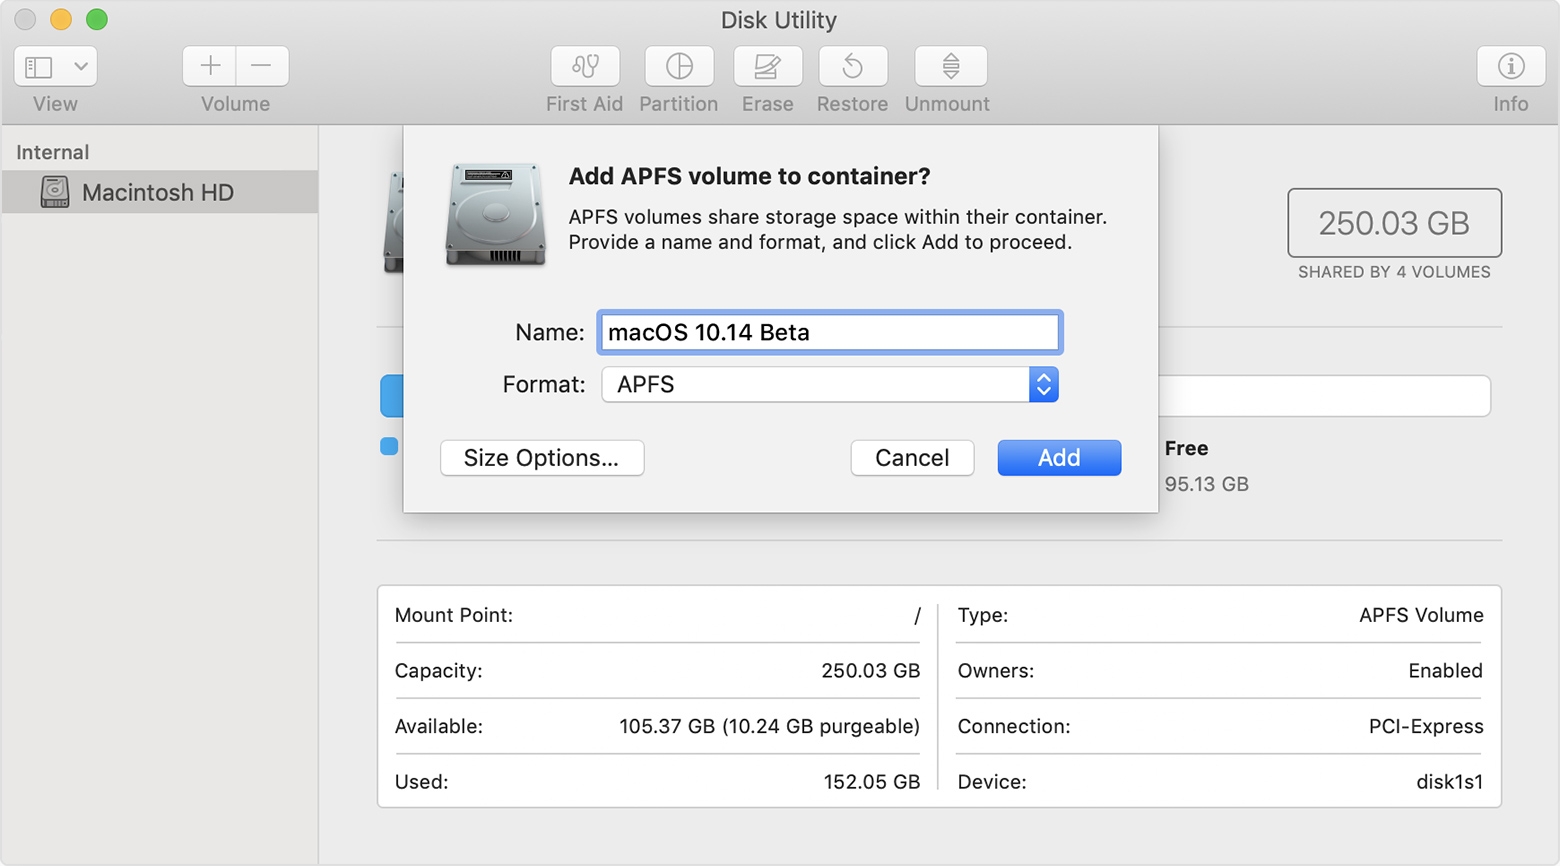
- Type any name for the new APFS volume, then click Add:
- Disk Utility should now show the new volume in the sidebar. The new volume will also appear in the Finder, as if it were a separate disk. You can now quit Disk Utility.
Install macOS on the volume
Choose an installation method:
- To install a beta (prerelease) version of macOS, enroll in the Apple Beta Software Program and follow the installation instructions on the program website.
- To install a release version of macOS, you can use macOS Recovery. The keys you press at startup determine which macOS is installed.
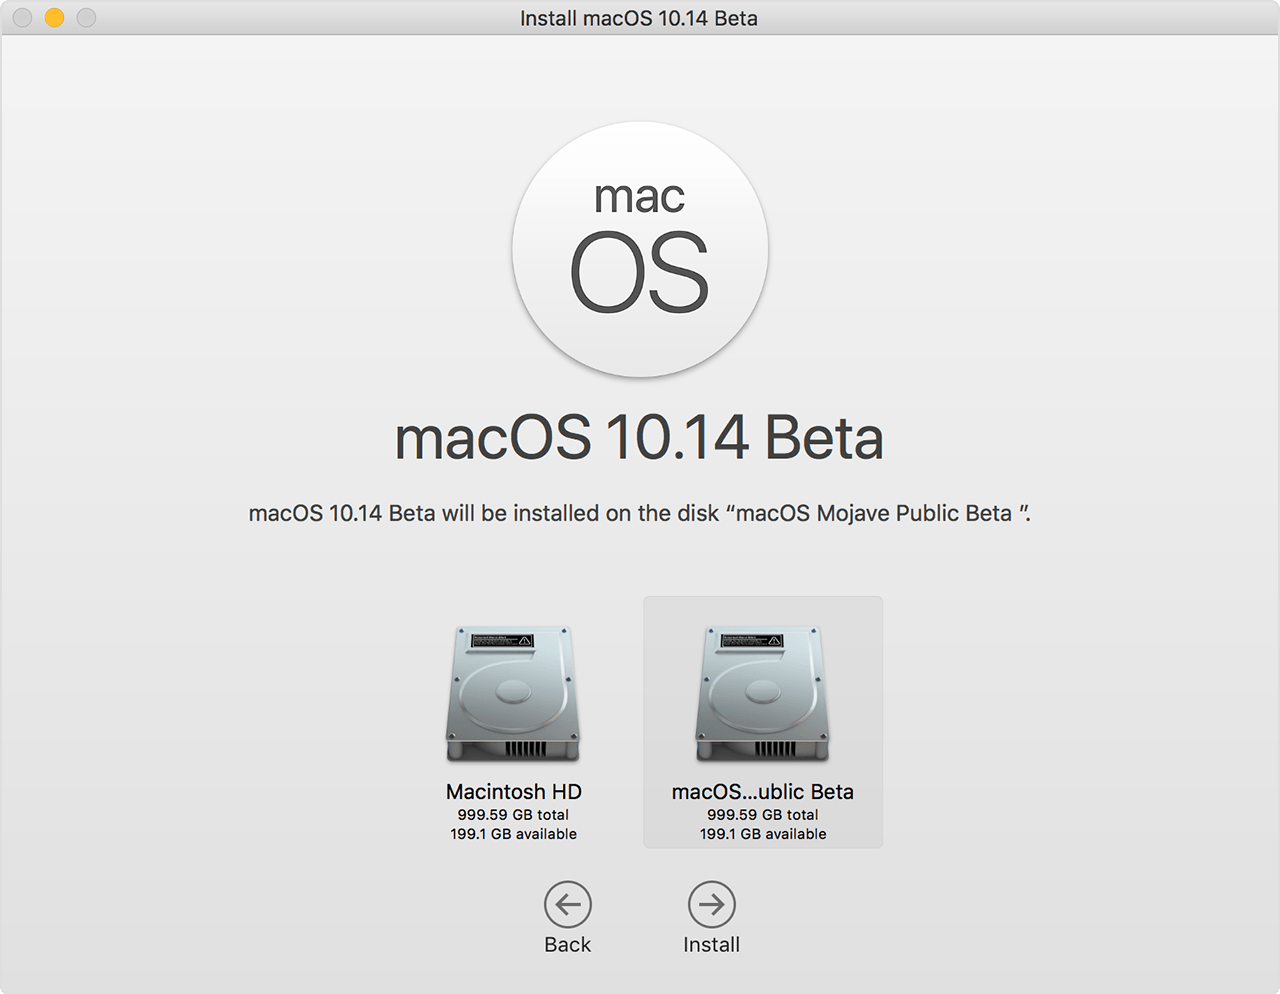
When the installer opens and you’re asked to choose where to install, click Show All Disks, then select the new volume.
Switch between macOS versions
After installation is complete, you can use Startup Disk preferences or Startup Manager to quickly switch between each macOS:
- Choose Apple () menu > Startup Disk, then click and enter your administrator password. Select the volume that you want to use, then click Restart.
- Or press and hold the Option key during startup. When prompted, choose the volume that you want to start up from.
 and enter your administrator password. Select the volume that you want to use, then click Restart.
Keep the macOS on each volume up to date
To find the latest updates for each version of macOS, check for software updates, then start up from the other volume and check for software updates again.
Learn more
If your Mac is using macOS Sierra or earlier, or the startup disk is formatted as Mac OS Extended instead of APFS, you can create a new partition instead. The space it occupies doesn’t automatically adjust to fit your content, so you must manually size the partition. Learn how to add a volume to a device formatted as Mac OS Extended.
Источник
Установка macOS Mojave на POXMOX 6.1
Установка macOS Mojave на POXMOX 6.1
23 марта 2020

Введение
В данной статье хочу поэтапно объяснить как установить macOS Mojave 10.14 на гипервизор PROXMOX 6.1. Лично мне macOS понадобился для поднятия GitLab Runner, возможно так же использовать как физическую машину прокинув USB-порты, а так же видеокарту. Хочу сразу предупредить, в 10.14 есть проблемы с драйверами видеокарт NVIDIA т.к. компания не спешит писать под нее драйвера. Так же для PCI Passthrough необходимо будет настроить соответственно Clover.
Итак, что необходимо:
1. Процессор должен поддерживать SSE 4.2
2. Установленный гипервизор PROXMOX 6.1
3. Доступ гипервизора в интернет
Подготовка к установке
Заходим на гипервизор по SSH, далее все команды выполняем от root пользователя:
После перезагрузки обновляем пакеты и ставим необходимый софт:
Теперь необходимо пропатчить OVMF, процесс компиляции может занять в среднем 10-30 минут в зависимости от ресурсов вашего ПК:
Ждем пока пройдет компиляция, на выходе мы получим deb-пакет. Устанавливаем:
Создание установочного ISO-образа macOS 10.14
Скачиваем образ при помощи замечательного скрипта fetch-macOS.py, для этого переходим в директорию в которой есть 6-8 Гигов свободного места, сам образ весит примерно 3Гига но в дальнейшем мы его будем конвертировать в ISO:
В командной строке необходимо выбрать версию macOS, печатаем цифру 4 и жмем Enter:
Ждем пока загрузится DMG образ macOS системы, это зависит от скорости Вашего интернет подключения. После того как образ загрузился, конвертируем его в ISO:
Переместим ISO образ в директорию туда, где Вы храните образы для виртуальных машин. Я укажу стандартную директорию PROXMOX:
Образ для установки готов, теперь качаем Clover, распаковываем и перемещаем в директорию с ISO образами:
Теперь можно удалить clover-r4920.iso.zip, а так же BaseSystem.dmg т.к. они нам больше не понадобятся:
Не закрывайте ваше SSH соединение т.к. оно Вам еще понадобится.
Создание виртуальной машины macOS
Переходим в браузер, открываем WEB-интерфейс PROXMOX и создаем новую виртуальную машину:

Далее, не важно выбирите ли вы ISO-диск с macOS т.к. это сейчас не принципиально (далее Вы поймете), главное выбираем тип ОС — Other и жмем далее:

Выбираем видеокарту — Совместимый с VMWare, BIOS — OVMF (UEFI), ставим галочку — Add EFI Disk, выбираем хранилище под EFI диск, контроллер SCSI — LSI 53C895A, машина — q35:

Жесткий диск: Шина/Устройство — SATA 0, кеш — Write back (не безопасно), хранилище и размер диска на ваше усмотрение минимально 40-60Гб, Я поставил 100Гб:

Процессор — 4 ядра, тип — Penryn:

Память 8Гб — 8192 Мб, убераем галочку — раздувание памяти:

В настройках сети выберите свой сетевой мост и укажите модель сетевой карты — VMware vmxnet3:

На последнем шаге проверьте установленные параметры виртуальной машины для macOS 10.14 Mojave и нажмите кнопку «Готово».
Настройка параметров виртуальной машины
Виртуальная машина создана, теперь необходимо произвести конфигурацию перед тем как мы ее запустим. Будте предельно внимательны на этом шаге!
Открываем созданную виртуальную машину, переходим в оборудование и УДАЛЯЕМ CD/DVD привод. Далее, создаем 2-а новых CD/DVD привода IDE 0 и IDE 2.
В виртуальный привод IDE 0 монтируем образ — Mojave-installer.iso, а в привод IDE 2 монтируем Clover — clover-r4920.iso. У вас должно получиться примерно следующие:
Открываем SSH-соединение с PROXMOX и теперь необходимо отредактировать конфигурационный файл созданной виртуальной машины, у меня она под номером 100:
Заменяем первую строку args на строку ниже:
Далее, переходим к строкам ide0 и ide2 там где смонтированы ISO-образы:
За место media=cdrom,size=. вписываем cache=unsafe, у Вас должно получиться так:
Нажимаем сочетание клавиш CTRL+O , жмем ENTER для сохранения. Нажимаем CTRL+X для выхода из редактора.
Теперь если мы зайдем в WEB-интерфейс PROXMOX (обновите страницу на всякий случай) то увидим, что CD-приводы стали как Жесткий диск (ide0) и Жесткий диск (ide2).
Настройка OVMF BIOS на виртуальной машине
Запускаем виртуальную машину, открываем терминал и жмем несколько раз клавишу F2 до тех пор, пока не попадем в BIOS машины. Если нажать не успели и загрузился Clover, тогда просто перезагрузите через CTRL+ALT+DEL и попробуйте зайти еще раз.
Выбираем пункт Device Manager:

Выбираем OVMF Platform Configuration:

Устанавливаем разрешение экрана 1920×1080:

Жмем Commit Changes and Exit, сохраняем. Далее в начальном окне выбираем пункт Reset и жмем Enter:

Установка macOS 10.14 на виртуальную машину PROXMOX
После перезагрузки загрузится Clover. Жмем Enter по жесткому диску и ждем загрузку установщика.

Сейчас необходимо форматировать жесткий диск в APFS. Выбираем дисковую ультилиту:

Выбираем формат — APFS, называем диск как Вам удобно и жмем кнопку — очистить.

Выбираем пункт — переустановить macOS:

Далее, выбираем диск APFS который Вы форматировали и жмем — далее. Пойдет установка системы macOS Mojave 10.14.

Ждем пока система установится.
Установка загрузчика Clover на жесткий диск PROXMOX
Система установлена и теперь необходимо отвязать Clover от ISO-образа и установить его на EFI-раздел жесткого диска. Для этого жмем Dashboard — Выбираем папку «Другие» — Терминал.
В окне терминала вводим команду:

У Вас расположение дисков может быть другим, необходимо с дика на котором есть раздел Linux Filesystem скопировать загрузчик на диск у которого есть раздел Apple_APFS:

Тоесть в моем случае — это исходный /dev/disk0s1 и /dev/disk2s1 с установленной системой. Выполняем команду копирования раздела с правами root:
Выключаем виртуальную машину macOS.
Загрузка macOS Mojave 10.14 с жесткого диска PROXMOX
Остался последний штрих. Открываем SSH соединение с PROXMOX и редактируем файл конфигурации виртуальной машины:
Теперь удаляем эти стоки:
Нажимаем сочетание клавиш CTRL+O , жмем ENTER для сохранения. Нажимаем CTRL+X для выхода из редактора.
Открываем WEB-интерфейс PROXMOX, обновляем страницу. Открываем параметры виртуальной машины и выставляем порядок загрузки:

Включаем виртуальную машину и загружаем macOS Mojave 10.14 c жесткого диска:

Если во время загрузки логотип яблока будет в верхнем углу, зайдите в OVMF BIOS и установите еще раз разрешение 1920×1080 и повторно загрузитесь.
Заключение
В данной статье я показал как установить macOS Mojave 10.14 на гипервизор PROXMOX. Конечно предстоит еще настроить Clover, сохранить DSDT и пропатчить но эта тема уже другой статьи.
P.S.:
Большая просьба при копировании материала указывать ссылку на эту статью.
Другие статьи

Сброс / Удаление кластера PROXMOX
24 марта 2020
Иногда возникают проблемы с кластером PROXMOX, чаще всего это происходит из-за непонимания того как этот кластер вообще работает. В случае когда чистые сервера объединяются в новый кластер как правило проблем никаких не возникает, но ситуации бывают разные.
Источник


