- The fundamentals of network booting
- What is network booting?
- Core technologies
- Other relevant protocols
- The BIOS boot process
- How iPXE extends the network boot process
- PXE — грузим всё! Осваиваем мультизагрузку по локальной сети
- Содержание статьи
- Xakep #201. Как стать киборгом
- Что будем реализовывать?
- Собираем все в кучу и взлетаем
- Syslinux. Ставим загрузчик
- Раздел Linux. Готовим на примере Ubuntu 14.04
- Тонкие клиенты / Thinstation Linux
- Acronis
- Windows PE
- Заключение
- Александр «Plus» Рак
The fundamentals of network booting
What is network booting?
Network booting, or booting from LAN as it is also called, is a process which allows a computer to start up and load an operating system or other program directly from the network without any locally attached storage device, like a floppy, CDROM, USB stick or hard drive.
On Intel architecture computers this is made possible with the PXE standard. PXE extends the features of the BIOS so that it can run software directly from the network. PXE support is now so common that you can expect it to be present in any reasonably modern computer that comes with an Ethernet jack (commonly known as RJ45).
This fact alone makes it possible to boot an Intel-based computer from the network without having to burn an EEPROM on your network card, like you had to do in the past.
Core technologies
- DHCP protocol, used to initialize network configuration for a client
- TFTP protocol, used to download a network boot program (NBP)
- HTTP protocol, used to download data from a web server
- PXE — a way to boot Intel computers using DHCP and TFTP
- UNDI — an API used by the PXE environment to generalize access to networking hardware
Other relevant protocols
All of these network protocols deal with how to access storage over they network in different ways.
- iSCSI — for block devices
- AoE — for block devices (non-routable, local network only)
- NBD — for block devices
- NFS — for files (mostly used on Unix)
- SMB/CIFS — for files (mostly used on Windows)
The BIOS boot process
When your computer powers on and starts running your operating system, it goes through a series of operations before it actually starts your operating system. Your operating system is a very sophisticated boot program that takes total control over your computer. But a boot program can also be a fairly simple program, like a memory diagnostics program, a hardware stability checker, or even a simple game like Pong or Tetris.
Power On When you put power on your computer and press the On button on the case. Initialize hardware The BIOS performs an inventory of all the components in the computer, such as the CPU, memory chips, extension cards, storage controllers, etc. Run self-tests All of the components discovered goes through a self-test procedure, to ensure they are operating properly. If any of the components fail, and that component is required for basic operation, your computer will usually make a series of beeps and stop functioning. When all problems have been fixed the BIOS will move on to the next step in the process, which is to discover additional option ROMs. Computer stopped If your computer ends up in this state, it will either hang forever, or it will turn itself off. This depends on how it entered this state, and how your BIOS is configured to react when it reaches this state. Discover built-in devices and option ROMs During this activity, your BIOS will discover all of the extensions available. BIOS extensions are usually included in the firmware of your BIOS or burned into an EEPROM or flash chip on one of your add-on cards. During booting you can normally notice this as your IDE, SATA, SCSI or other controllers finding the devices that are attached to them. For network cards, this is usually when you see the prompt that lets you specify what kind of boot protocol it should support (like PXE or RPL). Option ROMs should usually not do anything fancy at this point, except initialize hardware, run self-tests and set up boot service (BBS) entry points. Once all extensions have been allowed to run and add their boot service entry points, control goes back to the BIOS. At this point all the add-on cards and internal services of the BIOS have been initialized and are ready to do work. All of the boot service entry points are ordered according to the configuration specified in the BIOS. It is quite common that the user is given a choice of which boot service to try first by pressing a hotkey. F12 is a common key to start a boot service offered by a network card, but this varies among manufacturers. Once the first boot service has been selected, either manually or automatically, control moves to the next step. Start first boot service in BIOS boot services list During this stage, the program indicated by the boot service entry point is started. At this point, control passes to the boot service program, which starts its discovery process for a boot program. Boot service performs discovery for boot program Different boot services go about looking for the boot program in different ways. A floppy controller will read the first sector of the floppy and get ready to start that piece of code. A hard-drive (HDD) controller will usually read the master boot record (MBR) of the first attached HDD and designate that as the boot program. A network card using the PXE standard will perform a DHCP request to find out its IP address and location of boot program. If a location is advertised, a TFTP request is performed to fetch the boot program, commonly referred to as a network boot program (NBP). If the boot service was unable to find a valid boot program, the boot service will exit and control returns back to the BIOS, which will try the next boot service. If a boot program was successfully found, control will be handed over to it. Remove first boot service or put at bottom of list The BIOS needs to cycle to the next boot service in its list. Whether the BIOS discards the current boot service or adds it back at the end of the list varies between BIOS vendors. Both methods have pros and cons. The next step is to figure out if there are any more boot services to try out. More boot services available? If there are more boot services available, the next one in line will be started. If there are no more boot services the computer will halt and perform its halt operation. Start boot program At this point the boot program is in full control of the computer, and it will start doing whatever it is supposed to do. If the boot program detects a problem or wishes to, it can return back to the BIOS. This is not a very common thing to do for a boot program, as a lot of BIOSes have buggy implementations for getting control back. The more common method is just to display a message and hang, or reboot instantly. Since the boot program has full control over the computer it can make use of all the other devices the BIOS has detected to perform whatever action it needs to. Boot program running The final part a boot program normally does, is to hand over control to an operating system kernel. A boot program that performs this kind of action is usually called a boot loader. Common boot loaders for Linux systems are grub and syslinux. Before the boot loader does this, it will usually also fetch additional data from a storage device, e.g. drivers and configuration files. Any program code required to operate the hardware must be in main memory at this point, or you will be unable to access the hardware. This requirement is usually implemented using ramdisks, so that the kernel can be kept modular and flexible. In Linux they are called initial ramdisks (initrds), in Solaris they go by the name boot archives, and in recent Windows versions they are called wim files. The operating system kernel will then perform a complete discovery of the hardware attached to the system (again) and start doing whatever it is programmed to do. At this point, because another piece of code (the kernel) is in direct control of the hardware, it would be very unwise to switch control back to the BIOS, as hardware state has been modified under its feet.
How iPXE extends the network boot process
iPXE is a sophisticated boot program that is capable of extending the traditional PXE network boot process in several ways. It can be flashed as an add-on card’s option ROM, or it can be loaded as a network boot program (NBP) from an existing PXE option ROM via TFTP (this is called chainloading). It is also possible to include it as an option ROM inside your BIOS or load it from any local storage media, like floppy, USB, CD or HDD.
Depending on how iPXE is configured, it can load additional boot programs from several different sources in addition to TFTP. The most common way is to use HTTP to load additional content using a standard web server. If your web server supports range requests, you can also use it to boot floppies and CD images (ISOs) directly from the web server. FTP can also be used in the same way. There is even support for encrypted transmission with HTTPS. It is possible to configure it to only allow execution of programs that have been signed. If you combine this with ROM-burning you can have a network boot loader that will load only trusted code.
One of the most interesting features iPXE enables, is to boot a computer without an iSCSI host bus adapter from an iSCSI volume. This is possible, because iPXE implements a full-featured software-based iSCSI initiator. It even supports CHAP authentication! For operating systems that support it, you can also use AoE (ATA Over Ethernet) in addition to iSCSI.
The final feature that makes iPXE so impressive, is that it also has a very advanced scripting language and text-based menu system. These features enable you to make dynamic boot environments without the need to know a server-side scripting language like PHP, Perl or Python.
PXE — грузим всё! Осваиваем мультизагрузку по локальной сети
Содержание статьи
Сегодня автоматизируется все больше задач, для максимальной отдачи серверов все шире используют виртуализацию. Но устанавливать операционки по-прежнему приходится. Каждый делает это по-своему: у кого-то полные карманы различных образов на все случаи жизни, кто-то по старинке носит с собой «барсетку» с дисками, а то и две. Как правило, администраторы выполняют эту работу с невеликим удовольствием. Давай посмотрим, как сократить время на тривиальные задачи, как научить компьютеры устанавливать системы самостоятельно, вообще без участия админа, используя при этом только локальную сеть.
Итак, сегодня мы научимся: устанавливать Windows и Linux по сети, грузить небольшие ISO-образы, полезный софт (всяких там Касперских, Акронис, WinPE, мемтесты), разворачивать тонкие клиенты и рулить ими. Чтобы, например, бухгалтер, работающая с 1С по RDP, не прибила тебя за то, что у нее слетела винда, а отчет нужно было подготовить еще вчера. Или скупой начальник, который не хочет обновлять свой комп, восхитился твоим профессионализмом, когда увидит, как на стареньких компах летает Windows 8. В достижении наших коварных целей нам поможет сервер, предоставляющий загрузку по сети (PXE).
Xakep #201. Как стать киборгом
У любого системного администратора в заначке есть универсальный USB-диск для экстренной реанимации компьютера. Согласись, было бы куда лучше иметь ту же функциональность, используя одну лишь сетевую карту. Нельзя при этом не отметить возможность одновременной работы с несколькими узлами сразу. Итак, исходя из наших потребностей у нас есть два пути решения: использовать PXE или LTSP.
LTSP нам не очень подходит: он призван грузить по сети ОС, установленную на самом сервере, что позволяет использовать приложения сервера LTSP. Это не совсем то, что нам нужно. PXE — инструмент для загрузки компьютера по сети без использования локальных носителей данных, так же как и LTSP. PXE позволяет организовать мультизагрузочное меню загрузки, аналогичное универсальному «USB-реаниматору».
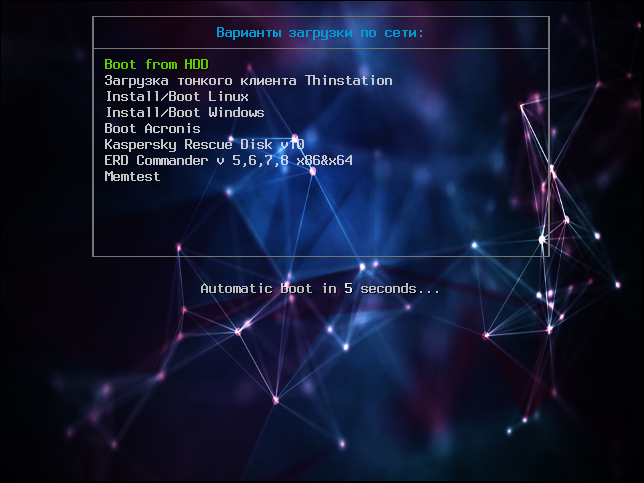 Главное меню загрузки PXE, графический режим
Что будем реализовывать?
Началось все с необходимости иметь под рукой инструмент для удаленной установки Ubuntu/Debian Server по сети, с возможностью загрузки Live CD маленькой системы, вроде SliTaz или Kolibri OS.
Как говорится, аппетит приходит во время еды: намеченное не успели реализовать, а к плану добавился еще ряд «хотелок». В итоге список получился весьма внушительным.
- Тонкие клиенты на базе Thinstation Linux.
- Раздел Linux.
- Установка Ubuntu 14.04 x86.
- Установка Ubuntu 14.04 x64.
- Установка Ubuntu 12.04 x86.
- Установка Ubuntu 12.04 x64.
- Загрузка SliTaz Live CD.
- Раздел Windows.
- Установка Windows 2012.
- Установка Windows 7.
- Acronis.
- Windows PE с пакетом полезного ПО.
- Acronis True Image.
- Legacy BIOS.
- UEFI.
- Acronis Disk Director.
- Legacy BIOS.
- UEFI.
- Касперский Rescue v 10.
- ERD Commander от 5 до 8 через ISO-образ.
- Memtest.
Собираем все в кучу и взлетаем
В качестве дистрибутива для сервера выбор пал на Ubuntu Server 14.04.2 LTS. Можно остановиться на любой другой ОС, разница будет только в синтаксисе. Итак, приступим. Нам потребуется TFTP, DHCP (необязательно установленный на этом же сервере, в роли DHCP-сервера может выступить роутер), сервис для организации сетевой файловой системы NFS. Рассматривать будем только те настройки, которые нас интересуют в рамках темы. Первым делом установим все необходимое, предварительно сделав все обновления:
Параметр -y означает, что на все вопросы отвечаем согласием. Настройка TFTP сводится к правке пары строк в соответствующем месте:
Обрати внимание, параметр TFTP_DIRECTORY=»/var/lib/tftpboot» указывает место расположения корневого каталога TFTP-сервера. После сохранения перезапускаем удобным для себя способом:
Далее настроим DHCP-сервер. Приведу простую конфигурацию файла /etc/dhcp/dhcpd.conf:
Данная конфигурация говорит о том, что DHCP-сервер работает в локальной сети 192.168.0.0/24. Клиенту присваиваются адреса из диапазона 192.168.0.150–192.168.0.200, им будут присвоены параметры шлюза — 192.168.0.1, DNS-сервера — 192.168.0.2 и 192.168.0.5. Класс pxeclients, а именно параметр filename — это имя файла загрузчика, расположенного в корневой папке TFTP-сервера, в нашем случае /var/lib/tftpboot/pxelinux.0, на сервере с адресом 192.168.0.10.
Syslinux. Ставим загрузчик
В качестве загрузчика будем использовать Syslinux. Последнюю версию можно взять здесь. Распаковываем и кладем в /var/lib/tftpboot следующие файлы: ldlinux.c32, libcom32.c32, pxelinux.0 и lpxelinux.0 и каталог boot, в который складываем chain.c32, ldlinux.c32, libcom32.c32, libcom32.elf, libutil.c32, linux.c32, memdisk, menu.c32, vesamenu.c32 (menu.c32 — только текстовое меню, vesamenu.c32 позволяет украсить меню, например добавив фон). Файл меню загрузки по умолчанию должен находиться в /var/lib/tftpboot/pxelinux.cfg/default и иметь вид
На этом этапе загрузчик должен работать и иметь единственный пункт меню «Загрузка с первого жесткого диска». Далее необходимо создать подменю. Чтобы не путаться и не городить огромные файлы, рекомендую вынести подпункты в отдельные файлы меню, например так:
Все, что относится к разделу меню Install/Boot Linux, вынесем в отдельный файл /var/lib/tftpboot/linux. Аналогично выносятся другие пункты меню. Остальные параметры загрузки рассмотрим при добавлении каждого пункта/продукта.
Раздел Linux. Готовим на примере Ubuntu 14.04
Первым пунктом ставим возврат в предыдущий раздел меню. Далее будет установка Ubuntu 14.04 i386 и amd64. Скачиваем образ Ubuntu 14.04 mini.iso, распаковываем, находим прямо в корне два файла: linux и initrd.gz. Напомню, что корневой каталог сервера для загрузки — это каталог TFTP-сервера /var/lib/tftpboot . Исходя из этого, располагаем файлы внутри tftpboot. В случае с установкой Ubuntu, например, в images/linux/ubuntu14/i386 для x86 и в /images/ubuntu14/amd64 для x64 архитектур соответственно. Заметь, пути указаны относительно каталога FTFP-сервера. Здесь можно задавать параметры для установки, для автоматизации процесса установки. Например, задать параметр установки в качестве окружения рабочего стола при установке Debian KDE: append desktop=kde . Следующим шагом запустим маленький SliTaz. Грузить ISO-образы будем через memdisk. Из листинга сверху видно раздел slitaz, memdisk у нас расположен в каталоге boot, сам образ — в каталоге images. Параметры аналогичны тем, что используются в мультизагрузочных дисках.
Тонкие клиенты / Thinstation Linux
Следующим шагом научим запускать тонкие клиенты. Образ Thinstation Linux можно скачать готовый в виде сборки, можно взять конструктор для сборки и собрать самостоятельно. Можно качнуть с GitHub. Будь готов, что в последнем случае для подготовки образа потребуется около 3 Гбайт свободного места и времени в районе часа. Подготовка образа из Git хорошо описана в статье на сайте quaded.com. Я взял сборку с сайта nixts.org. В образе, который мы используем, много «ненужных» файлов, потому что там сразу и загрузчик, и дефолтные конфиги. Берем ядро и образ файловой системы (initrd и vmlinuz), которые складываем, например, в /var/lib/tftpboot/images/thinstation/ . Файлы конфигураций ( thinstation.conf.network , thinstation.hosts , thinstation.conf-user ) располагаем в корневом каталоге TFTP-сервера! Thinstation позволяет при загрузке учитывать MAC-адреса, IP-адреса, определять имя и группировать клиентов, в зависимости от параметров регулировать загрузку, например уводить на разные RDP- или VNC-серверы, сессии. Это позволяет, например, наклепать кучу виртуалок с десктопными операционными системами и посадить каждого клиента на отдельную виртуалку. Для каждого клиента можно также отдельно задавать настройки доступа к локальным устройствам: принтерам, флешкам, дискам, приводам и так далее. В общем, каждый ограничен только своей фантазией, благо вариантов использования с описанием настроек в сети навалом.
Acronis
Продукты Acronis загружаются аналогично инсталляторам Linux-систем. Скачал в Сети первый попавшийся образ Acronis, исключительно в научных целях. Распаковал. Нас интересуют только два каталога: ADD12 и ATI2015. Внутри каждого каталога видим по два файла с одинаковым именем и разным расширением. Это сделано для загрузки на 32-битных и x64-системах. Если открыть файл menu.lst того же образа, можно посмотреть, что чему соответствует. Для удобства складываем True Image и Disk Director аналогичным образом. Создаем папку acronis в рабочем каталоге ( /var/lib/tftpboot ). В него копируем ADD12 и ATI2015 со всем содержимым. Для удобства продукты Acronis выносим в отдельный раздел меню, так же как и раздел Linux. В pxelinux.cfg/default добавляем:
Файл acronis приводим к такому виду:
Windows PE
Windows-образы грузить несколько сложнее. В реализации загрузки практически любого WinPE-образа с любым содержимым внутри нам поможет загрузчик WIMBoot. WIMBoot — это системный загрузчик WIM-образов по сети. Довольно хорошо о самом продукте рассказывается на сайте, там же есть ссылка на скачивание. На сайте Microsoft есть инструкция по созданию WIM-образов. Образ, с которым я работал, был щедро вручен мне нашим системным администратором с продуктами Акронис. Назывался он Acronis_WinPE_Sergei_Strelec_25.11.2013.iso . Распаковав его, увидел в папке source заветный образ acronis.wim . Для WIM-образов для большего порядка использую отдельный каталог wim. Чтобы не путаться, внутри сделал еще один каталог winpe. В него копируем acronis.wim . Еще нам потребуются два файла из каталога BOOT этого же образа: BCD, BOOT.SDI и файл BOOTMGR из корня образа. На этом образ можно закрыть, удалить, больше он не пригодится. Переходим к подготовке загрузчиков (WIMBoot и syslinux). Распаковываем куда-нибудь архив wimboot-latest.zip . Копируем загрузчик WIMBoot на сервер TFTP, для удобства в каталог boot. Поскольку образ содержит Windows PE и различное программное обеспечение, в том числе и Acronis, то отнести можно в любой раздел меню. Я расположил его в главном меню. Итак, в файл pxelinux.cfg/default вносим изменения:
Заключение
На этом всё. В следующей статье мы научимся подготавливать и добавлять Windows-образы, сетевой установке в ручном и автоматическом режимах. Добавим Kaspersky Rescue v10, ERD Commander, именуемый MSDaRT. Разберемся, как запускать диагностические утилиты на примере memtest, а также покажем, как украсить меню загрузки.

Александр «Plus» Рак
Участник сообщества OmskLUG. Инженер отдела электронного взаимодействия МКУ «Информационно-технического управления».


