- Boot server on linux
- 18.1 Introduction #Edit source
- 18.1.1 Configuring the Client Machine #Edit source
- 18.1.2 Preparation #Edit source
- 18.2 Configuring the Server #Edit source
- 18.2.1 DNS Server #Edit source
- 18.2.1.1 Configuring the DHCPv4 Server #Edit source
- 18.2.1.2 Configuring the DHCPv6 Server #Edit source
- 18.2.1.3 Deploying a TFTP server (Optional) #Edit source
- 18.2.1.4 Setting up the HTTP Server #Edit source
- 18.2.1.5 Enabling SSL Support for the HTTP Server (Optional) #Edit source
- 18.3 Booting the Client via HTTP Boot #Edit source
- Бездисковая загрузка с использованием PXE и iSCSI на примере Ubuntu
- Что необходимо?
- iSCSI-таргеты
- 1. Образ целевой системы
- 2. iSCSI-таргет
- 3. DHCP-сервер
- 4. TFTP-сервер
- 5. Syslinux
- Итоги:
- Configuring PXE Network Boot Server on Ubuntu 18.04 LTS
- Network Topology:
- Configuring the Network:
- Installing and Configuring dnsmasq:
- Installing and Configuring NFS Server:
- Installing Required PXE Boot Files:
- Preparing Ubuntu 18.04 LTS Desktop for PXE Boot:
- Adding PXE Boot Entry for Ubuntu 18.04 LTS:
- Installing Ubuntu 18.04 LTS via PXE:
Boot server on linux
This chapter describes how to set up and configure a UEFI HTTP Boot server.
18.1 Introduction #Edit source
HTTP Boot combines DHCP, DNS, and HTTP to make it possible to boot and deploy systems over the network. HTTP Boot can be used as a high-performance replacement for PXE. HTTP Boot allows to boot a server from a URI over HTTP, quickly transferring large files, such as the Linux kernel and root file system from servers outside of your local network.
18.1.1 Configuring the Client Machine #Edit source
Enabling HTTP Boot on a physical client machine depends on your specific hardware. Consult the documentation for further information on how to enable HTTP Boot on your particular machine.
18.1.2 Preparation #Edit source
The setup described here uses 192.168.111.0/24 (IPv4) and 2001:db8:f00f:cafe::/64 (IPv6) IP subnets and the server IP addresses are 192.168.111.1(IPv4) and 2001:db8:f00f:cafe::1/64 (IPv6) as examples. Adjust these values to match your specific setup.
Install the following packages on the machine that you plan to use as a HTTP Boot server: dhcp-server , apache2 (or lighttpd ), and dnsmasq .
18.2 Configuring the Server #Edit source
18.2.1 DNS Server #Edit source
While configuring the DNS server is optional, this does allow you to assign a user-friendly name to the HTTP Boot server. To set up the DNS server, add the following to the /etc/dnsmasq.conf file:
Assign a domain name to the IP addresses in the /etc/dnsmasq.d/hosts.conf file:
Start the DNS server.
Due to the change in UEFI 2.7, we recommend using a shim bootloader from SLE 15 or newer to avoid potential errors caused by the additional DNS node.
18.2.1.1 Configuring the DHCPv4 Server #Edit source
Before setting up the DHCP servers, specify the network interface for them in /etc/sysconfig/dhcpd :
This way, the DHCP servers provide the service on the eth0 interface only.
To set up a DHCPv4 server for both PXE Boot and HTTP Boot, add the following configuration to the /etc/dhcpd.conf file:
Note that the DHCPv4 server must use the HTTPClient parameter for the vendor class ID, as the client uses it to identify an HTTP Boot offer.
Start the DHCP daemon:
systemctl start dhcpd
18.2.1.2 Configuring the DHCPv6 Server #Edit source
To set up the DHCPv6 server, add the following configuration to /etc/dhcpd6.conf :
This configuration defines the type of the boot URL, the vendor class, and other required options. Similar to the DHCPv4 settings, it is necessary to provide the boot URL, which must have an IPv6 address. It is also necessary to specify the vendor class option. In DHCPv6, it consists of the enterprise number and the vendor class data (length and the content). Since the HTTP Boot driver ignores the enterprise number, you can set it to 0 . The content of the vendor class data has to be HTTPClient ; Otherwise, the client ignores the offer.
The older HTTP Boot implementation, which does not follow RFC 3315, requires a different configuration:
Start the dhcpv6 daemon.
18.2.1.2.1 Setting up the DHCPv6 Server for Both PXE and HTTP Boot #Edit source
Using the following configuration, it is possible to configure the DHCPv6 server for both PXE Boot and HTTP Boot:
It is also possible to match the vendor class to a specific architecture, as follows:
In this example, HTTPClient:Arch:00016 refers to a x86_64 HTTP Boot client. This configuration allows the server to serve different architectures simultaneously.
18.2.1.2.2 Configuring Firewall #Edit source
If DHCPv6 packets are dropped by the RP filter in the firewall, check its log. In case it contains the rpfilter_DROP entry, disable the filter using the following configuration in /etc/firewalld/firewalld.conf :
18.2.1.3 Deploying a TFTP server (Optional) #Edit source
To provide support for both PXE Boot and HTTP Boot, deploy a TFTP server. Install the tftp and start the service:
It is also necessary to install a specific tftpboot-installation package for use with PXE Boot. Run the zypper se tftpboot command, to list of the available tftp-installation packages, then install the package for the desired system version and architecture, for example tftpboot-installation-SLE-15-SP2-x86_64 For example, tftpboot-installation-SLE- VERSION-x86_64 (replace VERSION with the actual version). Copy the content of the SLE- VERSION-x86_64 directory to the root directory of the TFTP server:
For more information, refer to /usr/share/tftpboot-installation/SLE- VERSION-x86_64/README
18.2.1.4 Setting up the HTTP Server #Edit source
Copy the entire content of the first system ISO image to the /srv/www/htdocs/sle/ directory. Edit then the /srv/www/htdocs/sle/grub.cfg file. Use the following example as a reference:
18.2.1.4.1 Configuring lighttpd #Edit source
To enable the support for both IPv4 and IPv6 in lighttpd, modify /etc/lighttpd/lighttpd.conf as follows:
Start the lighttpd daemon:
18.2.1.4.2 Configuring apache2 #Edit source
Apache requires no additional configuration. Start the apache2 daemon:
18.2.1.5 Enabling SSL Support for the HTTP Server (Optional) #Edit source
To use the HTTPS Boot, you need to convert an existing server certificate into the DER format and enroll it into the client’s firmware.
Assuming you already have a certificate installed on your server, convert it into the DER format for use with the client using the following command:
18.2.1.5.1 Enroll The Server Certificate into the Client Firmware #Edit source
The exact procedure of enrolling the converted certificate depends on the specific implementation of the client’s firmware. For certain hardware, you have to enroll the certificate manually via the firmware UI using an external storage device with the certificate on it. Machines with Redfish support can enroll the certificate remotely. Consult documentation for your specific hardware for more information on enrolling certificates.
18.2.1.5.2 Enabling SSL Support in lighttpd #Edit source
Since lighttpd needs the private key and the certificate in the same file, unify them using the following command:
Copy CERTIFICATE.pem to the /etc/ssl/private/ directory.
Make sure that mod_openssl is listed in the server.modules section of the /etc/lighttpd/modules.conf file, for example:
Add the following lines to SSL Support section in /etc/lighttpd/lighttpd.conf :
Restart lighttpd to activate SSL support:
18.2.1.5.3 Enabling SSL Support in Apache #Edit source
Open the /etc/sysconfig/apache2 file and add the SSL flag as follows:
Make sure that the ssl module is listed in APACHE_MODULES , for example:
Next, copy the private key and the certificate to the /etc/apache2/ directory.
Create the ssl vhost configuration.
Edit /etc/apache2/vhosts.d/vhost-ssl.conf to change the private key and the certificate:
Restart apache to activate the SSL support:
18.2.1.5.4 Modify the DHCP configuration #Edit source
Replace the http:// prefix with https:// in dhcpd.conf/dhcpd6.conf and restart the dhcp server.
18.3 Booting the Client via HTTP Boot #Edit source
If the firmware already supports HTTP Boot, plug in the cable and choose the correct boot option.
Источник
Бездисковая загрузка с использованием PXE и iSCSI на примере Ubuntu
В этой статье будет рассказано, как запилить сервер, который будет при включении грузиться по PXE, потом монтировать корневую файловую систему по iSCSI и спокойно жить дальше.
Что необходимо?
Для загрузки системы нужны три компонента: ядро, initramfs и корневая файловая система.
Ядро и initramfs мы передадим по TFTP, а корневую файловую систему — по iSCSI.
iSCSI-таргеты
Для Ubuntu возможно использовать различные iSCSI-таргеты. Вот неполный их список:
- ISCSI Enterprise Target — одна из самых старых реализаций iSCSI-таргета на Linux. Насколько мне известно, жива и здравствует, однако требует установки (в Ubuntu) через DKMS и совсем лёгкого дребезга бубнов. На opennet.ru есть рабочий HOWTO, применимый и к более поздним версиям ОС (Precise)
- SCSI Target Framework (STGT/TGT) — реализация iSCSI-таргета, портированная из BSD-систем. В отличии от IET, позволяет использовать не только iSCSI, но и другие родственные технологии (такие, как, например, SRP). К сожалению, код STGT в части iSCSI в линуксе работает в userspace. Как следствие, производительность получается где-то в районе плинтуса.
- SCST — новая реализация универсального таргета для Linux. По заявлениям разработчиков обладает массой преимуществ и фишек. В ядро не включена, для установки требует патчей исходников ядра и продолжительного зубодробительного секса. По слухам, мила, прекрасна и похожа на сакуру. Когда-то давно ее использовали, например, в Оверсан-Скалакси (их опыт вкратце описан на хабре). Пакеты для Ubuntu перестали поддерживаться около полутора лет назад, в SVN есть некоторая активность, то есть проект жив и здравствует. Кстати, разработчики — русские парни 🙂
- LIO — Linux Unified Target, универсальная система, реализующая iSCSI, SRP, FCoE и несколько других вариантов экспорта устройств в сеть. Официально включена в ядро и является стандартным таргетом, начиная с версии 2.6.38. К ней есть определенные претензии в плане того, что на официальном сайте активно продвигается проприетарная сборка, обладающая большим функционалом, но оставим вопли RMS.
Я буду пользоваться LIO, но ничто не мешает реализовать аналогичный функционал на другом таргете или на проприетарной промышленной СХД, вроде NetApp или EMC.
Вариант, предлагаемый ниже, состоит из двух серверов: таргета, который дополнительно к iSCSI-таргету содержит на себе DHCP и tftp-сервер, необходимые для начальной загрузки и инициатора, у которого дисков нет, а есть только сетевая карта.
На таргете желательно использовать LVM для нарезания томов, но можно использовать и обычные файлы.
1. Образ целевой системы
Создадим том размером 16 ГиБ, который будет отдаваться по iSCSI (моя VolumeGroup называется vg00, том будет называться client):
1.1. Разделы и файловые системы
Я люблю и уважаю LVM за его гибкость и удобство в работе, поэтому использую сетап, не требующий таблицы разделов на образе client. Вместо этого сразу на client создаётся еще одна VolumeGroup, которая потом режется на lv-тома.
Создадим файловую систему и разметим раздел под swap:
1.2 Сам образ системы
Примонтируем файловую систему и развернем туда с помощью debootstrap минимальный образ:
Стоит слегка подправить получившуюся систему:
Обратите внимание, мы заменили initiatorname.iscsi. IQN — это iSCSI Qualified Name, он обязательно должен быть уникальным. IQN нашего инициатора — iqn.2013-02.org.example.client:default.
Приведем fstab к нужному виду:
Чтобы не оказаться в глупом положении, нужно изменить пароль в новой системе.
Отмонтируем rootfs и деактивируем группу томов, чтобы случайно ее не задеть:
Образ системы готов! Загрузчик ему не нужен, ядро будет запускаться с помощью pxelinux.
2. iSCSI-таргет
Установим userspace-утилиты для управления таргетом:
И запустим утилиту управления таргетом — targetcli:
2.1. Backstore
Находясь в консоли targetcli необходимо выполнить следующие команды:
Таким образом будет создан backstore для нашего тома vg00-client.
2.2. iSCSI
Назначим предварительно созданный backstore этому таргету:
Назначим таргету интерфейс для работы (без указания параметров назначатся все активные интерфейсы):
Настроим права доступа (документация по правам доступа доступна на официальном сайте:
2.3. Сохранение настроек
Несмотря на то, что действия в targetcli выполняются немедленно, они не сохраняются и после перезагрузки все таргеты не вернутся. В этом поведение LIO похоже на поведение любых других ядерных служб (iptables, ebtables, ipvsadm и т. п.). При сохранении настроек targetcli компилирует всю конфигурацию в shell-скрипт, который просто скармливает нужные данные в configFS.
Сохраним все настройки:
Таргет готов! Перейдем к настройке DHCP + TFTP.
3. DHCP-сервер
Предполагаем следующую конфигурацию:
Серверы живут в сети 10.0.0.0/24, таргет живет на 10.0.0.2, клиент получает по DHCP адрес 10.0.0.5.
Мануалов в сети море, поэтому коротко:
4. TFTP-сервер
Опять же, мануалов в сети море.
5. Syslinux
Копируем pxelinux.0 в /var/lib/tftpboot:
Также нам необходим образ ядра (можно взять с хост-системы). Сейчас у меня используется ядро от Ubuntu версии 3.2.0.37:
Дальше нужно собрать правильный initramfs. Для этого нам нужен модуль iSCSI:
Pxelinux будет искать файл с конфигурацией в директории pxelinux.cfg относительно корня tftp-сервера. Создадим ему конфигурацию:
Вместо XX необходимо подставить MAC-адрес сетевой карты client’а, записанный в нижнем регистре через минусы, а не через двоеточия.
Логин и пароль здесь необходимо использовать те же, что были указаны при настройке прав доступа к таргету.
Настройка Syslinux закончена. Теперь можно насладиться загрузкой 🙂
Мой лог загрузки выглядит примерно так:
Итоги:
Можно вполне использовать iSCSI для загрузки серверов, не имеющих своих дисков (актуально для виртуализации, самопильных систем хранения данных, серверов, которые не должны долго жить и т.п.).
Есть другой вариант, использовать инициатор, встроенный в сетевую карту. Такой подход иногда бывает невозможен по различным причинам (самая банальная — отсутствие необходимого функционала в самой карточке), а также обладает несколько меньшей гибкостью.
Присутствует security-hole, поскольку /proc/cmdline доступен любому желающему в системе и этот любой желающий может получить доступ к экспортированному тому. Поэтому можно на таргете закрыть фаерволом все адреса, кроме необходимого.
Описанная схема — по большей части драфт и основа для инфраструктуры сетевой загрузки.
Источник
Configuring PXE Network Boot Server on Ubuntu 18.04 LTS
In this article, I am going to show you how to configure PXE boot server on Ubuntu 18.04 LTS and boot into Ubuntu 18.04 LTS Desktop Live installer and install it on a computer over the network. So, let’s get started.
Network Topology:
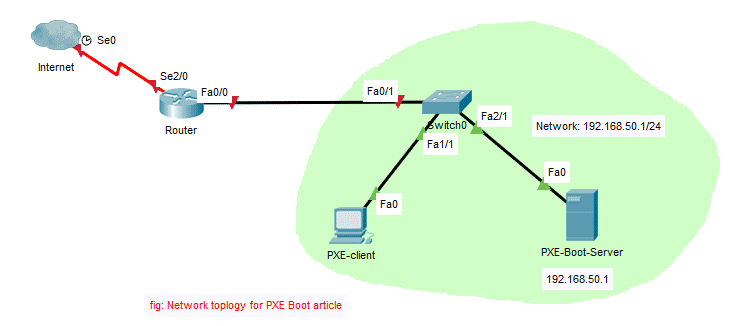
Here, I will configure a PXE boot server in the network. The boot server will also work as a DHCP server. Then, I will boot a Linux Live OS (Ubuntu 18.04 LTS Desktop) on the PXE-client and install Ubuntu 18.04 LTS Desktop there over the network.
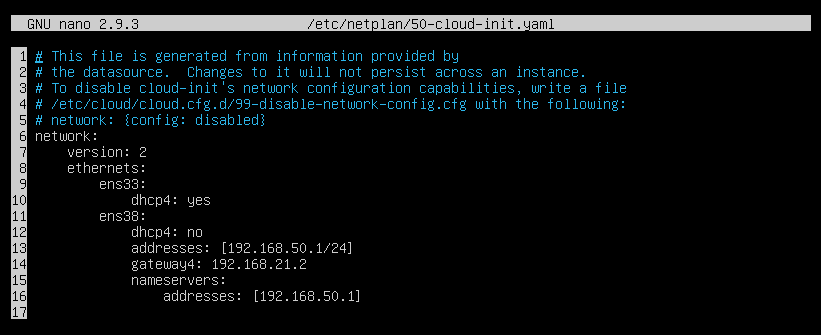
Configuring the Network:
I’ve configured the PXE boot server with a fixed IP address 192.168.50.1 using netplan. I’ve configured netplan as follows:

As you can see, the fixed IP address 192.168.50.1 is configured on ens38 interface.
Installing and Configuring dnsmasq:
In this article, dnsmasq will act as a DHCP server and TFTP server of the network.
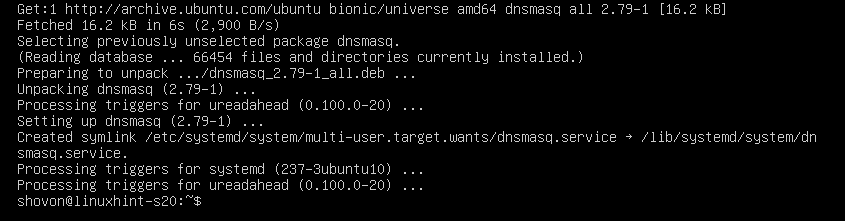
dnsmasq is not installed on Ubuntu 18.04 by default. So, install dnsmasq with the following command:

dnsmasq should be installed.
Now, rename the original /etc/dnsmasq.conf file to /etc/dnsmasq.conf.backup as follows:

Now, create an empty dnsmasq.conf file with the following command:

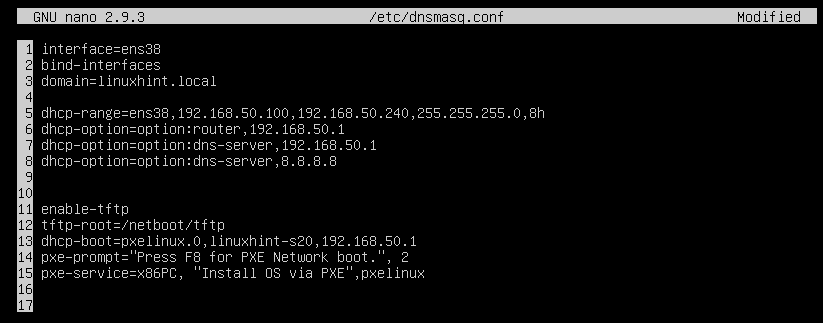
Now, type in the following lines:
interface =ens38
bind-interfaces
domain =linuxhint.local
dhcp-range=ens38,192.168.50.100,192.168.50.240,255.255.255.0,8h
dhcp-option=option:router,192.168.50.1
dhcp-option=option:dns-server,192.168.50.1
dhcp-option=option:dns-server,8.8.8.8
enable-tftp
tftp-root= / netboot / tftp
dhcp-boot=pxelinux.0,linuxhint-s20,192.168.50.1
pxe-prompt= «Press F8 for PXE Network boot.» , 2
pxe-service=x86PC, «Install OS via PXE» ,pxelinux
The final configuration file should look as follows. Once you’re done typing in everything, save the configuration file by pressing + x followed by y and .
Now, create the tftp-root directory /netboot/tftp with the following command:

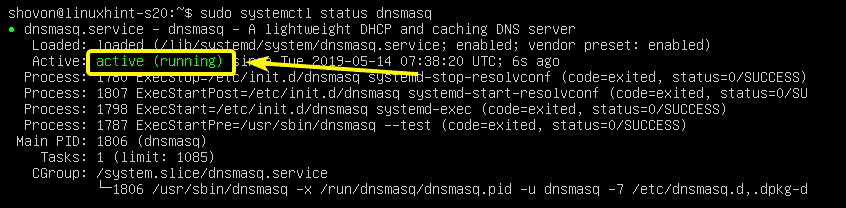
Now, restart the dnsmasq server as follows:

Now, check whether dnsmasq service is running as follows:
As you can see, dnsmasq service is running. So, it’s configured correctly.
Installing and Configuring NFS Server:
Ubuntu 18.04 LTS Desktop uses casper to boot into Live DVD mode. casper supports network boot via NFS only. So, in order to boot Ubuntu 18.04 LTS and any Ubuntu derivatives via PXE, you need to have a fully functional NFS server accessible over the network.
To install NFS server, run the following command:

NFS server should be installed.

Now, create a new directory /netboot/nfs to share via NFS as follows:

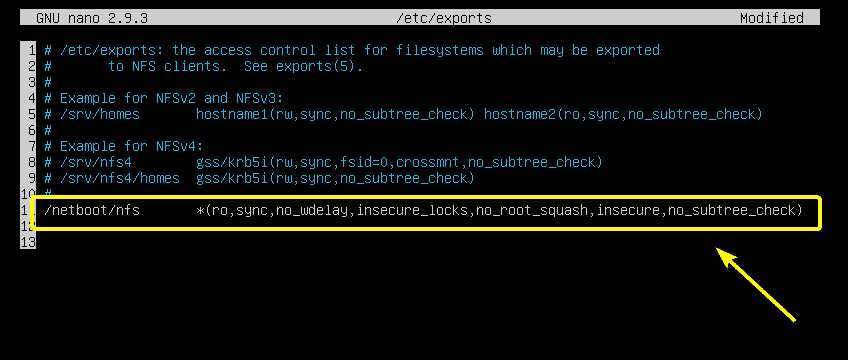
Now, open the /etc/exports configuration file as follows:

Now, add the following line at the end of the file:
The final configuration file should look as follows. Once you’re done, save the file.
Now, make the share available with the following command:

Installing Required PXE Boot Files:
Now, you have to install all the required bootloader files for PXE booting. To do that, run the following command:

Now, you have to copy all the required files to the /netboot/tftp/ directory.
Copy the pxelinux.0 file to the /netboot/tftp directory as follows:

Now, copy ldlinux.c32, libcom32.c32, libutil.c32, vesamenu.c32 files to the /netboot/tftp directory as follows:

Now, create PXE bootloader configuration directory /netboot/tftp/pxelinux.cfg/ as follows:

Now, create PXE bootloader’s default configuration file /netboot/tftp/pxelinux.cfg/default as follows:

TFTP server is now able to serve all the required bootloader files over the network.
Preparing Ubuntu 18.04 LTS Desktop for PXE Boot:
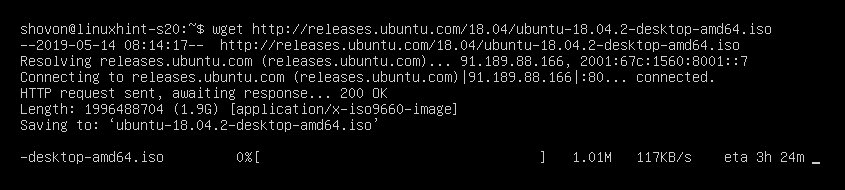
Now, download the Ubuntu 18.04 LTS Live Desktop ISO image with the following command:

It will take a while to complete.
Once the ISO image file is downloaded, mount the ISO file on the /mnt directory as follows:

Now, create dedicated directories for Ubuntu 18.04 LTS /netboot/nfs/ubuntu1804/ and /netboot/tftp/ubuntu1804/ as follows:

Now, copy the contents of the ISO file to the NFS directory /netboot/nfs/ubuntu1804/ as follows:

The contents of the ISO file should be copied.

Now, copy the vmlinuz and initrd files to the /netboot/tftp/ubuntu1804/ directory as follows:

Now, change the permission of the /netboot directory as follows:

Now, you can unmount the Ubuntu 18.04 LTS ISO image and delete it if you want.
Adding PXE Boot Entry for Ubuntu 18.04 LTS:
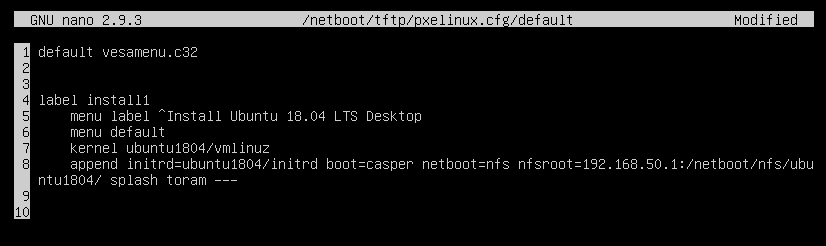
Now, you have to add a boot entry for Ubuntu 18.04 LTS on the /netboot/tftp/pxelinux.cfg/default file.
Open the PXE boot menu configuration file /netboot/tftp/pxelinux.cfg/default for editing as follows:

Now, add the following lines to the file.
label install1
menu label ^Install Ubuntu 18.04 LTS Desktop
menu default
kernel ubuntu1804 / vmlinuz
append initrd =ubuntu1804 / initrd boot =casper netboot =nfs nfsroot =192.168.50.1: /
netboot / nfs / ubuntu1804 / splash toram —
The final configuration file should look as follows. Now, save the configuration file.
Installing Ubuntu 18.04 LTS via PXE:
Now, on the PXE client where you want to install Ubuntu 18.04 LTS over the network via PXE, go to the BIOS and network Network Boot.
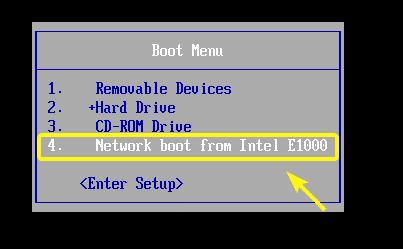
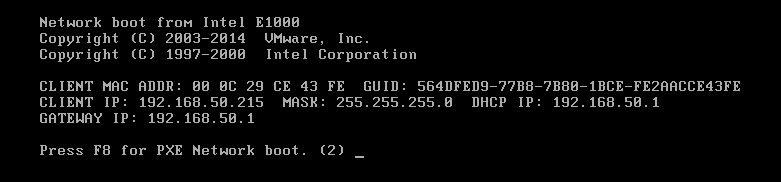
When you see the following message, press on your keyboard.
Now, select Install OS via PXE and press .
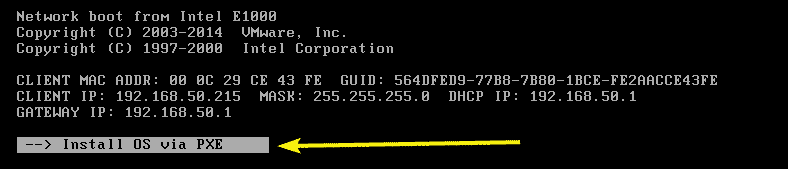
You will only have one option. So, just press .
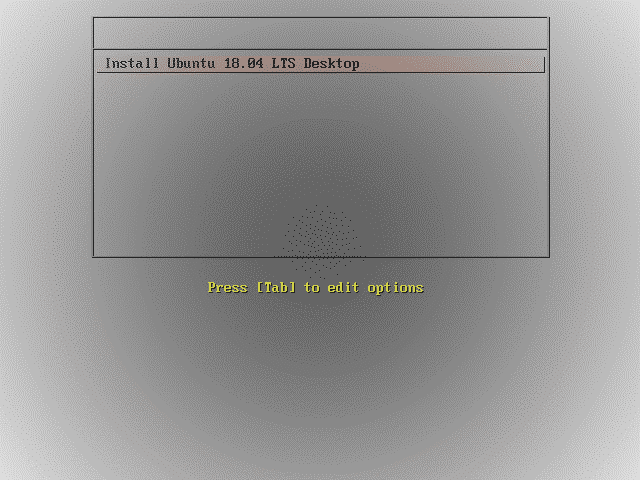
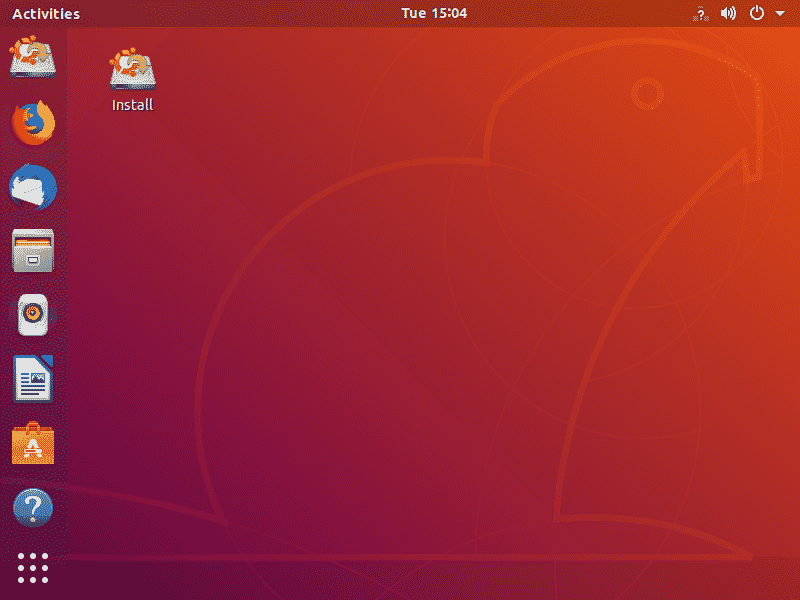
As you can see, Ubuntu 18.04 LTS splash screen is displayed. It’s loading. It may take a while depending on the speed of your network connection.

Ubuntu 18.04 LTS should be loaded. Now, you can install it on your client machine.
So, that’s how you configure PXE network boot server on Ubuntu 18.04 LTS. Thanks for reading this article.
Источник


