Как установить Windows 10 на ноутбук Asus с UEFI (на примере модели ZenBook UX310UA)
 Доброго времени суток.
Не так давно ко мне попал один компактный ноутбук, с жалобой о невозможности установки ОС Windows 10 (вылетала ошибка «Установка Windows на данный диск невозможна. Возможно оборудование данного компьютера. » ). Что же, пришлось разбираться.
На самом деле, проблема была (я так думаю) связана с тем, что пользователь неправильно создал загрузочный носитель и пытался с него установить систему. Хотя, сразу отмечу, что в некоторых случаях виной могут быть и неверные настройки BIOS/UEFI.
В этой статье я покажу на пошаговом примере установку ОС на ноутбук ASUS ZenBook UX310UA (добавлю, что на многих ноутбуках ASUS, тем более из этой линейки – действия будут аналогичны).
Установка Windows 10 на ноутбук ASUS
Создание загрузочной флешки
Для работы необходима утилита Rufus и загрузочный образ с ОС Windows 10.
Маленькая, но очень многофункциональная утилита для создания загрузочных накопителей. Позволяет создавать флешки для BIOS и UEFI (для GPT и MBR дисков), с разными ОС (Windows 10 поддерживается!). К тому же, она полностью бесплатна, и поддерживает русский язык.
2. Образ ISO с Windows 10
Требования: образ нужен, размер которого не превышает 4 ГБ. Во-вторых, отбросьте сразу различные «20 в 1» — нужен простой вариант, например, «Windows 10 x64 home» — т.е. в образе одна конкретная система (т.е. не использовать никаких «Win 10 home/Pro/Ent x32 + x64, 5 in 1») . Таких образов в сети достаточно много. (например, можно скачать на официальном сайте Microsoft).
И так, вставляем флешку и запускаем Rufus ( Важно! все данные на флешке будут удалены, поэтому скопируйте всё нужное с неё) .
Далее, укажите образ ISO (рекомендованный к установке выше), затем выберите вариант «GPT для компьютеров с интерфейсом UEFI» (файловая система — FAT 32) , «Стандартная установка Windows». Нажмите кнопку «Старт» (настройки представлены на скрине ниже).
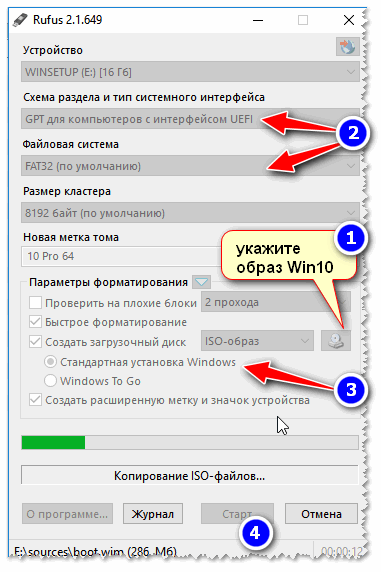
Настройки Rufus 2.1
Обновление от 24.01.2019 (т.к. программа Rufus несколько обновилась, и у нее изменился дизайн — приведу еще один скрин для версии 3.4, чтобы никто не путался) .
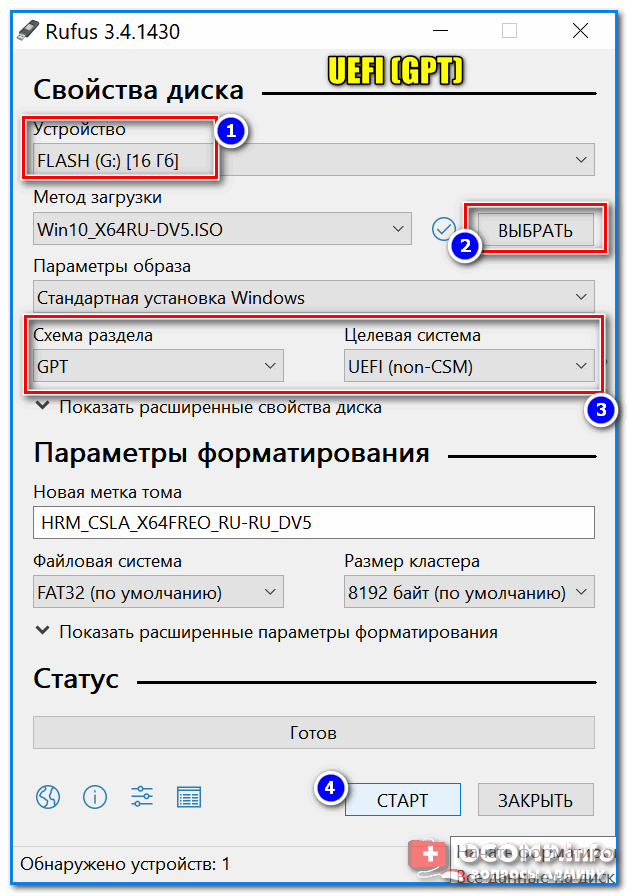
Rufus — создание флешки под UEFI (GPT)
В общем-то, флешка готова, можно идти дальше.
 Как создать загрузочную UEFI GPT флешку с Windows 10, или почему при установке системы на новый ноутбук (ПК) возникают ошибки – инструкция для начинающих.
Загрузка оптимальных настроек в BIOS – входим в загрузочное меню.
Не всегда настройки BIOS выставлены по умолчанию (дефолтные). Поэтому, прежде всего рекомендую зайти в BIOS и восстановить их.
Кстати, предварительно сразу же можете подключить созданную в предыдущем шаге загрузочную флешку. Рекомендую подключать к порту USB 3.1 (установка пройдет быстрее, особенно, если ваша флешка поддерживает сей стандарт).
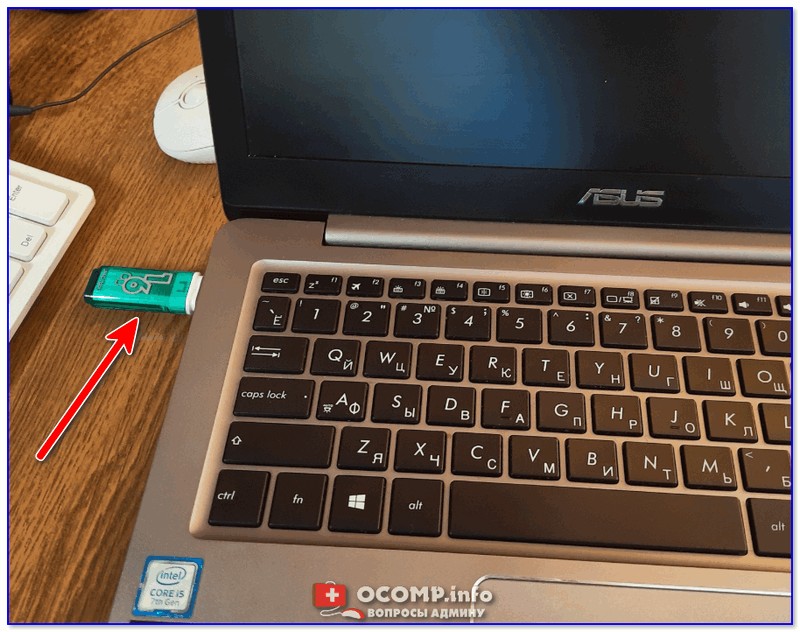
Подключаем флешку к USB 3.1 порту (установка пройдет быстрее!)
Чтобы войти в BIOS , сразу же после включения ноутбука (должен появиться фирменный логотип ASUS) нажимайте клавишу F2 (лучше несколько раз, чтобы наверняка. ).
В BIOS (UEFI): первым делом зайдите в Advanced Mode (клавиша F7) — см. нижнюю часть окна. 👇
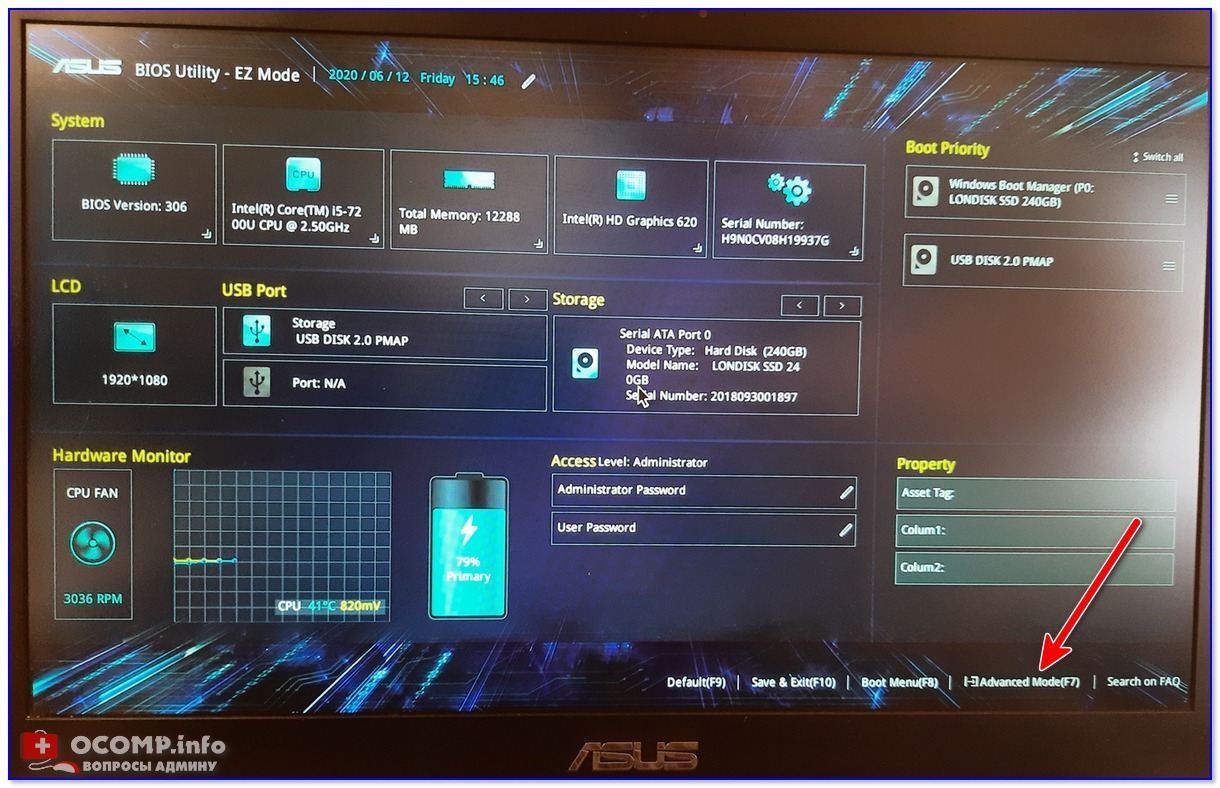
Advanced Mode (клавиша F7)
В разделе «Save & Exit» выберите функцию «Restore Defaults» (восстановление настроек по умолчанию). Затем сохранить изменения — кнопка «Save Changes» (можно просто нажать кнопку F10 — после чего все изменения будут сохранены и ноутбук уйдет на перезагрузку — снова войдите в BIOS клавишей F2).
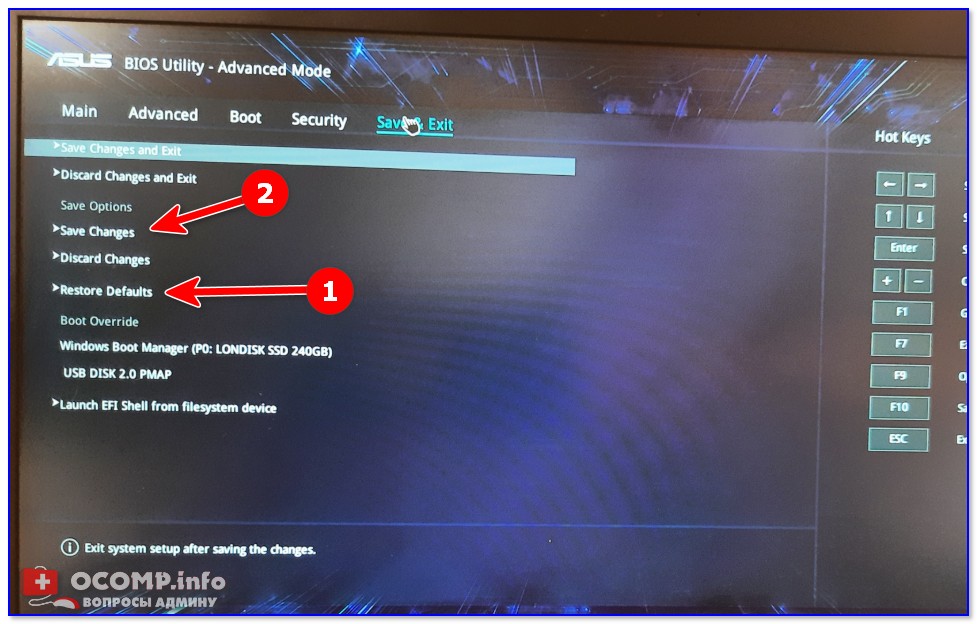
Restore Defaults — восстанавливаем настройки на по умолчанию
После восстановления настроек, войдя снова в главное окно BIOS (UEFI), нажмите кнопку F8 (вход в Boot Menu) . В нем вы должны увидеть нашу флешку – выбираем ее и жмем Enter.
Примечание: в загрузочном меню у вас (вероятнее всего) должно отображаться 2 строчки с названием установочной флешки. Нужно выбрать ту, напротив которой значится «UEFI OS» (👇).
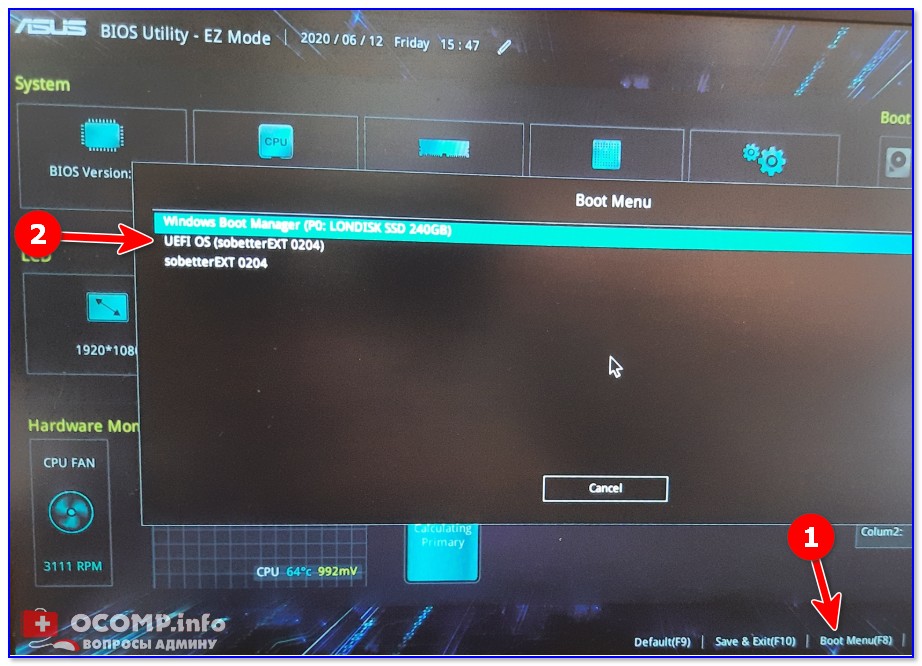
Boot Menu — выбираем загрузочный носитель
Далее ноутбук обязан начать установку Windows – по центру экрана должен забегать «кружок».
Если установки не происходит – проверьте, правильно ли вы записали установочную флешку, и задали настройки UEFI.
Процесс установки Windows 10
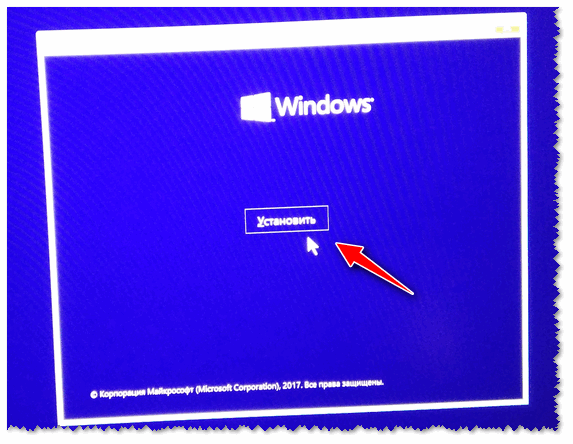
Первое окно – это приветствие с выбором языка (его я опустил, просто нажмите Enter). В следующем окне — нажмите кнопку «Установить» .
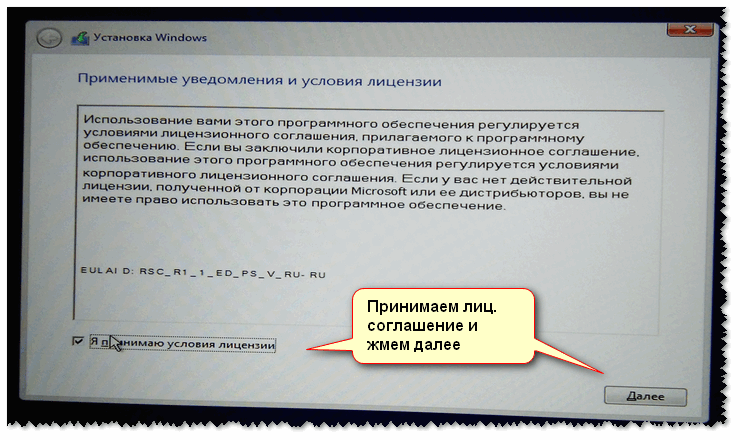
Далее появится окно с условиями лицензии — соглашаетесь и жмете «далее».
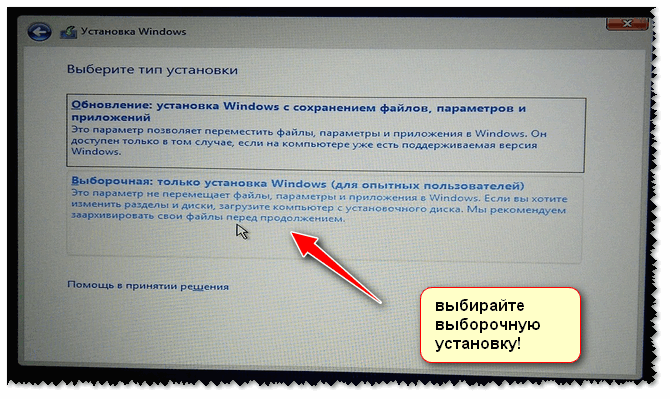
В окне с выбором варианта установки укажите «Выборочная: только установка Windows (для опытных пользователей)».
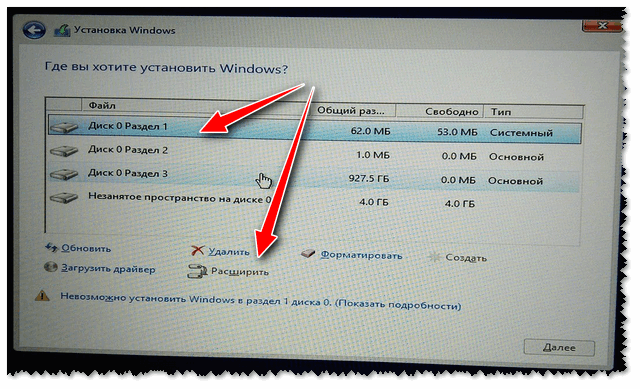
Далее самое важное окно — где задается диск под установку Windows. Вообще, я рекомендую удалять полностью все что есть на диске (все, что шло с магазина), и производить чистую установку Windows 10.
В некоторых случаях переустановка ОС может быть причиной в отказе гарантийного обслуживания (хотя, это довольно редко, но все же. Чаще всего, гарантия дается на «железо», а ПО можно ставить любое. ).
удаление всех разделов на жестком диске
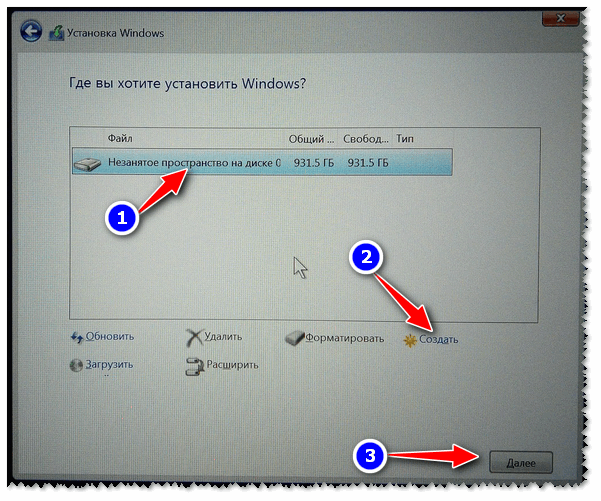
После чего, на весь диск можно создать один раздел и произвести в него установку (некоторые рекомендуют создавать два раздела — один под установку ОС Windows, другой — под пользовательские данные). Если создадите два раздела — то под Windows рекомендую выделить места, как минимум, на 100 ГБ.
В своем случае, я просто создал один раздел на весь диск (931,5 ГБ) и нажал «Далее» .
Создание раздела для Windows
Boot Menu — выбираем загрузочный носитель, если на этом шаге вы увидите ошибку, что «установка Windows на данный диск невозможна. » (см. скрин ниже) — то вы, скорее всего, неправильно создали загрузочную флешку (см. первую часть этой статьи). Также возможно, что вы скачали «некорректный» образ ISO с системой.
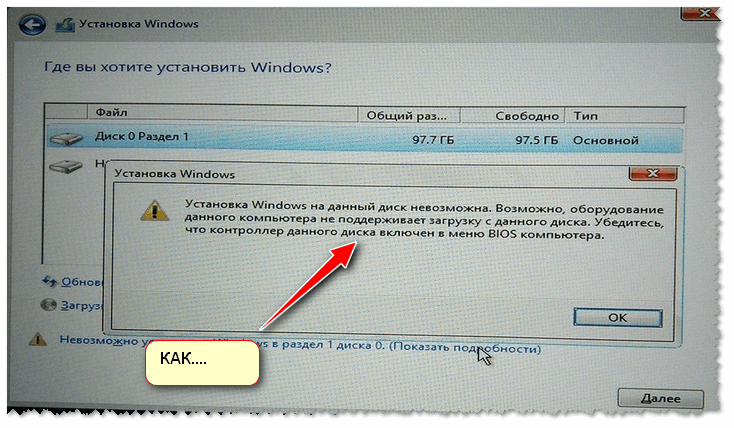
ошибка о невозможности установки
Собственно, если все хорошо — должна начаться установка Windows. Здесь нужно просто ждать, пока буду копироваться файлы (если подключили флеш-накопитель к USB 3.1 — то ждать недолго, минут 5-6).
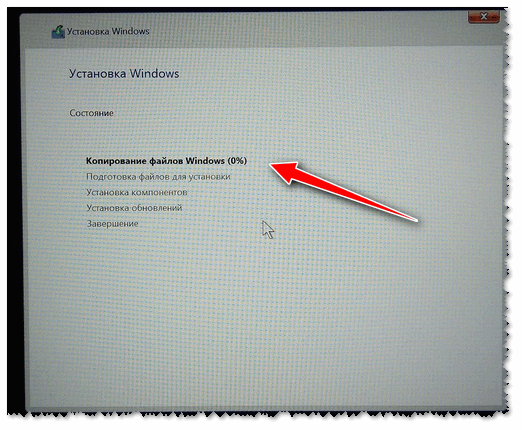
Пошло копирование файлов
Когда файлы будут скопированы, ноутбук перезагрузится и установка будет продолжена. Перед вами появится несколько окон: но в них нет ничего интересного, нужно будет ввести имя пользователя, задать настройки сети (также можно пропустить все шаги и сделать это после).
Все эти окна я опустил, т.к. практического интереса они не представляют, и думаю, что с ними все справятся и самостоятельно.
Собственно, на этом установка завершена. Дальше можно приступать к установке драйверов (в моем случае было достаточно зайти на официальный сайт вот на эту страничку: https://www.asus.com/ru/Laptops/ZenBook-Classic-Series-Products/ ).
Но честно говоря, я на всякий случай также прибегнул к Drive Booster и за доп. 5 минут обновил не только драйвера, но и всякие библиотеки: DirectX, Visual C++, Net FrameWork и пр. (никуда не входя и ничего не ища ) .

Небольшое видео с последовательностью установки Windows на устройство от ASUS.
На этом пока всё.
Дополнения в комментариях – приветствуются.
Thread: Guide: How to install windows 8/8.1/10 The proper way (UEFI based installation)
Thread Tools
Search Thread
Display
ROG Guru: Blue Belt Array Gps3dx PC Specs
| Gps3dx PC Specs | |
| Laptop (Model) | Current: G751JT | Retired: G55VW, G51JX |
| Motherboard | Inc M.2 slot |
| Storage #1 | Samsungs EVO 850 128GB |
| Storage #2 | 1TB HGST Travelstar 7K1000 (HTS721010A9E630) |
| CPU Cooler | Mother Nature & Thermodynamics laws |
| Mouse | Logitech MX 518 |
| Headset/Speakers | Logitech T6060 |
| OS | Cleaned installed Windows 10 HOME x64 |
| Accessory #1 | Leap Motion |
Join Date Feb 2015 Reputation 71 Posts 785
[GUIDES] Windows COMPLETE «How To»: Clean/Upgrade Install, Drivers
ALL IS WIP — I NEED TO MOVE ALOT OF STUFF AROUND .
How to install windows 8/8.1/10 on any UEFI & AHCI supported laptop
( E.I G751, G771, G551 GL552 etc) the PROPER way
I.E: on a GPT formatted disk, booted with UEFI
The «why should I bother» ?
you’ve got ROG Laptop, best in the market, fitted with UEFI, «the newest form of BIOS». ( READ MORE HERE )
No reason to work with OS that is installed on a MBR formatted drive that’s running on a BIOS emulated machine (like some preinstalled windows), if you wish the fastest laptop, OS & applications !
OS on a GPT formatted disk, booted with UEFI, is BETTER THEN MBR & BIOS !
Why ?
- Way Faster OS boot (I.E POST), with NO blinking underscore !
- Better (auto) chances to recover info from bad/damaged sector/block !
(Partition table is redundantly stored, checked using CRC) - No 2TiB limit on HDD size
- and MORE: READ MORE HERE & HERE
In my opinion win 10 is faster in desktop/office work ( gaming: depends ) but the down side is the privacy headache.
There are multiple scripts you MUST run, if you care about your own privacy! (see few post below,WIP!)
Win8.1 is a bit slower in desktop/office use, but does NOT have such privacy «spying» as win 10.
Any way you choose, you MUST install it on a GPT formatted drive, and MUST boot the OS installation disk/usb through a «special» boot method ( I.E UEFI boot ).
HERE’s A Benchmark review
There are multiple apps to format&create the required partitions, including the one during windows installation process.
The latter, creating more partitions then what most of consumers really needs !
Windows installer format a GPT based drive like that: 
- «Windows» is the OS partition — a MUST HAVE partition of course
- MSR is «MS reserve partition» — a MUST HAVE partition that is there in-order to: READ HERE.
for win8.1 MSR MIN size recommended by MS to be 128MB, inwin10 is recommended to be 16MB. As common users does NOT utilize any of the features that require the MSR partition, it’s advisable to use the MIN recommended size by MS. - «System» partition is the where the «EFI» supported windows-boot-files sit, therefore — a MUST HAVE partition of course.
- «Windows RE tools» — is important IN MOST CASES if you use windows built-in drive encryption. READ MORE HERE.
As I KNOW by experience that win7,8.1,10 CAN WORK WITHOUT «Windows RE tools» partition -> «Windows RE tools» partition is NOT necessary !!
300 MB ) and one less partition to be shown when you look at the partition map/list.
- 1st, boot into windows recovery environment, and open CMD -> write «diskpart» -> enter -> wait for it to load.
( «How to» guide HERE ) - VERY IMPORTANT: inside «diskpart», write: «list disk» to see all your disks.
Note the disk number of the disk you wish to format.
Write «select disk #» where # = disk number you wish to format. - ONLY THEN perform the following commands: (lines start with «rem» are notes. NOT commands!)
clean
rem == Note: ALERT AGAIN ! THIS COMMAND WILL WIPE YOUR DRIVE CLEAN !
convert gpt
rem == Note: convert your MBR based drive to GPT based drive
create partition efi size=100
rem == Note: «size=100» meaning the partition size will be 100MBytes
format quick fs=fat32 label=»System»
assign letter=»S»
rem == Note: replace the following «#» with a number as follows: #=128 for win8.1 | #=16 for win10
create partition msr size=#
rem == Note: For the following command(in white):
rem == Note: this way all the rest of the disk space will be «C»/windows OS partition.
rem == Note: if you wish to have another partitions ( E.I for file storage/archive) add a «size=#»
rem == Note: after the word «primary», where «#» is a number, the size in Mbytes of your
rem == Note: Windows OS partition, I.E the rest of the free space will be the other partition you
rem == Note: choose to have.
rem == Note: To be more precise, that next line of command might be:
rem == Note: create partition primary size=#
create partition primary
format quick fs=ntfs label=»Windows»
assign letter=»W»
exit
rem == Note: to quite diskpart utility, input another exit will close the CMD window and you’ll be return to the previous screen, which you must reboot afterward in order to accomplish the next step
- NOTE: if you create additional partition after the «windows» partition, you can format it now, or after the OS installation, through the «disk management» utility -> it really doesn’t matter to the OS installation procedure, but it’s best to leave it to later, just to prevent you from massing the disk structure, if you don’t know what you’re doing.
Last edited by Gps3dx; 08-22-2016 at 10:46 AM .
ROG Guru: Blue Belt Array Gps3dx PC Specs
| Gps3dx PC Specs | |
| Laptop (Model) | Current: G751JT | Retired: G55VW, G51JX |
| Motherboard | Inc M.2 slot |
| Storage #1 | Samsungs EVO 850 128GB |
| Storage #2 | 1TB HGST Travelstar 7K1000 (HTS721010A9E630) |
| CPU Cooler | Mother Nature & Thermodynamics laws |
| Mouse | Logitech MX 518 |
| Headset/Speakers | Logitech T6060 |
| OS | Cleaned installed Windows 10 HOME x64 |
| Accessory #1 | Leap Motion |
Join Date Feb 2015 Reputation 71 Posts 785
- Use windows that came when you purchase the laptop and plan to reinstall -> you need OEM channel !
- Bought a Retail copy ?(I.E physical disk/usb copy of windows) -> you need Retail channel
- plan to format & reinstalling same version ? CHECK your current edition
- plan to free-upgrade to win10 ? CHECK HERE what you’re going to have
- got a multiple-edition disk ? leave [EditionID] empty !
- make sure [VL] is 0.
Got your laptop from big organization ? -> ask your admin if your windows is VL licensed
NOTE: If you’ve performed the «advanced/manual method» you should NOT format any partition/drive from that screen, as it will change the disk structure and add unnecessary partitions as I explained above !
Q:«How do I know if I have NOT successfully boot windows installation in UEFI supported mode ?»
A: When you arrive to «Where to install windows» screen, if you get an alert at the bottom like the following image -> read and DO steps 4 then 5 again !
487,000,000 search results.
READ HERE, HERE, HERE, HERE, HERE or just Google it.
What can you do to protect yourself ?
1st KNOW THAT YOU CAN NEVER BE 100% proof, once connected to the internet.
This is true for ANY OS !
The best you can do is to make it REALLY HARD for others to «spy» on you.
follow the next (optional) few steps to stop (as best as possible) this unwelcome privacy invasion:
After installing windows 10 and before creating your account
(@gps3dx remarks: I.E: During «GET GOING FAST» screen (step 15 HERE))
open cmd.exe with Shift + F10
then. use Sc.exe to delete the 2 services by running this in CMD:
- «GIVE ME BACK MANUAL WINDOWS UPDATES !», aka «Windows Update MiniTool»
That’s a famous app from «MydigitalLife.info» ( closed forum, only register can read ) — which is, IMHO, the BEST forum out there for MS stuff ( windows/office etc.. ).- Although originally the UI was written in russian, the app has English support.
To get it, you need to get the translation file, which must sits in the same folder as the exe. - Main Features:
- That app can allow to MANUALLY CONTROL WINDOWS UPDATES ON WIN10 HOME ED !
(pick in the lower left side under «automatics updates» -> Disabled) - One can put any update in a «hidden» list, so windows update won’t install it at all !
- That app can allow to MANUALLY CONTROL WINDOWS UPDATES ON WIN10 HOME ED !
- Although originally the UI was written in russian, the app has English support.
- 1 Button to remove MS «spying-ware» — aka DWS
DOWNLOAD & SOURCE HERE
DWS allows you to block, wipe, and get rid of many, if not all, the «spying» feature win10 contains, such as keylogger etc.- Don’t forget to give «admin privileges» to the tool BEFORE YOU WORK WITH IT.
- MAKE SURE that SYSTEM RESTORE for DRIVE C is enabled BEFORE CLICKING ON THE «DESTROY WINDOWS 10 SPYING»
- To wipe built-in «apps» goto settings-> check «delete windows 10 apps» -> choose the apps you wish to WIPE.
- After initiating the «DESTROY» button, WAIT ! it takes like 2-3 min to finish !
- «I want windows 7 start button back. » -> IT IS POSSIBLE . though there are many solutions.
- FREEWARE: ClassicShell, Power 8
- PaidWare: StartIsBack
- NOTE — I DO NOT RECOMMEND «Start10» By ‘Stardock’ company — as IMHO, I suspect it to contain ‘bloatware’.
- (FOR ADVANCED USERS) [Script] Win 10 Toggle Tweaker
DOWNLOAD: HERE | SOURCE: Mydigitallife forum ( you need to be registered ! ),
Features:- User Interface Tweaks + Context Menu Tweaks
- Enable/Disable stuff In Windows 10
- Manage Microsoft Edge browser
- Manage Updates
- Manage OneDrive
- Manage Windows Features
- Manage User Accounts
- Manage Windows apps (Remove & Restore) Updated to TH2
- Manage TELEMETRY and Data collection Settings
- Internet Tweaks and Fixes
- Completely uninstall Cortana
- Completely uninstall Edge + the ability to restore it
and a lot more
Last edited by Gps3dx; 04-16-2016 at 11:28 PM . Reason: added more info
ROG Guru: Blue Belt Array Gps3dx PC Specs
| Gps3dx PC Specs | |
| Laptop (Model) | Current: G751JT | Retired: G55VW, G51JX |
| Motherboard | Inc M.2 slot |
| Storage #1 | Samsungs EVO 850 128GB |
| Storage #2 | 1TB HGST Travelstar 7K1000 (HTS721010A9E630) |
| CPU Cooler | Mother Nature & Thermodynamics laws |
| Mouse | Logitech MX 518 |
| Headset/Speakers | Logitech T6060 |
| OS | Cleaned installed Windows 10 HOME x64 |
| Accessory #1 | Leap Motion |
Join Date Feb 2015 Reputation 71 Posts 785
Windows 10 Issues & solutions:
- Q:Genesys Card reader — you’ve installed official driver for win10 x64 but it still refuses to read any SD card.
In the Device manager you see «SDHC card» with exclamation mark inside yellow rectangle.
A: Change «Genesys Logic USB3.0 card reader» driver under USB tree to «USB mass storage device» ( it should appears as a «compatible hardware» driver ).
Then re-inserted the SDcard into the built-in card-reader, then problem solved -> you can see your card content in file explorer.
UPDATE: also, when upgrade to win10 anniversary (1607) and allowing the system to use the builtin drivers from MS — the card reader works wonderfully. - Q: can I upgrade my win7(sp1)/win8/win8.1 to win10 even after 29.7.2016 ?
A: Apparently, you can, although it isn’t officially published, according to many sources.
Note that MS might close/finish the FREE upgrade program at any time in the near future. - Q: How to upgrade my win7(sp1)/win8/win8.1 to win10 with CLEAN INSTALLATION at the same time, and saving a lot of time and eliminate any upgrade issues ?
A: Read my LINKED GUIDE HERE.
Last edited by Gps3dx; 08-22-2016 at 10:56 AM .


